Acer Desktop User's Guide
Page 13
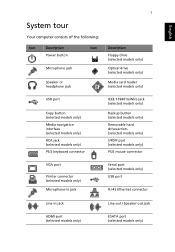
...consists of the following: Icon Description Icon Power button Microphone jack Speaker or headphone jack 1 Description Floppy drive (selected models only) Optical drive (selected models only) Media card reader (selected models only) USB port Copy button (selected models only) Media navigation interface (...selected models only) RCA jack (selected models only) PS/2 keyboard connector IEEE 1394/FireWire jack (selected models only) Backup button (selected models only) Removable hard drivecarriers (selected models only) S/PDIF port (selected models only) PS/2 mouse connector VGA port...
...consists of the following: Icon Description Icon Power button Microphone jack Speaker or headphone jack 1 Description Floppy drive (selected models only) Optical drive (selected models only) Media card reader (selected models only) USB port Copy button (selected models only) Media navigation interface (...selected models only) RCA jack (selected models only) PS/2 keyboard connector IEEE 1394/FireWire jack (selected models only) Backup button (selected models only) Removable hard drivecarriers (selected models only) S/PDIF port (selected models only) PS/2 mouse connector VGA port...
Acer Desktop User's Guide
Page 16
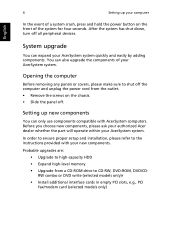
Opening the computer Before removing any panels or covers, please make sure to shut off the computer and unplug the power cord from a CD-ROM drive to the instructions provided with AcerSystem computers. System upgrade You can also upgrade the components of the...quickly and easily by adding components. Before you choose new components, please ask your authorized Acer dealer whether the part will operate within your computer English In the event of a system crash, press and hold the power button on the chassis. • Slide the panel off all peripheral devices. Probable upgrades ...
Opening the computer Before removing any panels or covers, please make sure to shut off the computer and unplug the power cord from a CD-ROM drive to the instructions provided with AcerSystem computers. System upgrade You can also upgrade the components of the...quickly and easily by adding components. Before you choose new components, please ask your authorized Acer dealer whether the part will operate within your computer English In the event of a system crash, press and hold the power button on the chassis. • Slide the panel off all peripheral devices. Probable upgrades ...

Acer Aspire Z5600 Desktop Service Guide
Page 7
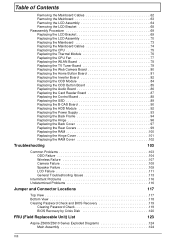
... 3 Your Acer Computer tour 4 Front View 4 Right View 5 Left View 6 Rear View 7 Using the Keyboard 8 Windows Keys 9 Hardware Specifications and Configurations 10 System Utilities 17 BIOS Setup Utility 17 Navigating the BIOS Utility 17 Information 18 Main 19 Advanced 23 Security 26 PC Health 29 Power 30 Boot... 48 Removing the Card Reader Board 49 Removing the Audio Board 50 Removing the ODD Button Board 51 Removing the ODD Module 52 Removing the Inverter Board 53 Removing the Home Button Board 55 Removing the Web Camera Board 56 Removing the TV Tuner Board 57 Removing ...
... 3 Your Acer Computer tour 4 Front View 4 Right View 5 Left View 6 Rear View 7 Using the Keyboard 8 Windows Keys 9 Hardware Specifications and Configurations 10 System Utilities 17 BIOS Setup Utility 17 Navigating the BIOS Utility 17 Information 18 Main 19 Advanced 23 Security 26 PC Health 29 Power 30 Boot... 48 Removing the Card Reader Board 49 Removing the Audio Board 50 Removing the ODD Button Board 51 Removing the ODD Module 52 Removing the Inverter Board 53 Removing the Home Button Board 55 Removing the Web Camera Board 56 Removing the TV Tuner Board 57 Removing ...
Acer Aspire Z5600 Desktop Service Guide
Page 8
... Replacing the ODD Module 84 Replacing the ODD Button Board 85 Replacing the Audio Board 86 Replacing the Card Reader Board 87 Replacing the Control Board 88 Replacing the SSD 89 Replacing the B-CAS Board 90 Replacing the HDD Module 92 Replacing the Power Supply 93 Replacing the Back Frame 94 Replacing... View 118 Clearing Password Check and BIOS Recovery 119 Clearing Password Check 119 BIOS Recovery by Crisis Disk 120 FRU (Field Replaceable Unit) List 123 Aspire Z5600/Z5610 Series Exploded Diagrams 124 Main Assembly 124 VIII
... Replacing the ODD Module 84 Replacing the ODD Button Board 85 Replacing the Audio Board 86 Replacing the Card Reader Board 87 Replacing the Control Board 88 Replacing the SSD 89 Replacing the B-CAS Board 90 Replacing the HDD Module 92 Replacing the Power Supply 93 Replacing the Back Frame 94 Replacing... View 118 Clearing Password Check and BIOS Recovery 119 Clearing Password Check 119 BIOS Recovery by Crisis Disk 120 FRU (Field Replaceable Unit) List 123 Aspire Z5600/Z5610 Series Exploded Diagrams 124 Main Assembly 124 VIII

Acer Aspire Z5600 Desktop Service Guide
Page 14
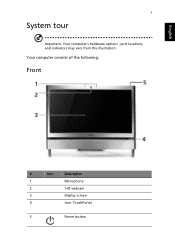
Use to talk through when making VoIP calls. You can also configure the power button to turn the power on or off. Press this illustration. Your Acer Computer tour After knowing your computer features, let us show you around your new computer. Access and ...control some of the handy features of your new computer. Front View No. Component 1 Microphone 2 HD webcam 3 Display screen 4 Acer TouchPortal 5 Power Button Icon Description Use to let others see who they are communicating with when making Voice over Internet Protocol (VoIP) calls. IMPORTANT:Your computer...
Use to talk through when making VoIP calls. You can also configure the power button to turn the power on or off. Press this illustration. Your Acer Computer tour After knowing your computer features, let us show you around your new computer. Access and ...control some of the handy features of your new computer. Front View No. Component 1 Microphone 2 HD webcam 3 Display screen 4 Acer TouchPortal 5 Power Button Icon Description Use to let others see who they are communicating with when making Voice over Internet Protocol (VoIP) calls. IMPORTANT:Your computer...

Acer Aspire Z5600 Desktop Service Guide
Page 44
... Remove RAM Cover Remove RAM Remove Rear Covers Remove Back Cover Remove Back Frame Remove HDD Module Remove Hinge Remove Home Button Board Remove Power Supply Remove Card Reader Board Remove Audio Board Remove B-CAS Board Remove Inverter Board Remove Control Board Remove Web Camera Board... Remove ODD Button Board Remove ODD Module Remove SSD Remove WLAN Board Remove Thermal Module Remove Mainboard Cables Remove Mainboard Remove TV ...
... Remove RAM Cover Remove RAM Remove Rear Covers Remove Back Cover Remove Back Frame Remove HDD Module Remove Hinge Remove Home Button Board Remove Power Supply Remove Card Reader Board Remove Audio Board Remove B-CAS Board Remove Inverter Board Remove Control Board Remove Web Camera Board... Remove ODD Button Board Remove ODD Module Remove SSD Remove WLAN Board Remove Thermal Module Remove Mainboard Cables Remove Mainboard Remove TV ...
Acer Aspire Z5600 Desktop Service Guide
Page 121
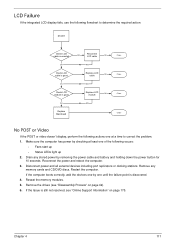
... is discovered. 4. Drain any memory cards and CD/DVD discs. If the computer boots correctly, add the devices one by removing the power cable and battery and holding down the power button for 10 seconds. Reseat the memory modules. 5. LCD Failure If the integrated LCD display fails, use the following flowchart to determine... video doesn't display, perform the following actions one at least one of the following occurs: • Fans start up • Status LEDs light up 2. Disconnect power and all external devices including port replicators or docking stations. Reconnect the...
... is discovered. 4. Drain any memory cards and CD/DVD discs. If the computer boots correctly, add the devices one by removing the power cable and battery and holding down the power button for 10 seconds. Reseat the memory modules. 5. LCD Failure If the integrated LCD display fails, use the following flowchart to determine... video doesn't display, perform the following actions one at least one of the following occurs: • Fans start up • Status LEDs light up 2. Disconnect power and all external devices including port replicators or docking stations. Reconnect the...
Acer Aspire Z5600 Desktop Service Guide
Page 129
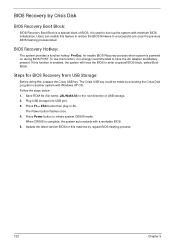
... of the HW Gap. • Plug in AC, keep the short condition on the HW Gap, and press Power Button to power on the system till BIOS POST finish. Chapter 5 119 Aspire Z5600/Z5610 Series provides one Hardware Open Gap on M/B as picture. • Use an electric conductivity tool to short ...)) Clear CMOS Jumper Location DIMM Bay Steps for Clearing BIOS Password Check If users set BIOS Password (Supervisor Password and/or User Password) for Aspire Z5600/Z5610 Series. Otherwise, please follow the steps and try again. Then remove the tool from the machine. • Open the back cover of...
... of the HW Gap. • Plug in AC, keep the short condition on the HW Gap, and press Power Button to power on the system till BIOS POST finish. Chapter 5 119 Aspire Z5600/Z5610 Series provides one Hardware Open Gap on M/B as picture. • Use an electric conductivity tool to short ...)) Clear CMOS Jumper Location DIMM Bay Steps for Clearing BIOS Password Check If users set BIOS Password (Supervisor Password and/or User Password) for Aspire Z5600/Z5610 Series. Otherwise, please follow the steps and try again. Then remove the tool from the machine. • Open the back cover of...
Acer Aspire Z5600 Desktop Service Guide
Page 130
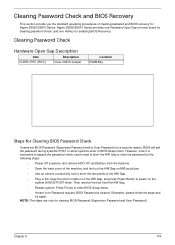
... 3. Update the latest version BIOS for this feature to restore the BIOS firmware to enter a special BIOS block, called Boot Block. The Power button flashes once. 4. If this , prepare the Crisis USB key. Steps for enable BIOS Recovery process when system is strongly recommended to boot ...up the system with a workable BIOS. 5. Press Power button to the root directory of BIOS. Save ROM file (file name: JAL90x64.fd) to initiate system CRISIS mode. BIOS Recovery by executing the...
... 3. Update the latest version BIOS for this feature to restore the BIOS firmware to enter a special BIOS block, called Boot Block. The Power button flashes once. 4. If this , prepare the Crisis USB key. Steps for enable BIOS Recovery process when system is strongly recommended to boot ...up the system with a workable BIOS. 5. Press Power button to the root directory of BIOS. Save ROM file (file name: JAL90x64.fd) to initiate system CRISIS mode. BIOS Recovery by executing the...

Acer Aspire Z5600 Desktop Service Guide
Page 131
... below: 1. Copy xxxxx.wph to the failed system. 3. A confirmation screen displays. 6. Click the OK button on the left to start the Crisis Disk Build. 5. Steps for BIOS Recovery by executing the Crisis Disk program in hand. Power Off failed system. 2. Execute wincris.exe to continue. Chapter 5 121 The Crisis Diskette could be...
... below: 1. Copy xxxxx.wph to the failed system. 3. A confirmation screen displays. 6. Click the OK button on the left to start the Crisis Disk Build. 5. Steps for BIOS Recovery by executing the Crisis Disk program in hand. Power Off failed system. 2. Execute wincris.exe to continue. Chapter 5 121 The Crisis Diskette could be...

Acer Aspire Z5600 Desktop Service Guide
Page 132
...complete the process. 8. Insert the Crisis Disk in . 10. Press the Power button. The system powers on the failed systems. When the Crisis flash process is finished, the system restarts with a workable BIOS. Click the (N) button when prompted to the latest version BIOS for the system using the regular BIOS ...flashing process. 122 Chapter 5 7. In the power-off state, unplug the AC power and hold Fn+Esc then plug the AC power in to the USB floppy drive attached...
...complete the process. 8. Insert the Crisis Disk in . 10. Press the Power button. The system powers on the failed systems. When the Crisis flash process is finished, the system restarts with a workable BIOS. Click the (N) button when prompted to the latest version BIOS for the system using the regular BIOS ...flashing process. 122 Chapter 5 7. In the power-off state, unplug the AC power and hold Fn+Esc then plug the AC power in to the USB floppy drive attached...
Acer Aspire Z5600 Desktop Service Guide
Page 136
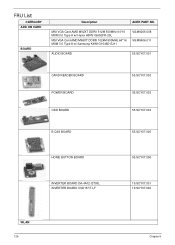
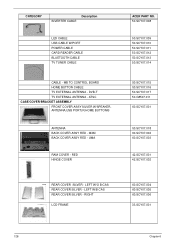
FRU List CATEGORY ADD ON CARD BOARD Description ACER PART NO. MSI VGA Card AMD M92XT DDRII 512M 500MHz 64*16 MXM 3.0 Type A w/ Hynix H5PS1G63EFR-20L MSI VGA Card AMD M96XT DDRIII 1024M 900MHz 64*16 MXM 3.0 Type A w/ Samsung K4W1G1646D-EJ11 VG.M9206.008 VG.M9606.011 AUDIO BOARD 55.SCY07.001 CARD READER BOARD POWER BOARD ODD BOARD 55.SCY07.002 55.SCY07.003 55.SCY07.004 B CAS BOARD 55.SCY07.005 HOME BUTTON BOARD 55.SCY07.006 INVERTER BOARD DA-4A12-QT03L INVERTER BOARD IV40157/T-LF 19.SCY07.001 19.SCY07.002 WLAN 126 Chapter 6
FRU List CATEGORY ADD ON CARD BOARD Description ACER PART NO. MSI VGA Card AMD M92XT DDRII 512M 500MHz 64*16 MXM 3.0 Type A w/ Hynix H5PS1G63EFR-20L MSI VGA Card AMD M96XT DDRIII 1024M 900MHz 64*16 MXM 3.0 Type A w/ Samsung K4W1G1646D-EJ11 VG.M9206.008 VG.M9606.011 AUDIO BOARD 55.SCY07.001 CARD READER BOARD POWER BOARD ODD BOARD 55.SCY07.002 55.SCY07.003 55.SCY07.004 B CAS BOARD 55.SCY07.005 HOME BUTTON BOARD 55.SCY07.006 INVERTER BOARD DA-4A12-QT03L INVERTER BOARD IV40157/T-LF 19.SCY07.001 19.SCY07.002 WLAN 126 Chapter 6
Acer Aspire Z5600 Desktop Service Guide
Page 138
CATEGORY Description INVERTER CABLE LED CABLE USB CABLE W/PORT POWER CABLE CARD READER CABLE BLUETOOTH CABLE TV TUNER CABLE CABLE - MB TO CONTROL BOARD HOME BUTTON CABLE TV EXTERNAL ANTENNA - RIGHT LCD FRAME 60.SCY07.004 60.SCY07.005 60.SCY07.006 33.SCY07.001 128 Chapter 6 ATSC CASE/COVER/...BRACKET ASSEMBLY FRONT COVER ASSY SILVER W/SPEAKER, ANTENNA,USB PORT,IR,HOME BUTTON/B ANTENNA BACK COVER ASSY RED - LEFT W/O B-CAS REAR COVER SILVER - DVB-T TV EXTERNAL ANTENNA - RED HINGE COVER ACER PART NO. 50.SCY07.008 50.SCY07.009 50.SCY07.010 50.SCY07.011 50.SCY07.012...
CATEGORY Description INVERTER CABLE LED CABLE USB CABLE W/PORT POWER CABLE CARD READER CABLE BLUETOOTH CABLE TV TUNER CABLE CABLE - MB TO CONTROL BOARD HOME BUTTON CABLE TV EXTERNAL ANTENNA - RIGHT LCD FRAME 60.SCY07.004 60.SCY07.005 60.SCY07.006 33.SCY07.001 128 Chapter 6 ATSC CASE/COVER/...BRACKET ASSEMBLY FRONT COVER ASSY SILVER W/SPEAKER, ANTENNA,USB PORT,IR,HOME BUTTON/B ANTENNA BACK COVER ASSY RED - LEFT W/O B-CAS REAR COVER SILVER - DVB-T TV EXTERNAL ANTENNA - RED HINGE COVER ACER PART NO. 50.SCY07.008 50.SCY07.009 50.SCY07.010 50.SCY07.011 50.SCY07.012...

Acer Aspire Z5600 OOBE
Page 9
..., other special keys) Function key label Function Location Sleep Button (Z Icon) Search Button (Magnifying glass Icon) Internet Button (Planet Icon) E-Mail Button (Letter Icon) Play/Pause Button Stop Button Back Track Button Forward Track Button Mute Button (Speaker w/Line) Puts the computer in most Media Programs. Mutes all shutdown options: Power Management Settings Not Present Not Present Not Present Not...
..., other special keys) Function key label Function Location Sleep Button (Z Icon) Search Button (Magnifying glass Icon) Internet Button (Planet Icon) E-Mail Button (Letter Icon) Play/Pause Button Stop Button Back Track Button Forward Track Button Mute Button (Speaker w/Line) Puts the computer in most Media Programs. Mutes all shutdown options: Power Management Settings Not Present Not Present Not Present Not...
User Manual
Page 13
English 1 System tour Important: Your computer's hardware options , port locations, and indicators may vary from this illustration. Your computer consists of the following: Front # Icon Description 1 Microphone 2 HD webcam 3 Display screen 4 Acer TouchPortal 5 Power button
English 1 System tour Important: Your computer's hardware options , port locations, and indicators may vary from this illustration. Your computer consists of the following: Front # Icon Description 1 Microphone 2 HD webcam 3 Display screen 4 Acer TouchPortal 5 Power button
User Manual
Page 19
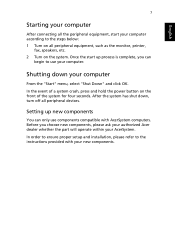
Setting up process is complete, you choose new components, please ask your authorized Acer dealer whether the part will operate within your computer From the "Start" menu, select "Shut Down" and click OK. In order to ensure proper setup .... Shutting down , turn off all peripheral devices. After the system has shut down your AcerSystem. In the event of a system crash, press and hold the power button on the system. Before you can only use your computer. English 7 Starting your computer After connecting all the peripheral equipment, start up new components You...
Setting up process is complete, you choose new components, please ask your authorized Acer dealer whether the part will operate within your computer From the "Start" menu, select "Shut Down" and click OK. In order to ensure proper setup .... Shutting down , turn off all peripheral devices. After the system has shut down your AcerSystem. In the event of a system crash, press and hold the power button on the system. Before you can only use your computer. English 7 Starting your computer After connecting all the peripheral equipment, start up new components You...


