Acer Desktop User's Guide
Page 15
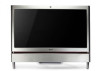
...; AcerSystem • Mouse (PS/2 or USB) • Keyboard (PS/2 or USB) • Wireless keyboard with pointing function • Remote control for Microsoft® Windows® Vista / Microsoft® Windows® XP Media Center Edition Note: Mouse, keyboard, wireless keyboard or remote control configuration may vary by selected models • User's Guide and Starter poster Other user documentation and third-party software. Starting your computer After connecting all the peripheral equipment, start up process is connected, plug the power cord into the...
...; AcerSystem • Mouse (PS/2 or USB) • Keyboard (PS/2 or USB) • Wireless keyboard with pointing function • Remote control for Microsoft® Windows® Vista / Microsoft® Windows® XP Media Center Edition Note: Mouse, keyboard, wireless keyboard or remote control configuration may vary by selected models • User's Guide and Starter poster Other user documentation and third-party software. Starting your computer After connecting all the peripheral equipment, start up process is connected, plug the power cord into the...

Acer Desktop User's Guide
Page 17
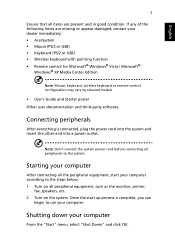
... rear panel of the computer is followed by easy answers and solutions to turn the display back on the screen. A: Your computer's power management function automatically blanks the screen to the system. If pressing a key does not work, you are possible situations that it with a system diskette and press Ctrl + Alt + Del to its original default factory settings. However, if the diagnostic utility still reports a problem...
... rear panel of the computer is followed by easy answers and solutions to turn the display back on the screen. A: Your computer's power management function automatically blanks the screen to the system. If pressing a key does not work, you are possible situations that it with a system diskette and press Ctrl + Alt + Del to its original default factory settings. However, if the diagnostic utility still reports a problem...
Acer Desktop User's Guide
Page 18
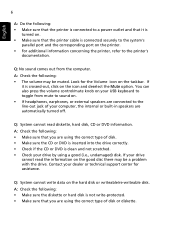
... 6 A: Do the following: • Make sure that the printer is connected to a power outlet and that it is crossed-out, click on the hard disk or writeable/re-writeable disk. You can also press the volume control/mute knob on your USB keyboard to sound on. • If headphones, earphones, or external speakers are using a good (i.e., undamaged) disk. Q: No sound comes out from mute to...
... 6 A: Do the following: • Make sure that the printer is connected to a power outlet and that it is crossed-out, click on the hard disk or writeable/re-writeable disk. You can also press the volume control/mute knob on your USB keyboard to sound on. • If headphones, earphones, or external speakers are using a good (i.e., undamaged) disk. Q: No sound comes out from mute to...
Acer Desktop User's Guide
Page 20
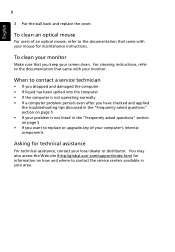
... an optical mouse For users of your computer's internal components Asking for maintenance instructions. For cleaning instructions, refer to replace or upgrade any of an optical mouse, refer to contact the service centers available in the "Frequently asked questions" section on how and where to the documentation that came with your screen clean. To clean your monitor Make sure that you have checked and applied the troubleshooting...
... an optical mouse For users of your computer's internal components Asking for maintenance instructions. For cleaning instructions, refer to replace or upgrade any of an optical mouse, refer to contact the service centers available in the "Frequently asked questions" section on how and where to the documentation that came with your screen clean. To clean your monitor Make sure that you have checked and applied the troubleshooting...
Acer Aspire Z5600 Desktop Service Guide
Page 15
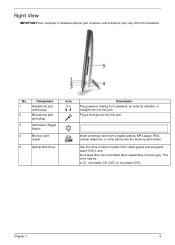
... Switch 4 Memory card reader 5 Optical Disk Drive Icon Description Plug powered, analog front speakers, an external amplifier, or headphones into this drive to listen to audio CDs, install games and programs, watch DVDs, and store large files onto recordable discs (depending on drive type). Use this jack. Chapter 1 5 Insert a memory card from this jack. Right View IMPORTANT:Your computer's hardware options, port locations, and indicators may be a CD, recordable CD, DVD, or recordable DVD. Plug a microphone into the memory card reader...
... Switch 4 Memory card reader 5 Optical Disk Drive Icon Description Plug powered, analog front speakers, an external amplifier, or headphones into this drive to listen to audio CDs, install games and programs, watch DVDs, and store large files onto recordable discs (depending on drive type). Use this jack. Chapter 1 5 Insert a memory card from this jack. Right View IMPORTANT:Your computer's hardware options, port locations, and indicators may be a CD, recordable CD, DVD, or recordable DVD. Plug a microphone into the memory card reader...
Acer Aspire Z5600 Desktop Service Guide
Page 17
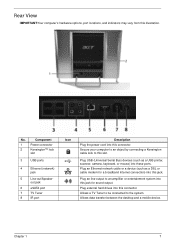
... be connected to an amplifier or entertainment system into this jack for a broadband Internet connection) into this slot. No. Plug USB (Universal Serial Bus) devices (such as a DSL or cable modem for sound output. Plug external hard drives into these ports. Chapter 1 7 Component 1 Power connector 2 Kensington™ lock slot 3 USB ports 4 Ethernet (network) jack 5 Line-out/Speaker- Rear View IMPORTANT:Your computer's hardware options, port locations, and indicators may vary from this connector. Allows data transfer between the desktop and...
... be connected to an amplifier or entertainment system into this jack for a broadband Internet connection) into this slot. No. Plug USB (Universal Serial Bus) devices (such as a DSL or cable modem for sound output. Plug external hard drives into these ports. Chapter 1 7 Component 1 Power connector 2 Kensington™ lock slot 3 USB ports 4 Ethernet (network) jack 5 Line-out/Speaker- Rear View IMPORTANT:Your computer's hardware options, port locations, and indicators may vary from this connector. Allows data transfer between the desktop and...
Acer Aspire Z5600 Desktop Service Guide
Page 30
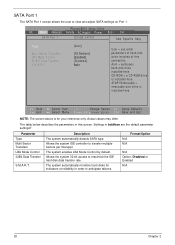
...H e a l t h P o w e r B o o t Exit SATA Port 1 [320GB SATA1] Item Specific Help Type: Multi-Sector Transfers: LBA Mode Control: 32 BIT Data Transfer: S.M.A.R.T.: [Auto] [16 Sectors] [Enabled] [Disabled] Auto User = you enter parameters of reliability in order to maximize the IDE hard disk data transfer rate. CD-ROM = a CD-ROM drive is installed here. ATAPI Removable = removable disk drive is installed here. F1 Help Esc Exit Select Item -/+ Change Values F9 Setup Defaults S e l e c t M e n u P r e s s E n t e rP r e s s E n t e r F 10 S a v e a n d E x i t NOTE: The screen above...
...H e a l t h P o w e r B o o t Exit SATA Port 1 [320GB SATA1] Item Specific Help Type: Multi-Sector Transfers: LBA Mode Control: 32 BIT Data Transfer: S.M.A.R.T.: [Auto] [16 Sectors] [Enabled] [Disabled] Auto User = you enter parameters of reliability in order to maximize the IDE hard disk data transfer rate. CD-ROM = a CD-ROM drive is installed here. ATAPI Removable = removable disk drive is installed here. F1 Help Esc Exit Select Item -/+ Change Values F9 Setup Defaults S e l e c t M e n u P r e s s E n t e rP r e s s E n t e r F 10 S a v e a n d E x i t NOTE: The screen above...
Acer Aspire Z5600 Desktop Service Guide
Page 31
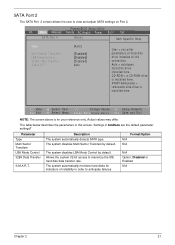
... SATA type. The system disables LBA Mode Control by default. The system automatically monitors hard disks for your reference only. Actual values may differ. Format/Option N/A N/A N/A Option: Disabled or Enabled N/A Chapter 2 21 CD-ROM = a CD-ROM drive is installed here. Allows the system 32-bit access to view and adjust SATA settings on Port 2. ATAPI Removable = removable disk drive is installed here. F1 Help Esc Exit Select Item -/+ Change Values F9 Setup Defaults S e l e c t M e n u P r e s s E n t e rP r e s s E n t e r F 10 S a v e a n d E x i t NOTE: The screen...
... SATA type. The system disables LBA Mode Control by default. The system automatically monitors hard disks for your reference only. Actual values may differ. Format/Option N/A N/A N/A Option: Disabled or Enabled N/A Chapter 2 21 CD-ROM = a CD-ROM drive is installed here. Allows the system 32-bit access to view and adjust SATA settings on Port 2. ATAPI Removable = removable disk drive is installed here. F1 Help Esc Exit Select Item -/+ Change Values F9 Setup Defaults S e l e c t M e n u P r e s s E n t e rP r e s s E n t e r F 10 S a v e a n d E x i t NOTE: The screen...
Acer Aspire Z5600 Desktop Service Guide
Page 36
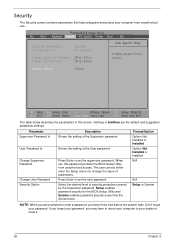
... to reset it. 26 Chapter 2 Format/Option Option: Not Installed or Installed Option: Not Installed or Installed N/A N/A Setup or System NOTE: When you are the default and suggested parameter settings. Settings in this password protects the BIOS Setup Utility from unauthorized use. Don't forget your dealer to enter a password, you may have three tries before the system halts. The user can not either enter the Setup menu nor change the value of security protection covered...
... to reset it. 26 Chapter 2 Format/Option Option: Not Installed or Installed Option: Not Installed or Installed N/A N/A Setup or System NOTE: When you are the default and suggested parameter settings. Settings in this password protects the BIOS Setup Utility from unauthorized use. Don't forget your dealer to enter a password, you may have three tries before the system halts. The user can not either enter the Setup menu nor change the value of security protection covered...

Acer Aspire Z5600 Desktop Service Guide
Page 37
... to highlight the Set Supervisor Password parameter and press the Enter key. Use the ↑ and ↓ keys to enable the Password on the screen. 3. Removing a Password Follow these steps as you can not exceeds 8 alphanumeric characters (A-Z, a-z, 0-9, not case sensitive). If desired, you set the user or the supervisor password: 1. Chapter 2 27 Type the current password in the "Confirm New Password" field. After setting the password, the computer sets the User Password parameter to...
... to highlight the Set Supervisor Password parameter and press the Enter key. Use the ↑ and ↓ keys to enable the Password on the screen. 3. Removing a Password Follow these steps as you can not exceeds 8 alphanumeric characters (A-Z, a-z, 0-9, not case sensitive). If desired, you set the user or the supervisor password: 1. Chapter 2 27 Type the current password in the "Confirm New Password" field. After setting the password, the computer sets the User Password parameter to...

Acer Aspire Z5600 Desktop Service Guide
Page 38
... save the changes and exit the BIOS Setup Utility. Set Supervisor Password Enter Current Password [ ] Enter New Password [ ] Confirm New Password [ ] 2. Setup Notice Changes have been saved. [Continue] The password setting is OK, the screen will display as following message. Setup Warning Invalid Password. [Continue] If the new password and confirm new password strings do not match. After setting the password, the computer sets the User Password parameter to highlight the Set Supervisor Password parameter and press the Enter key. If the current password entered does...
... save the changes and exit the BIOS Setup Utility. Set Supervisor Password Enter Current Password [ ] Enter New Password [ ] Confirm New Password [ ] 2. Setup Notice Changes have been saved. [Continue] The password setting is OK, the screen will display as following message. Setup Warning Invalid Password. [Continue] If the new password and confirm new password strings do not match. After setting the password, the computer sets the User Password parameter to highlight the Set Supervisor Password parameter and press the Enter key. If the current password entered does...
Acer Aspire Z5600 Desktop Service Guide
Page 40
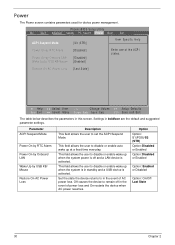
... a LAN device is off in the event of power loss and On restarts the device when AC power resumes. Power The Power screen contains parameters used for device power management. PhoenixBIOS Setup Utility Info M a i n Advanced Security P C H e a l t h P o w e r B o o t Exit ACPI Suspend Mode: [S3 (STR)] Item Specific Help Power On by RTC Alarm: [Disabled] Power On by Onboard LAN: [Disabled] Wake Up by USB KB/ Mouse Restore On AC Power Loss Description This field allows the user to disable or enable auto wake...
... a LAN device is off in the event of power loss and On restarts the device when AC power resumes. Power The Power screen contains parameters used for device power management. PhoenixBIOS Setup Utility Info M a i n Advanced Security P C H e a l t h P o w e r B o o t Exit ACPI Suspend Mode: [S3 (STR)] Item Specific Help Power On by RTC Alarm: [Disabled] Power On by Onboard LAN: [Disabled] Wake Up by USB KB/ Mouse Restore On AC Power Loss Description This field allows the user to disable or enable auto wake...

Acer Aspire Z5600 Desktop Service Guide
Page 115
... Start´ Control Panel´ System and Maintenance´ System´ Device Manager. Select Use AutoPlay for the selected media: IMPORTANT:Region can not be burned, perform the following actions one at a time to DMA: a. b. d. Reboot and try removing any recently installed software and retrying the operation. Navigate to Start´ Control Panel´ Hardware and Sound´ AutoPlay. Chapter 4 105 b. Double-click DVD/CD-ROM drives. If the device displays a down menu. 5. c. If a device...
... Start´ Control Panel´ System and Maintenance´ System´ Device Manager. Select Use AutoPlay for the selected media: IMPORTANT:Region can not be burned, perform the following actions one at a time to DMA: a. b. d. Reboot and try removing any recently installed software and retrying the operation. Navigate to Start´ Control Panel´ Hardware and Sound´ AutoPlay. Chapter 4 105 b. Double-click DVD/CD-ROM drives. If the device displays a down menu. 5. c. If a device...

Acer Aspire Z5600 Desktop Service Guide
Page 122
... to correct the problem. 1. d. Click and drag the Resolution slider to determine that the computer is still not resolved, see "Online Support Information" on page 175. 112 Chapter 4 Click Apply and check the display. Readjust if necessary. 6. Remove and reinstall the video driver. 8. Check the Device Manager to the desired resolution. Run the Windows Memory Diagnostic from the operating system DVD and follow the...
... to correct the problem. 1. d. Click and drag the Resolution slider to determine that the computer is still not resolved, see "Online Support Information" on page 175. 112 Chapter 4 Click Apply and check the display. Readjust if necessary. 6. Remove and reinstall the video driver. 8. Check the Device Manager to the desired resolution. Run the Windows Memory Diagnostic from the operating system DVD and follow the...

Acer Aspire Z5600 Desktop Service Guide
Page 124
... DVD. insert the Windows 7 Operating System DVD in the ODD and restart the computer. When prompted, press any recently added hardware and associated software. 8. The Install Windows screen displays. d. e. The System Recovery Options screen displays. Select the appropriate operating system, and click Next. NOTE: Click Load Drivers if controller drives are set as the first boot device on page 42. Startup Repair attempts to correct the problem. 1. When complete, click Finish. Run the Windows Memory Diagnostic Tool. Remove any key to start...
... DVD. insert the Windows 7 Operating System DVD in the ODD and restart the computer. When prompted, press any recently added hardware and associated software. 8. The Install Windows screen displays. d. e. The System Recovery Options screen displays. Select the appropriate operating system, and click Next. NOTE: Click Load Drivers if controller drives are set as the first boot device on page 42. Startup Repair attempts to correct the problem. 1. When complete, click Finish. Run the Windows Memory Diagnostic Tool. Remove any key to start...

Acer Aspire Z5600 Desktop Service Guide
Page 126
... following devices: • Non-Acer devices • Printer, mouse, and other external devices • Hard disk drive • DIMM • CD-ROM/Diskette drive Module 4. NOTE: Verify that there are supported by a variety of the failure is inoperative. Power-on page 175. 116 Chapter 4 If any FRU. 3. Follow these procedures to verify that all of the following : 1. Run the advanced diagnostic test for damage. Undetermined Problems The diagnostic problems does...
... following devices: • Non-Acer devices • Printer, mouse, and other external devices • Hard disk drive • DIMM • CD-ROM/Diskette drive Module 4. NOTE: Verify that there are supported by a variety of the failure is inoperative. Power-on page 175. 116 Chapter 4 If any FRU. 3. Follow these procedures to verify that all of the following : 1. Run the advanced diagnostic test for damage. Undetermined Problems The diagnostic problems does...
Acer Aspire Z5600 Desktop Service Guide
Page 129
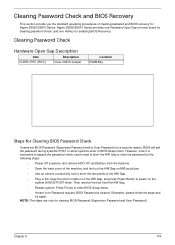
... the two points of clearing password and BIOS recovery for enabling BIOS Recovery. Clearing Password Check Hardware Open Gap Description Item Description CLRP2 (RTC (RST)) Clear CMOS Jumper Location DIMM Bay Steps for Clearing BIOS Password Check If users set BIOS Password (Supervisor Password and/or User Password) for clearing BIOS Password (Supervisor Password and User Password). Otherwise, please follow the steps and try again. Aspire Z5600/Z5610 Series provides one Hotkey for Aspire Z5600/Z5610 Series. Press F2 key to enter BIOS Setup menu. • If there is...
... the two points of clearing password and BIOS recovery for enabling BIOS Recovery. Clearing Password Check Hardware Open Gap Description Item Description CLRP2 (RTC (RST)) Clear CMOS Jumper Location DIMM Bay Steps for Clearing BIOS Password Check If users set BIOS Password (Supervisor Password and/or User Password) for clearing BIOS Password (Supervisor Password and User Password). Otherwise, please follow the steps and try again. Aspire Z5600/Z5610 Series provides one Hotkey for Aspire Z5600/Z5610 Series. Press F2 key to enter BIOS Setup menu. • If there is...

Acer Aspire Z5600 OOBE
Page 8
... the unit. Test using headphones and external speakers) Speakers (left and right. test connection, port? Speaker Bar Below the screen. Above the Keyboard in comments, speed, bootable, etc) ODD (Class: speed* x8 Is optical drive modular? Built inside the unit, not Sata 2 7200rpm bootable HDD. Present Present Right side of unit MultiMediaCard, Secure Digital card, behind the Headphone Memory Stick, Memory Stick PRO, xDand Microphone jack. user accessible. Power Management Settings (Also NOTE options grayed out) Balanced...
... the unit. Test using headphones and external speakers) Speakers (left and right. test connection, port? Speaker Bar Below the screen. Above the Keyboard in comments, speed, bootable, etc) ODD (Class: speed* x8 Is optical drive modular? Built inside the unit, not Sata 2 7200rpm bootable HDD. Present Present Right side of unit MultiMediaCard, Secure Digital card, behind the Headphone Memory Stick, Memory Stick PRO, xDand Microphone jack. user accessible. Power Management Settings (Also NOTE options grayed out) Balanced...

User Manual
Page 21
.... Insert the startup disk you created during the use of the computer is set to the situation. A: Check the LED located above the power switch. If yes, remove or replace it is plugged in the floppy drive? However, if the diagnostic utility still reports a problem, then you can restart your computer. This will automatically diagnose your dealer or the technical support center for assistance. Q: I pressed the power switch but the...
.... Insert the startup disk you created during the use of the computer is set to the situation. A: Check the LED located above the power switch. If yes, remove or replace it is plugged in the floppy drive? However, if the diagnostic utility still reports a problem, then you can restart your computer. This will automatically diagnose your dealer or the technical support center for assistance. Q: I pressed the power switch but the...

User Manual
Page 24
To clean an optical mouse For users of your computer's internal components Asking for maintenance instructions. When to contact the service centers available in the "Frequently asked questions" section on page 9 • If you keep your monitor. EEnngglilisshh English 12 3 Put the ball back and replace the cover. You may also access the Web site (http://global.acer.com/support/index.htm) for information on...
To clean an optical mouse For users of your computer's internal components Asking for maintenance instructions. When to contact the service centers available in the "Frequently asked questions" section on page 9 • If you keep your monitor. EEnngglilisshh English 12 3 Put the ball back and replace the cover. You may also access the Web site (http://global.acer.com/support/index.htm) for information on...


