User Manual
Page 4
...68 keep in the way that I get more information?.......... 96 HDMI Micro Troubleshooting 97 83 Troubleshooting tips 97 Universal Serial Bus (USB) BIOS utility 84 Error messages 97 85 Regulations and safety notices 99 Boot sequence 85 4 - Preparing the computer 67 Setting passwords 85 What ...to Start 90 Using passwords 69 How do I jump between apps 91 Entering passwords 70 How do I turn off my computer 91 Acer Theft Shield 71 Using Acer Theft Shield 73 General 73 Settings 74 Why is a Microsoft ID (account 95 How do I add a favorite to Internet Explorer ...
...68 keep in the way that I get more information?.......... 96 HDMI Micro Troubleshooting 97 83 Troubleshooting tips 97 Universal Serial Bus (USB) BIOS utility 84 Error messages 97 85 Regulations and safety notices 99 Boot sequence 85 4 - Preparing the computer 67 Setting passwords 85 What ...to Start 90 Using passwords 69 How do I jump between apps 91 Entering passwords 70 How do I turn off my computer 91 Acer Theft Shield 71 Using Acer Theft Shield 73 General 73 Settings 74 Why is a Microsoft ID (account 95 How do I add a favorite to Internet Explorer ...
User Manual
Page 31
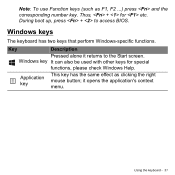
During boot up, press + to the Start screen. Note: To use Function keys (such as clicking the right mouse button; Thus, + for special functions, please check Windows Help. it returns to access BIOS. Windows keys The keyboard has two keys that perform Windows-specific functions. Using the keyboard - 31 Windows key It can also be used with other keys for etc. Key Description Pressed alone it opens the application's context menu. Application key This key has the same effect as F1, F2 ...) press and the corresponding number key.
During boot up, press + to the Start screen. Note: To use Function keys (such as clicking the right mouse button; Thus, + for special functions, please check Windows Help. it returns to access BIOS. Windows keys The keyboard has two keys that perform Windows-specific functions. Using the keyboard - 31 Windows key It can also be used with other keys for etc. Key Description Pressed alone it opens the application's context menu. Application key This key has the same effect as F1, F2 ...) press and the corresponding number key.
User Manual
Page 45
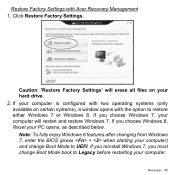
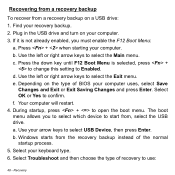
... is configured with two operating systems (only available on your computer will erase all files on certain systems), a window opens with Acer Recovery Management 1. If you must change Boot Mode to UEFI. Caution: 'Restore Factory Settings' will restart and restore Windows 7. ... you reinstall Windows 7, you choose Windows 8, Reset your computer. Note: To fully enjoy Windows 8 features after changing from Windows 7, enter the BIOS (press + when starting your computer) and change Boot Mode back to Legacy before restarting your PC opens, as described below. Click Restore Factory...
... is configured with two operating systems (only available on your computer will erase all files on certain systems), a window opens with Acer Recovery Management 1. If you must change Boot Mode to UEFI. Caution: 'Restore Factory Settings' will restart and restore Windows 7. ... you reinstall Windows 7, you choose Windows 8, Reset your computer. Note: To fully enjoy Windows 8 features after changing from Windows 7, enter the BIOS (press + when starting your computer) and change Boot Mode back to Legacy before restarting your PC opens, as described below. Click Restore Factory...
User Manual
Page 48
... change this setting to select the Main menu. Use the left or right arrow keys to Enabled. f. Select Troubleshoot and then choose the type of BIOS your computer uses, select Save Changes and Exit or Exit Saving Changes and press Enter. b. e. Select OK or Yes to open the boot menu. Use...
... change this setting to select the Main menu. Use the left or right arrow keys to Enabled. f. Select Troubleshoot and then choose the type of BIOS your computer uses, select Save Changes and Exit or Exit Saving Changes and press Enter. b. e. Select OK or Yes to open the boot menu. Use...
User Manual
Page 69
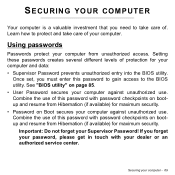
... set, you need to take care of this password with your computer and data: • Supervisor Password prevents unauthorized entry into the BIOS utility. Important: Do not forget your computer - 69 Securing your Supervisor Password! Combine the use . Learn how to protect and take...this password with password checkpoints on bootup and resume from Hibernation (if available) for your dealer or an authorized service center. See "BIOS utility" on Boot secures your computer. Combine the use . Setting these passwords creates several different levels of protection for maximum security. &#...
... set, you need to take care of this password with your computer and data: • Supervisor Password prevents unauthorized entry into the BIOS utility. Important: Do not forget your computer - 69 Securing your Supervisor Password! Combine the use . Learn how to protect and take...this password with password checkpoints on bootup and resume from Hibernation (if available) for your dealer or an authorized service center. See "BIOS utility" on Boot secures your computer. Combine the use . Setting these passwords creates several different levels of protection for maximum security. &#...
User Manual
Page 70
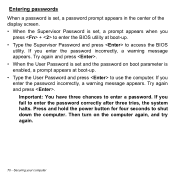
... down the computer. If you enter the password incorrectly, a warning message appears. If you press + to enter the BIOS utility at boot-up . • Type the Supervisor Password and press to access the BIOS utility. Then turn on boot parameter is set , a prompt appears when you fail to use the computer. Securing...
... down the computer. If you enter the password incorrectly, a warning message appears. If you press + to enter the BIOS utility at boot-up . • Type the Supervisor Password and press to access the BIOS utility. Then turn on boot parameter is set , a prompt appears when you fail to use the computer. Securing...
User Manual
Page 85
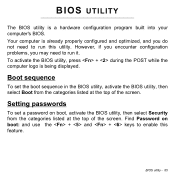
... However, if you encounter configuration problems, you do not need to run this feature. Find Password on boot, activate the BIOS utility, then select Security from the categories listed at the top of the screen. Your computer is already properly configured and optimized..., press + during the POST while the computer logo is a hardware configuration program built into your computer's BIOS. Setting passwords To set the boot sequence in the BIOS utility, activate the BIOS utility, then select Boot from the categories listed at the top of the screen. Boot sequence To set a ...
... However, if you encounter configuration problems, you do not need to run this feature. Find Password on boot, activate the BIOS utility, then select Security from the categories listed at the top of the screen. Your computer is already properly configured and optimized..., press + during the POST while the computer logo is a hardware configuration program built into your computer's BIOS. Setting passwords To set the boot sequence in the BIOS utility, activate the BIOS utility, then select Boot from the categories listed at the top of the screen. Boot sequence To set a ...
User Manual
Page 98
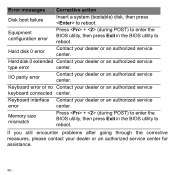
...Contact your dealer or an authorized service type error center. Memory size mismatch Press + (during POST) to enter the BIOS utility, then press Exit in the BIOS utility to reboot. Hard disk 0 extended Contact your dealer or an authorized service center. Hard disk 0 error Contact... your dealer or an authorized service error center. Equipment configuration error Press + (during POST) to enter the BIOS utility, then press Exit in the BIOS utility to reboot. Keyboard interface Contact your dealer or an authorized service center for assistance. 98 - Error messages...
...Contact your dealer or an authorized service type error center. Memory size mismatch Press + (during POST) to enter the BIOS utility, then press Exit in the BIOS utility to reboot. Hard disk 0 extended Contact your dealer or an authorized service center. Hard disk 0 error Contact... your dealer or an authorized service error center. Equipment configuration error Press + (during POST) to enter the BIOS utility, then press Exit in the BIOS utility to reboot. Keyboard interface Contact your dealer or an authorized service center for assistance. 98 - Error messages...
Acer S7-391 Notebook Service Guide
Page 5
... View 1-9 Left View 1-10 Right View 1-11 Base View 1-12 Touchpad Basics 1-13 Keyboard 1-14 System Block Diagram 1-17 Specification Tables 1-18 CHAPTER 2 System Utilities BIOS Setup Utility 2-3 Navigating the BIOS Utility 2-3 BIOS Menus 2-4 Information 2-4 Main 2-6 Security 2-7 Boot 2-11 Exit 2-12 v
... View 1-9 Left View 1-10 Right View 1-11 Base View 1-12 Touchpad Basics 1-13 Keyboard 1-14 System Block Diagram 1-17 Specification Tables 1-18 CHAPTER 2 System Utilities BIOS Setup Utility 2-3 Navigating the BIOS Utility 2-3 BIOS Menus 2-4 Information 2-4 Main 2-6 Security 2-7 Boot 2-11 Exit 2-12 v
Acer S7-391 Notebook Service Guide
Page 6
... Utilities 2-14 Removing the HDD Password 2-14 Removing the BIOS Passwords 2-16 Using DMI Utility 2-17 Using DMI Utility in DOS Mode 2-17 Using DMI Utility in Windows Mode 2-19 CHAPTER 3 Machine Maintenance Machine Disassembly ...
... Utilities 2-14 Removing the HDD Password 2-14 Removing the BIOS Passwords 2-16 Using DMI Utility 2-17 Using DMI Utility in DOS Mode 2-17 Using DMI Utility in Windows Mode 2-19 CHAPTER 3 Machine Maintenance Machine Disassembly ...
Acer S7-391 Notebook Service Guide
Page 7
... 4-13 WLAN Failure 4-14 Card Reader Failure 4-15 Thermal Unit Failure 4-16 Other Functions Failure 4-17 Intermittent Problems 4-18 Undetermined Problems 4-18 Error Codes 4-19 BIOS Beep Codes 4-20 POST Codes 4-25 Component Codes 4-25 Progress Codes 4-29 vii
... 4-13 WLAN Failure 4-14 Card Reader Failure 4-15 Thermal Unit Failure 4-16 Other Functions Failure 4-17 Intermittent Problems 4-18 Undetermined Problems 4-18 Error Codes 4-19 BIOS Beep Codes 4-20 POST Codes 4-25 Component Codes 4-25 Progress Codes 4-29 vii
Acer S7-391 Notebook Service Guide
Page 8
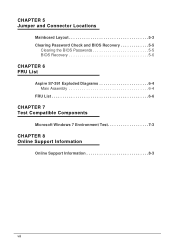
CHAPTER 5 Jumper and Connector Locations Mainboard Layout 5-3 Clearing Password Check and BIOS Recovery 5-5 Clearing the BIOS Passwords 5-5 BIOS Recovery 5-6 CHAPTER 6 FRU List Aspire S7-391 Exploded Diagrams 6-4 Main Assembly 6-4 FRU List 6-6 CHAPTER 7 Test Compatible Components Microsoft Windows 7 Environment Test 7-3 CHAPTER 8 Online Support Information Online Support Information 8-3 viii
CHAPTER 5 Jumper and Connector Locations Mainboard Layout 5-3 Clearing Password Check and BIOS Recovery 5-5 Clearing the BIOS Passwords 5-5 BIOS Recovery 5-6 CHAPTER 6 FRU List Aspire S7-391 Exploded Diagrams 6-4 Main Assembly 6-4 FRU List 6-6 CHAPTER 7 Test Compatible Components Microsoft Windows 7 Environment Test 7-3 CHAPTER 8 Online Support Information Online Support Information 8-3 viii
Acer S7-391 Notebook Service Guide
Page 13
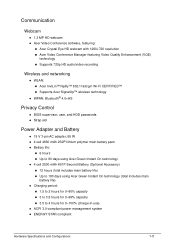
... audio/video recording Wireless and networking 0 WLAN: Acer InviLin™ Nplify™ 802.11a/b/g/n Wi-Fi CERTIFIED™ Supports Acer SignalUp™ wireless technology WPAN: Bluetooth® 4.0+HS Privacy Control 0 BIOS supervisor, user, and HDD passwords Strap slot Power Adapter and...
... audio/video recording Wireless and networking 0 WLAN: Acer InviLin™ Nplify™ 802.11a/b/g/n Wi-Fi CERTIFIED™ Supports Acer SignalUp™ wireless technology WPAN: Bluetooth® 4.0+HS Privacy Control 0 BIOS supervisor, user, and HDD passwords Strap slot Power Adapter and...
Acer S7-391 Notebook Service Guide
Page 28
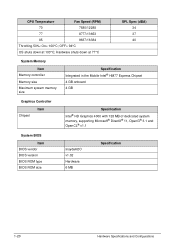
... Graphics 4000 with 128 MB of dedicated system memory, supporting Microsoft® DirectX® 11, OpenG® 3.1 and OpenCL® v1.1 System BIOS Item BIOS vendor BIOS version BIOS ROM type BIOS ROM size InsydeH2O v1.02 Hardware 6 MB Specification 1-20 Hardware Specifications and Configurations CPU Temperature Fan Speed (RPM) 70 7680/12288 77 8777...
... Graphics 4000 with 128 MB of dedicated system memory, supporting Microsoft® DirectX® 11, OpenG® 3.1 and OpenCL® v1.1 System BIOS Item BIOS vendor BIOS version BIOS ROM type BIOS ROM size InsydeH2O v1.02 Hardware 6 MB Specification 1-20 Hardware Specifications and Configurations CPU Temperature Fan Speed (RPM) 70 7680/12288 77 8777...
Acer S7-391 Notebook Service Guide
Page 29
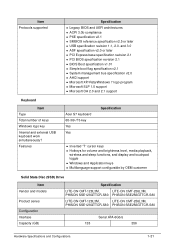
Features Acer S7 keyboard 68-/69-/73-key Yes Yes Specification Inverted "T" cursor keys Hotkeys for volume and brightness level, media playback, wireless and sleep functions,... v2.5 or later USB specification revision 1.1, 2.0. and 3.0 ASF specification v2.0 or later PCI Express base specification revision 2.1 PCI BIOS specification revision 2.1 BIOS Boot specification v1.01 Simple boot flag specification v2.1 System management bus specification v2.0 AHCI support Microsoft XP/Vista/Windows...
Features Acer S7 keyboard 68-/69-/73-key Yes Yes Specification Inverted "T" cursor keys Hotkeys for volume and brightness level, media playback, wireless and sleep functions,... v2.5 or later USB specification revision 1.1, 2.0. and 3.0 ASF specification v2.0 or later PCI Express base specification revision 2.1 PCI BIOS specification revision 2.1 BIOS Boot specification v1.01 Simple boot flag specification v2.1 System management bus specification v2.0 AHCI support Microsoft XP/Vista/Windows...
Acer S7-391 Notebook Service Guide
Page 40
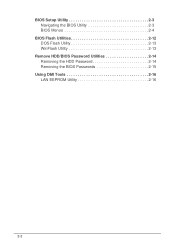
BIOS Setup Utility 2-3 Navigating the BIOS Utility 2-3 BIOS Menus 2-4 BIOS Flash Utilities 2-12 DOS Flash Utility 2-13 WinFlash Utility 2-13 Remove HDD/BIOS Password Utilities 2-14 Removing the HDD Password 2-14 Removing the BIOS Passwords 2-15 Using DMI Tools 2-16 LAN EEPROM Utility 2-16 2-2
BIOS Setup Utility 2-3 Navigating the BIOS Utility 2-3 BIOS Menus 2-4 BIOS Flash Utilities 2-12 DOS Flash Utility 2-13 WinFlash Utility 2-13 Remove HDD/BIOS Password Utilities 2-14 Removing the HDD Password 2-14 Removing the BIOS Passwords 2-15 Using DMI Tools 2-16 LAN EEPROM Utility 2-16 2-2
Acer S7-391 Notebook Service Guide
Page 41
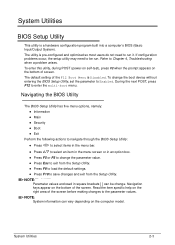
.... Press F9 to load the default settings. Press F10 to enter the multi-boot menu. Navigating the BIOS Utility 0 The BIOS Setup Utility has five menu options, namely: Information Main Security Boot &#...61472;Exit Perform the following actions to navigate through the BIOS Setup Utility: Press to select items in the menu bar. Press to select an item in the menu ...
.... Press F9 to load the default settings. Press F10 to enter the multi-boot menu. Navigating the BIOS Utility 0 The BIOS Setup Utility has five menu options, namely: Information Main Security Boot &#...61472;Exit Perform the following actions to navigate through the BIOS Setup Utility: Press to select items in the menu bar. Press to select an item in the menu ...
Acer S7-391 Notebook Service Guide
Page 42
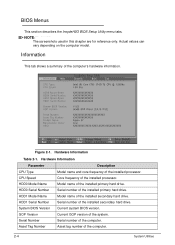
...vary depending on the computer model. Information 0 This tab shows a summary of the installed primary hard drive. System BIOS Version Current system BIOS version. Figure 2-1. HDD0 Model Name Model name of the computer's hardware information. HDD1 Model Name Model name of the... Serial Number Serial number of the system. HDD0 Serial Number Serial number of the computer. 2-4 System Utilities BIOS Menus 0 This section describes the InsydeH2O BIOS Setup Utility menu tabs. Hardware Information Table 2-1. Asset Tag Number Asset tag number of the installed primary hard ...
...vary depending on the computer model. Information 0 This tab shows a summary of the installed primary hard drive. System BIOS Version Current system BIOS version. Figure 2-1. HDD0 Model Name Model name of the computer's hardware information. HDD1 Model Name Model name of the... Serial Number Serial number of the system. HDD0 Serial Number Serial number of the computer. 2-4 System Utilities BIOS Menus 0 This section describes the InsydeH2O BIOS Setup Utility menu tabs. Hardware Information Table 2-1. Asset Tag Number Asset tag number of the installed primary hard ...
Acer S7-391 Notebook Service Guide
Page 44
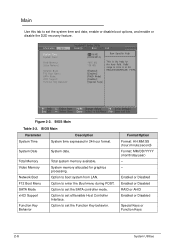
... 2-2. System Date System date. Option to set the Function Key behavior. BIOS Main Parameter Description System Time System time expressed in 24-hour format. System memory allocated for graphics processing. Option to enter the Boot menu during ...
... 2-2. System Date System date. Option to set the Function Key behavior. BIOS Main Parameter Description System Time System time expressed in 24-hour format. System memory allocated for graphics processing. Option to enter the Boot menu during ...

Acer S7-391 Notebook Service Guide
Page 45
... provides option to factory defaults. Option to safeguard and protect the computer from unauthorized use. Security 0 Use this tab to set a user password. Figure 2-3. BIOS Security Table 2-3. BIOS Security Parameter Supervisor Password Is User Password Is HDD0 Password Is Set Supervisor Password Set User Password Set HDD0 Password Password on Boot Secure...
... provides option to factory defaults. Option to safeguard and protect the computer from unauthorized use. Security 0 Use this tab to set a user password. Figure 2-3. BIOS Security Table 2-3. BIOS Security Parameter Supervisor Password Is User Password Is HDD0 Password Is Set Supervisor Password Set User Password Set HDD0 Password Password on Boot Secure...


