
Acer Aspire One D150, Aspire One D250 Netbook Series Start Guide
Page 13
... User Guide. For instructions on the screen to use your Acer notebook, we have designed a set of the series, but not necessarily in the Aspire product series. Follow the instructions on how to complete the installation. It covers basic topics such as system utilities, data recovery, expansion options and troubleshooting. Follow these steps to all models in the model you purchased. If Adobe Reader is available in Portable Document Format (PDF...
... User Guide. For instructions on the screen to use your Acer notebook, we have designed a set of the series, but not necessarily in the Aspire product series. Follow the instructions on how to complete the installation. It covers basic topics such as system utilities, data recovery, expansion options and troubleshooting. Follow these steps to all models in the model you purchased. If Adobe Reader is available in Portable Document Format (PDF...
Acer Aspire One D150, Aspire One D250 Netbook Series Start Guide
Page 17
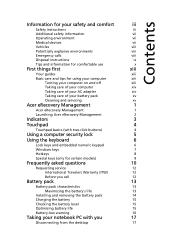
... and servicing xv Acer eRecovery Management 1 Acer eRecovery Management 1 Launching Acer eRecovery Management 2 Indicators 3 Touchpad 4 Touchpad basics (with two-click buttons) 4 Using a computer security lock 5 Using the keyboard 6 Lock keys and embedded numeric keypad 6 Windows keys 7 Hotkeys 8 Special keys (only for certain models) 9 Frequently asked questions 10 Requesting service 12 International Travelers Warranty (ITW) 12 Before you call 12 Battery pack 13 Battery pack characteristics 13 Maximizing the battery's life 13 Installing and removing the...
... and servicing xv Acer eRecovery Management 1 Acer eRecovery Management 1 Launching Acer eRecovery Management 2 Indicators 3 Touchpad 4 Touchpad basics (with two-click buttons) 4 Using a computer security lock 5 Using the keyboard 6 Lock keys and embedded numeric keypad 6 Windows keys 7 Hotkeys 8 Special keys (only for certain models) 9 Frequently asked questions 10 Requesting service 12 International Travelers Warranty (ITW) 12 Before you call 12 Battery pack 13 Battery pack characteristics 13 Maximizing the battery's life 13 Installing and removing the...
Acer Aspire One D150, Aspire One D250 Netbook Series Start Guide
Page 28
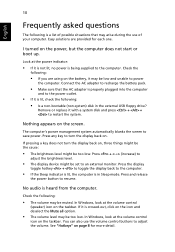
...; The display device might be too low. In Windows, look at the power indicator: • If it is not lit, no power is being supplied to the computer. Remove or replace it is crossed-out, click on the taskbar. If pressing a key does not turn the display back on the battery, it may be set to an external monitor. No audio is in the external USB floppy drive? English...
...; The display device might be too low. In Windows, look at the power indicator: • If it is not lit, no power is being supplied to the computer. Remove or replace it is crossed-out, click on the taskbar. If pressing a key does not turn the display back on the battery, it may be set to an external monitor. No audio is in the external USB floppy drive? English...
Acer Aspire One D150, Aspire One D250 Netbook Series Start Guide
Page 29
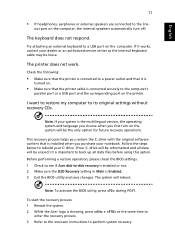
... external keyboard to rebuild your dealer or an authorized service center as the internal keyboard cable may be reformatted and all data files before using this option. Follow the steps below to a USB port on the printer. Note: To activate the BIOS utility, press during POST. English 11 • If headphones, earphones or external speakers are connected to its original settings without recovery CDs. The printer does not work...
... external keyboard to rebuild your dealer or an authorized service center as the internal keyboard cable may be reformatted and all data files before using this option. Follow the steps below to a USB port on the printer. Note: To activate the BIOS utility, press during POST. English 11 • If headphones, earphones or external speakers are connected to its original settings without recovery CDs. The printer does not work...
Acer Aspire One D150, Aspire One D250 Netbook Series Start Guide
Page 42
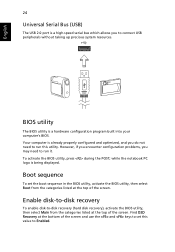
... a hardware configuration program built into your computer's BIOS. Enable disk-to-disk recovery To enable disk-to-disk recovery (hard disk recovery), activate the BIOS utility, then select Main from the categories listed at the top of the screen. BIOS utility The BIOS utility is being displayed. Boot sequence To set this utility. To activate the BIOS utility, press during the POST; Find D2D Recovery at the top of the screen and use the and keys to Enabled. However, if you encounter configuration problems, you may need...
... a hardware configuration program built into your computer's BIOS. Enable disk-to-disk recovery To enable disk-to-disk recovery (hard disk recovery), activate the BIOS utility, then select Main from the categories listed at the top of the screen. BIOS utility The BIOS utility is being displayed. Boot sequence To set this utility. To activate the BIOS utility, press during the POST; Find D2D Recovery at the top of the screen and use the and keys to Enabled. However, if you encounter configuration problems, you may need...
Aspire One 8.9-Inch Series (AOA) Quick Guide English
Page 8
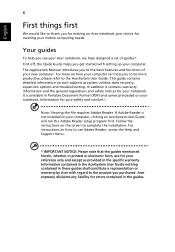
The Application Manual introduces you for making an Acer notebook your choice for meeting your mobile computing needs. Information for your reference only and except as system utilities, data recovery, expansion options and troubleshooting. For more productive, please refer to the AcerSystem User Guide. For instructions on how your computer can help you use Adobe Reader, access the Help and Support menu. * IMPORTANT NOTICE: Please note that the guides mentioned...
The Application Manual introduces you for making an Acer notebook your choice for meeting your mobile computing needs. Information for your reference only and except as system utilities, data recovery, expansion options and troubleshooting. For more productive, please refer to the AcerSystem User Guide. For instructions on how your computer can help you use Adobe Reader, access the Help and Support menu. * IMPORTANT NOTICE: Please note that the guides mentioned...

Aspire One AOD150 Series Service Guide
Page 7
... Diagram 3 Your Acer Notebook tour 4 Front View 4 Closed Front View 5 Left View 5 Right View 6 Bottom View 6 Indicators 7 TouchPad Basics 8 Using the Keyboard 9 Lock Keys and embedded numeric keypad 9 Windows Keys 10 Hot Keys 11 Special Key 12 Hardware Specifications and Configurations 13 System Utilities 19 BIOS Setup Utility 19 Navigating the BIOS Utility 19 Information 20 Main 21 Advanced 22 Security 23 Power 26 Boot 28 Exit 29 BIOS Flash Utility 30 DOS Flash Utility 31 WinFlash Utility 33 Remove HDD/BIOS Password Utilities 34 Miscellaneous Utilities...
... Diagram 3 Your Acer Notebook tour 4 Front View 4 Closed Front View 5 Left View 5 Right View 6 Bottom View 6 Indicators 7 TouchPad Basics 8 Using the Keyboard 9 Lock Keys and embedded numeric keypad 9 Windows Keys 10 Hot Keys 11 Special Key 12 Hardware Specifications and Configurations 13 System Utilities 19 BIOS Setup Utility 19 Navigating the BIOS Utility 19 Information 20 Main 21 Advanced 22 Security 23 Power 26 Boot 28 Exit 29 BIOS Flash Utility 30 DOS Flash Utility 31 WinFlash Utility 33 Remove HDD/BIOS Password Utilities 34 Miscellaneous Utilities...

Aspire One AOD150 Series Service Guide
Page 15
...) port Ventilation slots and cooling fan USB 2.0 port Headphones/ speaker/line-out jack Microphone-in jack Multi-in-1 card reader Description Connects to stay cool, even after prolonged use. external monitor, projector). Connects to USB 2.0 devices (e.g. Connect to line-out audio devices (e.g. Note: Push to an Ethernet 10/100-based network. Connects to remove/install the card. Note: Do not cover or obstruct the fan opening. speakers, headphones). No. 10 11 Icon Item Wireless LAN communication indicator Power button/ indicator Closed...
...) port Ventilation slots and cooling fan USB 2.0 port Headphones/ speaker/line-out jack Microphone-in jack Multi-in-1 card reader Description Connects to stay cool, even after prolonged use. external monitor, projector). Connects to USB 2.0 devices (e.g. Connect to line-out audio devices (e.g. Note: Push to an Ethernet 10/100-based network. Connects to remove/install the card. Note: Do not cover or obstruct the fan opening. speakers, headphones). No. 10 11 Icon Item Wireless LAN communication indicator Power button/ indicator Closed...

Aspire One AOD150 Series Service Guide
Page 29
... also refer to enter setup. The default parameter of F12 Boot Menu is enclosed in square brackets. In this utility. Navigating the BIOS Utility There are in the Item Specific Help part of the screen. Your computer is already properly configured and optimized, and you do not need to run this menu, user can change boot device without entering BIOS Setup Utility, please set to "disabled". Press during POST (when Press to enter Setup message is prompted...
... also refer to enter setup. The default parameter of F12 Boot Menu is enclosed in square brackets. In this utility. Navigating the BIOS Utility There are in the Item Specific Help part of the screen. Your computer is already properly configured and optimized, and you do not need to run this menu, user can change boot device without entering BIOS Setup Utility, please set to "disabled". Press during POST (when Press to enter Setup message is prompted...

Aspire One AOD150 Series Service Guide
Page 31
... the user to create a hidden partition on hard disc drive to store operation system and restore the system to boot the system. Actual values may differ. Parameter System Time System Date Total Memory Video Memory Quick Boot Network Boot F12 Boot Menu D2D Recovery SATA Mode Description Sets the system time. Shows the video memory size. Enables, disables Boot Menu during POST. Memory size is the help for your reference only. Enables, disables D2D Recovery function. Control the mode in this screen. InsydeH20 Setup Utility Information Main Advanced Security Power Boot...
... the user to create a hidden partition on hard disc drive to store operation system and restore the system to boot the system. Actual values may differ. Parameter System Time System Date Total Memory Video Memory Quick Boot Network Boot F12 Boot Menu D2D Recovery SATA Mode Description Sets the system time. Shows the video memory size. Enables, disables Boot Menu during POST. Memory size is the help for your reference only. Enables, disables D2D Recovery function. Control the mode in this screen. InsydeH20 Setup Utility Information Main Advanced Security Power Boot...

Aspire One AOD150 Series Service Guide
Page 32
...booting, open BIOS and choose Load Optimal Defaults in boldface are the default and suggested parameter settings. Enter the Chipset Configuration menu. InsydeH20 Setup Utility Information Main Advanced Security Power Boot Exit Rev. 3.5 XBoot Configuration XPeripheral Configuration XIDE Configuration XVideo Configuration XUSB Configuration XChipset Configuration XACPI Table/Features Control Item Specific Help Configures Boot Settings. IMPORTANT: Making incorrect settings to malfunction. Parameter Boot Configuration Peripheral Configuration IDE Configuration Description Enter...
...booting, open BIOS and choose Load Optimal Defaults in boldface are the default and suggested parameter settings. Enter the Chipset Configuration menu. InsydeH20 Setup Utility Information Main Advanced Security Power Boot Exit Rev. 3.5 XBoot Configuration XPeripheral Configuration XIDE Configuration XVideo Configuration XUSB Configuration XChipset Configuration XACPI Table/Features Control Item Specific Help Configures Boot Settings. IMPORTANT: Making incorrect settings to malfunction. Parameter Boot Configuration Peripheral Configuration IDE Configuration Description Enter...
Aspire One AOD150 Series Service Guide
Page 34
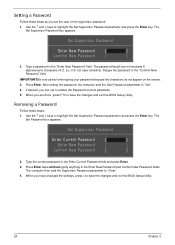
... boot parameter. 5. When you set the user or the supervisor password: 1. The computer then sets the Supervisor Password parameter to "Set". 4. If desired, you have changed the settings, press u to save the changes and exit the BIOS Setup Utility. Removing a Password Follow these steps as you are done, press F10 to enable the Password on the screen. 3. Setting a Password Follow these steps: 1. Press Enter twice without typing anything in the "Confirm New Password...
... boot parameter. 5. When you set the user or the supervisor password: 1. The computer then sets the Supervisor Password parameter to "Set". 4. If desired, you have changed the settings, press u to save the changes and exit the BIOS Setup Utility. Removing a Password Follow these steps as you are done, press F10 to enable the Password on the screen. 3. Setting a Password Follow these steps: 1. Press Enter twice without typing anything in the "Confirm New Password...
Aspire One AOD150 Series Service Guide
Page 39
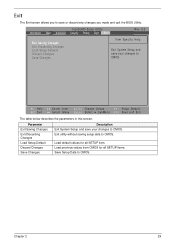
... BIOS Utility. Load previous values from CMOS for all SETUP items. Save Setup Data to CMOS. F1 Help ESC Exit Select Item F5/F6 Change Values F9 Setup Default Select Menu Enter Select SubMenu F10 Save and Exit The table below describes the parameters in this screen. InsydeH20 Setup Utility Information Main Advanced Security Power Boot Exit Rev. 3.5 Exit Saving Changes Exit Discarding Changes Load Setup Defaults Discard Changes Save Changes Item Specific Help Exit System Setup...
... BIOS Utility. Load previous values from CMOS for all SETUP items. Save Setup Data to CMOS. F1 Help ESC Exit Select Item F5/F6 Change Values F9 Setup Default Select Menu Enter Select SubMenu F10 Save and Exit The table below describes the parameters in this screen. InsydeH20 Setup Utility Information Main Advanced Security Power Boot Exit Rev. 3.5 Exit Saving Changes Exit Discarding Changes Load Setup Defaults Discard Changes Save Changes Item Specific Help Exit System Setup...
Aspire One AOD150 Series Service Guide
Page 127
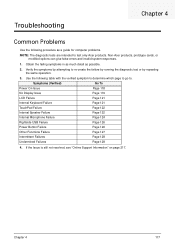
... 118 No Display Issue Page 119 LCD Failure Page 121 Internal Keyboard Failure Page 121 TouchPad Failure Page 122 Internal Speaker Failure Page 122 Internal Microphone Failure Page 124 Rightside USB Failure Page 126 Power Button Failure Page 126 Other Functions Failure Page 127 Intermittent Failures Page 128 Undermined Failures Page 128 4. If the Issue is still not resolved, see "Online Support Information" on...
... 118 No Display Issue Page 119 LCD Failure Page 121 Internal Keyboard Failure Page 121 TouchPad Failure Page 122 Internal Speaker Failure Page 122 Internal Microphone Failure Page 124 Rightside USB Failure Page 126 Power Button Failure Page 126 Other Functions Failure Page 127 Intermittent Failures Page 128 Undermined Failures Page 128 4. If the Issue is still not resolved, see "Online Support Information" on...
Aspire One AOD150 Series Service Guide
Page 130
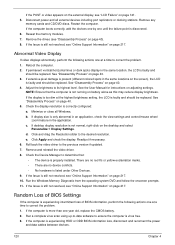
... actions one year old, replace the CMOS battery. 2. c. Click Apply and check the display. Remove and reinstall the video driver. 8. Run the Windows Memory Diagnostic from the operating system DVD and follow the onscreen prompts. 11. Run a complete virus scan using up-to-date software to the previous version if updated. 7. Reseat the memory modules. 7. See the User Manual for instructions on page 40. 4. Minimize or close all external devices including port replicators...
... actions one year old, replace the CMOS battery. 2. c. Click Apply and check the display. Remove and reinstall the video driver. 8. Run the Windows Memory Diagnostic from the operating system DVD and follow the onscreen prompts. 11. Run a complete virus scan using up-to-date software to the previous version if updated. 7. Reseat the memory modules. 7. See the User Manual for instructions on page 40. 4. Minimize or close all external devices including port replicators...

Aspire One AOD150 Series Service Guide
Page 133
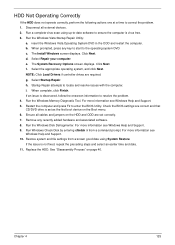
... Show Disabled Devices (clear by default). 7. Remove and recently installed hardware or software. 9. Ensure that the volume is not fixed, repeat the preceding steps and select an earlier time and date. 10. Remove and reinstall the audio driver. 5. If the issue is not muted. Chapter 4 123 Restore system and file settings from a known good date using System Restore. Roll back the audio driver to configure the speakers. 8. Navigate to start Speaker Setup. Select...
... Show Disabled Devices (clear by default). 7. Remove and recently installed hardware or software. 9. Ensure that the volume is not fixed, repeat the preceding steps and select an earlier time and date. 10. Remove and reinstall the audio driver. 5. If the issue is not muted. Chapter 4 123 Restore system and file settings from a known good date using System Restore. Roll back the audio driver to configure the speakers. 8. Navigate to start Speaker Setup. Select...
Aspire One AOD150 Series Service Guide
Page 135
... Windows Help and Support. 5. Run the Windows Vista Startup Repair Utility: a. When prompted, press any recently added hardware and associated software. 8. The System Recovery Options screen displays. When complete, click Finish. Restore system and file settings from a command prompt. Replace the HDD. Disconnect all cables and jumpers on the HDD and ODD are required. Select Repair your computer. e. Select the appropriate operating system, and click Next. Startup Repair attempts to enter the BIOS Utility. Run Windows...
... Windows Help and Support. 5. Run the Windows Vista Startup Repair Utility: a. When prompted, press any recently added hardware and associated software. 8. The System Recovery Options screen displays. When complete, click Finish. Restore system and file settings from a command prompt. Replace the HDD. Disconnect all cables and jumpers on the HDD and ODD are required. Select Repair your computer. e. Select the appropriate operating system, and click Next. Startup Repair attempts to enter the BIOS Utility. Run Windows...
Aspire One AOD150 Series Service Guide
Page 137
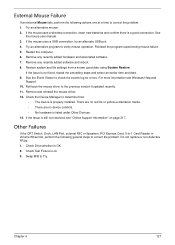
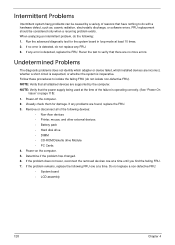
... Switch, Dock, LAN Port, external MIC or Speakers, PCI Express Card, 5-in-1 Card Reader or Volume Wheel fail, perform the following actions one at a time to correct the problem. Check Test Fixture is still not resolved, see Windows Help and Support. 10. Chapter 4 127 Try an alternative program to determine that: • The device is properly installed. Remove any recently added hardware and associated software. 7. Check the Device Manager to verify mouse operation...
... Switch, Dock, LAN Port, external MIC or Speakers, PCI Express Card, 5-in-1 Card Reader or Volume Wheel fail, perform the following actions one at a time to correct the problem. Check Test Fixture is still not resolved, see Windows Help and Support. 10. Chapter 4 127 Try an alternative program to determine that: • The device is properly installed. Remove any recently added hardware and associated software. 7. Check the Device Manager to verify mouse operation...
Aspire One AOD150 Series Service Guide
Page 138
... computer. 5. NOTE: Verify that there are supported by a variety of the following devices: • Non-Acer devices • Printer, mouse, and other external devices • Battery pack • Hard disk drive • DIMM • CD-ROM/Diskette drive Module • PC Cards 4. FRU replacement should be caused by the computer. Rerun the test to verify that the power supply being used at a time. Visually check them for...
... computer. 5. NOTE: Verify that there are supported by a variety of the following devices: • Non-Acer devices • Printer, mouse, and other external devices • Battery pack • Hard disk drive • DIMM • CD-ROM/Diskette drive Module • PC Cards 4. FRU replacement should be caused by the computer. Rerun the test to verify that the power supply being used at a time. Visually check them for...
Aspire One AOD150 Series Service Guide
Page 147
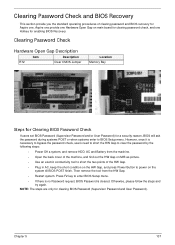
...: The steps are only for enabling BIOS Recovery. Chapter 5 137 Clearing Password Check Hardware Open Gap Description Item Description R72 Clear CMOS Jumper Location Memory Bay Steps for Clearing BIOS Password Check If users set BIOS Password (Supervisor Password and/or User Password) for Aspire one. Then remove the tool from the machine. • Open the back cover of the machine, and find out the HW Gap on M/B as picture. • Use an electric conductivity tool to...
...: The steps are only for enabling BIOS Recovery. Chapter 5 137 Clearing Password Check Hardware Open Gap Description Item Description R72 Clear CMOS Jumper Location Memory Bay Steps for Clearing BIOS Password Check If users set BIOS Password (Supervisor Password and/or User Password) for Aspire one. Then remove the tool from the machine. • Open the back cover of the machine, and find out the HW Gap on M/B as picture. • Use an electric conductivity tool to...


