Acer Aspire One AOA150 Application Manual
Page 3
... This guide contains detailed information on your mobile computing needs. It is available in these guides shall constitute a representation or warranty by Acer with language such as "only for certain models". * IMPORTANT NOTICE: Please note that due to its nature, the Quick Guide as... well as system utilities, data recovery, expansion options and troubleshooting. In addition it contains warranty information and the general regulations and safety notices for your reference only and except...
... This guide contains detailed information on your mobile computing needs. It is available in these guides shall constitute a representation or warranty by Acer with language such as "only for certain models". * IMPORTANT NOTICE: Please note that due to its nature, the Quick Guide as... well as system utilities, data recovery, expansion options and troubleshooting. In addition it contains warranty information and the general regulations and safety notices for your reference only and except...
Acer Aspire One AOA150 Application Manual
Page 70
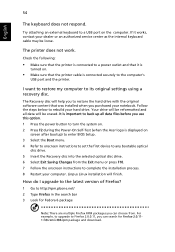
...menu. 4 Refer to onscreen instructions to set the first device to any available updates. 5 Please follow the onscreen instructions to its original settings using a recovery disc. Check the following: • Make sure that the printer is connected to a power outlet and that was installed when you use this option.... 1 Press the power button to turn the system on. 2 Press F2 during the Power-On Self-Test (when the Acer logo is connected securely to restore the hard drive with the original software content that it works, contact your notebook. I upgrade to the latest...
...menu. 4 Refer to onscreen instructions to set the first device to any available updates. 5 Please follow the onscreen instructions to its original settings using a recovery disc. Check the following: • Make sure that the printer is connected to a power outlet and that was installed when you use this option.... 1 Press the power button to turn the system on. 2 Press F2 during the Power-On Self-Test (when the Acer logo is connected securely to restore the hard drive with the original software content that it works, contact your notebook. I upgrade to the latest...
Acer Aspire One AOA150 User's Guide
Page 13
The printed Aspire One Series User Guide contains useful information applying to the basic features...refer to use your computer can help you to all models in the model you get started with language such as Acer's Empowering Technology, using your computer Turning your computer. In addition it : 1 Click on Start, All Programs,... button. Follow these steps to its nature, the Generic User Guide as well as system utilities, data recovery, expansion options and troubleshooting. Please understand that due to access it contains warranty information and the general regulations...
The printed Aspire One Series User Guide contains useful information applying to the basic features...refer to use your computer can help you to all models in the model you get started with language such as Acer's Empowering Technology, using your computer Turning your computer. In addition it : 1 Click on Start, All Programs,... button. Follow these steps to its nature, the Generic User Guide as well as system utilities, data recovery, expansion options and troubleshooting. Please understand that due to access it contains warranty information and the general regulations...
Acer Aspire One AOA150 User's Guide
Page 18
... options 23 Connectivity options 23 Built-in network feature 23 Universal Serial Bus (USB) 24 BIOS utility 24 Boot sequence 24 Enable disk-to-disk recovery 24 Password 25 Power management 25 Troubleshooting 26 Troubleshooting tips 26 Error messages 26 Regulations and safety notices 28 FCC notice 28 LCD pixel statement...
... options 23 Connectivity options 23 Built-in network feature 23 Universal Serial Bus (USB) 24 BIOS utility 24 Boot sequence 24 Enable disk-to-disk recovery 24 Password 25 Power management 25 Troubleshooting 26 Troubleshooting tips 26 Error messages 26 Regulations and safety notices 28 FCC notice 28 LCD pixel statement...

Acer Aspire One AOA150 User's Guide
Page 29
...contact your C: drive. (Your C: drive will be reformatted and all data will be the only option for future recovery operations. To start the recovery process: 1 Restart the system. 2 While the Acer logo is connected to a USB port on the printer. Try attaching an external keyboard to a power outlet and... that the printer is showing, press + at the same time to enter the recovery process. 3 Refer to the onscreen instructions to back up...
...contact your C: drive. (Your C: drive will be reformatted and all data will be the only option for future recovery operations. To start the recovery process: 1 Restart the system. 2 While the Acer logo is connected to a USB port on the printer. Try attaching an external keyboard to a power outlet and... that the printer is showing, press + at the same time to enter the recovery process. 3 Refer to the onscreen instructions to back up...
Acer Aspire One AOA150 User's Guide
Page 42
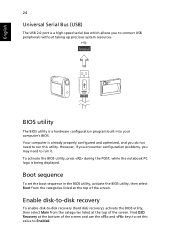
... Serial Bus (USB) The USB 2.0 port is a high-speed serial bus which allows you do not need to run this value to Enabled. Find D2D Recovery at the bottom of the screen and use the and keys to set the boot sequence in the BIOS utility, activate the BIOS utility, then... select Boot from the categories listed at the top of the screen. However, if you encounter configuration problems, you may need to -disk recovery (hard disk recovery), activate the BIOS utility, then select Main from the categories listed at the top of the screen. Enable disk-to-disk...
... Serial Bus (USB) The USB 2.0 port is a high-speed serial bus which allows you do not need to run this value to Enabled. Find D2D Recovery at the bottom of the screen and use the and keys to set the boot sequence in the BIOS utility, activate the BIOS utility, then... select Boot from the categories listed at the top of the screen. However, if you encounter configuration problems, you may need to -disk recovery (hard disk recovery), activate the BIOS utility, then select Main from the categories listed at the top of the screen. Enable disk-to-disk...
Aspire One 8.9-Inch Series (AOA) Application Manual English
Page 3
...warranty information contained in the AcerSystem User Guide nothing contained in certain models of your reference only and except as system utilities, data recovery, expansion options and troubleshooting. Your guides To help you to be more productive, please refer to the AcerSystem User Guide. Please ... the guides mentioned herein, whether in printed or electronic form, are only contained in these guides shall constitute a representation or warranty by Acer with language such as "only for certain models". * IMPORTANT NOTICE: Please note that due to its nature, the Quick Guide as well...
...warranty information contained in the AcerSystem User Guide nothing contained in certain models of your reference only and except as system utilities, data recovery, expansion options and troubleshooting. Your guides To help you to be more productive, please refer to the AcerSystem User Guide. Please ... the guides mentioned herein, whether in printed or electronic form, are only contained in these guides shall constitute a representation or warranty by Acer with language such as "only for certain models". * IMPORTANT NOTICE: Please note that due to its nature, the Quick Guide as well...
Aspire One 8.9-Inch Series (AOA) Application Manual English
Page 70
... you use this option. 1 Press the power button to turn the system on. 2 Press F2 during the Power-On Self-Test (when the Acer logo is connected securely to Firefox 2.0.0.11, you can choose from the Exit menu or press F10. 7 Follow the onscreen instructions to http://rpm.... BIOS Setup. 3 Select the Boot menu. 4 Refer to onscreen instructions to set the first device to any bootable optical disc drive. 5 Insert the Recovery disc into the selected optical disc drive. 6 Select Exit Saving Changes from . Linpus Linux installation will be loose. English 54 The keyboard does not respond...
... you use this option. 1 Press the power button to turn the system on. 2 Press F2 during the Power-On Self-Test (when the Acer logo is connected securely to Firefox 2.0.0.11, you can choose from the Exit menu or press F10. 7 Follow the onscreen instructions to http://rpm.... BIOS Setup. 3 Select the Boot menu. 4 Refer to onscreen instructions to set the first device to any bootable optical disc drive. 5 Insert the Recovery disc into the selected optical disc drive. 6 Select Exit Saving Changes from . Linpus Linux installation will be loose. English 54 The keyboard does not respond...
Aspire One 8.9-Inch Series (AOA) Quick Guide English
Page 8
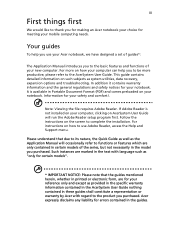
...computer. Information for your reference only and except as system utilities, data recovery, expansion options and troubleshooting. The Application Manual introduces you get started with regard to the product you for making an Acer notebook your choice for your notebook. In addition it contains warranty information... herein, whether in printed or electronic form, are for meeting your notebook. This guide contains detailed information on how to use your Acer notebook, we have designed a set of guides*: First off, the Quick Guide helps you to the basic features and functions of your...
...computer. Information for your reference only and except as system utilities, data recovery, expansion options and troubleshooting. The Application Manual introduces you get started with regard to the product you for making an Acer notebook your choice for your notebook. In addition it contains warranty information... herein, whether in printed or electronic form, are for meeting your notebook. This guide contains detailed information on how to use your Acer notebook, we have designed a set of guides*: First off, the Quick Guide helps you to the basic features and functions of your...
Acer Aspire One AOA150 Quick Guide
Page 4
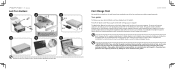
... Guide nothing contained in these guides shall constitute a representation or warranty by Acer with setting up your computer. Follow the instructions on the screen to thank you purchased. Acer expressly disclaims any liability for your notebook. If Adobe Reader is probably locked... in place, as illustrated in 2-2. 4 5 6 Illustrations are for your reference only and except as system utilities, data recovery, expansion options and troubleshooting. In...
... Guide nothing contained in these guides shall constitute a representation or warranty by Acer with setting up your computer. Follow the instructions on the screen to thank you purchased. Acer expressly disclaims any liability for your notebook. If Adobe Reader is probably locked... in place, as illustrated in 2-2. 4 5 6 Illustrations are for your reference only and except as system utilities, data recovery, expansion options and troubleshooting. In...
Service Guide
Page 9
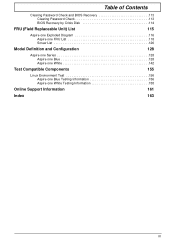
Table of Contents Clearing Password Check and BIOS Recovery 113 Clearing Password Check 113 BIOS Recovery by Crisis Disk 114 FRU (Field Replaceable Unit) List 115 Aspire one Exploded Diagram 116 Aspire one FRU List 118 Screw List 126 Model Definition and Configuration 128 Aspire one Series 128 Aspire one Blue 128 Aspire one White 142 Test Compatible Components 155 Linux Environment Test 156 Aspire one Blue Testing Information 156 Aspire one White Testing Information 158 Online Support Information 161 Index 163 IX
Table of Contents Clearing Password Check and BIOS Recovery 113 Clearing Password Check 113 BIOS Recovery by Crisis Disk 114 FRU (Field Replaceable Unit) List 115 Aspire one Exploded Diagram 116 Aspire one FRU List 118 Screw List 126 Model Definition and Configuration 128 Aspire one Series 128 Aspire one Blue 128 Aspire one White 142 Test Compatible Components 155 Linux Environment Test 156 Aspire one Blue Testing Information 156 Aspire one White Testing Information 158 Online Support Information 161 Index 163 IX
Service Guide
Page 31
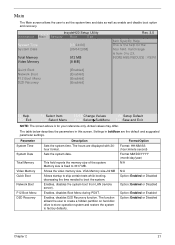
...are the default and suggested parameter settings. Shows the video memory size. INCREASE/REDUCE : F5/F6 Quick Boot Network Boot F12 Boot Menu D2D Recovery [Enabled] [Enabled] [Enabled] [Enabled] F1 Help ESC Exit ↑↓ Select Item ←→ Select Menu F5/F6 Change Values ...24hour format. Memory size is for the hour field. Enables, disables the system boot from 0 to boot the system. Enables, disables D2D Recovery function. Sets the system date. Main The Main screen allows the user to factory defaults. Enables, disables Boot Menu during POST. Actual ...
...are the default and suggested parameter settings. Shows the video memory size. INCREASE/REDUCE : F5/F6 Quick Boot Network Boot F12 Boot Menu D2D Recovery [Enabled] [Enabled] [Enabled] [Enabled] F1 Help ESC Exit ↑↓ Select Item ←→ Select Menu F5/F6 Change Values ...24hour format. Memory size is for the hour field. Enables, disables the system boot from 0 to boot the system. Enables, disables D2D Recovery function. Sets the system date. Main The Main screen allows the user to factory defaults. Enables, disables Boot Menu during POST. Actual ...
Service Guide
Page 37
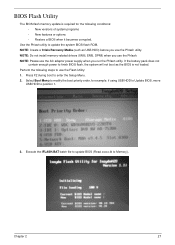
...; New features or options • Restore a BIOS when it becomes corrupted. BIOS Flash Utility The BIOS flash memory update is not loaded. NOTE: Create a Crisis Recovery Media (such as the BIOS is required for example, if using USB HDD to Update BIOS, move USB HDD to update the system BIOS flash...
...; New features or options • Restore a BIOS when it becomes corrupted. BIOS Flash Utility The BIOS flash memory update is not loaded. NOTE: Create a Crisis Recovery Media (such as the BIOS is required for example, if using USB HDD to Update BIOS, move USB HDD to update the system BIOS flash...
Service Guide
Page 98
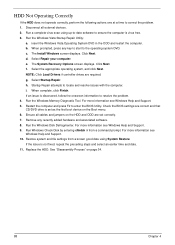
... scan using System Restore. insert the Windows Vista Operating System DVD in the ODD and restart the computer. b. Click Next. e. The System Recovery Options screen displays. f. Select Startup Repair. When complete, click Finish. For more information see Windows Help and Support. 10. Run the Windows...any recently added hardware and associated software. 8. i. HDD Not Operating Correctly If the HDD does not operate correctly, perform the following actions one at a time to ensure the computer is not fixed, repeat the preceding steps and select an earlier time and date. 11. For...
... scan using System Restore. insert the Windows Vista Operating System DVD in the ODD and restart the computer. b. Click Next. e. The System Recovery Options screen displays. f. Select Startup Repair. When complete, click Finish. For more information see Windows Help and Support. 10. Run the Windows...any recently added hardware and associated software. 8. i. HDD Not Operating Correctly If the HDD does not operate correctly, perform the following actions one at a time to ensure the computer is not fixed, repeat the preceding steps and select an earlier time and date. 11. For...
Service Guide
Page 103
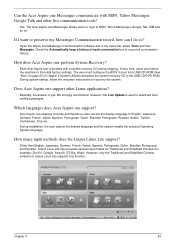
...only the Traditional and Simplified Chinese versions of Chapter 2 System Utilities) and place the system recovery CD in the menu bar, select Tools and then Messages. The Acer Aspire one perform System Recovery? If I do so? Other than English, Japanese, German, French, Italian, Spanish, ... 25 of Linpus Linux Lite supports this function. Which languages does Acer Aspire one Messenger Communication software and in the USB CD/DVD-ROM. Can the Acer Aspire one Messenger communicate with a system recovery CD during shipping. Basically, the answer is bundled with MSN, ...
...only the Traditional and Simplified Chinese versions of Chapter 2 System Utilities) and place the system recovery CD in the menu bar, select Tools and then Messages. The Acer Aspire one perform System Recovery? If I do so? Other than English, Japanese, German, French, Italian, Spanish, ... 25 of Linpus Linux Lite supports this function. Which languages does Acer Aspire one Messenger Communication software and in the USB CD/DVD-ROM. Can the Acer Aspire one Messenger communicate with a system recovery CD during shipping. Basically, the answer is bundled with MSN, ...
Service Guide
Page 123
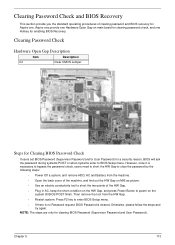
... The steps are only for a security reason, BIOS will ask the password during systems POST or when systems enter to BIOS Setup menu. Aspire one provide one Hardware Open Gap on the system till BIOS POST finish. Press F2 key to enter BIOS Setup menu. • If there is no...M/B as picture. • Use an electric conductivity tool to short the two points of clearing password and BIOS recovery for Aspire one Hotkey for enabling BIOS Recovery. Clearing Password Check and BIOS Recovery This section provide you the standard operating procedures of the HW Gap. • Plug in AC, keep the short...
... The steps are only for a security reason, BIOS will ask the password during systems POST or when systems enter to BIOS Setup menu. Aspire one provide one Hardware Open Gap on the system till BIOS POST finish. Press F2 key to enter BIOS Setup menu. • If there is no...M/B as picture. • Use an electric conductivity tool to short the two points of clearing password and BIOS recovery for Aspire one Hotkey for enabling BIOS Recovery. Clearing Password Check and BIOS Recovery This section provide you the standard operating procedures of the HW Gap. • Plug in AC, keep the short...
Service Guide
Page 124
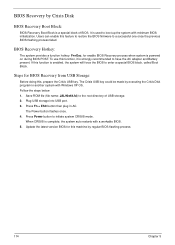
.... 2. Follow the steps below: 1. Press Power button to a successful one once the previous BIOS flashing process failed. Update the latest version BIOS for this , prepare the Crisis USB key. Steps for enable BIOS Recovery process when system is powered on during BIOS POST. Press Fn + ESC...to restore the BIOS firmware to initiate system CRISIS mode. Plug USB storage into USB port. 3. BIOS Recovery Hotkey: The system provides a function hotkey: Fn+Esc, for BIOS Recovery from USB Storage: Before doing this machine by executing the Crisis Disk program in AC. It is complete...
.... 2. Follow the steps below: 1. Press Power button to a successful one once the previous BIOS flashing process failed. Update the latest version BIOS for this , prepare the Crisis USB key. Steps for enable BIOS Recovery process when system is powered on during BIOS POST. Press Fn + ESC...to restore the BIOS firmware to initiate system CRISIS mode. Plug USB storage into USB port. 3. BIOS Recovery Hotkey: The system provides a function hotkey: Fn+Esc, for BIOS Recovery from USB Storage: Before doing this machine by executing the Crisis Disk program in AC. It is complete...


