Acer Aspire One AOA150 Application Manual
Page 20
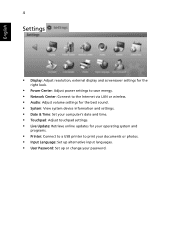
English 4 Settings • Display: Adjust resolution, external display and screensaver settings for the right look. • Power Center: Adjust power settings to save energy. • Network Center: Connect to the Internet via LAN or wireless. • Audio: Adjust volume settings for the best sound. • System: View system device information and settings. • Date & Time: Set your computer's date and time. • Touchpad: Adjust touchpad settings. • Live Update: Retrieve online updates for your operating system and programs...
English 4 Settings • Display: Adjust resolution, external display and screensaver settings for the right look. • Power Center: Adjust power settings to save energy. • Network Center: Connect to the Internet via LAN or wireless. • Audio: Adjust volume settings for the best sound. • System: View system device information and settings. • Date & Time: Set your computer's date and time. • Touchpad: Adjust touchpad settings. • Live Update: Retrieve online updates for your operating system and programs...
Acer Aspire One AOA150 Application Manual
Page 70
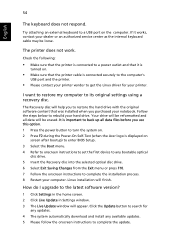
... during the Power-On Self-Test (when the Acer logo is connected securely to the computer's USB port and the printer. • Please contact your printer vendor to rebuild your dealer or an authorized service center as the internal keyboard cable may be erased. Try attaching an external keyboard to the latest software version? 1 Click Settings in the home screen. 2 Click Live Update in Settings window. 3 The Live Update window will...
... during the Power-On Self-Test (when the Acer logo is connected securely to the computer's USB port and the printer. • Please contact your printer vendor to rebuild your dealer or an authorized service center as the internal keyboard cable may be erased. Try attaching an external keyboard to the latest software version? 1 Click Settings in the home screen. 2 Click Live Update in Settings window. 3 The Live Update window will...
Acer Aspire One AOA150 User's Guide
Page 13
..., the Generic User Guide as well as Acer's Empowering Technology, using your computer Turning your notebook. For instructions on how your computer can help you use Adobe Reader, access the Help and Support menu. It covers basic topics such as the AcerSystem User Guide mentioned below the LCD screen beside the easy-launch buttons. The printed Quick Guide introduces you to be more on how to all models in the Aspire product series. Such instances...
..., the Generic User Guide as well as Acer's Empowering Technology, using your computer Turning your notebook. For instructions on how your computer can help you use Adobe Reader, access the Help and Support menu. It covers basic topics such as the AcerSystem User Guide mentioned below the LCD screen beside the easy-launch buttons. The printed Quick Guide introduces you to be more on how to all models in the Aspire product series. Such instances...

Acer Aspire One AOA150 User's Guide
Page 17
... and servicing xv Acer eRecovery Management 1 Acer eRecovery Management 1 Launching Acer eRecovery Management 1 Indicators 3 Touchpad 4 Touchpad basics (with two-click buttons) 4 Using a computer security lock 5 Using the keyboard 6 Lock keys and embedded numeric keypad 6 Windows keys 7 Hotkeys 8 Special keys (only for certain models) 9 Frequently asked questions 10 Requesting service 12 International Travelers Warranty (ITW) 12 Before you call 12 Battery pack 13 Battery pack characteristics 13 Maximizing the battery's life 13 Installing and removing the...
... and servicing xv Acer eRecovery Management 1 Acer eRecovery Management 1 Launching Acer eRecovery Management 1 Indicators 3 Touchpad 4 Touchpad basics (with two-click buttons) 4 Using a computer security lock 5 Using the keyboard 6 Lock keys and embedded numeric keypad 6 Windows keys 7 Hotkeys 8 Special keys (only for certain models) 9 Frequently asked questions 10 Requesting service 12 International Travelers Warranty (ITW) 12 Before you call 12 Battery pack 13 Battery pack characteristics 13 Maximizing the battery's life 13 Installing and removing the...

Acer Aspire One AOA150 User's Guide
Page 29
... first turn off. Before performing a restore operation, please check the BIOS settings. 1 Check to see if Acer disk-to-disk recovery is enabled or not. 2 Make sure the D2D Recovery setting in Main is showing, press + at the same time to enter the recovery process. 3 Refer to the onscreen instructions to a power outlet and that it works, contact your C: drive. (Your C: drive will be reformatted and all data files before using this...
... first turn off. Before performing a restore operation, please check the BIOS settings. 1 Check to see if Acer disk-to-disk recovery is enabled or not. 2 Make sure the D2D Recovery setting in Main is showing, press + at the same time to enter the recovery process. 3 Refer to the onscreen instructions to a power outlet and that it works, contact your C: drive. (Your C: drive will be reformatted and all data files before using this...
Acer Aspire One AOA150 User's Guide
Page 42
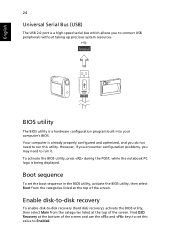
... displayed. while the notebook PC logo is a hardware configuration program built into your computer's BIOS. Find D2D Recovery at the bottom of the screen and use the and keys to set the boot sequence in the BIOS utility, activate the BIOS utility, then select Boot from the categories listed at the top of the screen. Enable disk-to-disk recovery To enable disk-to run it. However, if you encounter configuration problems, you may need to -disk recovery (hard disk recovery), activate the BIOS utility...
... displayed. while the notebook PC logo is a hardware configuration program built into your computer's BIOS. Find D2D Recovery at the bottom of the screen and use the and keys to set the boot sequence in the BIOS utility, activate the BIOS utility, then select Boot from the categories listed at the top of the screen. Enable disk-to-disk recovery To enable disk-to run it. However, if you encounter configuration problems, you may need to -disk recovery (hard disk recovery), activate the BIOS utility...
Aspire One 8.9-Inch Series (AOA) Application Manual English
Page 3
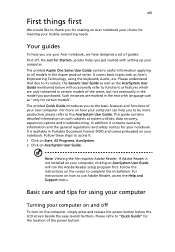
... nature, the Quick Guide as well as system utilities, data recovery, expansion options and troubleshooting. Acer expressly disclaims any liability for your computer can help you to the product you purchased. Your guides To help you use Adobe Reader, access the Help and Support menu. This guide contains detailed information on how your safety and comfort.\ Note: Viewing the file requires Adobe Reader. Information for errors contained in these guides shall constitute...
... nature, the Quick Guide as well as system utilities, data recovery, expansion options and troubleshooting. Acer expressly disclaims any liability for your computer can help you to the product you purchased. Your guides To help you use Adobe Reader, access the Help and Support menu. This guide contains detailed information on how your safety and comfort.\ Note: Viewing the file requires Adobe Reader. Information for errors contained in these guides shall constitute...

Aspire One 8.9-Inch Series (AOA) Application Manual English
Page 20
English 4 Settings • Display: Adjust resolution, external display and screensaver settings for the right look. • Power Center: Adjust power settings to save energy. • Network Center: Connect to the Internet via LAN or wireless. • Audio: Adjust volume settings for the best sound. • System: View system device information and settings. • Date & Time: Set your computer's date and time. • Touchpad: Adjust touchpad settings. • Live Update: Add or remove programs from your computer...
English 4 Settings • Display: Adjust resolution, external display and screensaver settings for the right look. • Power Center: Adjust power settings to save energy. • Network Center: Connect to the Internet via LAN or wireless. • Audio: Adjust volume settings for the best sound. • System: View system device information and settings. • Date & Time: Set your computer's date and time. • Touchpad: Adjust touchpad settings. • Live Update: Add or remove programs from your computer...
Aspire One 8.9-Inch Series (AOA) Quick Guide English
Page 8
... as system utilities, data recovery, expansion options and troubleshooting. Information for your computer, clicking on how to use your Acer notebook, we have designed a set of your computer. For instructions on AcerSystem User Guide will run the Adobe Reader setup program first. Acer expressly disclaims any liability for meeting your mobile computing needs. Your guides To help you to be more on how your notebook. The Application Manual introduces...
... as system utilities, data recovery, expansion options and troubleshooting. Information for your computer, clicking on how to use your Acer notebook, we have designed a set of your computer. For instructions on AcerSystem User Guide will run the Adobe Reader setup program first. Acer expressly disclaims any liability for meeting your mobile computing needs. Your guides To help you to be more on how your notebook. The Application Manual introduces...
Acer Aspire One AOA150 Quick Guide
Page 4
... guides To help you use Adobe Reader, access the Help and Support menu. * IMPORTANT NOTICE: Please note that the battery is probably locked in place, as system utilities, data recovery, expansion options and troubleshooting. For more productive, please refer to the basic features and functions of guides*: First off, the Quick Guide helps you for making an Acer notebook your choice for your reference only and except as provided in the specific...
... guides To help you use Adobe Reader, access the Help and Support menu. * IMPORTANT NOTICE: Please note that the battery is probably locked in place, as system utilities, data recovery, expansion options and troubleshooting. For more productive, please refer to the basic features and functions of guides*: First off, the Quick Guide helps you for making an Acer notebook your choice for your reference only and except as provided in the specific...
Service Guide
Page 7
... Lock Keys and embedded numeric keypad 9 Hot Keys 10 Special Key 11 Hardware Specifications and Configurations 12 System Utilities 19 BIOS Setup Utility 19 Navigating the BIOS Utility 19 Information 20 Main 21 Security 22 Boot 25 Exit 26 BIOS Flash Utility 27 Remove HDD/BIOS Utility 29 Machine Disassembly and Replacement 33 Disassembly Requirements 33 Related Information 33 General Information 34 Pre-disassembly Instructions 34 Disassembly Process 34 External Module Disassembly Process 35 External Modules Disassembly Flowchart 35 Removing the Battery Pack 36 Removing...
... Lock Keys and embedded numeric keypad 9 Hot Keys 10 Special Key 11 Hardware Specifications and Configurations 12 System Utilities 19 BIOS Setup Utility 19 Navigating the BIOS Utility 19 Information 20 Main 21 Security 22 Boot 25 Exit 26 BIOS Flash Utility 27 Remove HDD/BIOS Utility 29 Machine Disassembly and Replacement 33 Disassembly Requirements 33 Related Information 33 General Information 34 Pre-disassembly Instructions 34 Disassembly Process 34 External Module Disassembly Process 35 External Modules Disassembly Flowchart 35 Removing the Battery Pack 36 Removing...
Service Guide
Page 12
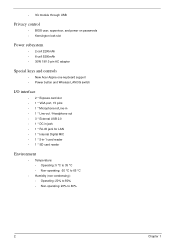
...; 30W 19V 3-pin AC adapter Special keys and controls • New Acer Aspire one keyboard support • Power button and Wireless LAN/3G switch I/O interface • 2 * Express card slot • 1 * VGA port, 15 pins • 1 * Microphone-in/Line-in • 1 * Line-out / Headphone out • 3 * External USB 2.0 • 1 * DC in jack • 1 * RJ-45 jack for LAN • 1 * Internal Digital MIC • 1 * 5-in-1 card reader • 1 * SD card reader Environment • Temperature: • Operating: 5 °C to 35...
...; 30W 19V 3-pin AC adapter Special keys and controls • New Acer Aspire one keyboard support • Power button and Wireless LAN/3G switch I/O interface • 2 * Express card slot • 1 * VGA port, 15 pins • 1 * Microphone-in/Line-in • 1 * Line-out / Headphone out • 3 * External USB 2.0 • 1 * DC in jack • 1 * RJ-45 jack for LAN • 1 * Internal Digital MIC • 1 * 5-in-1 card reader • 1 * SD card reader Environment • Temperature: • Operating: 5 °C to 35...
Service Guide
Page 33
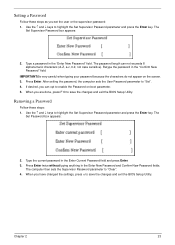
... the Enter key. Setting a Password Follow these steps: 1. Use the ↑ and ↓ keys to "Clear". 4. After setting the password, the computer sets the User Password parameter to highlight the Set Supervisor Password parameter and press the Enter key. Type the current password in the "Confirm New Password" field. Use the ↑ and ↓ keys to "Set". 4. When you have changed the settings, press u to save the changes and exit the BIOS Setup Utility. Press Enter twice without typing anything...
... the Enter key. Setting a Password Follow these steps: 1. Use the ↑ and ↓ keys to "Clear". 4. After setting the password, the computer sets the User Password parameter to highlight the Set Supervisor Password parameter and press the Enter key. Type the current password in the "Confirm New Password" field. Use the ↑ and ↓ keys to "Set". 4. When you have changed the settings, press u to save the changes and exit the BIOS Setup Utility. Press Enter twice without typing anything...
Service Guide
Page 37
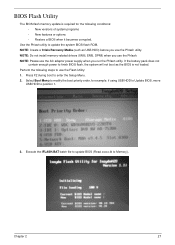
... • Restore a BIOS when it becomes corrupted. Press F2 during boot to Memory). If the battery pack does not contain enough power to update the system BIOS flash ROM. Chapter 2 27 Execute the IFLASH.BAT batch file to update BIOS (Read xxxxx.fd to enter the Setup Menu. 2. Use the Phlash utility to finish BIOS flash, the system will not boot as USB HDD) before you run the Phlash utility. BIOS Flash Utility The BIOS flash memory update is not...
... • Restore a BIOS when it becomes corrupted. Press F2 during boot to Memory). If the battery pack does not contain enough power to update the system BIOS flash ROM. Chapter 2 27 Execute the IFLASH.BAT batch file to update BIOS (Read xxxxx.fd to enter the Setup Menu. 2. Use the Phlash utility to finish BIOS flash, the system will not boot as USB HDD) before you run the Phlash utility. BIOS Flash Utility The BIOS flash memory update is not...
Service Guide
Page 89
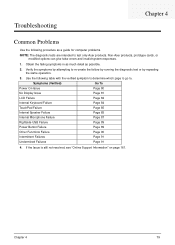
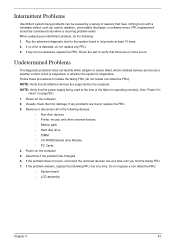
... the same operation. 3. Symptoms (Verified) Go To Power On Issue Page 80 No Display Issue Page 81 LCD Failure Page 84 Internal Keyboard Failure Page 84 TouchPad Failure Page 85 Internal Speaker Failure Page 85 Internal Microphone Failure Page 87 Rightside USB Failure Page 89 Power Button Failure Page 89 Other Functions Failure Page 90 Intermittent Failures Page 91 Undermined Failures Page 91 4. Use the...
... the same operation. 3. Symptoms (Verified) Go To Power On Issue Page 80 No Display Issue Page 81 LCD Failure Page 84 Internal Keyboard Failure Page 84 TouchPad Failure Page 85 Internal Speaker Failure Page 85 Internal Microphone Failure Page 87 Rightside USB Failure Page 89 Power Button Failure Page 89 Other Functions Failure Page 90 Intermittent Failures Page 91 Undermined Failures Page 91 4. Use the...
Service Guide
Page 93
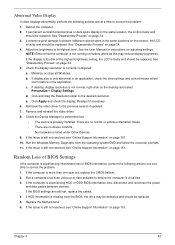
... Motherboard. 6. See the User Manual for instructions on page 34. 5. If the display is too dim at a time to correct the problem. 1. Check the display resolution is more than one year old, replace the CMOS battery. 2. Click Apply and check the display. Readjust if necessary. 6. Run the Windows Memory Diagnostic from the BIOS, the drive may reduce display brightness. If the computer is correctly configured: a. Run a complete virus scan using...
... Motherboard. 6. See the User Manual for instructions on page 34. 5. If the display is too dim at a time to correct the problem. 1. Check the display resolution is more than one year old, replace the CMOS battery. 2. Click Apply and check the display. Readjust if necessary. 6. Run the Windows Memory Diagnostic from the BIOS, the drive may reduce display brightness. If the computer is correctly configured: a. Run a complete virus scan using...
Service Guide
Page 98
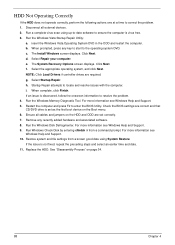
... the problem. 1. Ensure all external devices. 2. b. f. The Install Windows screen displays. Click Next. Check the BIOS settings are required. Run the Windows Vista Startup Repair Utility: a. The System Recovery Options screen displays. Remove any key to start to ensure the computer is discovered, follow the onscreen information to enter the BIOS Utility. For more information see Windows Help and Support. 10. d. NOTE: Click Load Drivers if controller drives are correct and that CD/DVD drive is not fixed, repeat...
... the problem. 1. Ensure all external devices. 2. b. f. The Install Windows screen displays. Click Next. Check the BIOS settings are required. Run the Windows Vista Startup Repair Utility: a. The System Recovery Options screen displays. Remove any key to start to ensure the computer is discovered, follow the onscreen information to enter the BIOS Utility. For more information see Windows Help and Support. 10. d. NOTE: Click Load Drivers if controller drives are correct and that CD/DVD drive is not fixed, repeat...
Service Guide
Page 100
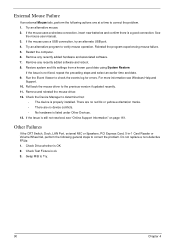
... the CRT Switch, Dock, LAN Port, external MIC or Speakers, PCI Express Card, 5-in-1 Card Reader or Volume Wheel fail, perform the following actions one at a time to determine that: • The device is properly installed. See the mouse user manual. 3. Restart the computer. 6. Remove any recently added hardware and associated software. 7. If the issue is still not resolved, see Windows Help and Support. 10. If the Issue is not fixed, repeat...
... the CRT Switch, Dock, LAN Port, external MIC or Speakers, PCI Express Card, 5-in-1 Card Reader or Volume Wheel fail, perform the following actions one at a time to determine that: • The device is properly installed. See the mouse user manual. 3. Restart the computer. 6. Remove any recently added hardware and associated software. 7. If the issue is still not resolved, see Windows Help and Support. 10. If the Issue is not fixed, repeat...
Service Guide
Page 101
... board • LCD assembly Chapter 4 91 FRU replacement should be caused by the computer. NOTE: Verify that all of reasons that have nothing to verify that there are supported by a variety of the following devices: • Non-Acer devices • Printer, mouse, and other external devices • Battery pack • Hard disk drive • DIMM • CD-ROM/Diskette drive Module • PC Cards 4. Determine if the problem has changed...
... board • LCD assembly Chapter 4 91 FRU replacement should be caused by the computer. NOTE: Verify that all of reasons that have nothing to verify that there are supported by a variety of the following devices: • Non-Acer devices • Printer, mouse, and other external devices • Battery pack • Hard disk drive • DIMM • CD-ROM/Diskette drive Module • PC Cards 4. Determine if the problem has changed...
Service Guide
Page 102
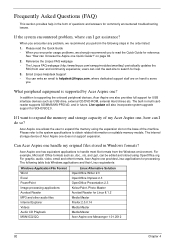
... the Quick Guide for help in Windows formats? When you encounter any problem, we strongly recommend you perform the following table lists Windows applications and their Linux equivalents: Windows Application/File Format Word Excel PowerPoint Image processing applications Acrobat Reader MP3 and other formats, Acer Aspire one also provides full support for commonly encountered troubleshooting issues. Frequently Asked Questions (FAQ) This section provides help . 3. The internal storage device...
... the Quick Guide for help in Windows formats? When you encounter any problem, we strongly recommend you perform the following table lists Windows applications and their Linux equivalents: Windows Application/File Format Word Excel PowerPoint Image processing applications Acrobat Reader MP3 and other formats, Acer Aspire one also provides full support for commonly encountered troubleshooting issues. Frequently Asked Questions (FAQ) This section provides help . 3. The internal storage device...


