Service Guide
Page 8
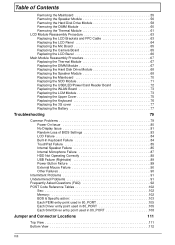
... Questions (FAQ 92 POST Code Reference Tables 102 Sec 102 Memory 102 BDS & Specific action 103 Each PEIM entry point used in 80_PORT 105 Each Driver entry point used in 80_PORT 105 Each SmmDriver entry point used in 80_PORT 108 Jumper and Connector Locations 111 Top View 111 Bottom View 112...
... Questions (FAQ 92 POST Code Reference Tables 102 Sec 102 Memory 102 BDS & Specific action 103 Each PEIM entry point used in 80_PORT 105 Each Driver entry point used in 80_PORT 105 Each SmmDriver entry point used in 80_PORT 108 Jumper and Connector Locations 111 Top View 111 Bottom View 112...
Service Guide
Page 37
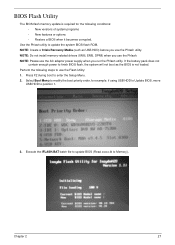
... features or options • Restore a BIOS when it becomes corrupted. Use the Phlash utility to use the Phlash utility. NOTE: Do not install memory-related drivers (XMS, EMS, DPMI) when you use the Flash Utility: 1. Press F2 during boot to Memory). If the battery pack does not contain enough power to...
... features or options • Restore a BIOS when it becomes corrupted. Use the Phlash utility to use the Phlash utility. NOTE: Do not install memory-related drivers (XMS, EMS, DPMI) when you use the Flash Utility: 1. Press F2 during boot to Memory). If the battery pack does not contain enough power to...
Service Guide
Page 93
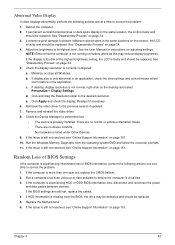
...Information" on battery alone as this may be defective and should be replaced. 5. Click Apply and check the display. Remove and reinstall the video driver. 8. If the Issue is not normal, right-click on page 34. 3. If the BIOS settings are no red Xs or yellow exclamation marks...previous version if updated. 7. See the User Manual for instructions on page 34. 5. Roll back the video driver to its highest level. Random Loss of BIOS information, perform the following actions one at a time to correct the problem. 1. If the computer is correctly configured: a. Check the display ...
...Information" on battery alone as this may be defective and should be replaced. 5. Click Apply and check the display. Remove and reinstall the video driver. 8. If the Issue is not normal, right-click on page 34. 3. If the BIOS settings are no red Xs or yellow exclamation marks...previous version if updated. 7. See the User Manual for instructions on page 34. 5. Roll back the video driver to its highest level. Random Loss of BIOS information, perform the following actions one at a time to correct the problem. 1. If the computer is correctly configured: a. Check the display ...
Service Guide
Page 96
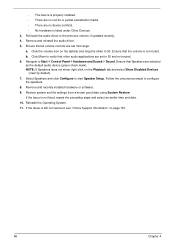
Remove and reinstall the audio driver. 5. Ensure that Speakers are no red Xs or yellow exclamation marks. • There are selected as the default audio device (green check mark). Remove and ... other audio applications are set to configure the speakers. 8. Click Mixer to verify that all volume controls are set mid range: a. b. Roll back the audio driver to 50.
Remove and reinstall the audio driver. 5. Ensure that Speakers are no red Xs or yellow exclamation marks. • There are selected as the default audio device (green check mark). Remove and ... other audio applications are set to configure the speakers. 8. Click Mixer to verify that all volume controls are set mid range: a. b. Roll back the audio driver to 50.

Service Guide
Page 98
Run the Windows Vista Startup Repair Utility: a. The Install Windows screen displays. Select Repair your computer. NOTE: Click Load Drivers if controller drives are correct and that CD/DVD drive is virus free. 3. Startup Repair attempts to resolve the problem. 4. Remove any key to .... 11. Run the Windows Disk Defragmenter. Replace the HDD. HDD Not Operating Correctly If the HDD does not operate correctly, perform the following actions one at a time to enter the BIOS Utility. Disconnect all cables and jumpers on the HDD and ODD are set as the first boot device on...
Run the Windows Vista Startup Repair Utility: a. The Install Windows screen displays. Select Repair your computer. NOTE: Click Load Drivers if controller drives are correct and that CD/DVD drive is virus free. 3. Startup Repair attempts to resolve the problem. 4. Remove any key to .... 11. Run the Windows Disk Defragmenter. Replace the HDD. HDD Not Operating Correctly If the HDD does not operate correctly, perform the following actions one at a time to enter the BIOS Utility. Disconnect all cables and jumpers on the HDD and ODD are set as the first boot device on...
Service Guide
Page 100
...Issue is still not resolved, see Windows Help and Support. 10. Try an alternative mouse. 2. If the issue is OK. 2. Roll back the mouse driver to determine that: • The device is a good connection. Check the Device Manager to the previous version if updated recently. 11. Reinstall the program... Switch, Dock, LAN Port, external MIC or Speakers, PCI Express Card, 5-in-1 Card Reader or Volume Wheel fail, perform the following actions one at a time to verify mouse operation. If the mouse uses a wireless connection, insert new batteries and confirm there is properly installed.
...Issue is still not resolved, see Windows Help and Support. 10. Try an alternative mouse. 2. If the issue is OK. 2. Roll back the mouse driver to determine that: • The device is a good connection. Check the Device Manager to the previous version if updated recently. 11. Reinstall the program... Switch, Dock, LAN Port, external MIC or Speakers, PCI Express Card, 5-in-1 Card Reader or Volume Wheel fail, perform the following actions one at a time to verify mouse operation. If the mouse uses a wireless connection, insert new batteries and confirm there is properly installed.
Service Guide
Page 113
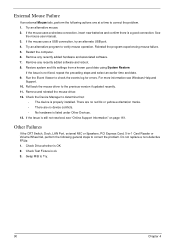
... memory range do the hard ware ECC init Report status code of every memory range Get the root bridge handle Notify pci bus driver starts to program the resource Reset the host controller IdeBus begin initialization Simple Text Output Protocol Functions (VGA class reset) Report that VGA... Class driver is being disabled Report that VGA Class driver is being enabled Terminal Console In reset and Console Out reset Report that the remote terminal is being disabled Report ...
... memory range do the hard ware ECC init Report status code of every memory range Get the root bridge handle Notify pci bus driver starts to program the resource Reset the host controller IdeBus begin initialization Simple Text Output Protocol Functions (VGA class reset) Report that VGA... Class driver is being disabled Report that VGA Class driver is being enabled Terminal Console In reset and Console Out reset Report that the remote terminal is being disabled Report ...

Service Guide
Page 114
Code 0xF8 0xF9 Component Report that ExitBootServices() has been called Runtime driver set virtual address map 104 Chapter 4
Code 0xF8 0xF9 Component Report that ExitBootServices() has been called Runtime driver set virtual address map 104 Chapter 4

User Guide
Page 19
English 1 Acer eRecovery Management Note: The following content is for general reference only. Acer eRecovery Management Acer eRecovery Management allows you with: • Create Factory Default Disc • Create Drivers and Applications Disc Acer eRecovery Management provides you to restore or reinstall applications and drivers. Acer eRecovery Management backs up and recovers data flexibly, reliably and completely. Actual product specifications may vary.
English 1 Acer eRecovery Management Note: The following content is for general reference only. Acer eRecovery Management Acer eRecovery Management allows you with: • Create Factory Default Disc • Create Drivers and Applications Disc Acer eRecovery Management provides you to restore or reinstall applications and drivers. Acer eRecovery Management backs up and recovers data flexibly, reliably and completely. Actual product specifications may vary.

User Guide
Page 20
English 2 Launching Acer eRecovery Management 1 You may also launch Acer eRecovery Management by running the program from the Acer program group in the Start menu, or by double-clicking the icon if you have created a desktop shortcut. 2 You can choose to restore the system from a factory default image or reinstall applications and drivers. 3 Follow the instructions on screen to complete the process. Note: External optical disc drive required. Please see your retailer for more details.
English 2 Launching Acer eRecovery Management 1 You may also launch Acer eRecovery Management by running the program from the Acer program group in the Start menu, or by double-clicking the icon if you have created a desktop shortcut. 2 You can choose to restore the system from a factory default image or reinstall applications and drivers. 3 Follow the instructions on screen to complete the process. Note: External optical disc drive required. Please see your retailer for more details.
User Guide
Page 37
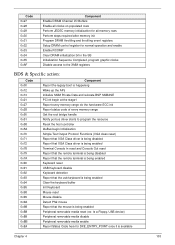
... or mouse. What to take with you Take the following items with you: • AC adapter • Spare, fully-charged battery pack(s) • Additional printer driver files if you are moving within a larger distance, for significant periods of the car to avoid exposing the computer to excessive heat. • Changes in...
... or mouse. What to take with you Take the following items with you: • AC adapter • Spare, fully-charged battery pack(s) • Additional printer driver files if you are moving within a larger distance, for significant periods of the car to avoid exposing the computer to excessive heat. • Changes in...
User Guide
Page 38
... not use another country, check that are appropriate for the country to which you are traveling • Spare, fully-charged battery packs • Additional printer driver files if you plan to use converter kits sold for appliances to hand-held metal detectors. Airport security X-ray machines are useful when traveling internationally...
... not use another country, check that are appropriate for the country to which you are traveling • Spare, fully-charged battery packs • Additional printer driver files if you plan to use converter kits sold for appliances to hand-held metal detectors. Airport security X-ray machines are useful when traveling internationally...

