Service Guide
Page 7
... Lock Keys and embedded numeric keypad 9 Hot Keys 10 Special Key 11 Hardware Specifications and Configurations 12 System Utilities 19 BIOS Setup Utility 19 Navigating the BIOS Utility 19 Information 20 Main 21 Security 22 Boot 25 Exit 26 BIOS Flash Utility 27 Remove HDD/BIOS Utility 29 Machine Disassembly and Replacement 33 Disassembly Requirements 33 Related Information 33 General Information 34 Pre-disassembly Instructions 34 Disassembly Process 34 External Module Disassembly Process 35 External Modules Disassembly Flowchart 35 Removing the Battery Pack 36 Removing...
... Lock Keys and embedded numeric keypad 9 Hot Keys 10 Special Key 11 Hardware Specifications and Configurations 12 System Utilities 19 BIOS Setup Utility 19 Navigating the BIOS Utility 19 Information 20 Main 21 Security 22 Boot 25 Exit 26 BIOS Flash Utility 27 Remove HDD/BIOS Utility 29 Machine Disassembly and Replacement 33 Disassembly Requirements 33 Related Information 33 General Information 34 Pre-disassembly Instructions 34 Disassembly Process 34 External Module Disassembly Process 35 External Modules Disassembly Flowchart 35 Removing the Battery Pack 36 Removing...
Service Guide
Page 12
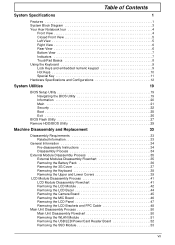
...; 30W 19V 3-pin AC adapter Special keys and controls • New Acer Aspire one keyboard support • Power button and Wireless LAN/3G switch I/O interface • 2 * Express card slot • 1 * VGA port, 15 pins • 1 * Microphone-in/Line-in • 1 * Line-out / Headphone out • 3 * External USB 2.0 • 1 * DC in jack • 1 * RJ-45 jack for LAN • 1 * Internal Digital MIC • 1 * 5-in-1 card reader • 1 * SD card reader Environment • Temperature: • Operating: 5 °C to 35...
...; 30W 19V 3-pin AC adapter Special keys and controls • New Acer Aspire one keyboard support • Power button and Wireless LAN/3G switch I/O interface • 2 * Express card slot • 1 * VGA port, 15 pins • 1 * Microphone-in/Line-in • 1 * Line-out / Headphone out • 3 * External USB 2.0 • 1 * DC in jack • 1 * RJ-45 jack for LAN • 1 * Internal Digital MIC • 1 * 5-in-1 card reader • 1 * SD card reader Environment • Temperature: • Operating: 5 °C to 35...
Service Guide
Page 15
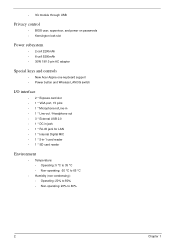
... files to stay cool, even after prolonged use the 5-in jack External display (VGA) port Ventilation slots and cooling fan Ethernet (RJ-45) port USB 2.0 port Storage expansion slot Description Connects to an AC adapter Connects to expand the capacity of My Files. No. 1 2 3 4 5 6 Icon Item DC-in -1 card reader. USB mouse). Note: Do not cover or obstruct the fan opening. Closed Front View No. 1 Left View Icon Item Wireless communication switch Description Enables/disables the wireless function...
... files to stay cool, even after prolonged use the 5-in jack External display (VGA) port Ventilation slots and cooling fan Ethernet (RJ-45) port USB 2.0 port Storage expansion slot Description Connects to an AC adapter Connects to expand the capacity of My Files. No. 1 2 3 4 5 6 Icon Item DC-in -1 card reader. USB mouse). Note: Do not cover or obstruct the fan opening. Closed Front View No. 1 Left View Icon Item Wireless communication switch Description Enables/disables the wireless function...
Service Guide
Page 29
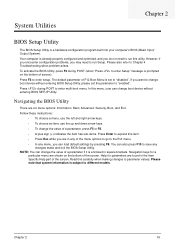
... Specific Help part of F12 Boot Menu is subject to run this carefully when making changes to "enabled". System Utilities Chapter 2 BIOS Setup Utility The BIOS Setup Utility is already properly configured and optimized, and you may need to run Setup. Your computer is a hardware configuration program built into your computer's BIOS (Basic Input/ Output System). However, if you encounter configuration problems, you do not need to different models. The default parameter of the screen. Navigation keys...
... Specific Help part of F12 Boot Menu is subject to run this carefully when making changes to "enabled". System Utilities Chapter 2 BIOS Setup Utility The BIOS Setup Utility is already properly configured and optimized, and you may need to run Setup. Your computer is a hardware configuration program built into your computer's BIOS (Basic Input/ Output System). However, if you encounter configuration problems, you do not need to different models. The default parameter of the screen. Navigation keys...
Service Guide
Page 32
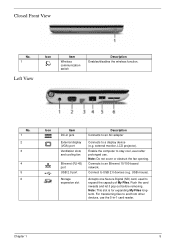
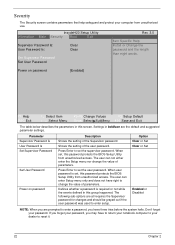
... system halts. InsydeH20 Setup Utility Information Main Security Boot Exit Supervisor Password Is: User Password Is: Clear Clear Set Supervisor Password Set User Password Rev. 3.5 Item Specific Help Install or Change the password and the length than eight words. Press Enter to your password, you have to return your notebook computer to set the user password. The following sub-options are the default and suggested parameter settings. Security The Security screen contains parameters that help safeguard and protect your password. If you...
... system halts. InsydeH20 Setup Utility Information Main Security Boot Exit Supervisor Password Is: User Password Is: Clear Clear Set Supervisor Password Set User Password Rev. 3.5 Item Specific Help Install or Change the password and the length than eight words. Press Enter to your password, you have to return your notebook computer to set the user password. The following sub-options are the default and suggested parameter settings. Security The Security screen contains parameters that help safeguard and protect your password. If you...
Service Guide
Page 33
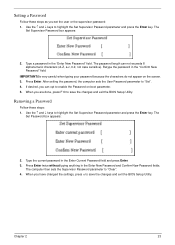
... The Set Supervisor Password box appears: 2. Press Enter. If desired, you set the user or the supervisor password: 1. Removing a Password Follow these steps as you can not exceeds 8 alphanumeric characters (A-Z, a-z, 0-9, not case sensitive). The password length can opt to enable the Password on the screen. 3. IMPORTANT:Be very careful when typing your password because the characters do not appear on boot parameter. 5. Press Enter twice without typing...
... The Set Supervisor Password box appears: 2. Press Enter. If desired, you set the user or the supervisor password: 1. Removing a Password Follow these steps as you can not exceeds 8 alphanumeric characters (A-Z, a-z, 0-9, not case sensitive). The password length can opt to enable the Password on the screen. 3. IMPORTANT:Be very careful when typing your password because the characters do not appear on boot parameter. 5. Press Enter twice without typing...
Service Guide
Page 37
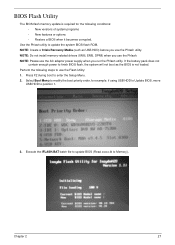
If the battery pack does not contain enough power to use the Phlash. Press F2 during boot to Memory). Execute the IFLASH.BAT batch file to update BIOS (Read xxxxx.fd to enter the Setup Menu. 2. Select Boot Menu to modify the boot priority order, for the following steps to finish BIOS flash, the system will not boot as USB HDD) before you use the Phlash utility. Chapter 2 27 NOTE: Please use the...
If the battery pack does not contain enough power to use the Phlash. Press F2 during boot to Memory). Execute the IFLASH.BAT batch file to update BIOS (Read xxxxx.fd to enter the Setup Menu. 2. Select Boot Menu to modify the boot priority order, for the following steps to finish BIOS flash, the system will not boot as USB HDD) before you use the Phlash utility. Chapter 2 27 NOTE: Please use the...
Service Guide
Page 89
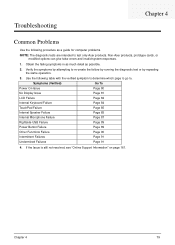
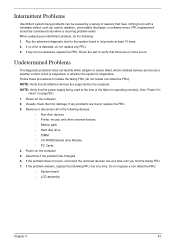
... 81 LCD Failure Page 84 Internal Keyboard Failure Page 84 TouchPad Failure Page 85 Internal Speaker Failure Page 85 Internal Microphone Failure Page 87 Rightside USB Failure Page 89 Power Button Failure Page 89 Other Functions Failure Page 90 Intermittent Failures Page 91 Undermined Failures Page 91 4. If the Issue is still not resolved, see "Online Support Information" on page 161. Chapter 4 79 Use...
... 81 LCD Failure Page 84 Internal Keyboard Failure Page 84 TouchPad Failure Page 85 Internal Speaker Failure Page 85 Internal Microphone Failure Page 87 Rightside USB Failure Page 89 Power Button Failure Page 89 Other Functions Failure Page 90 Intermittent Failures Page 91 Undermined Failures Page 91 4. If the Issue is still not resolved, see "Online Support Information" on page 161. Chapter 4 79 Use...
Service Guide
Page 93
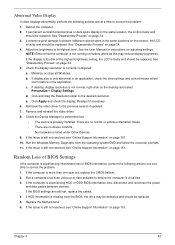
... version if updated. 7. Click Apply and check the display. Readjust if necessary. 6. Roll back the video driver to the desired resolution. Check the Device Manager to determine that the computer is not running on the screen), the LCD is faulty and should be replaced. Run the Windows Memory Diagnostic from the BIOS, the drive may reduce display brightness. If the Issue is still not resolved, see "Online Support...
... version if updated. 7. Click Apply and check the display. Readjust if necessary. 6. Roll back the video driver to the desired resolution. Check the Device Manager to determine that the computer is not running on the screen), the LCD is faulty and should be replaced. Run the Windows Memory Diagnostic from the BIOS, the drive may reduce display brightness. If the Issue is still not resolved, see "Online Support...
Service Guide
Page 96
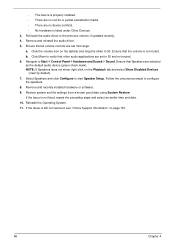
... the audio driver to start Speaker Setup. Ensure that all volume controls are selected as the default audio device (green check mark). Select Speakers and click Configure to the previous version, if updated recently. 4. b. Restore system and file settings from a known good date using System Restore. Remove and reinstall the audio driver. 5. Reinstall the Operating System. 11. Ensure that Speakers are set to 50. Click Mixer to verify that the volume is still...
... the audio driver to start Speaker Setup. Ensure that all volume controls are selected as the default audio device (green check mark). Select Speakers and click Configure to the previous version, if updated recently. 4. b. Restore system and file settings from a known good date using System Restore. Remove and reinstall the audio driver. 5. Reinstall the Operating System. 11. Ensure that Speakers are set to 50. Click Mixer to verify that the volume is still...
Service Guide
Page 98
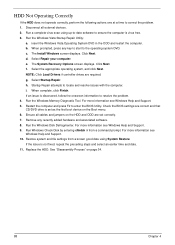
...: Click Load Drivers if controller drives are set as the first boot device on the Boot menu. 6. When complete, click Finish. For more information see Windows Help and Support. 9. d. h. Run a complete virus scan using System Restore. Run Windows Check Disk by entering chkdsk /r from a known good date using up-to-date software to the operating system DVD. Disconnect all cables and jumpers on page 34. 88 Chapter 4 c. Replace the HDD. HDD Not Operating Correctly If...
...: Click Load Drivers if controller drives are set as the first boot device on the Boot menu. 6. When complete, click Finish. For more information see Windows Help and Support. 9. d. h. Run a complete virus scan using System Restore. Run Windows Check Disk by entering chkdsk /r from a known good date using up-to-date software to the operating system DVD. Disconnect all cables and jumpers on page 34. 88 Chapter 4 c. Replace the HDD. HDD Not Operating Correctly If...
Service Guide
Page 100
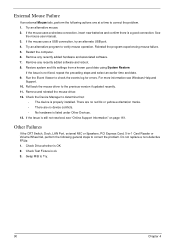
... alternate USB port. 4. Restore system and file settings from a known good date using System Restore. Other Failures If the CRT Switch, Dock, LAN Port, external MIC or Speakers, PCI Express Card, 5-in-1 Card Reader or Volume Wheel fail, perform the following actions one at a time to correct the problem. 1. Swap M/B to Try. 90 Chapter 4 External Mouse Failure If an external Mouse fails, perform the following general steps to correct the problem. See the mouse user manual...
... alternate USB port. 4. Restore system and file settings from a known good date using System Restore. Other Failures If the CRT Switch, Dock, LAN Port, external MIC or Speakers, PCI Express Card, 5-in-1 Card Reader or Volume Wheel fail, perform the following actions one at a time to correct the problem. 1. Swap M/B to Try. 90 Chapter 4 External Mouse Failure If an external Mouse fails, perform the following general steps to correct the problem. See the mouse user manual...
Service Guide
Page 101
... replace a non-defective FRU: • System board • LCD assembly Chapter 4 91 NOTE: Verify that have nothing to do not isolate non-defective FRU). If the problem remains, replace the following devices: • Non-Acer devices • Printer, mouse, and other external devices • Battery pack • Hard disk drive • DIMM • CD-ROM/Diskette drive Module • PC Cards 4. Visually check them for the system board in loop mode...
... replace a non-defective FRU: • System board • LCD assembly Chapter 4 91 NOTE: Verify that have nothing to do not isolate non-defective FRU). If the problem remains, replace the following devices: • Non-Acer devices • Printer, mouse, and other external devices • Battery pack • Hard disk drive • DIMM • CD-ROM/Diskette drive Module • PC Cards 4. Visually check them for the system board in loop mode...
Service Guide
Page 102
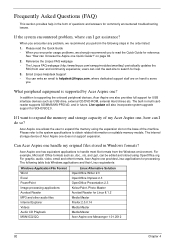
... Media Master Media Master Acer Aspire one does not support expansion. Acer Aspire one also provides full support for USB interface devices such as .doc, .xls, and .ppt, can visit the web site to handle most file formats from user and community experience; Please refer to the system specifications to read the Quick Guide for SDHC/SD2.0. For example, Microsoft Office formats such as USB drive, external CD/DVD-ROM, external Hard drives etc...
... Media Master Media Master Acer Aspire one does not support expansion. Acer Aspire one also provides full support for USB interface devices such as .doc, .xls, and .ppt, can visit the web site to handle most file formats from user and community experience; Please refer to the system specifications to read the Quick Guide for SDHC/SD2.0. For example, Microsoft Office formats such as USB drive, external CD/DVD-ROM, external Hard drives etc...
Service Guide
Page 123
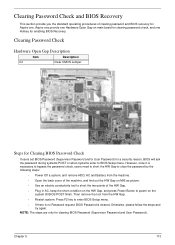
...; Use an electric conductivity tool to short the two points of clearing password and BIOS recovery for enabling BIOS Recovery. NOTE: The steps are only for a security reason, BIOS will ask the password during systems POST or when systems enter to BIOS Setup menu. However, once it is cleared. Clearing Password Check Hardware Open Gap Description Item G1 Description Clear CMOS Jumper Steps for Clearing BIOS Password Check If users set BIOS Password (Supervisor Password and/or User Password) for clearing BIOS Password (Supervisor Password and User Password). Press...
...; Use an electric conductivity tool to short the two points of clearing password and BIOS recovery for enabling BIOS Recovery. NOTE: The steps are only for a security reason, BIOS will ask the password during systems POST or when systems enter to BIOS Setup menu. However, once it is cleared. Clearing Password Check Hardware Open Gap Description Item G1 Description Clear CMOS Jumper Steps for Clearing BIOS Password Check If users set BIOS Password (Supervisor Password and/or User Password) for clearing BIOS Password (Supervisor Password and User Password). Press...
Quick Guide
Page 3
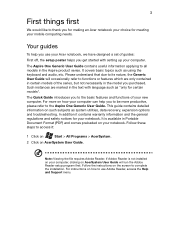
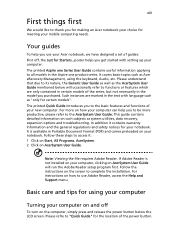
... series. For instructions on how to all models in the text with setting up your mobile computing needs. This guide contains detailed information on AcerSystem User Guide. For more productive, please refer to complete the installation. Follow these steps to the basic features and functions of guides: First off, the setup poster helps you use Adobe Reader, access the Help and Support menu. The Aspire One Generic User Guide contains useful information applying to use your Acer notebook...
... series. For instructions on how to all models in the text with setting up your mobile computing needs. This guide contains detailed information on AcerSystem User Guide. For more productive, please refer to complete the installation. Follow these steps to the basic features and functions of guides: First off, the setup poster helps you use Adobe Reader, access the Help and Support menu. The Aspire One Generic User Guide contains useful information applying to use your Acer notebook...

Quick Guide
Page 7
...by model. USB port Connects to a display device (e.g., external port monitor, LCD projector). Left view 1 234 # Icon 1 2 3 4 Item Description External display (VGA) Connects to USB devices. if a port is blue it is off. Press + to enable Wi-Fi/Bluetooth connection. HDMI port Supports high-definition digital video connections. Click On to bring up the Launch Manager window panel. English 7 Using the communication key* Here you can enable and disable the various wireless connectivity devices on your computer. A red toggle indicates the device is USB 2.0 compatible...
...by model. USB port Connects to a display device (e.g., external port monitor, LCD projector). Left view 1 234 # Icon 1 2 3 4 Item Description External display (VGA) Connects to USB devices. if a port is blue it is off. Press + to enable Wi-Fi/Bluetooth connection. HDMI port Supports high-definition digital video connections. Click On to bring up the Launch Manager window panel. English 7 Using the communication key* Here you can enable and disable the various wireless connectivity devices on your computer. A red toggle indicates the device is USB 2.0 compatible...
User Guide
Page 13
... turn on such subjects as "only for using the keyboard, Audio, etc. xiii First things first We would like to all models in the Aspire one Series User Guide contains useful information applying to thank you use Adobe Reader, access the Help and Support menu. Your guides To help you get started with language such as system utilities, data recovery, expansion options and troubleshooting. The printed Aspire one product series. If Adobe Reader is available in Portable Document Format (PDF...
... turn on such subjects as "only for using the keyboard, Audio, etc. xiii First things first We would like to all models in the Aspire one Series User Guide contains useful information applying to thank you use Adobe Reader, access the Help and Support menu. Your guides To help you get started with language such as system utilities, data recovery, expansion options and troubleshooting. The printed Aspire one product series. If Adobe Reader is available in Portable Document Format (PDF...
User Guide
Page 17
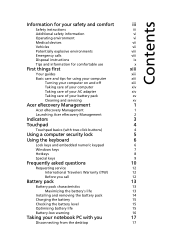
...Cleaning and servicing xv Acer eRecovery Management 1 Acer eRecovery Management 1 Launching Acer eRecovery Management 2 Indicators 3 Touchpad 4 Touchpad basics (with two-click buttons) 4 Using a computer security lock 5 Using the keyboard 6 Lock keys and embedded numeric keypad 6 Windows keys 7 Hotkeys 8 Special keys 9 Frequently asked questions 10 Requesting service 12 International Travelers Warranty (ITW) 12 Before you call 12 Battery pack 13 Battery pack characteristics 13 Maximizing the battery's life 13 Installing and removing the battery pack 14...
...Cleaning and servicing xv Acer eRecovery Management 1 Acer eRecovery Management 1 Launching Acer eRecovery Management 2 Indicators 3 Touchpad 4 Touchpad basics (with two-click buttons) 4 Using a computer security lock 5 Using the keyboard 6 Lock keys and embedded numeric keypad 6 Windows keys 7 Hotkeys 8 Special keys 9 Frequently asked questions 10 Requesting service 12 International Travelers Warranty (ITW) 12 Before you call 12 Battery pack 13 Battery pack characteristics 13 Maximizing the battery's life 13 Installing and removing the battery pack 14...
User Guide
Page 42
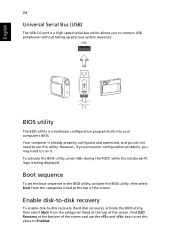
... encounter configuration problems, you may need to run it. To activate the BIOS utility, press during the POST; Boot sequence To set this utility. while the notebook PC logo is a hardware configuration program built into your computer's BIOS. Enable disk-to-disk recovery To enable disk-to-disk recovery (hard disk recovery), activate the BIOS utility, then select Main from the categories listed at the top of the screen and use the and keys to set the boot sequence in the BIOS utility, activate the BIOS utility...
... encounter configuration problems, you may need to run it. To activate the BIOS utility, press during the POST; Boot sequence To set this utility. while the notebook PC logo is a hardware configuration program built into your computer's BIOS. Enable disk-to-disk recovery To enable disk-to-disk recovery (hard disk recovery), activate the BIOS utility, then select Main from the categories listed at the top of the screen and use the and keys to set the boot sequence in the BIOS utility, activate the BIOS utility...


