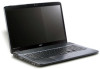
Acer Aspire 7740, Aspire 7740G Notebook Series Service Guide
Page 8
...the Web Camera 86 Removing the Antennas 88 Troubleshooting 89 System Check Procedures 90 External Diskette Drive Check 90 External Optical Disk Drive Check 90 Keyboard or Auxiliary Input Device Check 90 Memory Check 91 Power System Check 91 Touchpad Check 92 Power-... 105 Main Board 105 Clearing Password Check and BIOS Recovery 107 Clearing Password Check 107 BIOS Recovery by Crisis Disk 108 FRU (Field Replaceable Unit) List 113 Exploded Diagram 114 Model Definition and Configuration 125 Aspire 7740/7740G Series 126 Test Compatible Components 147 Hardware Device ...
...the Web Camera 86 Removing the Antennas 88 Troubleshooting 89 System Check Procedures 90 External Diskette Drive Check 90 External Optical Disk Drive Check 90 Keyboard or Auxiliary Input Device Check 90 Memory Check 91 Power System Check 91 Touchpad Check 92 Power-... 105 Main Board 105 Clearing Password Check and BIOS Recovery 107 Clearing Password Check 107 BIOS Recovery by Crisis Disk 108 FRU (Field Replaceable Unit) List 113 Exploded Diagram 114 Model Definition and Configuration 125 Aspire 7740/7740G Series 126 Test Compatible Components 147 Hardware Device ...
Acer Aspire 7740, Aspire 7740G Notebook Series Service Guide
Page 40
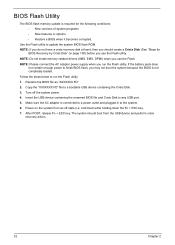
... (XMS, EMS, DPMI) when you run the Flash utility: 1. Rename the BIOS file as "XXXXXXX.FD" 2. NOTE: If you do not have a crisis recovery disk at hand, then you should boot from an off the system power. 4. Turn off state (i.e. Insert the USB device containing the renamed BIOS file and... enough power to finish BIOS flash, you use the Flash. Make sure the AC adapter is required for BIOS Recovery by Crisis Disk" on the system from the USB device and perform crisis recovery action. 32 Chapter 2 After POST, release Fn + ESC key. BIOS Flash Utility The BIOS flash memory update...
... (XMS, EMS, DPMI) when you run the Flash utility: 1. Rename the BIOS file as "XXXXXXX.FD" 2. NOTE: If you do not have a crisis recovery disk at hand, then you should boot from an off the system power. 4. Turn off state (i.e. Insert the USB device containing the renamed BIOS file and... enough power to finish BIOS flash, you use the Flash. Make sure the AC adapter is required for BIOS Recovery by Crisis Disk" on the system from the USB device and perform crisis recovery action. 32 Chapter 2 After POST, release Fn + ESC key. BIOS Flash Utility The BIOS flash memory update...
Acer Aspire 7740, Aspire 7740G Notebook Series Service Guide
Page 114
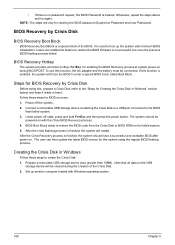
...workable BIOS after power on with minimum BIOS initialization. After the Crisis Recovery process is a special block of the Crisis Disk. 2. Note that all data on the USB storage device will be connected. BIOS Recovery by Crisis Disk Before doing this system using the regular BIOS flashing process. Prepare ... and hold Fn+Esc and then press the power button. Creating the Crisis Disk in hand. If this function is used to the "Steps for BIOS Recovery by Crisis Disk BIOS Recovery Boot Block: BIOS Recovery Boot Block is finished, the system should be powered on . BIOS Boot ...
...workable BIOS after power on with minimum BIOS initialization. After the Crisis Recovery process is a special block of the Crisis Disk. 2. Note that all data on the USB storage device will be connected. BIOS Recovery by Crisis Disk Before doing this system using the regular BIOS flashing process. Prepare ... and hold Fn+Esc and then press the power button. Creating the Crisis Disk in hand. If this function is used to the "Steps for BIOS Recovery by Crisis Disk BIOS Recovery Boot Block: BIOS Recovery Boot Block is finished, the system should be powered on . BIOS Boot ...
Acer Aspire 7740, Aspire 7740G Notebook Series Service Guide
Page 159
...19 B back cover removing 42 battery pack removing 40 BIOS 15 vendor 15 Version 15 BIOS Recovery 107 BIOS Recovery Boot Block 108 BIOS Recovery by Crisis Disk 108 steps 108 BIOS Recovery Hotkey 108 BIOS Utility 23-34 Navigating 24 System Security 33 brightness hotkeys 6 button/indicator Bluetooth...Clearing BIOS Password steps 107 Clearing Password 107 computer on indicator 5, 6 CPU removing 51 CPU Fan True Value Table 15 Crisis Disk creating 108 Crisis Recovery Disk 34 D DIMM module removing 46 Index display hotkeys 6 E Euro 11 External CD-ROM Drive Check 90 External Module Disassembly Flowchart...
...19 B back cover removing 42 battery pack removing 40 BIOS 15 vendor 15 Version 15 BIOS Recovery 107 BIOS Recovery Boot Block 108 BIOS Recovery by Crisis Disk 108 steps 108 BIOS Recovery Hotkey 108 BIOS Utility 23-34 Navigating 24 System Security 33 brightness hotkeys 6 button/indicator Bluetooth...Clearing BIOS Password steps 107 Clearing Password 107 computer on indicator 5, 6 CPU removing 51 CPU Fan True Value Table 15 Crisis Disk creating 108 Crisis Recovery Disk 34 D DIMM module removing 46 Index display hotkeys 6 E Euro 11 External CD-ROM Drive Check 90 External Module Disassembly Flowchart...


