
Quick Start Guide
Page 3
..., data recovery, expansion options and troubleshooting. Follow the instructions on how to complete the installation. For instructions on the screen to use your computer. poster helps you...help you to be more productive, please refer to the AcerSystem User Guide. The Aspire Generic User Guide contains useful information applying to all models in certain models of guides.... It is not installed on AcerSystem User Guide. Such instances are only contained in the Acer product series. Follow these steps to access it contains warranty information and the general regulations and...
..., data recovery, expansion options and troubleshooting. Follow the instructions on how to complete the installation. For instructions on the screen to use your computer. poster helps you...help you to be more productive, please refer to the AcerSystem User Guide. The Aspire Generic User Guide contains useful information applying to all models in certain models of guides.... It is not installed on AcerSystem User Guide. Such instances are only contained in the Acer product series. Follow these steps to access it contains warranty information and the general regulations and...

Service Guide
Page 7
Table of Contents System Specifications 1 Features 1 System Block Diagram 3 Your Acer Notebook tour 4 Front View 4 Closed Front View 5 Rear View 6 Left View 6 Right View 7 Bottom View 7 Indicators 8 TouchPad Basics 9 Using the Keyboard 10... DOS Flash Utility 34 WinFlash Utility 36 Remove HDD/BIOS Password Utilities 37 Machine Disassembly and Replacement 43 Disassembly Requirements 43 Pre-disassembly Instructions 44 Disassembly Process 44 External Module Disassembly Process 45 External Modules Disassembly Flowchart 45 Removing the Battery Pack 46 Removing the SD Dummy ...
Table of Contents System Specifications 1 Features 1 System Block Diagram 3 Your Acer Notebook tour 4 Front View 4 Closed Front View 5 Rear View 6 Left View 6 Right View 7 Bottom View 7 Indicators 8 TouchPad Basics 9 Using the Keyboard 10... DOS Flash Utility 34 WinFlash Utility 36 Remove HDD/BIOS Password Utilities 37 Machine Disassembly and Replacement 43 Disassembly Requirements 43 Pre-disassembly Instructions 44 Disassembly Process 44 External Module Disassembly Process 45 External Modules Disassembly Flowchart 45 Removing the Battery Pack 46 Removing the SD Dummy ...

Service Guide
Page 31
... the value of the menu options to go to the Exit menu. • In any changes made and exit the BIOS Setup Utility. Follow these instructions: • To choose a menu, use the left and right arrow keys. • To choose an item, use the up and down arrow keys. • To...
... the value of the menu options to go to the Exit menu. • In any changes made and exit the BIOS Setup Utility. Follow these instructions: • To choose a menu, use the left and right arrow keys. • To choose an item, use the up and down arrow keys. • To...

Service Guide
Page 54
... battery pack. If any of factory conditions. Place the system on a flat, stable surface. 4. Disassembly Process IMPORTANT: The LCD Module cannot be replaced. Pre-disassembly Instructions Before proceeding with the disassembly procedure, make sure that order. Unplug the AC adapter and all peripherals. 2. The disassembly process is faulty, such as the...
... battery pack. If any of factory conditions. Place the system on a flat, stable surface. 4. Disassembly Process IMPORTANT: The LCD Module cannot be replaced. Pre-disassembly Instructions Before proceeding with the disassembly procedure, make sure that order. Unplug the AC adapter and all peripherals. 2. The disassembly process is faulty, such as the...
Service Guide
Page 55
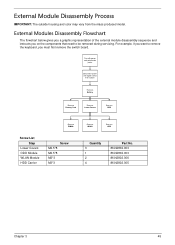
... that need to be removed during servicing. External Modules Disassembly Flowchart The flowchart below gives you a graphic representation of the external module disassembly sequence and instructs you must first remove the switch board.
... that need to be removed during servicing. External Modules Disassembly Flowchart The flowchart below gives you a graphic representation of the external module disassembly sequence and instructs you must first remove the switch board.
Service Guide
Page 136
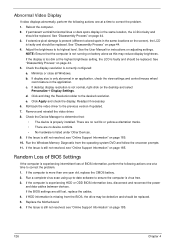
... the same location, the LCD is not running on battery alone as this may be defective and should be replaced. 5. See the User Manual for instructions on page 44. 4. If display size is faulty and should be replaced. Click and drag the Resolution slider to ensure the computer is virus free...
... the same location, the LCD is not running on battery alone as this may be defective and should be replaced. 5. See the User Manual for instructions on page 44. 4. If display size is faulty and should be replaced. Click and drag the Resolution slider to ensure the computer is virus free...


