
Acer Aspire 7535 Notebook Series Quick Guide
Page 5
... on and off . 5 HDD Indicates when the hard disk drive is activated. 6 Wireless LAN Enables/disables the wireless LAN communication function. Charging: The light shows amber when the battery is activated. Indicates the status of Bluetooth communication. (only for certain models) Backup key Launches Acer Backup Management for certain models). Bluetooth communication button...
... on and off . 5 HDD Indicates when the hard disk drive is activated. 6 Wireless LAN Enables/disables the wireless LAN communication function. Charging: The light shows amber when the battery is activated. Indicates the status of Bluetooth communication. (only for certain models) Backup key Launches Acer Backup Management for certain models). Bluetooth communication button...

Acer Aspire 7535 Notebook Series Quick Guide
Page 11
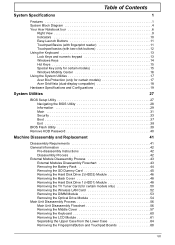
...) support for digital speakers MS-Sound compatible Acer PureZone technology with two built-in stereo microphones 2.5" hard disk drive Optical drive options: • Blu-ray Disc™/DVD-Super Multi double-layer drive* • DVD-Super Multi double-layer drive* 5-in-1 card reader Integrated Acer Crystal Eye webcam* WLAN: • Acer InviLink™ Nplify™ 802.11b/g/Draft...
...) support for digital speakers MS-Sound compatible Acer PureZone technology with two built-in stereo microphones 2.5" hard disk drive Optical drive options: • Blu-ray Disc™/DVD-Super Multi double-layer drive* • DVD-Super Multi double-layer drive* 5-in-1 card reader Integrated Acer Crystal Eye webcam* WLAN: • Acer InviLink™ Nplify™ 802.11b/g/Draft...
Acer Aspire 7535 Notebook Service Guide
Page 7
...Hot Keys 15 Special Key (only for certain models 15 Windows Mobility Center 16 Using the System Utilities 17 Acer Bio-Protection (only for certain models 17 Acer GridVista (dual-display compatible 18 Hardware Specifications and Configurations 19 System Utilities 27 BIOS Setup Utility 27 Navigating ... Modules Disassembly Flowchart 43 Removing the Battery Pack 44 Removing the SD Dummy Card 45 Removing the Hard Disk Drive 2 (HDD2) Module 46 Removing the Back Cover 48 Removing the Hard Disk Drive 1 (HDD1) Module 48 Removing the TV Tuner Card (for certain models only 50 Removing the...
...Hot Keys 15 Special Key (only for certain models 15 Windows Mobility Center 16 Using the System Utilities 17 Acer Bio-Protection (only for certain models 17 Acer GridVista (dual-display compatible 18 Hardware Specifications and Configurations 19 System Utilities 27 BIOS Setup Utility 27 Navigating ... Modules Disassembly Flowchart 43 Removing the Battery Pack 44 Removing the SD Dummy Card 45 Removing the Hard Disk Drive 2 (HDD2) Module 46 Removing the Back Cover 48 Removing the Hard Disk Drive 1 (HDD1) Module 48 Removing the TV Tuner Card (for certain models only 50 Removing the...
Acer Aspire 7535 Notebook Service Guide
Page 10
...; NVIDIA® GeForce® GT 130M (for 7738/7738G only) For Aspire 7535/7535G/7235 Series • ATI Radeon™ HD 3200 Graphics* •...; 2.5" hard disk drive • Optical drive options: • Blu-ray Disc™/DVD-Super Multi double-layer drive* • DVD-Super Multi double-layer drive* •...Acer Purezone technology with two built-in microphones Communication • Acer Video Conference, featuring: • Integrated Acer Crystal Eye webcam* • Acer PureZone technology* • WLAN: Intel® Wireless WiFi Link 5100/5300 (for Aspire 7738/7738G Series and Aspire...
...; NVIDIA® GeForce® GT 130M (for 7738/7738G only) For Aspire 7535/7535G/7235 Series • ATI Radeon™ HD 3200 Graphics* •...; 2.5" hard disk drive • Optical drive options: • Blu-ray Disc™/DVD-Super Multi double-layer drive* • DVD-Super Multi double-layer drive* •...Acer Purezone technology with two built-in microphones Communication • Acer Video Conference, featuring: • Integrated Acer Crystal Eye webcam* • Acer PureZone technology* • WLAN: Intel® Wireless WiFi Link 5100/5300 (for Aspire 7738/7738G Series and Aspire...
Acer Aspire 7535 Notebook Service Guide
Page 14
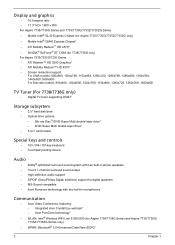
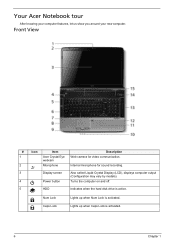
... features, let us show you around your new computer. Num Lock Caps Lock Lights up when Caps Lock is active. Front View # Icon Item Description 1 Acer Crystal Eye Web camera for sound recording. 3 Display screen Also called Liquid-Crystal Display (LCD), displays computer output (Configuration may vary by models). 4 Power button...
... features, let us show you around your new computer. Num Lock Caps Lock Lights up when Caps Lock is active. Front View # Icon Item Description 1 Acer Crystal Eye Web camera for sound recording. 3 Display screen Also called Liquid-Crystal Display (LCD), displays computer output (Configuration may vary by models). 4 Power button...

Acer Aspire 7535 Notebook Service Guide
Page 29
...Wireless XB63 Aspire 7535/7535G/7235 Series: Foxconn Wireless LAN Atheros AR5B91 1x2 BGN/QMI Wireless LAN Atheros AR5B91 1x2 BGN 11~54 Mbps, up to 270 Mbps for Draft-N 802.11b+g, Draft-N PCI bus (mini PCI socket for wireless module) Hard Disk Drive Item Vendor... & Model Name Seagate 2.5" ST9160310AS Toshiba 2.5" Mk1655GSX HGST 2.5" HTS543216L9A300 WD 2.5" WD1600BEVT22ZCTO Capacity (MB) 160000 Bytes per 512 sector Data heads 3/4 Drive Format Disks 2 Spindle speed (RPM) 5400 RPM Performance ...
...Wireless XB63 Aspire 7535/7535G/7235 Series: Foxconn Wireless LAN Atheros AR5B91 1x2 BGN/QMI Wireless LAN Atheros AR5B91 1x2 BGN 11~54 Mbps, up to 270 Mbps for Draft-N 802.11b+g, Draft-N PCI bus (mini PCI socket for wireless module) Hard Disk Drive Item Vendor... & Model Name Seagate 2.5" ST9160310AS Toshiba 2.5" Mk1655GSX HGST 2.5" HTS543216L9A300 WD 2.5" WD1600BEVT22ZCTO Capacity (MB) 160000 Bytes per 512 sector Data heads 3/4 Drive Format Disks 2 Spindle speed (RPM) 5400 RPM Performance ...

Acer Aspire 7535 Notebook Service Guide
Page 40
...Memory Quiet Boot Network Boot F12 Boot Menu D2D Recovery SATA Mode Description Sets the system time. Memory size is disabled or enabled. For Aspire 8530 Series only. shows Summary Screen is fixed to control the settings in these cases. 32 Chapter 2 This field reports the memory size... allowed to 640MB This field reports the total memory size of the system. The function allows the user to create a hidden partition on hard disc drive to store operation system and restore the system to disable or auto. Disabled: Customer Logo is not displayed, and Summary Screen is disabled....
...Memory Quiet Boot Network Boot F12 Boot Menu D2D Recovery SATA Mode Description Sets the system time. Memory size is disabled or enabled. For Aspire 8530 Series only. shows Summary Screen is fixed to control the settings in these cases. 32 Chapter 2 This field reports the memory size... allowed to 640MB This field reports the total memory size of the system. The function allows the user to create a hidden partition on hard disc drive to store operation system and restore the system to disable or auto. Disabled: Customer Logo is not displayed, and Summary Screen is disabled....

Acer Aspire 7535 Notebook Service Guide
Page 45
Bootable devices includes the diskette drive in module bay, the onboard hard disk drive and the CD-ROM in module bay. Boot This menu allows the user to decide the order of boot devices to move it down the ...
Bootable devices includes the diskette drive in module bay, the onboard hard disk drive and the CD-ROM in module bay. Boot This menu allows the user to decide the order of boot devices to move it down the ...
Acer Aspire 7535 Notebook Service Guide
Page 51
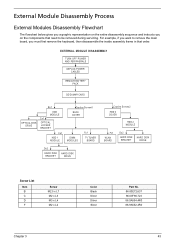
... OPTICAL LOCKER BRACKET Cx1 HDD 1 MODULE Captive Screwx6 BACK COVER DIMM MODULES Fx1 TV TUNER BOARD Dx2 HARD DISK BRACKET HARD DISK DRIVE Captive Screwx2 HDD 2 COVER HDD 2 MODULE Fx1 WLAN BOARD Dx2 HARD DISK BRACKET HARD DISK DRIVE Screw List Item B C D F Screw M2.5 x L7 M2 x L3 M3 x L4 M2 x L4 Color Black Silver Silver Silver...
... OPTICAL LOCKER BRACKET Cx1 HDD 1 MODULE Captive Screwx6 BACK COVER DIMM MODULES Fx1 TV TUNER BOARD Dx2 HARD DISK BRACKET HARD DISK DRIVE Captive Screwx2 HDD 2 COVER HDD 2 MODULE Fx1 WLAN BOARD Dx2 HARD DISK BRACKET HARD DISK DRIVE Screw List Item B C D F Screw M2.5 x L7 M2 x L3 M3 x L4 M2 x L4 Color Black Silver Silver Silver...
Acer Aspire 7535 Notebook Service Guide
Page 54
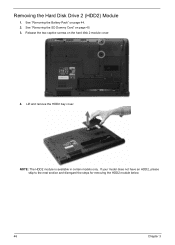
See "Removing the Battery Pack" on page 45. 3. See "Removing the SD Dummy Card" on page 44. 2. Lift and remove the HDD2 bay cover. If your model does not have an HDD2, please skip to the next section and disregard the steps for removing the HDD2 module below. 46 Chapter 3 Release the two captive screws on the hard disk 2 module cover. 4. NOTE: The HDD2 module is available in certain models only. Removing the Hard Disk Drive 2 (HDD2) Module 1.
See "Removing the Battery Pack" on page 45. 3. See "Removing the SD Dummy Card" on page 44. 2. Lift and remove the HDD2 bay cover. If your model does not have an HDD2, please skip to the next section and disregard the steps for removing the HDD2 module below. 46 Chapter 3 Release the two captive screws on the hard disk 2 module cover. 4. NOTE: The HDD2 module is available in certain models only. Removing the Hard Disk Drive 2 (HDD2) Module 1.

Acer Aspire 7535 Notebook Service Guide
Page 56
See "Removing the SD Dummy Card" on page 46. 4. See "Removing the Hard Disk Drive 2 (HDD2) Module" on page 45. 3. Release the six captive screws securing the back cover. 5. Carefully lift and remove the back cover. Removing the Hard Disk Drive 1 (HDD1) Module 1. See "Removing the Hard Disk Drive 2 (HDD2) Module" on page 48. 48 Chapter 3 See "Removing the Back Cover" on page 46. 4. See "Removing the Battery Pack" on page 45. 3. See "Removing the SD Dummy Card" on page 44. 2. Removing the Back Cover 1. See "Removing the Battery Pack" on page 44. 2.
See "Removing the SD Dummy Card" on page 46. 4. See "Removing the Hard Disk Drive 2 (HDD2) Module" on page 45. 3. Release the six captive screws securing the back cover. 5. Carefully lift and remove the back cover. Removing the Hard Disk Drive 1 (HDD1) Module 1. See "Removing the Hard Disk Drive 2 (HDD2) Module" on page 48. 48 Chapter 3 See "Removing the Back Cover" on page 46. 4. See "Removing the Battery Pack" on page 45. 3. See "Removing the SD Dummy Card" on page 44. 2. Removing the Back Cover 1. See "Removing the Battery Pack" on page 44. 2.

Acer Aspire 7535 Notebook Service Guide
Page 57
Size (Quantity) M2 x L3 (1) Silver Color Torque 1.6 kgf-cm 6. Chapter 3 49 5. Part No. 86.00F80.723 NOTE: To prevent damage to the system. Lift the HDD1 module and remove it . Remove the one screw (C) securing the hard disk drive 1 (HDD1) module to device, avoid pressing down on it or placing heavy objects on top of it from the hard disk drive bay.
Size (Quantity) M2 x L3 (1) Silver Color Torque 1.6 kgf-cm 6. Chapter 3 49 5. Part No. 86.00F80.723 NOTE: To prevent damage to the system. Lift the HDD1 module and remove it . Remove the one screw (C) securing the hard disk drive 1 (HDD1) module to device, avoid pressing down on it or placing heavy objects on top of it from the hard disk drive bay.
Acer Aspire 7535 Notebook Service Guide
Page 58
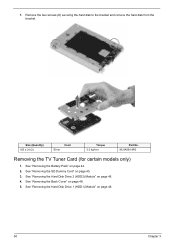
Remove the two screws (D) securing the hard disk to the bracket and remove the hard disk from the bracket. See "Removing the Hard Disk Drive 2 (HDD2) Module" on page 48. 5. See "Removing the Back Cover" on page 46. 4. 7. Size (Quantity) M3 x L4 (2) Color Silver Torque 3.0 kgf-cm Part No. 86.9A554.4R0 Removing the TV Tuner Card (for certain models only) 1. See "Removing the Battery Pack" on page 45. 3. See "Removing the SD Dummy Card" on page 44. 2. See "Removing the Hard Disk Drive 1 (HDD1) Module" on page 48. 50 Chapter 3
Remove the two screws (D) securing the hard disk to the bracket and remove the hard disk from the bracket. See "Removing the Hard Disk Drive 2 (HDD2) Module" on page 48. 5. See "Removing the Back Cover" on page 46. 4. 7. Size (Quantity) M3 x L4 (2) Color Silver Torque 3.0 kgf-cm Part No. 86.9A554.4R0 Removing the TV Tuner Card (for certain models only) 1. See "Removing the Battery Pack" on page 45. 3. See "Removing the SD Dummy Card" on page 44. 2. See "Removing the Hard Disk Drive 1 (HDD1) Module" on page 48. 50 Chapter 3
Acer Aspire 7535 Notebook Service Guide
Page 60
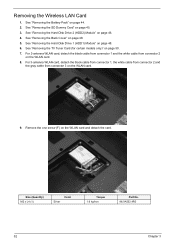
... from connector 1, the white cable from connector 2 and the gray cable from connector 2 on the WLAN card. 8. See "Removing the Hard Disk Drive 2 (HDD2) Module" on page 50. 7. See "Removing the Hard Disk Drive 1 (HDD1) Module" on page 45. 3. Removing the Wireless LAN Card 1. For 2-antenna WLAN card, detach the black cable from connector...
... from connector 1, the white cable from connector 2 and the gray cable from connector 2 on the WLAN card. 8. See "Removing the Hard Disk Drive 2 (HDD2) Module" on page 50. 7. See "Removing the Hard Disk Drive 1 (HDD1) Module" on page 45. 3. Removing the Wireless LAN Card 1. For 2-antenna WLAN card, detach the black cable from connector...
Acer Aspire 7535 Notebook Service Guide
Page 61
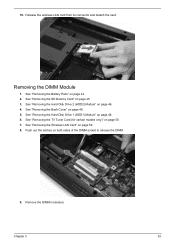
..." on page 44. 2. Remove the DIMM module(s). Chapter 3 53 Removing the DIMM Module 1. See "Removing the Battery Pack" on page 48. 6. See "Removing the Hard Disk Drive 2 (HDD2) Module" on page 52. 8. See "Removing the Wireless LAN Card" on page 46. 4. Release the wireless LAN card from its connector and detach the...
..." on page 44. 2. Remove the DIMM module(s). Chapter 3 53 Removing the DIMM Module 1. See "Removing the Battery Pack" on page 48. 6. See "Removing the Hard Disk Drive 2 (HDD2) Module" on page 52. 8. See "Removing the Wireless LAN Card" on page 46. 4. Release the wireless LAN card from its connector and detach the...
Acer Aspire 7535 Notebook Service Guide
Page 62
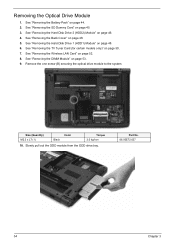
Slowly pull out the ODD module from the ODD drive bay. See "Removing the Hard Disk Drive 2 (HDD2) Module" on page 52. 8. See "Removing the Wireless LAN Card" on page 46. 4. See "Removing the Back Cover" on page 45. 3. Removing the Optical Drive Module 1. See "Removing the SD Dummy Card" ... 48. 6. Size (Quantity) M2.5 x L7 (1) Black Color Torque 3.0 kgf-cm 10. Remove the one screw (B) securing the optical drive module to the system. See "Removing the Hard Disk Drive 1 (HDD1) Module" on page 50. 7. See "Removing the DIMM Module" on page 44. 2. Part No. 86.00E72.637 54...
Slowly pull out the ODD module from the ODD drive bay. See "Removing the Hard Disk Drive 2 (HDD2) Module" on page 52. 8. See "Removing the Wireless LAN Card" on page 46. 4. See "Removing the Back Cover" on page 45. 3. Removing the Optical Drive Module 1. See "Removing the SD Dummy Card" ... 48. 6. Size (Quantity) M2.5 x L7 (1) Black Color Torque 3.0 kgf-cm 10. Remove the one screw (B) securing the optical drive module to the system. See "Removing the Hard Disk Drive 1 (HDD1) Module" on page 50. 7. See "Removing the DIMM Module" on page 44. 2. Part No. 86.00E72.637 54...
Acer Aspire 7535 Notebook Service Guide
Page 65
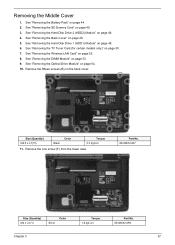
... Part No. 86.00E72.637 Size (Quantity) M2 x L4 (1) Silver Color Torque 1.6 kgf-cm Part No. 86.9A552.4R0 Chapter 3 57 See "Removing the Hard Disk Drive 2 (HDD2) Module" on page 44. 2. Remove the fifteen screws (B) on page 48. 6. Remove the one screw (F) from the lower case. See "Removing the... Hard Disk Drive 1 (HDD1) Module" on the back cover. See "Removing the Wireless LAN Card" on page 50. 7. See "Removing the TV Tuner Card (for certain...
... Part No. 86.00E72.637 Size (Quantity) M2 x L4 (1) Silver Color Torque 1.6 kgf-cm Part No. 86.9A552.4R0 Chapter 3 57 See "Removing the Hard Disk Drive 2 (HDD2) Module" on page 44. 2. Remove the fifteen screws (B) on page 48. 6. Remove the one screw (F) from the lower case. See "Removing the... Hard Disk Drive 1 (HDD1) Module" on the back cover. See "Removing the Wireless LAN Card" on page 50. 7. See "Removing the TV Tuner Card (for certain...
Acer Aspire 7535 Notebook Service Guide
Page 68
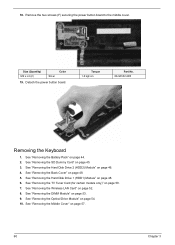
... kgf-cm Part No. 86.9A552.4R0 Removing the Keyboard 1. See "Removing the Back Cover" on page 57. 60 Chapter 3 See "Removing the Optical Drive Module" on page 44. 2. 18. Size (Quantity) M2 x L4 (2) Silver Color 19. See "Removing the Battery Pack" on page 54. 10. See ..."Removing the Hard Disk Drive 1 (HDD1) Module" on page 46. 4. See "Removing the Hard Disk Drive 2 (HDD2) Module" on page 48. 6. See "Removing the SD Dummy Card" on page 53. 9. See "Removing the DIMM ...
... kgf-cm Part No. 86.9A552.4R0 Removing the Keyboard 1. See "Removing the Back Cover" on page 57. 60 Chapter 3 See "Removing the Optical Drive Module" on page 44. 2. 18. Size (Quantity) M2 x L4 (2) Silver Color 19. See "Removing the Battery Pack" on page 54. 10. See ..."Removing the Hard Disk Drive 1 (HDD1) Module" on page 46. 4. See "Removing the Hard Disk Drive 2 (HDD2) Module" on page 48. 6. See "Removing the SD Dummy Card" on page 53. 9. See "Removing the DIMM ...
Acer Aspire 7535 Notebook Service Guide
Page 69
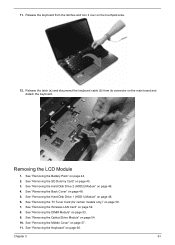
See "Removing the SD Dummy Card" on page 46. 4. Removing the LCD Module 1. See "Removing the Hard Disk Drive 2 (HDD2) Module" on page 45. 3. Chapter 3 61 Release the latch (a) and disconnect the keyboard cable (b) from the latches and turn it over on the touchpad ... Cover" on page 53. 9. See "Removing the Middle Cover" on page 52. 8. See "Removing the Wireless LAN Card" on page 57. 11. See "Removing the Hard Disk Drive 1 (HDD1) Module" on page 60. 11. See "Removing the Keyboard" on page 48. 6. See "Removing the TV Tuner Card (for certain models only)" on...
See "Removing the SD Dummy Card" on page 46. 4. Removing the LCD Module 1. See "Removing the Hard Disk Drive 2 (HDD2) Module" on page 45. 3. Chapter 3 61 Release the latch (a) and disconnect the keyboard cable (b) from the latches and turn it over on the touchpad ... Cover" on page 53. 9. See "Removing the Middle Cover" on page 52. 8. See "Removing the Wireless LAN Card" on page 57. 11. See "Removing the Hard Disk Drive 1 (HDD1) Module" on page 60. 11. See "Removing the Keyboard" on page 48. 6. See "Removing the TV Tuner Card (for certain models only)" on...
Acer Aspire 7535 Notebook Service Guide
Page 115
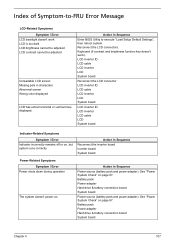
... Abnormal screen Wrong color displayed LCD has extra horizontal or vertical lines displayed. Battery pack Power adapter Hard drive & battery connection board System board Power source (battery pack and power adapter). Battery pack Power adapter Hard drive & battery connection board System board Chapter 4 107 Reconnect the LCD connectors. Action in Sequence Enter BIOS Utility...
... Abnormal screen Wrong color displayed LCD has extra horizontal or vertical lines displayed. Battery pack Power adapter Hard drive & battery connection board System board Power source (battery pack and power adapter). Battery pack Power adapter Hard drive & battery connection board System board Chapter 4 107 Reconnect the LCD connectors. Action in Sequence Enter BIOS Utility...


