
Acer Aspire 6920 / 6920G Notebook Service Guide
Page 26
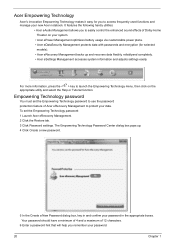
... to protect your data. Empowering Technology password You must set the Empowering Technology password: 1 Launch Acer eRecovery Management. 2 Click the Restore tab. 3 Click Password settings. Acer Empowering Technology Acer's innovative Empowering Technology makes it easy for selected models). • Acer eRecovery Management backs up . 4 Click Create a new password. 5 In the Create a New Password dialog box...
... to protect your data. Empowering Technology password You must set the Empowering Technology password: 1 Launch Acer eRecovery Management. 2 Click the Restore tab. 3 Click Password settings. Acer Empowering Technology Acer's innovative Empowering Technology makes it easy for selected models). • Acer eRecovery Management backs up . 4 Click Create a new password. 5 In the Create a New Password dialog box...

Acer Aspire 6920 / 6920G Notebook Service Guide
Page 31
... create full or incremental backups, burn the factory default image to optical disc, and restore from user backup • Password settings To use the password protection feature of Acer eRecovery Management to factory default • Reinstall applications/drivers • Restore system from previously created backups or reinstall applications and drivers. By default, user...
... create full or incremental backups, burn the factory default image to optical disc, and restore from user backup • Password settings To use the password protection feature of Acer eRecovery Management to factory default • Reinstall applications/drivers • Restore system from previously created backups or reinstall applications and drivers. By default, user...
Acer Aspire 6920 / 6920G Notebook Service Guide
Page 52
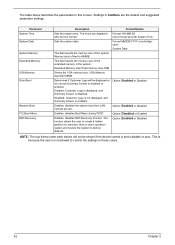
... not displayed, and Summary Screen is disabled. The function allows the user to create a hidden partition on hard disc drive to store operation system and restore the system to disable or auto. Format: HH:MM:SS (hour:minute:second) System Time Sets the system date. shows Summary Screen is fixed to...
... not displayed, and Summary Screen is disabled. The function allows the user to create a hidden partition on hard disc drive to store operation system and restore the system to disable or auto. Format: HH:MM:SS (hour:minute:second) System Time Sets the system date. shows Summary Screen is fixed to...
Acer Aspire 6920 / 6920G Notebook Service Guide
Page 60
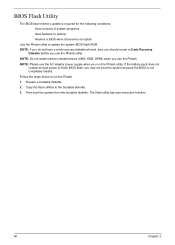
... when you may not boot the system because the BIOS is required for the following conditions: New versions of system programs New features or options Restore a BIOS when it becomes corrupted. Fellow the steps below to finish BIOS flash, you run the Phlash. 1. Prepare a bootable diskette. 2. NOTE: If you do not...
... when you may not boot the system because the BIOS is required for the following conditions: New versions of system programs New features or options Restore a BIOS when it becomes corrupted. Fellow the steps below to finish BIOS flash, you run the Phlash. 1. Prepare a bootable diskette. 2. NOTE: If you do not...
Acer Aspire 6920 / 6920G Notebook Service Guide
Page 88
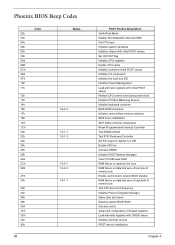
... CPU cache Initialize caches to initial POST values Initialize I/O component Initialize the local bus IDE Initialize Power Management Load alternate registers with initial POST values Restore CPU control word during warm boot Initialize PCI Bus Mastering devices Initialize keyboard controller BIOS ROM checksum Initialize cache before memory autosize 8254 timer initialization...
... CPU cache Initialize caches to initial POST values Initialize I/O component Initialize the local bus IDE Initialize Power Management Load alternate registers with initial POST values Restore CPU control word during warm boot Initialize PCI Bus Mastering devices Initialize keyboard controller BIOS ROM checksum Initialize cache before memory autosize 8254 timer initialization...
User Guide
Page 5
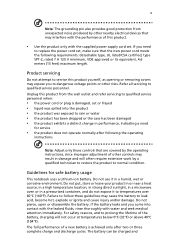
Unplug this product from unexpected noise produced by a qualified technician to restore the product to normal condition. The battery can be charged and v Note: The grounding pin also provides good protection from the wall outlet and refer ...
Unplug this product from unexpected noise produced by a qualified technician to restore the product to normal condition. The battery can be charged and v Note: The grounding pin also provides good protection from the wall outlet and refer ...

User Guide
Page 22
Manage user backups 73 Restore 74 Troubleshooting 75 Troubleshooting tips 75 Error messages 75 Regulations and safety notices 77 FCC notice 77 Modem notices 78 Laser compliance statement 81 LCD pixel statement 81 Macrovision copyright protection notice 81 Radio device regulatory notice 82 General 82 European Union (EU) 82 The FCC RF safety requirement 83 Canada - Low-power license-exempt radio communication devices (RSS-210) 84 LCD panel ergonomic specifications 85 Index 86
Manage user backups 73 Restore 74 Troubleshooting 75 Troubleshooting tips 75 Error messages 75 Regulations and safety notices 77 FCC notice 77 Modem notices 78 Laser compliance statement 81 LCD pixel statement 81 Macrovision copyright protection notice 81 Radio device regulatory notice 82 General 82 European Union (EU) 82 The FCC RF safety requirement 83 Canada - Low-power license-exempt radio communication devices (RSS-210) 84 LCD panel ergonomic specifications 85 Index 86

User Guide
Page 25
... the appropriate boxes. Empowering Technology 3 Empowering Technology password You must set the Empowering Technology password: 1 Launch Acer eRecovery Management. 2 Click the Restore tab. 3 Click Password settings. Your password should have a minimum of 4 and a maximum of Acer eRecovery Management to use the password protection feature of 12 characters. 6 Enter a password hint that will help...
... the appropriate boxes. Empowering Technology 3 Empowering Technology password You must set the Empowering Technology password: 1 Launch Acer eRecovery Management. 2 Click the Restore tab. 3 Click Password settings. Your password should have a minimum of 4 and a maximum of Acer eRecovery Management to use the password protection feature of 12 characters. 6 Enter a password hint that will help...
User Guide
Page 28
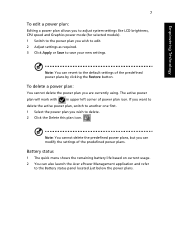
...and Power saver. For more power options, click in the Acer ePower Management utility, or right-click the Windows power icon in the system tray and select Acer ePower Management. You can create, switch between, edit, delete and restore power plans, as described below. The quick menu appears. ...View and adjust settings for On Battery and Plugged In modes by launching the Acer ePower Management application. To switch ...
...and Power saver. For more power options, click in the Acer ePower Management utility, or right-click the Windows power icon in the system tray and select Acer ePower Management. You can create, switch between, edit, delete and restore power plans, as described below. The quick menu appears. ...View and adjust settings for On Battery and Plugged In modes by launching the Acer ePower Management application. To switch ...
User Guide
Page 29
Battery status 1 The quick menu shows the remaining battery life based on current usage. 2 You can also launch the Acer ePower Management application and refer to delete. 2 Click the Delete this plan icon. The active power plan will mark with in upper left corner of ... plan you wish to edit. 2 Adjust settings as required. 3 Click Apply or Save to the default settings of the predefined power plans by clicking the Restore button.
Battery status 1 The quick menu shows the remaining battery life based on current usage. 2 You can also launch the Acer ePower Management application and refer to delete. 2 Click the Delete this plan icon. The active power plan will mark with in upper left corner of ... plan you wish to edit. 2 Adjust settings as required. 3 Click Apply or Save to the default settings of the predefined power plans by clicking the Restore button.
User Guide
Page 33
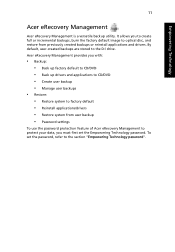
... you to create full or incremental backups, burn the factory default image to optical disc, and restore from user backup • Password settings To use the password protection feature of Acer eRecovery Management to protect your data, you with: • Backup: • Back up factory...8226; Back up drivers and applications to CD/DVD • Create user backup • Manage user backups • Restore: • Restore system to the D:\ drive. Acer eRecovery Management provides you must first set the password, refer to the section "Empowering Technology password". By default, user-...
... you to create full or incremental backups, burn the factory default image to optical disc, and restore from user backup • Password settings To use the password protection feature of Acer eRecovery Management to protect your data, you with: • Backup: • Back up factory...8226; Back up drivers and applications to CD/DVD • Create user backup • Manage user backups • Restore: • Restore system to the D:\ drive. Acer eRecovery Management provides you must first set the password, refer to the section "Empowering Technology password". By default, user-...

User Guide
Page 51
... the Run dialog box < > + : Cycle through programs on the taskbar < > + : Open Ease of Access Center < > + : Open Windows Mobility Center < > + : Display the System Properties dialog box < > + : Restore minimized windows to the desktop < > + : Cycle through programs on the taskbar by using Windows Flip 3-D < > + : Bring all gadgets to the front and select Windows Sidebar...
... the Run dialog box < > + : Cycle through programs on the taskbar < > + : Open Ease of Access Center < > + : Open Windows Mobility Center < > + : Display the System Properties dialog box < > + : Restore minimized windows to the desktop < > + : Cycle through programs on the taskbar by using Windows Flip 3-D < > + : Bring all gadgets to the front and select Windows Sidebar...
User Guide
Page 63
... future recovery operations. To start the recovery process: 1 Restart the system. 2 While the Acer logo is Enabled. 3 Exit the BIOS utility and save changes. Follow the steps below to perform system recovery. This recovery process helps you restore the C: drive with the original software content that is important to its original settings...
... future recovery operations. To start the recovery process: 1 Restart the system. 2 While the Acer logo is Enabled. 3 Exit the BIOS utility and save changes. Follow the steps below to perform system recovery. This recovery process helps you restore the C: drive with the original software content that is important to its original settings...
User Guide
Page 94
... backup discs From the Backup page of the entire C:\ drive to quickly back up /restore the factory default image, and reinstall applications and drivers. English 72 Acer eRecovery Management Acer eRecovery Management is a tool to a hard disk, CDs or DVDs. You can also...DVD • Create user backup • Manage user backups 2 Restore: • Restore system to factory default • Reinstall applications/drivers • Restore system from the Empowering Technology toolbar to start Acer eRecovery Management. 2 Acer eRecovery Management opens to the Backup page. Note: This feature is...
... backup discs From the Backup page of the entire C:\ drive to quickly back up /restore the factory default image, and reinstall applications and drivers. English 72 Acer eRecovery Management Acer eRecovery Management is a tool to a hard disk, CDs or DVDs. You can also...DVD • Create user backup • Manage user backups 2 Restore: • Restore system to factory default • Reinstall applications/drivers • Restore system from the Empowering Technology toolbar to start Acer eRecovery Management. 2 Acer eRecovery Management opens to the Backup page. Note: This feature is...
User Guide
Page 96
... backups. You can also reinstall applications and drivers for your Acer system. 1 Select Acer eRecovery Management from the Empowering Technology toolbar to start Acer eRecovery Management. 2 Switch to the restore page by selecting the Restore button. 3 You can choose to restore the system from a factory default image, restore from a previously created user backup or reinstall applications and...
... backups. You can also reinstall applications and drivers for your Acer system. 1 Select Acer eRecovery Management from the Empowering Technology toolbar to start Acer eRecovery Management. 2 Switch to the restore page by selecting the Restore button. 3 You can choose to restore the system from a factory default image, restore from a previously created user backup or reinstall applications and...


