

Aspire 5335 / 5735 / 5735Z Service Guide
Page 22
... alone, this key has the same effect as clicking on your edition of Access Center < > + : Open Windows Mobility Center < > + : Display the System Properties dialog box < > + : Restore minimized windows to the desktop < > + : Cycle through programs on the taskbar by using Windows Flip 3-D < > + : Bring all gadgets to the front and select Windows Sidebar...
... alone, this key has the same effect as clicking on your edition of Access Center < > + : Open Windows Mobility Center < > + : Display the System Properties dialog box < > + : Restore minimized windows to the desktop < > + : Cycle through programs on the taskbar by using Windows Flip 3-D < > + : Bring all gadgets to the front and select Windows Sidebar...

Aspire 5335 / 5735 / 5735Z Service Guide
Page 26
Click the Restore tab. 3. The Empowering Technology Password Center dialogue box pops up. 4. Your password should have a minimum of 4 and a maximum of Acer eRecovery Management to protect your data. To set the password. 16 Chapter 1 In the Create a New Password dialogue box, key in... boxes. Click Password settings. Enter a password hint that will help you remember your password in and confirm your password. 7. Launch Acer eRecovery Management. 2. Click Create a new password. 5. Click OK to set the Empowering Technology password: 1. Make sure the box Use for...
Click the Restore tab. 3. The Empowering Technology Password Center dialogue box pops up. 4. Your password should have a minimum of 4 and a maximum of Acer eRecovery Management to protect your data. To set the password. 16 Chapter 1 In the Create a New Password dialogue box, key in... boxes. Click Password settings. Enter a password hint that will help you remember your password in and confirm your password. 7. Launch Acer eRecovery Management. 2. Click Create a new password. 5. Click OK to set the Empowering Technology password: 1. Make sure the box Use for...
Aspire 5335 / 5735 / 5735Z Service Guide
Page 28
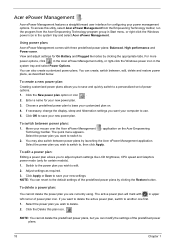
...new power plan. 3. For more power options, click in the Acer ePower Management utility, or right-click the Windows power icon in upper left corner of power options. 1. You can create, switch between, edit, delete and restore power plans, as required. 3. Choose a predefined power plan ...to . To switch between power plans by clicking the appropriate tabs. Select the power plan you wish to save your customized plan on the Acer Empowering 2. Switch to the power plan...
...new power plan. 3. For more power options, click in the Acer ePower Management utility, or right-click the Windows power icon in upper left corner of power options. 1. You can create, switch between, edit, delete and restore power plans, as required. 3. Choose a predefined power plan ...to . To switch between power plans by clicking the appropriate tabs. Select the power plan you wish to save your customized plan on the Acer Empowering 2. Switch to the power plan...

Aspire 5335 / 5735 / 5735Z Service Guide
Page 30
Acer eRecovery Management Acer eRecovery Management is the only other key capable of decrypting the file. If you lose the password, the Master Password is a versatile backup utility. If ...-created backups are stored to decrypt it. It allows you with: • Backup: 20 Chapter 1 Be sure to optical disc, and restore from previously created backups or reinstall applications and drivers. Acer eRecovery Management provides you to create full or incremental backups, burn the factory default image to safeguard all related passwords!
Acer eRecovery Management Acer eRecovery Management is the only other key capable of decrypting the file. If you lose the password, the Master Password is a versatile backup utility. If ...-created backups are stored to decrypt it. It allows you with: • Backup: 20 Chapter 1 Be sure to optical disc, and restore from previously created backups or reinstall applications and drivers. Acer eRecovery Management provides you to create full or incremental backups, burn the factory default image to safeguard all related passwords!
Aspire 5335 / 5735 / 5735Z Service Guide
Page 31
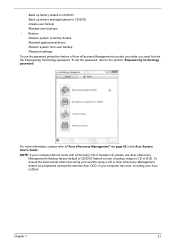
...(except the external Acer ODD, if your computer has one), including your Acer ezDock. •Back up factory default to CD/DVD •Back up drivers and applications to CD/DVD •Create user backup •Manage user backups • Restore: •Restore system to factory default... •Reinstall applications/drivers •Restore system from user backup •Password settings To use Acer eRecovery Management's Backup factory default to CD/DVD feature to burn a backup...
...(except the external Acer ODD, if your computer has one), including your Acer ezDock. •Back up factory default to CD/DVD •Back up drivers and applications to CD/DVD •Create user backup •Manage user backups • Restore: •Restore system to factory default... •Reinstall applications/drivers •Restore system from user backup •Password settings To use Acer eRecovery Management's Backup factory default to CD/DVD feature to burn a backup...

Aspire 5335 / 5735 / 5735Z Service Guide
Page 47
... or Enabled Enables, disables D2D Recovery function. The function allows the user to create a hidden partition on hard disc drive to store operation system and restore the system to 640MB This field reports the memory size of the system. Determines if Customer Logo will not be displayed or not; Option: Enabled...
... or Enabled Enables, disables D2D Recovery function. The function allows the user to create a hidden partition on hard disc drive to store operation system and restore the system to 640MB This field reports the memory size of the system. Determines if Customer Logo will not be displayed or not; Option: Enabled...

Aspire 5335 / 5735 / 5735Z Service Guide
Page 54
... when you may not boot the system because the BIOS is required for the following conditions: q New versions of system programs q New features or options q Restore a BIOS when it becomes corrupted. NOTE: Please use the Flash utility. Fellow the steps below to finish BIOS flash, you run the Flash. 1. Prepare a bootable...
... when you may not boot the system because the BIOS is required for the following conditions: q New versions of system programs q New features or options q Restore a BIOS when it becomes corrupted. NOTE: Please use the Flash utility. Fellow the steps below to finish BIOS flash, you run the Flash. 1. Prepare a bootable...
Aspire 5335 / 5735 / 5735Z Service Guide
Page 116
... CPU cache Initialize caches to initial POST values Initialize I/O component Initialize the local bus IDE Initialize Power Management Load alternate registers with initial POST values Restore CPU control word during warm boot Initialize PCI Bus Mastering devices Initialize keyboard controller BIOS ROM checksum Initialize cache before memory autosize 8254 timer initialization...
... CPU cache Initialize caches to initial POST values Initialize I/O component Initialize the local bus IDE Initialize Power Management Load alternate registers with initial POST values Restore CPU control word during warm boot Initialize PCI Bus Mastering devices Initialize keyboard controller BIOS ROM checksum Initialize cache before memory autosize 8254 timer initialization...
Aspire 5335 / 5735 / 5735Z Service Guide
Page 130
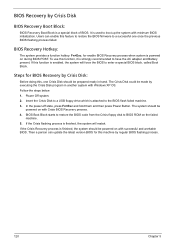
... Crisis Recovery process is a special block of BIOS. BIOS Recovery Hotkey: The system provides a function hotkey: Fn+Esc, for this feature to restore the BIOS firmware to BIOS ROM on with successful and workable BIOS. The system should be powered on the failed machine. 5. BIOS Recovery by ...regular BIOS flashing process. 120 Chapter 5 BIOS Boot Block starts to restore the BIOS code from the Crisis floppy disk to a successful one Crisis Disk should be made by executing the Crisis Disk program in hand....
... Crisis Recovery process is a special block of BIOS. BIOS Recovery Hotkey: The system provides a function hotkey: Fn+Esc, for this feature to restore the BIOS firmware to BIOS ROM on with successful and workable BIOS. The system should be powered on the failed machine. 5. BIOS Recovery by ...regular BIOS flashing process. 120 Chapter 5 BIOS Boot Block starts to restore the BIOS code from the Crisis floppy disk to a successful one Crisis Disk should be made by executing the Crisis Disk program in hand....


