
Aspire 3680/5570/5570Z/5580 User's Guide EN
Page 12
... installation. In addition it : 1 Click on Start, All Programs, AcerSystem. 2 Click on the computer, simply press and release the power button below the LCD screen beside the easy-launch buttons. The printed User's Guide introduces you use Adobe Reader, access the Help and Support menu. This guide contains detailed information on the screen to the AcerSystem User's Guide. Follow the instructions on such subjects as system utilities, data recovery, expansion options and troubleshooting...
... installation. In addition it : 1 Click on Start, All Programs, AcerSystem. 2 Click on the computer, simply press and release the power button below the LCD screen beside the easy-launch buttons. The printed User's Guide introduces you use Adobe Reader, access the Help and Support menu. This guide contains detailed information on the screen to the AcerSystem User's Guide. Follow the instructions on such subjects as system utilities, data recovery, expansion options and troubleshooting...
Aspire 3680/5570/5570Z/5580 User's Guide EN
Page 16
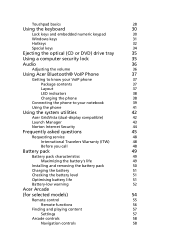
Touchpad basics 28 Using the keyboard 30 Lock keys and embedded numeric keypad 30 Windows keys 31 Hotkeys 32 Special keys 34 Ejecting the optical (CD or DVD) drive tray 35 Using a computer security lock 35 Audio 36 Adjusting the volume 36 Using Acer Bluetooth® VoIP Phone 37 Getting to know your VoIP phone 37 Package contents 37 Layout 37 LED indicators 38 Charging the phone 38 Connecting the phone to your notebook 39...
Touchpad basics 28 Using the keyboard 30 Lock keys and embedded numeric keypad 30 Windows keys 31 Hotkeys 32 Special keys 34 Ejecting the optical (CD or DVD) drive tray 35 Using a computer security lock 35 Audio 36 Adjusting the volume 36 Using Acer Bluetooth® VoIP Phone 37 Getting to know your VoIP phone 37 Package contents 37 Layout 37 LED indicators 38 Charging the phone 38 Connecting the phone to your notebook 39...

Aspire 3680/5570/5570Z/5580 User's Guide EN
Page 18
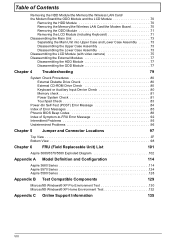
... through options 79 Connectivity options 79 Fax/data modem 79 Built-in network feature 80 Fast Infrared (FIR) (for selected models) 80 Universal Serial Bus (USB) 81 IEEE 1394 port (for selected models) 81 PC Card slot 82 Installing memory 82 BIOS utility 83 Boot sequence 83 Enable disk-to-disk recovery 84 Password 84 Using software 85 Playing DVD movies 85 Acer eRecovery Management 86 Create backup 86 Burn backup disc 87 Restore and recovery 87 87 Troubleshooting 88 Troubleshooting tips 88 Error messages...
... through options 79 Connectivity options 79 Fax/data modem 79 Built-in network feature 80 Fast Infrared (FIR) (for selected models) 80 Universal Serial Bus (USB) 81 IEEE 1394 port (for selected models) 81 PC Card slot 82 Installing memory 82 BIOS utility 83 Boot sequence 83 Enable disk-to-disk recovery 84 Password 84 Using software 85 Playing DVD movies 85 Acer eRecovery Management 86 Create backup 86 Burn backup disc 87 Restore and recovery 87 87 Troubleshooting 88 Troubleshooting tips 88 Error messages...

Aspire 3680/5570/5570Z/5580 User's Guide EN
Page 36
...display Connects to a display device (e.g., external (VGA) port monitor, LCD projector). 2 Ventilation slots Enable the computer to stay cool, even after prolonged use. 3 S-video/TV-out Connects to a television or display device (NTSC/PAL) port with infrared devices (e.g., infrared printer and IR-aware computer). (for selected models) 6 Infrared port Interfaces with S-video input. 4 USB 2.0 port Connects to USB 2.0 devices (e.g., USB mouse, USB camera). 5 4-pin IEEE 1394 Connects to IEEE 1394 devices. Accepts audio line-in -1 card reader Accepts Memory Stick (MS), Memory...
...display Connects to a display device (e.g., external (VGA) port monitor, LCD projector). 2 Ventilation slots Enable the computer to stay cool, even after prolonged use. 3 S-video/TV-out Connects to a television or display device (NTSC/PAL) port with infrared devices (e.g., infrared printer and IR-aware computer). (for selected models) 6 Infrared port Interfaces with S-video input. 4 USB 2.0 port Connects to USB 2.0 devices (e.g., USB mouse, USB camera). 5 4-pin IEEE 1394 Connects to IEEE 1394 devices. Accepts audio line-in -1 card reader Accepts Memory Stick (MS), Memory...
Aspire 3680/5570/5570Z/5580 User's Guide EN
Page 65
... the Sleep indicator is lit, the computer is set to the appropriate resolution. Then click on . If pressing a key does not turn the display back on the Settings tab to make sure that the resolution is in the external USB floppy drive? Connect the AC adapter to recharge the battery pack. • Make sure that may be set the resolution lower than the specified resolution are using...
... the Sleep indicator is lit, the computer is set to the appropriate resolution. Then click on . If pressing a key does not turn the display back on the Settings tab to make sure that the resolution is in the external USB floppy drive? Connect the AC adapter to recharge the battery pack. • Make sure that may be set the resolution lower than the specified resolution are using...
Aspire 3680/5570/5570Z/5580 User's Guide EN
Page 107
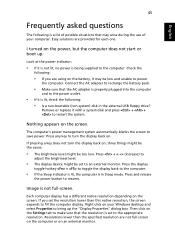
... a user backup will not be bootable. English 87 Burn backup disc Using the Burn Disc page of Acer eRecovery Management, you can burn the factory default image, a user backup image, the current system configuration, or an application backup image to CD or DVD. 1 Press + or select Acer eRecovery Management from the Empowering Technology toolbar to start Acer eRecovery Management. 2 Switch to the restore and recovery page by selecting the Burn Disc button. 3 Select the type of backup (factory default, user...
... a user backup will not be bootable. English 87 Burn backup disc Using the Burn Disc page of Acer eRecovery Management, you can burn the factory default image, a user backup image, the current system configuration, or an application backup image to CD or DVD. 1 Press + or select Acer eRecovery Management from the Empowering Technology toolbar to start Acer eRecovery Management. 2 Switch to the restore and recovery page by selecting the Burn Disc button. 3 Select the type of backup (factory default, user...
Aspire 3680/5570/5580 Service Guide
Page 8
... Assembly 73 Disassembling the LCD Module (with video camera 75 Disassembling the External Modules 77 Disassembling the HDD Module 77 Disassembling the ODD Module 77 Chapter 4 Troubleshooting 79 System Check Procedures 80 External Diskette Drive Check 80 External CD-ROM Drive Check 80 Keyboard or Auxiliary Input Device Check 80 Memory check 81 Power System Check 81 Touchpad Check 83 Power-On Self-Test (POST) Error Message 84 Index of Error Messages 85 Phoenix BIOS Beep Codes 88 Index...
... Assembly 73 Disassembling the LCD Module (with video camera 75 Disassembling the External Modules 77 Disassembling the HDD Module 77 Disassembling the ODD Module 77 Chapter 4 Troubleshooting 79 System Check Procedures 80 External Diskette Drive Check 80 External CD-ROM Drive Check 80 Keyboard or Auxiliary Input Device Check 80 Memory check 81 Power System Check 81 Touchpad Check 83 Power-On Self-Test (POST) Error Message 84 Index of Error Messages 85 Phoenix BIOS Beep Codes 88 Index...
Aspire 3680/5570/5580 Service Guide
Page 21
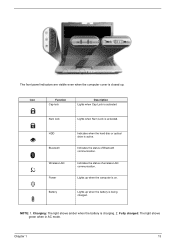
HDD Bluetooth Wireless LAN Power Battery Indicates when the hard disc or optical drive is activated. Icon Function Cap lock Description Lights when Cap Lock is activated Icon Function Description Num lock Lights when Num Lock is active. Indicates the status of Bluetooth communication. Lights up when the computer is being charged. Chapter 1 13 Charging: The light shows amber when the battery is closed up. NOTE: 1. Indicates the status of wireless LAN communication. Fully charged: The light shows green when in AC mode. Lights up when...
HDD Bluetooth Wireless LAN Power Battery Indicates when the hard disc or optical drive is activated. Icon Function Cap lock Description Lights when Cap Lock is activated Icon Function Description Num lock Lights when Num Lock is active. Indicates the status of Bluetooth communication. Lights up when the computer is being charged. Chapter 1 13 Charging: The light shows amber when the battery is closed up. NOTE: 1. Indicates the status of wireless LAN communication. Fully charged: The light shows green when in AC mode. Lights up when...
Aspire 3680/5570/5580 Service Guide
Page 45
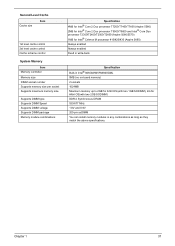
Second Level Cache Cache size Item 1st level cache control 2st level cache control Cache scheme control System Memory Item Memory controller Memory size DIMM socket number Supports memory size per socket Supports maximum memory size Supports DIMM type Supports DIMM Speed Supports DIMM voltage Supports DIMM package Memory module combinations Specification 4MB for Intel® Core 2 Duo processor T7200/T7400/T7600 (Aspire 5580) 2MB for Intel® Core 2 Duo processor T5500/T5600...
Second Level Cache Cache size Item 1st level cache control 2st level cache control Cache scheme control System Memory Item Memory controller Memory size DIMM socket number Supports memory size per socket Supports maximum memory size Supports DIMM type Supports DIMM Speed Supports DIMM voltage Supports DIMM package Memory module combinations Specification 4MB for Intel® Core 2 Duo processor T7200/T7400/T7600 (Aspire 5580) 2MB for Intel® Core 2 Duo processor T5500/T5600...
Aspire 3680/5570/5580 Service Guide
Page 50
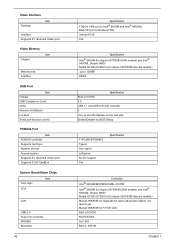
... USB Port Item Chipset USB Compliancy Level OHCI Number of USB port Location Serial port function control PCMCIA Port Item PCMCIA controller Supports card type Number of slots Access location Supports ZV (Zoomed Video) port Supports 32 bit CardBus System Board Major Chips Item Core logic VGA LAN USB 2.0 Super I/O controller MODEM Bluetooth 42 Specification FCBGA 1466-pin for Intel® 945GM and Intel® 940GML BGA 533 pin for Nvidia G7300 internal PCIE Yes Specification Intel® 945GM (for Aspire 5570/5580 UMA models...
... USB Port Item Chipset USB Compliancy Level OHCI Number of USB port Location Serial port function control PCMCIA Port Item PCMCIA controller Supports card type Number of slots Access location Supports ZV (Zoomed Video) port Supports 32 bit CardBus System Board Major Chips Item Core logic VGA LAN USB 2.0 Super I/O controller MODEM Bluetooth 42 Specification FCBGA 1466-pin for Intel® 945GM and Intel® 940GML BGA 533 pin for Nvidia G7300 internal PCIE Yes Specification Intel® 945GM (for Aspire 5570/5580 UMA models...
Aspire 3680/5570/5580 Service Guide
Page 61
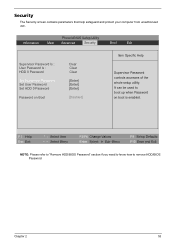
... Change Values Enter Select 4 Sub-Menu F9 Setup Defaults F10 Save and Exit NOTE: Please refer to "Remove HDD/BIOS Password" section if you need to know how to boot up when Password on Boot Clear Clear Clear [Enter] [Enter] [Enter] [Disabled] Item Specific Help Supervisor Password controls accesses of the whole setup utility. Security The Security screen contains parameters that help safeguard and protect your computer from unauthorized use. PhoenixBIOS Setup Utility Information Main Advanced Security Boot Exit Supervisor Password Is : User Password...
... Change Values Enter Select 4 Sub-Menu F9 Setup Defaults F10 Save and Exit NOTE: Please refer to "Remove HDD/BIOS Password" section if you need to know how to boot up when Password on Boot Clear Clear Clear [Enter] [Enter] [Enter] [Disabled] Item Specific Help Supervisor Password controls accesses of the whole setup utility. Security The Security screen contains parameters that help safeguard and protect your computer from unauthorized use. PhoenixBIOS Setup Utility Information Main Advanced Security Boot Exit Supervisor Password Is : User Password...

Aspire 3680/5570/5580 Service Guide
Page 62
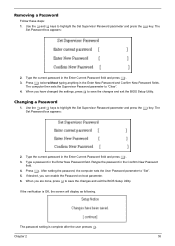
... your password. Type a password in the "Confirm New Password" field. Parameter User Password is Supervisor Password is set the user or the supervisor password: 1. Enables or disables primary hard disk security function. Option Clear or Set Clear or Set Disabled or Enabled NOTE: When you are the default and suggested parameter settings. Setting a Password Follow these steps as you may have to return your notebook computer to save the changes and exit the BIOS Setup Utility. 54 Chapter 2 The user can enter Setup menu only and...
... your password. Type a password in the "Confirm New Password" field. Parameter User Password is Supervisor Password is set the user or the supervisor password: 1. Enables or disables primary hard disk security function. Option Clear or Set Clear or Set Disabled or Enabled NOTE: When you are the default and suggested parameter settings. Setting a Password Follow these steps as you may have to return your notebook computer to save the changes and exit the BIOS Setup Utility. 54 Chapter 2 The user can enter Setup menu only and...
Aspire 3680/5570/5580 Service Guide
Page 63
... the BIOS Setup Utility. If the verification is complete after the user presses u. Use the w and y keys to "Clear". 4. Retype the password in the Enter New Password field. The Set Password box appears: 2. Type a password in the Confirm New Password field. 4. Removing a Password Follow these steps: 1. Type the current password in the Enter Current Password field and press e. 3. The computer then sets the Supervisor Password parameter to highlight the Set Supervisor Password parameter and press the e key. Changing a Password 1. The password setting...
... the BIOS Setup Utility. If the verification is complete after the user presses u. Use the w and y keys to "Clear". 4. Retype the password in the Enter New Password field. The Set Password box appears: 2. Type a password in the Confirm New Password field. 4. Removing a Password Follow these steps: 1. Type the current password in the Enter Current Password field and press e. 3. The computer then sets the Supervisor Password parameter to highlight the Set Supervisor Password parameter and press the e key. Changing a Password 1. The password setting...
Aspire 3680/5570/5580 Service Guide
Page 66
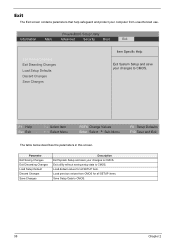
... save your changes to CMOS. PhoenixBIOS Setup Utility Information Main Advanced Security Boot Exit Exit Saving Changes Exit Disarding Changes Load Setup Defaults Discard Changes Save Changes Item Specific Help Exit System Setup and save your computer from CMOS for all SETUP items. Save Setup Data to CMOS. F1 Help Esc Exit ↑ ↓ Select Item ← → Select Menu F5/F6 Change Values Enter Select 4 Sub-Menu F9 Setup Defaults F10 Save...
... save your changes to CMOS. PhoenixBIOS Setup Utility Information Main Advanced Security Boot Exit Exit Saving Changes Exit Disarding Changes Load Setup Defaults Discard Changes Save Changes Item Specific Help Exit System Setup and save your computer from CMOS for all SETUP items. Save Setup Data to CMOS. F1 Help Esc Exit ↑ ↓ Select Item ← → Select Menu F5/F6 Change Values Enter Select 4 Sub-Menu F9 Setup Defaults F10 Save...
Aspire 3680/5570/5580 Service Guide
Page 68
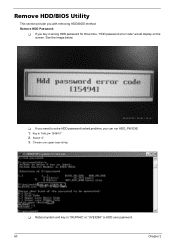
Key in wrong HDD password for three time, "HDD password error code" would display on the screen. Choose one upper-case string T Reboot system and key in "0KJFN42" or "UVEIQ96" to solve HDD password locked problem, you key in "hdd_pw 15494 0" 2. T If you need to HDD user password. 60 Chapter 2 Remove HDD/BIOS Utility This section provide you with removing HDD/BIOS method: Remove HDD Password: T If you can run HDD_PW.EXE 1. Select "2" 3. See the image below.
Key in wrong HDD password for three time, "HDD password error code" would display on the screen. Choose one upper-case string T Reboot system and key in "0KJFN42" or "UVEIQ96" to solve HDD password locked problem, you key in "hdd_pw 15494 0" 2. T If you need to HDD user password. 60 Chapter 2 Remove HDD/BIOS Utility This section provide you with removing HDD/BIOS method: Remove HDD Password: T If you can run HDD_PW.EXE 1. Select "2" 3. See the image below.
Aspire 3680/5570/5580 Service Guide
Page 75
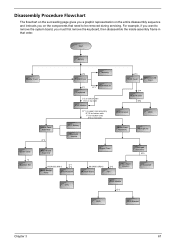
... Cover H*2 DIMM Cover Memory P*1 Keyboard ODD Module E*1 J*2 on bottom side K*2 on top side LCD Module E*1 on upper case assemby E*12 on bottom side F*3 on bottom side A*2 on the components that order. For example, if you want to remove the system board, you on rear side H*3 HDD Cover Wireless LAN Card O*4 HDD Module M*4 HDD Bracket HDD Lower Case Assembly O*2 RTC Battery Bluetooth Module Upper Case Assembly Microphone Lower Case *2 Speaker Set Main Board Assembly Upper Case Touchpad...
... Cover H*2 DIMM Cover Memory P*1 Keyboard ODD Module E*1 J*2 on bottom side K*2 on top side LCD Module E*1 on upper case assemby E*12 on bottom side F*3 on bottom side A*2 on the components that order. For example, if you want to remove the system board, you on rear side H*3 HDD Cover Wireless LAN Card O*4 HDD Module M*4 HDD Bracket HDD Lower Case Assembly O*2 RTC Battery Bluetooth Module Upper Case Assembly Microphone Lower Case *2 Speaker Set Main Board Assembly Upper Case Touchpad...
Aspire 3680/5570/5580 Service Guide
Page 93
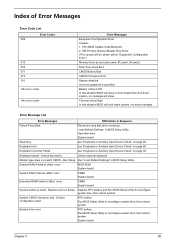
... "Load Default Settings" in BIOS Setup Utility. Keyboard locked - Default configuration used RTC battery Run BIOS Setup Utility to reconfigure system time, then reboot system. Hard disk drive System board Stuck Key see "Keyboard or Auxiliary Input Device Check" on page 80. System CMOS checksum bad - CPU BIOS Update Code Mismatch 2. Battery critical LOW In this situation BIOS will show message. Error Message List Error Messages FRU/Action in Sequence Failure Fixed Disk Reconnect hard disk drive connector. Unlock key switch Unlock external keyboard Monitor type does...
... "Load Default Settings" in BIOS Setup Utility. Keyboard locked - Default configuration used RTC battery Run BIOS Setup Utility to reconfigure system time, then reboot system. Hard disk drive System board Stuck Key see "Keyboard or Auxiliary Input Device Check" on page 80. System CMOS checksum bad - CPU BIOS Update Code Mismatch 2. Battery critical LOW In this situation BIOS will show message. Error Message List Error Messages FRU/Action in Sequence Failure Fixed Disk Reconnect hard disk drive connector. Unlock key switch Unlock external keyboard Monitor type does...

Aspire 3680/5570/5580 Service Guide
Page 97
... devices Initialize all video adapters in system QuietBoot start (optional) Shadow video BIOS ROM Display BIOS copyright notice Display CPU type and speed Initialize EISA board Test keyboard Set key click if enabled Test for unexpected interrupts Initialize POST display service Display prompt "Press F2 to enter SETUP" Disable CPU cache Test RAM between 512 and 640 KB Test extended memory Test extended memory address lines Jump to User Patch1 Configure advanced cache registers Initialize Multi Processor APIC Enable external and CPU caches Setup...
... devices Initialize all video adapters in system QuietBoot start (optional) Shadow video BIOS ROM Display BIOS copyright notice Display CPU type and speed Initialize EISA board Test keyboard Set key click if enabled Test for unexpected interrupts Initialize POST display service Display prompt "Press F2 to enter SETUP" Disable CPU cache Test RAM between 512 and 640 KB Test extended memory Test extended memory address lines Jump to User Patch1 Configure advanced cache registers Initialize Multi Processor APIC Enable external and CPU caches Setup...
Aspire 3680/5570/5580 Service Guide
Page 100
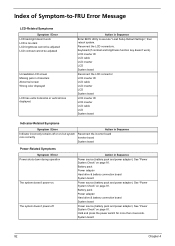
...). Battery pack Power adapter Hard drive & battery connection board System board Power source (battery pack and power adapter). Keyboard (if contrast and brightness function key doesn't work LCD is too dark LCD brightness cannot be adjusted LCD contrast cannot be adjusted Unreadable LCD screen Missing pels in characters Abnormal screen Wrong color displayed LCD has extra horizontal or vertical lines displayed. Hold and press the power switch for more than 4 seconds. Index of Symptom-to execute "Load Setup Default Settings", then reboot system. Action in Sequence Enter BIOS Utility...
...). Battery pack Power adapter Hard drive & battery connection board System board Power source (battery pack and power adapter). Keyboard (if contrast and brightness function key doesn't work LCD is too dark LCD brightness cannot be adjusted LCD contrast cannot be adjusted Unreadable LCD screen Missing pels in characters Abnormal screen Wrong color displayed LCD has extra horizontal or vertical lines displayed. Hold and press the power switch for more than 4 seconds. Index of Symptom-to execute "Load Setup Default Settings", then reboot system. Action in Sequence Enter BIOS Utility...
Aspire 3680/5570/5580 Service Guide
Page 101
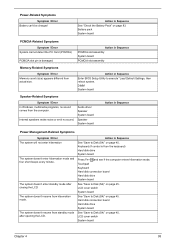
... slot pin is from hibernation mode. Internal speakers make noise or emit no sound comes from standby mode after closing the LCD The system doesn't resume from the keyboard) Hard disk drive System board Press Fn+oand see if the computer enters hibernation mode. The system doesn't resume from the computer. Touchpad Keyboard Hard disk connection board Hard disk drive System board See "Save to Disk (S4)" on page 45. Power-Related Symptoms Symptom / Error Battery can't be charged...
... slot pin is from hibernation mode. Internal speakers make noise or emit no sound comes from standby mode after closing the LCD The system doesn't resume from the keyboard) Hard disk drive System board Press Fn+oand see if the computer enters hibernation mode. The system doesn't resume from the computer. Touchpad Keyboard Hard disk connection board Hard disk drive System board See "Save to Disk (S4)" on page 45. Power-Related Symptoms Symptom / Error Battery can't be charged...


