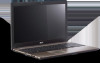
Acer Aspire 5538 Series Service Guide
Page 7
...View 5 Closed Front View 6 Left View 6 Right View 7 Base View 8 Rear View 8 Indicators 9 TouchPad Basics 10 Using the Keyboard 11 Lock Keys and embedded numeric keypad 11 Windows Keys 12 Hot Keys 13 Special Keys 14 Hardware Specifications and Configurations 15 System Utilities 23... Removing the Battery Pack 45 Removing the Hard Disk Drive Module 46 Removing the Optical Disk Drive Module 49 Removing the DIMM Module 52 Removing the WLAN Board 55 Main Unit Disassembly Process 58 Main Unit Disassembly Flowchart 58 Removing the Keyboard 60 Removing the Upper Cover 62 Removing...
...View 5 Closed Front View 6 Left View 6 Right View 7 Base View 8 Rear View 8 Indicators 9 TouchPad Basics 10 Using the Keyboard 11 Lock Keys and embedded numeric keypad 11 Windows Keys 12 Hot Keys 13 Special Keys 14 Hardware Specifications and Configurations 15 System Utilities 23... Removing the Battery Pack 45 Removing the Hard Disk Drive Module 46 Removing the Optical Disk Drive Module 49 Removing the DIMM Module 52 Removing the WLAN Board 55 Main Unit Disassembly Process 58 Main Unit Disassembly Flowchart 58 Removing the Keyboard 60 Removing the Upper Cover 62 Removing...
Acer Aspire 5538 Series Service Guide
Page 8
...Removing the Touchpad Bracket 69 Removing the Power Board 71 Removing the Speaker Modules 73 Removing the Media Board 75 Removing the Bluetooth Module 77 Removing the I/O Board 78 Removing the DC-In Cable 81 Removing the Mainboard 82 Removing the LCD Module 85 Removing the Fan 87 Removing the Thermal Module 89 Removing...Power Board 129 Replacing the Touchpad Bracket 130 Replacing the Button Board 132 Replacing the Upper Cover 134 Replacing the Keyboard 138 External Module Reassembly Process 140 Replacing the WLAN Board 140 Replacing the DIMM Modules 141 Replacing the Hard Disk...
...Removing the Touchpad Bracket 69 Removing the Power Board 71 Removing the Speaker Modules 73 Removing the Media Board 75 Removing the Bluetooth Module 77 Removing the I/O Board 78 Removing the DC-In Cable 81 Removing the Mainboard 82 Removing the LCD Module 85 Removing the Fan 87 Removing the Thermal Module 89 Removing...Power Board 129 Replacing the Touchpad Bracket 130 Replacing the Button Board 132 Replacing the Upper Cover 134 Replacing the Keyboard 138 External Module Reassembly Process 140 Replacing the WLAN Board 140 Replacing the DIMM Modules 141 Replacing the Hard Disk...
Acer Aspire 5538 Series Service Guide
Page 53
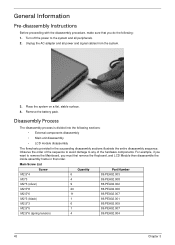
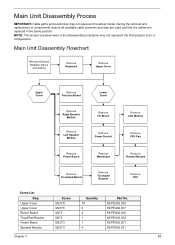
... do the following sections: • External components disassembly • Main unit disassembly • LCD module disassembly The flowcharts provided in that you must first remove the Keyboard, and LCD Module then disassemble the inside assembly frame in the succeeding disassembly sections illustrate the entire disassembly sequence. Turn off the power to any...
... do the following sections: • External components disassembly • Main unit disassembly • LCD module disassembly The flowcharts provided in that you must first remove the Keyboard, and LCD Module then disassemble the inside assembly frame in the succeeding disassembly sections illustrate the entire disassembly sequence. Turn off the power to any...
Acer Aspire 5538 Series Service Guide
Page 68
... Remove External Modules before proceeding Remove Keyboard Remove Upper Cover Upper Cover Remove Function Board Lower Cover Remove Right Speaker Module Remove Left Speaker Module Remove I/O Board Remove Power Socket Remove LCD Module Remove CPU Fan Remove Power Board Remove Mainboard Remove Thermal Module Remove Touchpad Board Remove Touchpad Bracket Remove ...006 86.PEA02.007 86.PEA02.002 86.PEA02.002 86.PEA02.001 86.PEA02.001 Chapter 3 58 During the removal and replacement of components, ensure all available cable channels and clips are used and that the cables are replaced in...
... Remove External Modules before proceeding Remove Keyboard Remove Upper Cover Upper Cover Remove Function Board Lower Cover Remove Right Speaker Module Remove Left Speaker Module Remove I/O Board Remove Power Socket Remove LCD Module Remove CPU Fan Remove Power Board Remove Mainboard Remove Thermal Module Remove Touchpad Board Remove Touchpad Bracket Remove ...006 86.PEA02.007 86.PEA02.002 86.PEA02.002 86.PEA02.001 86.PEA02.001 Chapter 3 58 During the removal and replacement of components, ensure all available cable channels and clips are used and that the cables are replaced in...
Acer Aspire 5538 Series Service Guide
Page 70
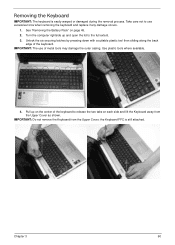
... open the lid to use of the keyboard. IMPORTANT: Do not remove the Keyboard from the Upper Cover as shown. the Keyboard FFC is easily warped or damaged during the removal process. IMPORTANT: The use excessive force when removing the keyboard and replace if any damage occurs. 1. Removing the Keyboard IMPORTANT: The keyboard is still attached. Unlock the six securing...
... open the lid to use of the keyboard. IMPORTANT: Do not remove the Keyboard from the Upper Cover as shown. the Keyboard FFC is easily warped or damaged during the removal process. IMPORTANT: The use excessive force when removing the keyboard and replace if any damage occurs. 1. Removing the Keyboard IMPORTANT: The keyboard is still attached. Unlock the six securing...
Acer Aspire 5538 Series Service Guide
Page 71
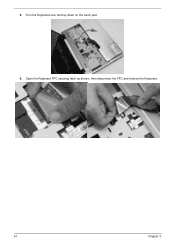
Open the Keyboard FFC securing latch as shown, then disconnect the FFC and remove the Keyboard. 61 Chapter 3 5. Turn the Keyboard over and lay down on the touch pad. 6.
Open the Keyboard FFC securing latch as shown, then disconnect the FFC and remove the Keyboard. 61 Chapter 3 5. Turn the Keyboard over and lay down on the touch pad. 6.
Acer Aspire 5538 Series Service Guide
Page 182
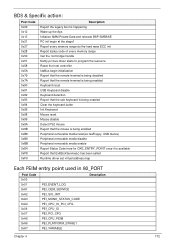
... remote terminal is being enabled Keyboard reset USB Keyboard disable Keyboard detection Report that the usb keyboard is being enabled Clear the keyboard buffer Init Keyboard Mouse reset Mouse disable Detect PS2 mouse Report that the mouse is being enabled Peripheral removable media reset(ex:IsaFloppy, USB device) Peripheral removable media disable Peripheral removable media enable Report Status Code...
... remote terminal is being enabled Keyboard reset USB Keyboard disable Keyboard detection Report that the usb keyboard is being enabled Clear the keyboard buffer Init Keyboard Mouse reset Mouse disable Detect PS2 mouse Report that the mouse is being enabled Peripheral removable media reset(ex:IsaFloppy, USB device) Peripheral removable media disable Peripheral removable media enable Report Status Code...

Acer Aspire 5538 Series Service Guide
Page 224
... Internal Speaker Failure 157 J Jumper and Connector Locations 177 Top View 177 K Keyboard Removing 60 Replacing 138 Keyboard Failure 156 L LCD Bezel Removing 92 Replacing 110 LCD Brackets Removing 98 Replacing 106 LCD Cable Removing 96, 107 LCD Failure 156 LCD Module Disassembly 91 Reassembly 103 Removing 85 Replacing 113 LCD Module Disassembly Flowchart 91 LCD Panel...
... Internal Speaker Failure 157 J Jumper and Connector Locations 177 Top View 177 K Keyboard Removing 60 Replacing 138 Keyboard Failure 156 L LCD Bezel Removing 92 Replacing 110 LCD Brackets Removing 98 Replacing 106 LCD Cable Removing 96, 107 LCD Failure 156 LCD Module Disassembly 91 Reassembly 103 Removing 85 Replacing 113 LCD Module Disassembly Flowchart 91 LCD Panel...


