Aspire 5235 / 5535 Service Guide
Page 30
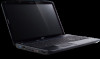
...to create full or incremental backups, burn the factory default image to optical disc, and restore from previously created backups or reinstall applications and drivers. It allows you lose both passwords, there will be no way to decrypt your encrypted file! If you lose the password, the Master... Password is the unique key that the system needs to decrypt it. Acer eRecovery Management provides you can use the Master Password to decrypt the file. By default, user-created backups are stored to safeguard all related...
...to create full or incremental backups, burn the factory default image to optical disc, and restore from previously created backups or reinstall applications and drivers. It allows you lose both passwords, there will be no way to decrypt your encrypted file! If you lose the password, the Master... Password is the unique key that the system needs to decrypt it. Acer eRecovery Management provides you can use the Master Password to decrypt the file. By default, user-created backups are stored to safeguard all related...
Aspire 5235 / 5535 Service Guide
Page 31
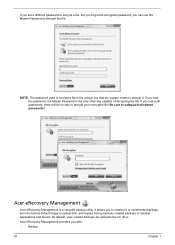
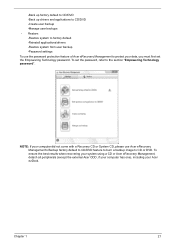
...detach all peripherals (except the external Acer ODD, if your computer has one), including your data, you must first set the password, refer to CD or DVD. Chapter 1 21 •Back up factory default to CD/DVD •Back up drivers and applications to CD/DVD &#... backup •Manage user backups • Restore: •Restore system to factory default •Reinstall applications/drivers •Restore system from user backup •Password settings To use Acer eRecovery Management's Backup factory default to CD/DVD feature to burn a backup image to the section "Empowering ...
...detach all peripherals (except the external Acer ODD, if your computer has one), including your data, you must first set the password, refer to CD or DVD. Chapter 1 21 •Back up factory default to CD/DVD •Back up drivers and applications to CD/DVD &#... backup •Manage user backups • Restore: •Restore system to factory default •Reinstall applications/drivers •Restore system from user backup •Password settings To use Acer eRecovery Management's Backup factory default to CD/DVD feature to burn a backup image to the section "Empowering ...

Aspire 5235 / 5535 Service Guide
Page 33
... Windows Mobility Center by right-clicking Center. in one easy-to-find place, so you can quickly configure your Acer system to the Acer user guide, drivers and utilities. Windows Mobility Center also includes Acer-specific settings like sharing folders overview/sharing service on /off , Bluetooth Add Device (if applicable), and a shortcut to fit...
... Windows Mobility Center by right-clicking Center. in one easy-to-find place, so you can quickly configure your Acer system to the Acer user guide, drivers and utilities. Windows Mobility Center also includes Acer-specific settings like sharing folders overview/sharing service on /off , Bluetooth Add Device (if applicable), and a shortcut to fit...
Aspire 5235 / 5535 Service Guide
Page 56
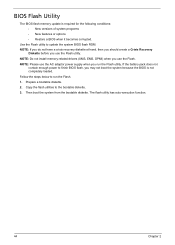
... not completely loaded. Use the Flash utility to the bootable diskette. 3. Then boot the system from the bootable diskette. NOTE: Do not install memory-related drivers (XMS, EMS, DPMI) when you use the Flash. Prepare a bootable diskette. 2. NOTE: If you do not have a crisis recovery diskette at hand, then you should...
... not completely loaded. Use the Flash utility to the bootable diskette. 3. Then boot the system from the bootable diskette. NOTE: Do not install memory-related drivers (XMS, EMS, DPMI) when you use the Flash. Prepare a bootable diskette. 2. NOTE: If you do not have a crisis recovery diskette at hand, then you should...
Aspire 5235 / 5535 Service Guide
Page 65
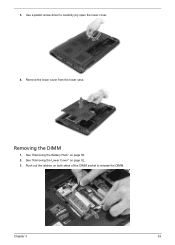
See "Removing the Battery Pack" on page 52.. 3. Push out the latches on both sides of the DIMM socket to carefully pry open the lower cover. 4. Use a plastic screw driver to release the DIMM. Removing the DIMM 1. See "Removing the Lower Cover" on page 50. 2. Remove the lower cover from the lower case. Chapter 3 53 3.
See "Removing the Battery Pack" on page 52.. 3. Push out the latches on both sides of the DIMM socket to carefully pry open the lower cover. 4. Use a plastic screw driver to release the DIMM. Removing the DIMM 1. See "Removing the Lower Cover" on page 50. 2. Remove the lower cover from the lower case. Chapter 3 53 3.
Aspire 5235 / 5535 Service Guide
Page 74
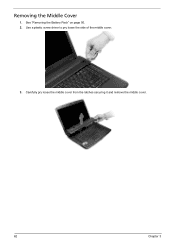
Carefully pry loose the middle cover from the latches securing it and remove the middle cover. 62 Chapter 3 Use a plastic screw driver to pry loose the side of the middle cover. 3. See "Removing the Battery Pack" on page 50. 2. Removing the Middle Cover 1.
Carefully pry loose the middle cover from the latches securing it and remove the middle cover. 62 Chapter 3 Use a plastic screw driver to pry loose the side of the middle cover. 3. See "Removing the Battery Pack" on page 50. 2. Removing the Middle Cover 1.
Aspire 5235 / 5535 Service Guide
Page 110
A write-enabled, diagnostic diskette is correctly seated in the connector on the system board. Do the following to isolate the problem to a controller, driver, or diskette. Follow the instructions in the message window. Replace the main board. Follow the instructions in the message window. Replace the main board. If ...
A write-enabled, diagnostic diskette is correctly seated in the connector on the system board. Do the following to isolate the problem to a controller, driver, or diskette. Follow the instructions in the message window. Replace the main board. Follow the instructions in the message window. Replace the main board. If ...
Aspire 5235 / 5535 Service Guide
Page 124
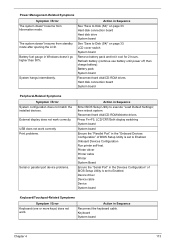
... System cannot detect the PC Card (PCMCIA) PCMCIA slot pin is from the computer. Hold and press the power switch for more than 4 seconds. Audio driver Speaker System board Speaker System board Action in Sequence Power Management-Related Symptoms Symptom / Error Action in Sequence The system will not enter hibernation See...
... System cannot detect the PC Card (PCMCIA) PCMCIA slot pin is from the computer. Hold and press the power switch for more than 4 seconds. Audio driver Speaker System board Speaker System board Action in Sequence Power Management-Related Symptoms Symptom / Error Action in Sequence The system will not enter hibernation See...
Aspire 5235 / 5535 Service Guide
Page 125
...Fn+F5, LCD/CRT/Both display switching System board System board Ensure the "Parallel Port" in Windows doesn't go higher than 90%. Device driver Device cable Device System board Keyboard/Touchpad-Related Symptoms Symptom / Error Keyboard (one or more keys) does not work correctly. LCD cover switch ... board Remove battery pack and let it cool for 2 hours. Refresh battery (continue use battery until power off, then charge battery). Printer driver Printer cable Printer System Board Ensure the "Serial Port" in Sequence Enter BIOS Setup Utility to Disk (S4)" on page 33. Power Management...
...Fn+F5, LCD/CRT/Both display switching System board System board Ensure the "Parallel Port" in Windows doesn't go higher than 90%. Device driver Device cable Device System board Keyboard/Touchpad-Related Symptoms Symptom / Error Keyboard (one or more keys) does not work correctly. LCD cover switch ... board Remove battery pack and let it cool for 2 hours. Refresh battery (continue use battery until power off, then charge battery). Printer driver Printer cable Printer System Board Ensure the "Serial Port" in Sequence Enter BIOS Setup Utility to Disk (S4)" on page 33. Power Management...


