Aspire 5534 Service Guide
Page 99
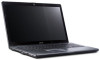
Lift the CPU clear of the socket. See "Removing the Thermal Module" on page 88. 2. Using a flat blade screw driver, rotate the CPU screw 180° counter clockwise to release the CPU from the socket. 3. Chapter 3 89 Removing the CPU 1.
Lift the CPU clear of the socket. See "Removing the Thermal Module" on page 88. 2. Using a flat blade screw driver, rotate the CPU screw 180° counter clockwise to release the CPU from the socket. 3. Chapter 3 89 Removing the CPU 1.
Aspire 5534 Service Guide
Page 124
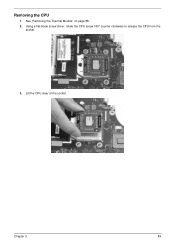
Replacing the Thermal Module IMPORTANT: Ensure all traces of thermal grease or pad adhesive from the CPU and thermal module using a lint-free cloth or cotton swab and Isopropyl Alcohol, Acetone, or other approved cleaning agent. 2. The following thermal pads are in place before replacing the Thermal Module. Place the pads as shown. 114 Chapter 3 Remove all heat pads are approved for use: • Eapus XR-PE 1. Using a flat blade screw driver, rotate the CPU screw 180° clockwise to lock the CPU into the socket. 2.
Replacing the Thermal Module IMPORTANT: Ensure all traces of thermal grease or pad adhesive from the CPU and thermal module using a lint-free cloth or cotton swab and Isopropyl Alcohol, Acetone, or other approved cleaning agent. 2. The following thermal pads are in place before replacing the Thermal Module. Place the pads as shown. 114 Chapter 3 Remove all heat pads are approved for use: • Eapus XR-PE 1. Using a flat blade screw driver, rotate the CPU screw 180° clockwise to lock the CPU into the socket. 2.
Aspire 5534 Service Guide
Page 161
...all Windows. If desktop display resolution is not running on the desktop and select Personalize´ Display Settings. Roll back the video driver to the desired resolution. If the computer is faulty and should be replaced. If the display is too dim at the highest ...date software to ensure the computer is experiencing intermittent loss of BIOS Settings If the computer is virus free. 3. d. Remove and reinstall the video driver. 8. See "Disassembly Process" on page 52. 4. Random Loss of BIOS information, perform the following actions one at a time to correct the ...
...all Windows. If desktop display resolution is not running on the desktop and select Personalize´ Display Settings. Roll back the video driver to the desired resolution. If the computer is faulty and should be replaced. If the display is too dim at the highest ...date software to ensure the computer is experiencing intermittent loss of BIOS Settings If the computer is virus free. 3. d. Remove and reinstall the video driver. 8. See "Disassembly Process" on page 52. 4. Random Loss of BIOS information, perform the following actions one at a time to correct the ...
Aspire 5534 Service Guide
Page 164
... the onscreen prompts to start Speaker Setup. Restore system and file settings from a known good date using System Restore. Roll back the audio driver to 50 and not muted. 6. b. Click Mixer to verify that other audio applications are set mid range: a. Ensure that the volume ...default). 7. Chapter 4 154 If the issue is still not resolved, see "Online Support Information" on page 191. Remove and reinstall the audio driver. 5. Ensure that all volume controls are set to the previous version, if updated recently. 4. NOTE: If Speakers does not show, right-click...
... the onscreen prompts to start Speaker Setup. Restore system and file settings from a known good date using System Restore. Roll back the audio driver to 50 and not muted. 6. b. Click Mixer to verify that other audio applications are set mid range: a. Ensure that the volume ...default). 7. Chapter 4 154 If the issue is still not resolved, see "Online Support Information" on page 191. Remove and reinstall the audio driver. 5. Ensure that all volume controls are set to the previous version, if updated recently. 4. NOTE: If Speakers does not show, right-click...

Aspire 5534 Service Guide
Page 166
... date. 11. Remove any key to start to the operating system DVD. For more information see Windows Help and Support. 5. Chapter 4 156 NOTE: Click Load Drivers if controller drives are set as the first boot device on page 52. For more information see Windows Help and Support. 9. Restart the computer and...
... date. 11. Remove any key to start to the operating system DVD. For more information see Windows Help and Support. 5. Chapter 4 156 NOTE: Click Load Drivers if controller drives are set as the first boot device on page 52. For more information see Windows Help and Support. 9. Restart the computer and...
Aspire 5534 Service Guide
Page 168
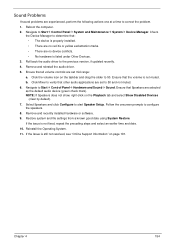
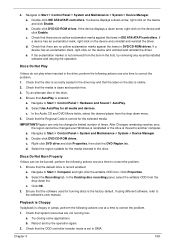
... Audio CD and DVD Movie fields, select the desired player from the drop down arrow, right-click on the device and uninstall and reinstall the driver. After Changes remaining reaches zero, the region cannot be changed a limited number of times. d. c. c. If a device has an exclamation mark, right...or jumps, perform the following actions one at a time to another computer. Check that the label on the device and uninstall and reinstall the driver. b. Discs Do Not Burn Properly If discs can only be burned, perform the following actions one at a time to the software's user ...
... Audio CD and DVD Movie fields, select the desired player from the drop down arrow, right-click on the device and uninstall and reinstall the driver. After Changes remaining reaches zero, the region cannot be changed a limited number of times. d. c. c. If a device has an exclamation mark, right...or jumps, perform the following actions one at a time to another computer. Check that the label on the device and uninstall and reinstall the driver. b. Discs Do Not Burn Properly If discs can only be burned, perform the following actions one at a time to the software's user ...
Aspire 5534 Service Guide
Page 174
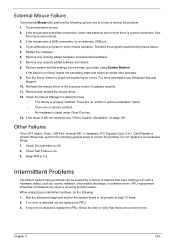
...the program experiencing mouse failure. 5. Remove any recently added software and reboot. 8. If the issue is properly installed. Roll back the mouse driver to correct the problem. 1. Check the Device Manager to do with a hardware defect, such as: cosmic radiation, electrostatic discharge, or ... system and file settings from a known good date using System Restore. Run the Event Viewer to verify mouse operation. Remove and reinstall the mouse driver. 12. Check Drive whether is ok. 3. Check Test Fixture is OK. 2. Swap M/B to correct the problem. If no device conflicts....
...the program experiencing mouse failure. 5. Remove any recently added software and reboot. 8. If the issue is properly installed. Roll back the mouse driver to correct the problem. 1. Check the Device Manager to do with a hardware defect, such as: cosmic radiation, electrostatic discharge, or ... system and file settings from a known good date using System Restore. Run the Event Viewer to verify mouse operation. Remove and reinstall the mouse driver. 12. Check Drive whether is ok. 3. Check Test Fixture is OK. 2. Swap M/B to correct the problem. If no device conflicts....

Aspire 5534 Service Guide
Page 178
...every memory range do the hard ware ECC init Report status code of every memory range Get the root bridge handle Notify pci bus driver starts to program the resource Reset the host controller IdeBus begin initialization Report that the remote terminal is being disabled Report that the ...removable media disable Peripheral removable media enable Report Status Code here for DXE_ENTRY_POINT once it is available Report that ExitBootServices() has been called Runtime driver set virtual address map Each PEIM entry point used in 80_PORT Post Code 0x00 0x01 0xA1 0xA2 0xA3 0xA4 0x06 0x07 0xA5 0xA6 0xA7...
...every memory range do the hard ware ECC init Report status code of every memory range Get the root bridge handle Notify pci bus driver starts to program the resource Reset the host controller IdeBus begin initialization Report that the remote terminal is being disabled Report that the ...removable media disable Peripheral removable media enable Report Status Code here for DXE_ENTRY_POINT once it is available Report that ExitBootServices() has been called Runtime driver set virtual address map Each PEIM entry point used in 80_PORT Post Code 0x00 0x01 0xA1 0xA2 0xA3 0xA4 0x06 0x07 0xA5 0xA6 0xA7...
Aspire 5534 Service Guide
Page 179
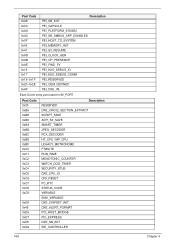
... 0xAE 0x16 0x17 0x16~0x1F 0x20~0x2E 0xAF Description PEI_SB_INIT PEI_CAPSULE PEI_PLATFORM_STAGE2 PEI_SB_SMBUS_ARP_DISABLED PEI_HOST_TO_SYSTEM PEI_MEMORY_INIT PEI_S3_RESUME PEI_CLOCK_GEN PEI_OP_PRESENCE PEI_FIND_FV PEI_H2O_DEBUG_IO PEI_H2O_DEBUG_COMM PEI_RESERVED PEI_OEM_DEFINED PEI_DXE_IPL Each Driver entry point used in 80_PORT Post Code 0x30 0xB6 0xB8 0xB9 0xBA 0xBB 0xBC 0xBE 0xBF 0xC0 0xC1 0xC2 0xC3 0xC4 0xC5 0xC6 0xC7 0xC8...
... 0xAE 0x16 0x17 0x16~0x1F 0x20~0x2E 0xAF Description PEI_SB_INIT PEI_CAPSULE PEI_PLATFORM_STAGE2 PEI_SB_SMBUS_ARP_DISABLED PEI_HOST_TO_SYSTEM PEI_MEMORY_INIT PEI_S3_RESUME PEI_CLOCK_GEN PEI_OP_PRESENCE PEI_FIND_FV PEI_H2O_DEBUG_IO PEI_H2O_DEBUG_COMM PEI_RESERVED PEI_OEM_DEFINED PEI_DXE_IPL Each Driver entry point used in 80_PORT Post Code 0x30 0xB6 0xB8 0xB9 0xBA 0xBB 0xBC 0xBE 0xBF 0xC0 0xC1 0xC2 0xC3 0xC4 0xC5 0xC6 0xC7 0xC8...


