Acer Aspire 5534 Notebook Series Start Guide
Page 11
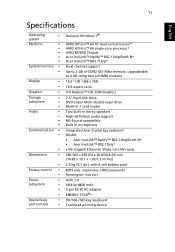
...LAN ready 380 (W) x 259 (D) x 26.4/30.8 (H) mm (14.82 x 10.1 x 1.02/1.2 inches) 2.4 kg (5.3 lbs.) with 6-cell battery pack BIOS user, supervisor, HDD passwords Kensington lock slot ACPI 3.0 48.8 W 4400 mAh 3-pin 65 W AC adapter ENERGY STAR®* 99-/100-/103-key keyboard Touchpad pointing ...Genuine Windows 7® AMD Athlon™ 64 X2 dual-core processor* AMD Athlon™ 64 single-core processor* AMD M780G Chipset Acer InviLink™ Nplify™ 802.11b/g/Draft-N* Acer InviLink™ 802.11b/g* Dual-channel support Up to 2 GB of DDR2 667 MHz memory, upgradeable to 4 GB using two soDIMM...
...LAN ready 380 (W) x 259 (D) x 26.4/30.8 (H) mm (14.82 x 10.1 x 1.02/1.2 inches) 2.4 kg (5.3 lbs.) with 6-cell battery pack BIOS user, supervisor, HDD passwords Kensington lock slot ACPI 3.0 48.8 W 4400 mAh 3-pin 65 W AC adapter ENERGY STAR®* 99-/100-/103-key keyboard Touchpad pointing ...Genuine Windows 7® AMD Athlon™ 64 X2 dual-core processor* AMD Athlon™ 64 single-core processor* AMD M780G Chipset Acer InviLink™ Nplify™ 802.11b/g/Draft-N* Acer InviLink™ 802.11b/g* Dual-channel support Up to 2 GB of DDR2 667 MHz memory, upgradeable to 4 GB using two soDIMM...
Aspire 5534 Service Guide
Page 7
... numeric keypad 10 Windows Keys 11 Hot Keys 12 Special Keys 13 Hardware Specifications and Configurations 14 System Utilities 23 BIOS Setup Utility 23 Navigating the BIOS Utility 23 Information 24 Main 25 Advanced 26 Security 28 Power 31 Boot 32 Exit 33... BIOS Flash Utility 34 DOS Flash Utility 35 WinFlash Utility 36 Remove HDD/BIOS Password Utilities 37 Removing BIOS Passwords 38 Miscellaneous Utilities 39 Machine Disassembly and Replacement 43 Disassembly Requirements 43 Related ...
... numeric keypad 10 Windows Keys 11 Hot Keys 12 Special Keys 13 Hardware Specifications and Configurations 14 System Utilities 23 BIOS Setup Utility 23 Navigating the BIOS Utility 23 Information 24 Main 25 Advanced 26 Security 28 Power 31 Boot 32 Exit 33... BIOS Flash Utility 34 DOS Flash Utility 35 WinFlash Utility 36 Remove HDD/BIOS Password Utilities 37 Removing BIOS Passwords 38 Miscellaneous Utilities 39 Machine Disassembly and Replacement 43 Disassembly Requirements 43 Related ...
Aspire 5534 Service Guide
Page 9
Table of Contents Troubleshooting 148 Common Problems 148 Power On Issue 149 No Display Issue 150 Random Loss of BIOS Settings 151 LCD Failure 152 Built-In Keyboard Failure 152 Touchpad Failure 153 Internal Speaker Failure 153 Internal Microphone Failure ...Top View 173 Bottom View 174 Clearing Password Check and BIOS Recovery 175 Clearing Password Check 175 BIOS Recovery by Crisis Disk 176 FRU (Field Replaceable Unit) List 177 Aspire 5534 Exploded Diagrams 178 Main Assembly 178 LCD Assembly 179 Aspire 5534 FRU List 180 Screw List 186 Model Definition and Configuration...
Table of Contents Troubleshooting 148 Common Problems 148 Power On Issue 149 No Display Issue 150 Random Loss of BIOS Settings 151 LCD Failure 152 Built-In Keyboard Failure 152 Touchpad Failure 153 Internal Speaker Failure 153 Internal Microphone Failure ...Top View 173 Bottom View 174 Clearing Password Check and BIOS Recovery 175 Clearing Password Check 175 BIOS Recovery by Crisis Disk 176 FRU (Field Replaceable Unit) List 177 Aspire 5534 Exploded Diagrams 178 Main Assembly 178 LCD Assembly 179 Aspire 5534 FRU List 180 Screw List 186 Model Definition and Configuration...

Aspire 5534 Service Guide
Page 12
The exact configuration of the PC depends on -LAN ready Privacy control • BIOS user, supervisor, HDD passwords • Kensington lock slot Dimensions and Weight • 380 (W) x 259 (D) x 26.4/30.8 (H) mm (14.82 x 10.1 x 1.02/1.2 inches) • 2.4 kg (5.3 lbs.) ...: 20% to 80% • Non-operating: 20% to 80% NOTE: The specifications listed above are for reference only. Wake-on the model purchased. 2 Chapter 1 • Acer InviLink™ Nplify™ 802.11b/g/Draft-N* • Acer InviLink™ 802.11b/g* • LAN: Gigabit Ethernet;
The exact configuration of the PC depends on -LAN ready Privacy control • BIOS user, supervisor, HDD passwords • Kensington lock slot Dimensions and Weight • 380 (W) x 259 (D) x 26.4/30.8 (H) mm (14.82 x 10.1 x 1.02/1.2 inches) • 2.4 kg (5.3 lbs.) ...: 20% to 80% • Non-operating: 20% to 80% NOTE: The specifications listed above are for reference only. Wake-on the model purchased. 2 Chapter 1 • Acer InviLink™ Nplify™ 802.11b/g/Draft-N* • Acer InviLink™ 802.11b/g* • LAN: Gigabit Ethernet;
Aspire 5534 Service Guide
Page 28
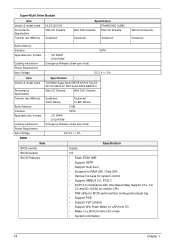
... • • CD R/RW DVD R/RW Loading mechanism Emergency Release (draw open hole) Power Requirement Input Voltage DC 5 V +/- 5% BIOS Item Specification BIOS vendor Insyde BIOS Version 3.5 BIOS Features • Flash ROM 1MB • Support ISIPP • Support multi-boot • Suspend to RAM (S3) / Disk (S4) ...8226; ACPI 2.0 compliance with Intel Speed Step Support C1e, C2, C3 and S3, S4,S5 for mobile CPU. • DMI utility for BIOS serial number configuration/asset tag • Support PXE • Support Y2K solution • Support Win Flash Wake on LAN from S3 •...
... • • CD R/RW DVD R/RW Loading mechanism Emergency Release (draw open hole) Power Requirement Input Voltage DC 5 V +/- 5% BIOS Item Specification BIOS vendor Insyde BIOS Version 3.5 BIOS Features • Flash ROM 1MB • Support ISIPP • Support multi-boot • Suspend to RAM (S3) / Disk (S4) ...8226; ACPI 2.0 compliance with Intel Speed Step Support C1e, C2, C3 and S3, S4,S5 for mobile CPU. • DMI utility for BIOS serial number configuration/asset tag • Support PXE • Support Y2K solution • Support Win Flash Wake on LAN from S3 •...
Aspire 5534 Service Guide
Page 33
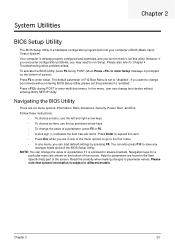
... to Chapter 4 Troubleshooting when problem arises. Please note that system information is set the parameter to enter setup. To activate the BIOS Utility, press F2 during POST to different models. Navigation keys for parameters are in square brackets. Press during POST (when Press... to "disabled". System Utilities Chapter 2 BIOS Setup Utility The BIOS Setup Utility is enclosed in any of a parameter, press F5 or F6. • A plus sign (+) indicates the item ...
... to Chapter 4 Troubleshooting when problem arises. Please note that system information is set the parameter to enter setup. To activate the BIOS Utility, press F2 during POST to different models. Navigation keys for parameters are in square brackets. Press during POST (when Press... to "disabled". System Utilities Chapter 2 BIOS Setup Utility The BIOS Setup Utility is enclosed in any of a parameter, press F5 or F6. • A plus sign (+) indicates the item ...

Aspire 5534 Service Guide
Page 34
...(UUID) is subject to different models. Parameter CPU Type CPU Speed HDD Model Name HDD Serial Number ATAPI Model Name System BIOS Version VGA BIOS Version Serial Number Asset Tag Number Product Name Manufacturer Name UUID Number Description This field shows the CPU type and speed of the...name: System BIOS Version: VGA BIOS Version: Serial Number: Asset Tag Number: Product Name: Manufacturer Name: UUID: AMD Athlon(tm) X2 Dual Core Processor L310 1200 MHz WDC WD2500BEVT-22ZCT0 WD-WXE409NM6664 TSSTcorp CDDVDW TS-U633A v0.14 ATI VGA VER01.022.002.002.033268 Aspire 5534 Acer 65E9A02C-F302-62AB...
...(UUID) is subject to different models. Parameter CPU Type CPU Speed HDD Model Name HDD Serial Number ATAPI Model Name System BIOS Version VGA BIOS Version Serial Number Asset Tag Number Product Name Manufacturer Name UUID Number Description This field shows the CPU type and speed of the...name: System BIOS Version: VGA BIOS Version: Serial Number: Asset Tag Number: Product Name: Manufacturer Name: UUID: AMD Athlon(tm) X2 Dual Core Processor L310 1200 MHz WDC WD2500BEVT-22ZCT0 WD-WXE409NM6664 TSSTcorp CDDVDW TS-U633A v0.14 ATI VGA VER01.022.002.002.033268 Aspire 5534 Acer 65E9A02C-F302-62AB...
Aspire 5534 Service Guide
Page 36
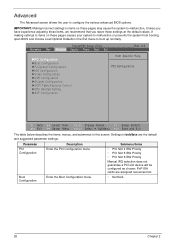
... Enter Select SubMenu F10 Save and Exit The table below describes the items, menus, and submenus in the Exit menu to configure the various advanced BIOS options. Submenu Items • PCI Slot 4 IRQ Priority • PCI Slot 5 IRQ Priority • PCI Slot 6 IRQ Priority Manual IRQ...experience adjusting these items, we recommend that you leave these pages causes your system to malfunction or prevents the system from booting, open BIOS and choose Load Optimal Defaults in this screen. InsydeH20 Setup Utility Information Main Advanced Security Power Boot Exit Rev. 3.5 XPCI Configuration ...
... Enter Select SubMenu F10 Save and Exit The table below describes the items, menus, and submenus in the Exit menu to configure the various advanced BIOS options. Submenu Items • PCI Slot 4 IRQ Priority • PCI Slot 5 IRQ Priority • PCI Slot 6 IRQ Priority Manual IRQ...experience adjusting these items, we recommend that you leave these pages causes your system to malfunction or prevents the system from booting, open BIOS and choose Load Optimal Defaults in this screen. InsydeH20 Setup Utility Information Main Advanced Security Power Boot Exit Rev. 3.5 XPCI Configuration ...

Aspire 5534 Service Guide
Page 38
... Change Values F9 Setup Default Select Menu Enter Select SubMenu F10 Save and Exit The table below describes the parameters in this password protects the BIOS Setup Utility from unauthorized use. Defines whether a password is set , this screen. Press Enter to enter setup. When set , this group...HDD Password Item Specific Help Install or Change the password and the length of the user password. Settings in this password protects the BIOS Setup Utility from unauthorized access. When user password is required or not while the events defined in boldface are the default and ...
... Change Values F9 Setup Default Select Menu Enter Select SubMenu F10 Save and Exit The table below describes the parameters in this password protects the BIOS Setup Utility from unauthorized use. Defines whether a password is set , this screen. Press Enter to enter setup. When set , this group...HDD Password Item Specific Help Install or Change the password and the length of the user password. Settings in this password protects the BIOS Setup Utility from unauthorized access. When user password is required or not while the events defined in boldface are the default and ...
Aspire 5534 Service Guide
Page 39
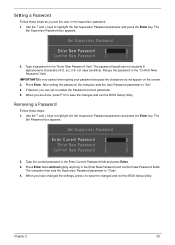
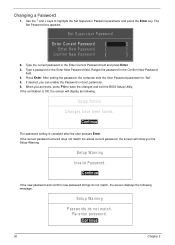
...password because the characters do not appear on boot parameter. 5. When you have changed the settings, press u to save the changes and exit the BIOS Setup Utility. Removing a Password Follow these steps as you can not exceeds 8 alphanumeric characters (A-Z, a-z, 0-9, not case sensitive). If desired, you ...Password parameter and press the Enter key. Press Enter. When you are done, press F10 to save the changes and exit the BIOS Setup Utility. After setting the password, the computer sets the User Password parameter to highlight the Set Supervisor Password parameter and press ...
...password because the characters do not appear on boot parameter. 5. When you have changed the settings, press u to save the changes and exit the BIOS Setup Utility. Removing a Password Follow these steps as you can not exceeds 8 alphanumeric characters (A-Z, a-z, 0-9, not case sensitive). If desired, you ...Password parameter and press the Enter key. Press Enter. When you are done, press F10 to save the changes and exit the BIOS Setup Utility. After setting the password, the computer sets the User Password parameter to highlight the Set Supervisor Password parameter and press ...
Aspire 5534 Service Guide
Page 40
... Password [ ] Enter New Password [ ] Confirm New Password [ ] 2. After setting the password, the computer sets the User Password parameter to save the changes and exit the BIOS Setup Utility. When you are done, press F10 to "Set". 5. Setup Warning Passwords do not match, the screen displays the following . Changing a Password 1. Setup Warning...
... Password [ ] Enter New Password [ ] Confirm New Password [ ] 2. After setting the password, the computer sets the User Password parameter to save the changes and exit the BIOS Setup Utility. When you are done, press F10 to "Set". 5. Setup Warning Passwords do not match, the screen displays the following . Changing a Password 1. Setup Warning...

Aspire 5534 Service Guide
Page 43
... System Setup and save your changes to CMOS. Exit utility without saving setup data to save or discard any changes you made and quit the BIOS Utility. Chapter 2 33 Load default values for all SETUP item. F1 Help ESC Exit Select Item F5/F6 Change Values F9 Setup Default Select Menu...
... System Setup and save your changes to CMOS. Exit utility without saving setup data to save or discard any changes you made and quit the BIOS Utility. Chapter 2 33 Load default values for all SETUP item. F1 Help ESC Exit Select Item F5/F6 Change Values F9 Setup Default Select Menu...

Aspire 5534 Service Guide
Page 44
BIOS Flash Utility The BIOS flash memory update is required for the following conditions: • New versions of system programs • New features or options • Restore a BIOS when it becomes corrupted. 34 Chapter 2
BIOS Flash Utility The BIOS flash memory update is required for the following conditions: • New versions of system programs • New features or options • Restore a BIOS when it becomes corrupted. 34 Chapter 2

Aspire 5534 Service Guide
Page 45
...DOS Flash Utility Perform the following message displays. USB FDD : 4. Execute the FLASH.BAT batch file to move it down the list, or to update BIOS. Flash is not connected, the following steps to escape the menu F1 Help ESC Exit Select Item F5/F6 Change Values F9 Setup Default Select...< > or < > to select a device, then press to move USB HDD to position 1. Plug in the AC power to enter the Setup Menu. 2. In flash BIOS, the message Please do not remove AC Power Source displays. Network Boot : Realtek Boot Agent 5. Press F2 during boot to continue. 5. Select Boot Menu to...
...DOS Flash Utility Perform the following message displays. USB FDD : 4. Execute the FLASH.BAT batch file to move it down the list, or to update BIOS. Flash is not connected, the following steps to escape the menu F1 Help ESC Exit Select Item F5/F6 Change Values F9 Setup Default Select...< > or < > to select a device, then press to move USB HDD to position 1. Plug in the AC power to enter the Setup Menu. 2. In flash BIOS, the message Please do not remove AC Power Source displays. Network Boot : Realtek Boot Agent 5. Press F2 during boot to continue. 5. Select Boot Menu to...
Aspire 5534 Service Guide
Page 47
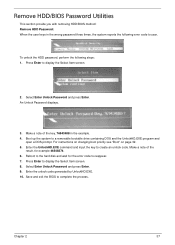
...press Enter. Make a note of the key, 76943488 in the wrong password three times, the system reports the following steps: 1. Save and exit the BIOS to display the Select Item screen. 2. An Unlock Password displays. 3. Make a note of the result, for the error code to display the Select...and the UnlockHD.EXE program and open a DOS prompt. Boot up the system to create an unlock code. Remove HDD/BIOS Password Utilities This section provide you with removing HDD/BIOS method: Remove HDD Password: When the user keys in the example. 4. Press Enter to reappear. 7. Enter the ...
...press Enter. Make a note of the key, 76943488 in the wrong password three times, the system reports the following steps: 1. Save and exit the BIOS to display the Select Item screen. 2. An Unlock Password displays. 3. Make a note of the result, for the error code to display the Select...and the UnlockHD.EXE program and open a DOS prompt. Boot up the system to create an unlock code. Remove HDD/BIOS Password Utilities This section provide you with removing HDD/BIOS method: Remove HDD Password: When the user keys in the example. 4. Press Enter to reappear. 7. Enter the ...

Aspire 5534 Service Guide
Page 48
See the image below. From a DOS prompt, Execute clnpwd.exe 2. The on the screen. Press 1 or 2 to clean the desired password shown on -screen message determines whether the function is successful or not. 38 Chapter 2 Removing BIOS Passwords: If you key in the wrong Supervisor Password three times, System Disabled displays on the screen. To reset the BIOS password, run clnpwd.exe as follows: 1.
See the image below. From a DOS prompt, Execute clnpwd.exe 2. The on the screen. Press 1 or 2 to clean the desired password shown on -screen message determines whether the function is successful or not. 38 Chapter 2 Removing BIOS Passwords: If you key in the wrong Supervisor Password three times, System Disabled displays on the screen. To reset the BIOS password, run clnpwd.exe as follows: 1.
Aspire 5534 Service Guide
Page 49
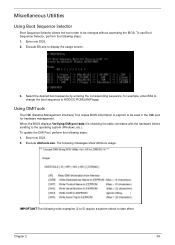
... to 5) require a system reboot to take effect Chapter 2 39 Using DMITools The DMI (Desktop Management Interface) Tool copies BIOS information to eeprom to be changes without accessing the BIOS. Execute dmitools.exe. The following messages show dmitools usage: IMPORTANT:The following steps: 1. Select the desired boot sequence by...be used in the DMI pool for example, enter BS2 to change the boot sequence to HDD|CD ROM|LAN|Floppy. When the BIOS displays Verifying DMI pool data it is checking the table correlates with the hardware before sending to display the usage screen. 3. To ...
... to 5) require a system reboot to take effect Chapter 2 39 Using DMITools The DMI (Desktop Management Interface) Tool copies BIOS information to eeprom to be changes without accessing the BIOS. Execute dmitools.exe. The following messages show dmitools usage: IMPORTANT:The following steps: 1. Select the desired boot sequence by...be used in the DMI pool for example, enter BS2 to change the boot sequence to HDD|CD ROM|LAN|Floppy. When the BIOS displays Verifying DMI pool data it is checking the table correlates with the hardware before sending to display the usage screen. 3. To ...
Aspire 5534 Service Guide
Page 161
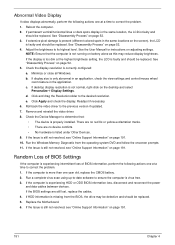
... If the Issue is still not resolved, see "Online Support Information" on the desktop and select Personalize´ Display Settings. Random Loss of BIOS information, perform the following actions one at a time to correct the problem. 1. Replace the Motherboard. 6. See "Disassembly Process" on page ... the display resolution is still not resolved, see "Online Support Information" on the screen), the LCD is experiencing intermittent loss of BIOS Settings If the computer is faulty and should be replaced. Readjust if necessary. 6. Run a complete virus scan using up-to-date...
... If the Issue is still not resolved, see "Online Support Information" on the desktop and select Personalize´ Display Settings. Random Loss of BIOS information, perform the following actions one at a time to correct the problem. 1. Replace the Motherboard. 6. See "Disassembly Process" on page ... the display resolution is still not resolved, see "Online Support Information" on the screen), the LCD is experiencing intermittent loss of BIOS Settings If the computer is faulty and should be replaced. Readjust if necessary. 6. Run a complete virus scan using up-to-date...

Aspire 5534 Service Guide
Page 166
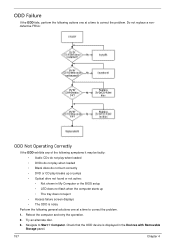
... an issue is not fixed, repeat the preceding steps and select an earlier time and date. 11. Run the Windows Memory Diagnostic Tool. Check the BIOS settings are set as the first boot device on the Boot menu. 6. HDD Not Operating Correctly If the HDD does not operate correctly, perform the... problem. 4. Remove any key to start to ensure the computer is set correctly. 7. If the issue is discovered, follow the onscreen information to enter the BIOS Utility. Chapter 4 156
... an issue is not fixed, repeat the preceding steps and select an earlier time and date. 11. Run the Windows Memory Diagnostic Tool. Check the BIOS settings are set as the first boot device on the Boot menu. 6. HDD Not Operating Correctly If the HDD does not operate correctly, perform the... problem. 4. Remove any key to start to ensure the computer is set correctly. 7. If the issue is discovered, follow the onscreen information to enter the BIOS Utility. Chapter 4 156
Aspire 5534 Service Guide
Page 167
... • DVD or CD play breaks up or jumps • Optical drive not found or not active: • Not shown in My Computer or the BIOS setup • LED does not flash when the computer starts up • The tray does not eject • Access failure screen displays • The ODD...
... • DVD or CD play breaks up or jumps • Optical drive not found or not active: • Not shown in My Computer or the BIOS setup • LED does not flash when the computer starts up • The tray does not eject • Access failure screen displays • The ODD...


