Aspire 5532 Keyboard - Acer
Aspire 5532 Keyboard

Related Manual Pages


Related Videos

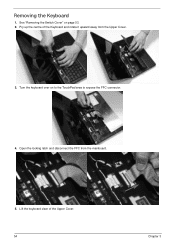
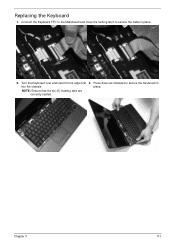
How to replace the keyboard in the Acer Aspire 5532 laptop
Duration: 2:38
Total Views: 779
Duration: 2:38
Total Views: 779
Similar Questions

Keyboard Doesn't Work, Some Bottoms Are Not Active (backspace, Enter, Some Lette
keyboard doesn't work, some bottoms are not active (backspace, enter, tab, some letters)
keyboard doesn't work, some bottoms are not active (backspace, enter, tab, some letters)
(Posted by gvsvas 11 years ago)


Keyboard Problem With Aspire 5532
Some of the keys os n my Aspire5532 are not functioning. I removed on of the offending keys and find...
Some of the keys os n my Aspire5532 are not functioning. I removed on of the offending keys and find...
(Posted by wilhelm2 13 years ago)