

Acer Aspire 5532 Notebook Series Service Guide
Page 33
...note that system information is set the parameter to expand this menu, user can change the value of F12 Boot Menu is subject to save any menu, you do not need to run this carefully when making changes to enter multi-boot menu. The default parameter of a parameter, press F5 or ...the bottom of the screen. Chapter 2 23 Please also refer to enter setup. If you are six menu options: Information, Main, Advanced, Security, Boot, and Exit. Help for a particular menu are found in any of a parameter if it is a hardware configuration program built into your computer's ...
...note that system information is set the parameter to expand this menu, user can change the value of F12 Boot Menu is subject to save any menu, you do not need to run this carefully when making changes to enter multi-boot menu. The default parameter of a parameter, press F5 or ...the bottom of the screen. Chapter 2 23 Please also refer to enter setup. If you are six menu options: Information, Main, Advanced, Security, Boot, and Exit. Help for a particular menu are found in any of a parameter if it is a hardware configuration program built into your computer's ...
Acer Aspire 5532 Notebook Series Service Guide
Page 34
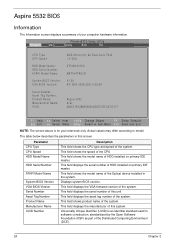
...Boot Exit CPU Type CPU Speed HDD Model Name: HDD Serial Number: ATAPI Model Name: System BIOS Version: VGA BIOS Version: Serial Number: Asset Tag Number: Product Name: Manufacturer Name: UUID: AMD Athlon(tm) 64 Dual-Core TK42 1.6 GHz ST9160310AS MATSHITADVD V1.00 ATI M92 V008.050I.0-26.00 Aspire 5532 Acer... 39353164386665643635001EECE1D377 F1 Help Esc Exit Select Item F5/F6 Change Values F9 Setup Defaults Select Menu Enter Select Sub-Menu F10 Save and Exit NOTE: The screen above is an identifier standard...
...Boot Exit CPU Type CPU Speed HDD Model Name: HDD Serial Number: ATAPI Model Name: System BIOS Version: VGA BIOS Version: Serial Number: Asset Tag Number: Product Name: Manufacturer Name: UUID: AMD Athlon(tm) 64 Dual-Core TK42 1.6 GHz ST9160310AS MATSHITADVD V1.00 ATI M92 V008.050I.0-26.00 Aspire 5532 Acer... 39353164386665643635001EECE1D377 F1 Help Esc Exit Select Item F5/F6 Change Values F9 Setup Defaults Select Menu Enter Select Sub-Menu F10 Save and Exit NOTE: The screen above is an identifier standard...
Acer Aspire 5532 Notebook Series Service Guide
Page 35
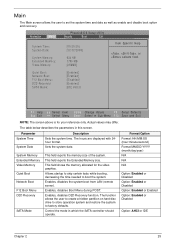
... below describes the parameters in which the SATA controller should operate. The hours are displayed with 24hour format. Enables, disables Boot Menu during POST. Enables, disables D2D Recovery function. Information M a i n System Time: System Date: System Memory: Extended Memory: Video Memory...field reports the memory size of the system. Parameter System Time System Date System Memory Extended Memory Video Memory Quiet Boot Network Boot F12 Boot Menu D2D Recovery SATA Mode Description Sets the system time. This field reports the Extended Memory size. Main The Main ...
... below describes the parameters in which the SATA controller should operate. The hours are displayed with 24hour format. Enables, disables Boot Menu during POST. Enables, disables D2D Recovery function. Information M a i n System Time: System Date: System Memory: Extended Memory: Video Memory...field reports the memory size of the system. Parameter System Time System Date System Memory Extended Memory Video Memory Quiet Boot Network Boot F12 Boot Menu D2D Recovery SATA Mode Description Sets the system time. This field reports the Extended Memory size. Main The Main ...
Acer Aspire 5532 Notebook Series Service Guide
Page 36
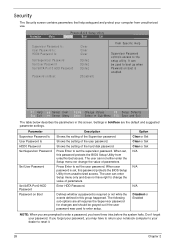
... Select Sub-Menu F10 Save and Exit The table below describes the parameters in boldface are prompted to your password. Parameter Supervisor Password Is User Password Is HDD0 Password Set Supervisor Password Set User Password Set SATA Port0 HDD Password Password on Boot: Clear Clear Clear [Enter] [... Set User Password Set SATA Port 0 HDD Password Password on Boot Description Shows the setting of the Supervisor password Shows the setting of parameters. When set , this group happened. It can not either enter the Setup menu nor change the value of the hard disk password.
... Select Sub-Menu F10 Save and Exit The table below describes the parameters in boldface are prompted to your password. Parameter Supervisor Password Is User Password Is HDD0 Password Set Supervisor Password Set User Password Set SATA Port0 HDD Password Password on Boot: Clear Clear Clear [Enter] [... Set User Password Set SATA Port 0 HDD Password Password on Boot Description Shows the setting of the Supervisor password Shows the setting of parameters. When set , this group happened. It can not either enter the Setup menu nor change the value of the hard disk password.
Acer Aspire 5532 Notebook Series Service Guide
Page 39
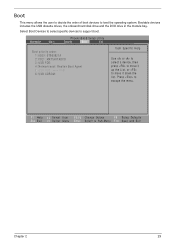
Boot This menu allows the user to decide the order of boot devices to support boot. Select Boot Devices to select specific devices to load the operating system. Information M a i n PhoenixBIOS Setup Utility Security Boot Exit Boot priority order: 1: IDE0: ST960821A 2: IDE1: MATSHITADVD 3: USB FDD: 4: Network boot: Realtek Boot Agent 5: USB HDD: xxxx USB 6: USB CDROM: Item Specific Help Use < > or...
Boot This menu allows the user to decide the order of boot devices to support boot. Select Boot Devices to select specific devices to load the operating system. Information M a i n PhoenixBIOS Setup Utility Security Boot Exit Boot priority order: 1: IDE0: ST960821A 2: IDE1: MATSHITADVD 3: USB FDD: 4: Network boot: Realtek Boot Agent 5: USB HDD: xxxx USB 6: USB CDROM: Item Specific Help Use < > or...
Acer Aspire 5532 Notebook Series Service Guide
Page 40
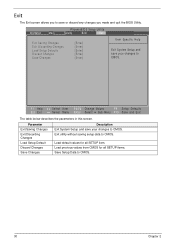
... Setup and save your changes to CMOS. F1 Help Esc Exit Select Item F5/F6 Change Values F9 Setup Defaults Select Menu Enter Select Sub-Menu F10 Save and Exit The table below describes the parameters in this screen. Load default values for all SETUP item. Exit... Data to CMOS. 30 Chapter 2 Exit The Exit screen allows you to save your changes to CMOS. Information M a i n PhoenixBIOS Setup Utility Security Boot Exit Exit Saving Changes Exit Discarding Changes Load Setup Defaults Discard Changes Save Changes [Enter] [Enter] [Enter] [Enter] [Enter] Item Specific Help Exit ...
... Setup and save your changes to CMOS. F1 Help Esc Exit Select Item F5/F6 Change Values F9 Setup Defaults Select Menu Enter Select Sub-Menu F10 Save and Exit The table below describes the parameters in this screen. Load default values for all SETUP item. Exit... Data to CMOS. 30 Chapter 2 Exit The Exit screen allows you to save your changes to CMOS. Information M a i n PhoenixBIOS Setup Utility Security Boot Exit Exit Saving Changes Exit Discarding Changes Load Setup Defaults Discard Changes Save Changes [Enter] [Enter] [Enter] [Enter] [Enter] Item Specific Help Exit ...

Acer Aspire 5532 Notebook Series Service Guide
Page 42
...F1 Help Esc Exit Select Item F5/F6 Change Values F9 Setup Defaults Select Menu Enter Select Sub-Menu F10 Save and Exit 3. The flash process begins as shown. 32 Chapter 2 Select Boot Menu to modify the boot priority order, for example, if using USB HDD to Update BIOS, move ...USB HDD to escape the menu. Execute the FLASH.BAT batch file to move it down the list. Information M a i n PhoenixBIOS Setup Utility Security Boot Exit Boot priority order: 1: IDE0:...
...F1 Help Esc Exit Select Item F5/F6 Change Values F9 Setup Defaults Select Menu Enter Select Sub-Menu F10 Save and Exit 3. The flash process begins as shown. 32 Chapter 2 Select Boot Menu to modify the boot priority order, for example, if using USB HDD to Update BIOS, move ...USB HDD to escape the menu. Execute the FLASH.BAT batch file to move it down the list. Information M a i n PhoenixBIOS Setup Utility Security Boot Exit Boot priority order: 1: IDE0:...
Acer Aspire 5532 Notebook Series Service Guide
Page 136
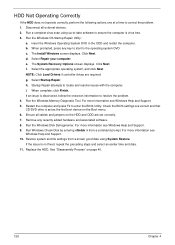
Click Next. NOTE: Click Load Drivers if controller drives are set as the first boot device on page 40. 126 Chapter 4 g. If the issue is virus free. 3. insert the Windows Operating System DVD in the ODD and restart the computer. ... and select an earlier time and date. 11. Disconnect all cables and jumpers on the HDD and ODD are required. See "Disassembly Process" on the Boot menu. 6. Ensure all external devices. 2. HDD Not Operating Correctly If the HDD does not operate correctly, perform the following actions one at a time to enter the...
Click Next. NOTE: Click Load Drivers if controller drives are set as the first boot device on page 40. 126 Chapter 4 g. If the issue is virus free. 3. insert the Windows Operating System DVD in the ODD and restart the computer. ... and select an earlier time and date. 11. Disconnect all cables and jumpers on the HDD and ODD are required. See "Disassembly Process" on the Boot menu. 6. Ensure all external devices. 2. HDD Not Operating Correctly If the HDD does not operate correctly, perform the following actions one at a time to enter the...
Acer Aspire 5532 Notebook Series Service Guide
Page 145
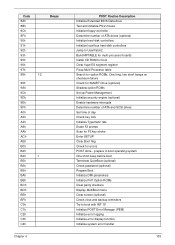
...function Initialize system error handler 135 prepare to boot operating system One short beep before boot Terminate QuietBoot (optional) Check password (optional) Prepare Boot Initialize DMI parameters Initialize PnP Option ROMs Clear parity checkers Display MultiBoot menu Clear screen (optional) Check virus and ...backup reminders Try to UserPatch2 Build MPTABLE for multi-processor boards Install CD ROM for boot Clear huge ES segment register Fixup Multi Processor table ...
...function Initialize system error handler 135 prepare to boot operating system One short beep before boot Terminate QuietBoot (optional) Check password (optional) Prepare Boot Initialize DMI parameters Initialize PnP Option ROMs Clear parity checkers Display MultiBoot menu Clear screen (optional) Check virus and ...backup reminders Try to UserPatch2 Build MPTABLE for multi-processor boards Install CD ROM for boot Clear huge ES segment register Fixup Multi Processor table ...
Aspire 5740DG Notebook Series Users Guide
Page 34
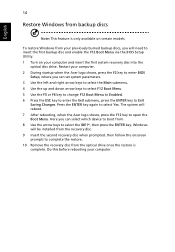
... discs, you will need to open the Boot Menu. The system will be installed from the recovery disc. 9 Insert the second recovery disc when prompted, then follow the onscreen prompts to Exit Saving Changes. Windows will reboot. 7 After rebooting, when the Acer logo shows, press the F12 key to ...insert the first backup disc and enable the F12 Boot Menu via the BIOS Setup Utility. 1 Turn on certain models. Do this before rebooting your computer and...
... discs, you will need to open the Boot Menu. The system will be installed from the recovery disc. 9 Insert the second recovery disc when prompted, then follow the onscreen prompts to Exit Saving Changes. Windows will reboot. 7 After rebooting, when the Acer logo shows, press the F12 key to ...insert the first backup disc and enable the F12 Boot Menu via the BIOS Setup Utility. 1 Turn on certain models. Do this before rebooting your computer and...


