
Acer Aspire 5517 Notebook Series Quick Guide
Page 10
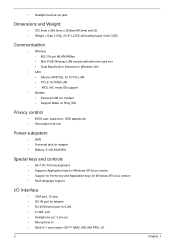
Wake-on-LAN ready 372.3 (W) x 246.5 (D) x 26.8/39.6 (H) mm (14.4 x 10.8 x 1.1/1.5 inches) 2.7 kg (6.0 lbs.) with 6-cell battery pack BIOS user, supervisor, HDD passwords Kensington lock slot ACPI 3.0 48.8 W 4400 mAh 3-pin 65 W AC adapter ENERGY STAR®* 99-/100-/103-key keyboard Touchpad pointing ...
Wake-on-LAN ready 372.3 (W) x 246.5 (D) x 26.8/39.6 (H) mm (14.4 x 10.8 x 1.1/1.5 inches) 2.7 kg (6.0 lbs.) with 6-cell battery pack BIOS user, supervisor, HDD passwords Kensington lock slot ACPI 3.0 48.8 W 4400 mAh 3-pin 65 W AC adapter ENERGY STAR®* 99-/100-/103-key keyboard Touchpad pointing ...
Acer Aspire 5517 Series Service Guide
Page 7
... the System Utilities 16 Acer GridVista (dual-display compatible 16 Hardware Specifications and Configurations 17 System Utilities 25 BIOS Setup Utility 25 Navigating the BIOS Utility 25 Aspire 5517 BIOS 26 Information 26 Main 27 Security 28 Boot 31 Exit 32 BIOS Flash Utilities 33 DOS ...Flash Utility 34 WinFlash Utility 35 Remove HDD/BIOS Password Utilities 36 Machine ...
... the System Utilities 16 Acer GridVista (dual-display compatible 16 Hardware Specifications and Configurations 17 System Utilities 25 BIOS Setup Utility 25 Navigating the BIOS Utility 25 Aspire 5517 BIOS 26 Information 26 Main 27 Security 28 Boot 31 Exit 32 BIOS Flash Utilities 33 DOS ...Flash Utility 34 WinFlash Utility 35 Remove HDD/BIOS Password Utilities 36 Machine ...
Acer Aspire 5517 Series Service Guide
Page 8
... the SD Dummy Card 118 Replacing the Battery 119 Troubleshooting 121 Common Problems 121 Power On Issue 122 No Display Issue 123 Random Loss of BIOS Settings 124 LCD Failure 125 Built-In Keyboard Failure 125 TouchPad Failure 126 Internal Speaker Failure 126 HDD Not Operating Correctly 128 ODD Failure 129...
... the SD Dummy Card 118 Replacing the Battery 119 Troubleshooting 121 Common Problems 121 Power On Issue 122 No Display Issue 123 Random Loss of BIOS Settings 124 LCD Failure 125 Built-In Keyboard Failure 125 TouchPad Failure 126 Internal Speaker Failure 126 HDD Not Operating Correctly 128 ODD Failure 129...
Acer Aspire 5517 Series Service Guide
Page 9
... View 140 Power Board 141 Clearing Password Check and BIOS Recovery 142 Clearing Password Check 142 Clear CMOS Jumper 142 BIOS Recovery by Crisis Disk 143 FRU (Field Replaceable Unit) List 145 Aspire 5517 Exploded Diagrams 146 Main Assembly 146 Base Assembly 148 Rear Assembly 149 Aspire 5517 FRU List 150 Model Definition and Configuration 160...
... View 140 Power Board 141 Clearing Password Check and BIOS Recovery 142 Clearing Password Check 142 Clear CMOS Jumper 142 BIOS Recovery by Crisis Disk 143 FRU (Field Replaceable Unit) List 145 Aspire 5517 Exploded Diagrams 146 Main Assembly 146 Base Assembly 148 Rear Assembly 149 Aspire 5517 FRU List 150 Model Definition and Configuration 160...
Acer Aspire 5517 Series Service Guide
Page 12
...; PCI-E 10/100M LAN • WOL (AC mode S5) support • Modem • External USB 2.0 modem • Support Wake on Ring (S3) Privacy control • BIOS user, supervisor, HDD passwords • Kensington lock slot Power subsystem • 65W • Universal jack for adapter • Battery: 6-cell AS2009A Special keys and controls...
...; PCI-E 10/100M LAN • WOL (AC mode S5) support • Modem • External USB 2.0 modem • Support Wake on Ring (S3) Privacy control • BIOS user, supervisor, HDD passwords • Kensington lock slot Power subsystem • 65W • Universal jack for adapter • Battery: 6-cell AS2009A Special keys and controls...
Acer Aspire 5517 Series Service Guide
Page 24
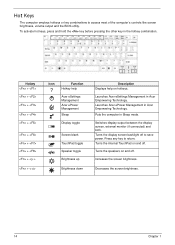
... like screen brightness, volume output and the BIOS utility. Increases the screen brightness. Switches display output between the display screen, external monitor (if connected) and both. To activate hot keys, press and hold the key before pressing the other key in Acer Empowering Technology. Launches Acer ePower Management in the hotkey combination. Puts...
... like screen brightness, volume output and the BIOS utility. Increases the screen brightness. Switches display output between the display screen, external monitor (if connected) and both. To activate hot keys, press and hold the key before pressing the other key in Acer Empowering Technology. Launches Acer ePower Management in the hotkey combination. Puts...
Acer Aspire 5517 Series Service Guide
Page 27
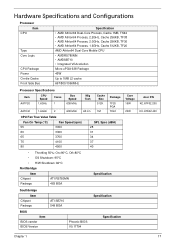
...;C, Off=80°C • OS Shutdown: 95°C • H/W Shutdown: 92°C Northbridge Item Chipset Package ATI RS780MN 465 BGA Specification Core Voltage 15W 20W Acer P/N KC.ATF02.200 KC.ATK02.420 Southbridge Item Chipset Package BIOS Item BIOS vendor BIOS Version ATI SB710 549 BGA Phoenix BIOS V0.11T04 Specification Specification Chapter 1 17
...;C, Off=80°C • OS Shutdown: 95°C • H/W Shutdown: 92°C Northbridge Item Chipset Package ATI RS780MN 465 BGA Specification Core Voltage 15W 20W Acer P/N KC.ATF02.200 KC.ATK02.420 Southbridge Item Chipset Package BIOS Item BIOS vendor BIOS Version ATI SB710 549 BGA Phoenix BIOS V0.11T04 Specification Specification Chapter 1 17
Acer Aspire 5517 Series Service Guide
Page 28
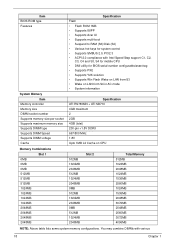
... DIMM Speed Supports DIMM voltage Cache Specification Flash • Flash ROM 1MB • Supports ISIPP • Supports Acer UI • Supports multi-boot • Suspend to RAM (S3)/Disk (S4) • Various hot-keys for BIOS serial number configurable/asset tag • Supports PXE • Supports Y2K solution • Supports Win Flash...
... DIMM Speed Supports DIMM voltage Cache Specification Flash • Flash ROM 1MB • Supports ISIPP • Supports Acer UI • Supports multi-boot • Suspend to RAM (S3)/Disk (S4) • Various hot-keys for BIOS serial number configurable/asset tag • Supports PXE • Supports Y2K solution • Supports Win Flash...
Acer Aspire 5517 Series Service Guide
Page 35
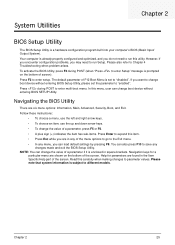
... There are shown on the bottom of the screen. Read this carefully when making changes to run Setup. Chapter 2 25 System Utilities Chapter 2 BIOS Setup Utility The BIOS Setup Utility is enclosed in any of a parameter, press F5 or F6. • A plus sign (+) indicates the item has sub-items. Press Enter... to the Exit menu. • In any changes made and exit the BIOS Setup Utility. If you do not need to enter Setup" message is prompted on the bottom of screen). Press during POST (when "Press to run...
... There are shown on the bottom of the screen. Read this carefully when making changes to run Setup. Chapter 2 25 System Utilities Chapter 2 BIOS Setup Utility The BIOS Setup Utility is enclosed in any of a parameter, press F5 or F6. • A plus sign (+) indicates the item has sub-items. Press Enter... to the Exit menu. • In any changes made and exit the BIOS Setup Utility. If you do not need to enter Setup" message is prompted on the bottom of screen). Press during POST (when "Press to run...
Acer Aspire 5517 Series Service Guide
Page 36
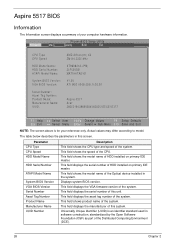
... of this system. This field displays the manufacturer of this screen. This field shows the model name of your reference only. Aspire 5517 BIOS Information The Information screen displays a summary of the Optical device installed in the system. This field displays the asset tag number...: ATAPI Model Name: System BIOS Version: VGA BIOS Version: Serial Number: Asset Tag Number: Product Name: Manufacturer Name: UUID: AMD Athlon(tm) X2 ZM-84 2300 Mhz ST960821A-(PM) 3LF005DB MATSHITADVD V1.00 ATI M92 V008.050I.0-26.00 Aspire 5517 Acer 39353164386665643635001EECE1D377 F1 Help Esc Exit ...
... of this system. This field displays the manufacturer of this screen. This field shows the model name of your reference only. Aspire 5517 BIOS Information The Information screen displays a summary of the Optical device installed in the system. This field displays the asset tag number...: ATAPI Model Name: System BIOS Version: VGA BIOS Version: Serial Number: Asset Tag Number: Product Name: Manufacturer Name: UUID: AMD Athlon(tm) X2 ZM-84 2300 Mhz ST960821A-(PM) 3LF005DB MATSHITADVD V1.00 ATI M92 V008.050I.0-26.00 Aspire 5517 Acer 39353164386665643635001EECE1D377 F1 Help Esc Exit ...
Acer Aspire 5517 Series Service Guide
Page 38
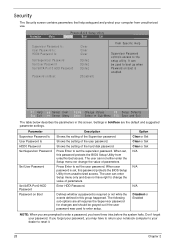
...notebook computer to your dealer to enter setup. When user password is required or not while the events defined in this password protects the BIOS Setup Utility from unauthorized use. Option Clear or Set Clear or Set Clear or Set N/A N/A N/A Disabled or Enabled NOTE: When ... Values F9 Setup Defaults Select Menu Enter Select Sub-Menu F10 Save and Exit The table below describes the parameters in this password protects the BIOS Setup Utility from unauthorized access. Defines whether a password is set the user password. Don't forget your password. Information M a i n PhoenixBIOS ...
...notebook computer to your dealer to enter setup. When user password is required or not while the events defined in this password protects the BIOS Setup Utility from unauthorized use. Option Clear or Set Clear or Set Clear or Set N/A N/A N/A Disabled or Enabled NOTE: When ... Values F9 Setup Defaults Select Menu Enter Select Sub-Menu F10 Save and Exit The table below describes the parameters in this password protects the BIOS Setup Utility from unauthorized access. Defines whether a password is set the user password. Don't forget your password. Information M a i n PhoenixBIOS ...

Acer Aspire 5517 Series Service Guide
Page 39
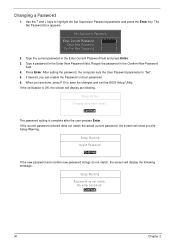
... Enter Current Password field and press Enter. 3. Removing a Password Follow these steps as you are done, press F10 to save the changes and exit the BIOS Setup Utility. Type the current password in the "Enter New Password" field. The Set Supervisor Password box appears: Set Supervisor Password Enter New Password [ ]..." field. Use the ↑ and ↓ keys to "Clear". 4. If desired, you have changed the settings, press u to save the changes and exit the BIOS Setup Utility. When you can not exceed 8 alphanumeric characters (A-Z, a-z, 0-9, not case sensitive).
... Enter Current Password field and press Enter. 3. Removing a Password Follow these steps as you are done, press F10 to save the changes and exit the BIOS Setup Utility. Type the current password in the "Enter New Password" field. The Set Supervisor Password box appears: Set Supervisor Password Enter New Password [ ]..." field. Use the ↑ and ↓ keys to "Clear". 4. If desired, you have changed the settings, press u to save the changes and exit the BIOS Setup Utility. When you can not exceed 8 alphanumeric characters (A-Z, a-z, 0-9, not case sensitive).
Acer Aspire 5517 Series Service Guide
Page 40
... password in the Confirm New Password field. 4. After setting the password, the computer sets the User Password parameter to save the changes and exit the BIOS Setup Utility. Setup Warning Invalid Password. [Continue] If the new password and confirm new password strings do not match. Use the ↑ and ↓ keys...
... password in the Confirm New Password field. 4. After setting the password, the computer sets the User Password parameter to save the changes and exit the BIOS Setup Utility. Setup Warning Invalid Password. [Continue] If the new password and confirm new password strings do not match. Use the ↑ and ↓ keys...
Acer Aspire 5517 Series Service Guide
Page 42
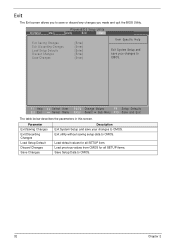
Exit The Exit screen allows you made and quit the BIOS Utility. Parameter Exit Saving Changes Exit Discarding Changes Load Setup Default Discard Changes Save Changes Description Exit System Setup and save or discard any changes ...
Exit The Exit screen allows you made and quit the BIOS Utility. Parameter Exit Saving Changes Exit Discarding Changes Load Setup Default Discard Changes Save Changes Description Exit System Setup and save or discard any changes ...
Acer Aspire 5517 Series Service Guide
Page 43
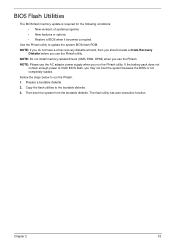
NOTE: Please use the AC adaptor power supply when you use the Phlash utility. Copy the flash utilities to update the system BIOS flash ROM. Chapter 2 33 Prepare a bootable diskette. 2. NOTE: Do not install memory-related drivers (XMS, EMS, DPMI) when you run the Phlash. 1. ... bootable diskette. If the battery pack does not contain enough power to run the Phlash utility. BIOS Flash Utilities The BIOS flash memory update is not completely loaded. Fellow the steps below to finish BIOS flash, you use the Phlash. NOTE: If you do not have a crisis recovery diskette at...
NOTE: Please use the AC adaptor power supply when you use the Phlash utility. Copy the flash utilities to update the system BIOS flash ROM. Chapter 2 33 Prepare a bootable diskette. 2. NOTE: Do not install memory-related drivers (XMS, EMS, DPMI) when you run the Phlash. 1. ... bootable diskette. If the battery pack does not contain enough power to run the Phlash utility. BIOS Flash Utilities The BIOS flash memory update is not completely loaded. Fellow the steps below to finish BIOS flash, you use the Phlash. NOTE: If you do not have a crisis recovery diskette at...
Acer Aspire 5517 Series Service Guide
Page 44
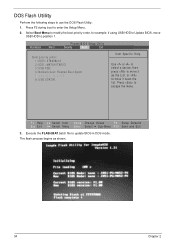
Select Boot Menu to modify the boot priority order, for example, if using USB HDD to Update BIOS, move USB HDD to escape the menu. Press to position 1. Press F2 during boot to move it down the list. Information M a i n PhoenixBIOS Setup Utility Security .../F6 Change Values F9 Setup Defaults Select Menu Enter Select Sub-Menu F10 Save and Exit 3. DOS Flash Utility Perform the following steps to update BIOS in DOS mode. The flash process begins as shown. 34 Chapter 2 Execute the FLASH.BAT batch file to use the DOS Flash Utility: 1.
Select Boot Menu to modify the boot priority order, for example, if using USB HDD to Update BIOS, move USB HDD to escape the menu. Press to position 1. Press F2 during boot to move it down the list. Information M a i n PhoenixBIOS Setup Utility Security .../F6 Change Values F9 Setup Defaults Select Menu Enter Select Sub-Menu F10 Save and Exit 3. DOS Flash Utility Perform the following steps to update BIOS in DOS mode. The flash process begins as shown. 34 Chapter 2 Execute the FLASH.BAT batch file to use the DOS Flash Utility: 1.
Acer Aspire 5517 Series Service Guide
Page 45
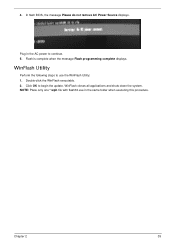
In flash BIOS, the message Please do not remove AC Power Source displays. 4. WinFlash closes all applications and shuts down the system. WinFlash Utility Perform the following steps to begin the update. NOTE: Place only one *.wph file with flash32.exe in the AC power to continue. 5. Plug in the same folder when executing this procedure. Double-click the WinFlash executable. 2. Chapter 2 35 Flash is complete when the message Flash programming complete displays. Click OK to use the WinFlash Utility: 1.
In flash BIOS, the message Please do not remove AC Power Source displays. 4. WinFlash closes all applications and shuts down the system. WinFlash Utility Perform the following steps to begin the update. NOTE: Place only one *.wph file with flash32.exe in the AC power to continue. 5. Plug in the same folder when executing this procedure. Double-click the WinFlash executable. 2. Chapter 2 35 Flash is complete when the message Flash programming complete displays. Click OK to use the WinFlash Utility: 1.

Acer Aspire 5517 Series Service Guide
Page 46
... :46548274 4. Execute the UnlockHD.EXE file to create the unlock code in DOS Mode using the format UnlockHD [Encode code] with details about removing HDD/BIOS password: Remove HDD Password: If you key in the wrong HDD password three times, an error is generated for unlocking the HDD. To reset the... HDD password, perform the following steps: 1. An error code is generated. Remove HDD/BIOS Password Utilities This section provides you with the code noted in the password to unlock the HDD. 36 Chapter 2
... :46548274 4. Execute the UnlockHD.EXE file to create the unlock code in DOS Mode using the format UnlockHD [Encode code] with details about removing HDD/BIOS password: Remove HDD Password: If you key in the wrong HDD password three times, an error is generated for unlocking the HDD. To reset the... HDD password, perform the following steps: 1. An error code is generated. Remove HDD/BIOS Password Utilities This section provides you with the code noted in the password to unlock the HDD. 36 Chapter 2
Acer Aspire 5517 Series Service Guide
Page 47
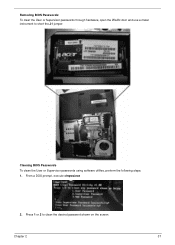
Press 1 or 2 to short the J1 jumper. Removing BIOS Passwords: To clear the User or Supervisor passwords through hardware, open the WLAN door and use a metal instrument to clean the desired password shown on the screen. Chapter 2 37 From a DOS prompt, execute clnpwd.exe 2. Cleaning BIOS Passwords To clean the User or Supervisor passwords using software utilites, perform the following steps: 1.
Press 1 or 2 to short the J1 jumper. Removing BIOS Passwords: To clear the User or Supervisor passwords through hardware, open the WLAN door and use a metal instrument to clean the desired password shown on the screen. Chapter 2 37 From a DOS prompt, execute clnpwd.exe 2. Cleaning BIOS Passwords To clean the User or Supervisor passwords using software utilites, perform the following steps: 1.
Acer Aspire 5517 Series Service Guide
Page 48
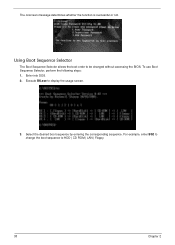
Execute BS.exe to HDD | CD ROM | LAN | Floppy. 38 Chapter 2 To use Boot Sequence Selector, perform the following steps: 1. Select the desired boot sequence by entering the corresponding sequence. Enter into DOS. 2. For example, enter BS2 to change the boot sequence to display the usage screen. 3. Using Boot Sequence Selector The Boot Sequence Selector allows the boot order to be changed without accessing the BIOS. The onscreen message determines whether the function is successful or not.
Execute BS.exe to HDD | CD ROM | LAN | Floppy. 38 Chapter 2 To use Boot Sequence Selector, perform the following steps: 1. Select the desired boot sequence by entering the corresponding sequence. Enter into DOS. 2. For example, enter BS2 to change the boot sequence to display the usage screen. 3. Using Boot Sequence Selector The Boot Sequence Selector allows the boot order to be changed without accessing the BIOS. The onscreen message determines whether the function is successful or not.


