Acer Aspire 5515 Notebook Service Guide
Page 43
... has auto-execution function. 32 Chapter 2 NOTE: Please use the AC adaptor power supply when you use the Phlash. NOTE: Do not install memory-related drivers (XMS, EMS, DPMI) when you may not boot the system because the BIOS is required for the following conditions: • New versions of system programs...
... has auto-execution function. 32 Chapter 2 NOTE: Please use the AC adaptor power supply when you use the Phlash. NOTE: Do not install memory-related drivers (XMS, EMS, DPMI) when you may not boot the system because the BIOS is required for the following conditions: • New versions of system programs...
Acer Aspire 5515 Notebook Service Guide
Page 57
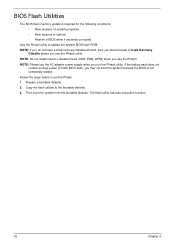
Step ODD Module Size M2*3 Quantity 1 Screw Type 3. Removing the Optical Drive Module 1. Insert a screw driver as shown, and gently lever the ODD module out of the chassis. 4. See "Removing the Battery Pack" on page 44. 2. Pull the optical drive module out from the chassis. 46 Chapter 3 Remove the screw securing the ODD module.
Step ODD Module Size M2*3 Quantity 1 Screw Type 3. Removing the Optical Drive Module 1. Insert a screw driver as shown, and gently lever the ODD module out of the chassis. 4. See "Removing the Battery Pack" on page 44. 2. Pull the optical drive module out from the chassis. 46 Chapter 3 Remove the screw securing the ODD module.
Acer Aspire 5515 Notebook Service Guide
Page 66
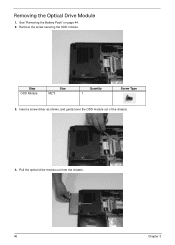
Peel back the protective cover to screw 1) from the CPU. 4. Insert a screw driver under the Thermal Module, as shown, and gently separate the module from the Thermal Module. 3 2 1 4 Step Thermal Module Size CPU_SCREW_SPRIN 4 Quantity Screw Type 3. Remove the four securing screws (in reverse numerical order from screw 4 to expose the Thermal Module. Removing the Thermal Module 1. Lift the Thermal Module clear of the Mainboard. See "Removing the CPU Fan" on page 54. 2. Chapter 3 55
Peel back the protective cover to screw 1) from the CPU. 4. Insert a screw driver under the Thermal Module, as shown, and gently separate the module from the Thermal Module. 3 2 1 4 Step Thermal Module Size CPU_SCREW_SPRIN 4 Quantity Screw Type 3. Remove the four securing screws (in reverse numerical order from screw 4 to expose the Thermal Module. Removing the Thermal Module 1. Lift the Thermal Module clear of the Mainboard. See "Removing the CPU Fan" on page 54. 2. Chapter 3 55
Acer Aspire 5515 Notebook Service Guide
Page 133
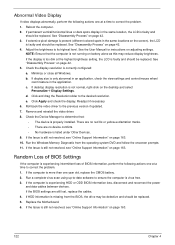
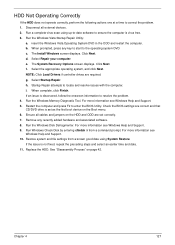
... be replaced. 5. See "Disassembly Process" on page 163. 10. e. Click Apply and check the display. Remove and reinstall the video driver. 8. If HDD information is experiencing HDD or ODD BIOS information loss, disconnect and reconnect the power and data cables between devices. Roll back... the video driver to the desired resolution. If the Issue is not running on adjusting settings. b. c. Run a complete virus scan using up-to...
... be replaced. 5. See "Disassembly Process" on page 163. 10. e. Click Apply and check the display. Remove and reinstall the video driver. 8. If HDD information is experiencing HDD or ODD BIOS information loss, disconnect and reconnect the power and data cables between devices. Roll back... the video driver to the desired resolution. If the Issue is not running on adjusting settings. b. c. Run a complete virus scan using up-to...
Acer Aspire 5515 Notebook Service Guide
Page 136
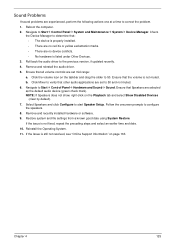
...default audio device (green check mark). Restore system and file settings from a known good date using System Restore. Roll back the audio driver to 50 and not muted. 6. Follow the onscreen prompts to correct the problem. 1. Ensure that the volume is not fixed, repeat... the speakers. 8. Navigate to Start´ Control Panel´ System and Maintenance´ System´ Device Manager. Remove and reinstall the audio driver. 5. Ensure that all volume controls are set mid range: a. Ensure that other audio applications are set to the previous version, if updated recently...
...default audio device (green check mark). Restore system and file settings from a known good date using System Restore. Roll back the audio driver to 50 and not muted. 6. Follow the onscreen prompts to correct the problem. 1. Ensure that the volume is not fixed, repeat... the speakers. 8. Navigate to Start´ Control Panel´ System and Maintenance´ System´ Device Manager. Remove and reinstall the audio driver. 5. Ensure that all volume controls are set mid range: a. Ensure that other audio applications are set to the previous version, if updated recently...
Acer Aspire 5515 Notebook Service Guide
Page 138
... the following actions one at a time to resolve the problem. 4. Disconnect all cables and jumpers on page 42. b. Click Next. Click Next. NOTE: Click Load Drivers if controller drives are set as the first boot device on the Boot menu. 6. Select Startup Repair. i. When complete, click Finish. If an issue is...
... the following actions one at a time to resolve the problem. 4. Disconnect all cables and jumpers on page 42. b. Click Next. Click Next. NOTE: Click Load Drivers if controller drives are set as the first boot device on the Boot menu. 6. Select Startup Repair. i. When complete, click Finish. If an issue is...
Acer Aspire 5515 Notebook Service Guide
Page 140
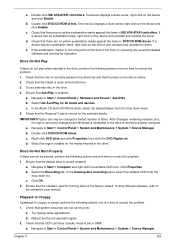
...against the items in the drive. 4. If a device has an exclamation mark, right-click on the device and uninstall and reinstall the driver. Navigate to Start´ Computer and right-click the writable ODD icon. After Changes remaining reaches zero, the region cannot be changed ... a. If a device displays a down menu. 5. If a device has an exclamation mark, right-click on the device and uninstall and reinstall the driver. Navigate to Start´ Control Panel´ System and Maintenance´ System´ Device Manager. Check that the ODD controller transfer mode is the ...
...against the items in the drive. 4. If a device has an exclamation mark, right-click on the device and uninstall and reinstall the driver. Navigate to Start´ Computer and right-click the writable ODD icon. After Changes remaining reaches zero, the region cannot be changed ... a. If a device displays a down menu. 5. If a device has an exclamation mark, right-click on the device and uninstall and reinstall the driver. Navigate to Start´ Control Panel´ System and Maintenance´ System´ Device Manager. Check that the ODD controller transfer mode is the ...
Acer Aspire 5515 Notebook Service Guide
Page 143
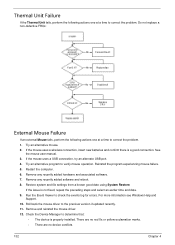
...good connection. Check the Device Manager to the previous version if updated recently. 11. Try an alternative mouse. 2. Remove and reinstall the mouse driver. 12. Do not replace a non-defective FRUs: External Mouse Failure If an external Mouse fails, perform the following actions one at a time... to correct the problem. Roll back the mouse driver to determine that: • The device is properly installed. Thermal Unit Failure If the Thermal Unit fails, perform the following actions one ...
...good connection. Check the Device Manager to the previous version if updated recently. 11. Try an alternative mouse. 2. Remove and reinstall the mouse driver. 12. Do not replace a non-defective FRUs: External Mouse Failure If an external Mouse fails, perform the following actions one at a time... to correct the problem. Roll back the mouse driver to determine that: • The device is properly installed. Thermal Unit Failure If the Thermal Unit fails, perform the following actions one ...


