
Aspire 5500Z Service Guide
Page 41
key activates accelerators. NOTE: The screen above is for your reference only. Actual values may differ. button or key accept entries. button or key reject entries. Use cursor, spacebar, and numeric keys to select a control. Chapter 2 33 Insyde Software SCU Main Advanced Security May 20, 2005 5:40:09 AM Boot Exit Date and Time Power On Display Power On Display ˇ Quiet Boot ˇ LCD Auto DIM (˙ ) Auto ( ) Both ˇ Network Boot _ F12 Boot Menu OK ˇ D2D Recovery Cancel Press key to change values.
key activates accelerators. NOTE: The screen above is for your reference only. Actual values may differ. button or key accept entries. button or key reject entries. Use cursor, spacebar, and numeric keys to select a control. Chapter 2 33 Insyde Software SCU Main Advanced Security May 20, 2005 5:40:09 AM Boot Exit Date and Time Power On Display Power On Display ˇ Quiet Boot ˇ LCD Auto DIM (˙ ) Auto ( ) Both ˇ Network Boot _ F12 Boot Menu OK ˇ D2D Recovery Cancel Press key to change values.
Aspire 5500Z Service Guide
Page 42
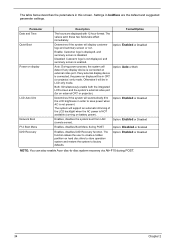
... the integrated LCD screen and the system's external video port (for an external CRT or projector). Option: Disabled or Enabled Enables, disables D2D Recovery function. If any display device is not present. Otherwise it will be in LCD only mode. Option: Enabled or Disabled Enables, disables the ...logo and summary screen or not. The function allows the user to factory defaults. Option: Enabled or Disabled NOTE: You can also enable Acer disc-to save power when AC is connected on hard disc drive to store operation system and restore the system to create a hidden ...
... the integrated LCD screen and the system's external video port (for an external CRT or projector). Option: Disabled or Enabled Enables, disables D2D Recovery function. If any display device is not present. Otherwise it will be in LCD only mode. Option: Enabled or Disabled Enables, disables the ...logo and summary screen or not. The function allows the user to factory defaults. Option: Enabled or Disabled NOTE: You can also enable Acer disc-to save power when AC is connected on hard disc drive to store operation system and restore the system to create a hidden ...
Aspire 5500Z Service Guide
Page 43
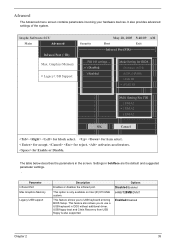
... Infrared Port(FIR Max. for block select. This option is also supported. It also provides advanced settings of the system. USB floppy boot and Crisis Recovery from USB floppy is only available on Intel (R) 915 UMA system.
... Infrared Port(FIR Max. for block select. This option is also supported. It also provides advanced settings of the system. USB floppy boot and Crisis Recovery from USB floppy is only available on Intel (R) 915 UMA system.
Aspire 5500Z Service Guide
Page 47
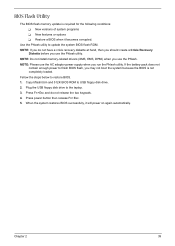
... Fn+Esc. 5. Fellow the steps below to update the system BIOS flash ROM. Press Fn+Esc and do not have a crisis recovery diskette at hand, then you should create a Crisis Recovery Diskette before you do not release the two keypads. 4. When the system restores BIOS successfully, it becomes corrupted. NOTE: Please use...
... Fn+Esc. 5. Fellow the steps below to update the system BIOS flash ROM. Press Fn+Esc and do not have a crisis recovery diskette at hand, then you should create a Crisis Recovery Diskette before you do not release the two keypads. 4. When the system restores BIOS successfully, it becomes corrupted. NOTE: Please use...
Aspire 5500Z User's Guide - EN
Page 4
...your notebook. For more productive, please refer to the AcerSystem User's Guide. Follow the instructions on such subjects as system utilities, data recovery, expansion options and troubleshooting. This guide contains detailed information on the screen to complete the installation. If Adobe Reader is available in Portable... 2 Click on page 11 for meeting your mobile computing needs. iv First things first We would like to thank you for making an Acer notebook your choice for the location of the power button. See "Front view" on AcerSystem User's Guide. It is not installed on ...
...your notebook. For more productive, please refer to the AcerSystem User's Guide. Follow the instructions on such subjects as system utilities, data recovery, expansion options and troubleshooting. This guide contains detailed information on the screen to complete the installation. If Adobe Reader is available in Portable... 2 Click on page 11 for meeting your mobile computing needs. iv First things first We would like to thank you for making an Acer notebook your choice for the location of the power button. See "Front view" on AcerSystem User's Guide. It is not installed on ...
Aspire 5500Z User's Guide - EN
Page 9
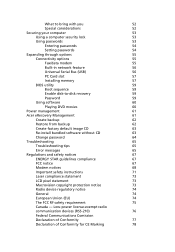
...) 56 PC Card slot 57 Installing memory 57 BIOS utility 59 Boot sequence 59 Enable disk-to-disk recovery 59 Password 59 Using software 60 Playing DVD movies 60 Power management 61 Acer eRecovery Management 61 Create backup 62 Restore from backup 62 Create factory default image CD 63 Re-install bundled...
...) 56 PC Card slot 57 Installing memory 57 BIOS utility 59 Boot sequence 59 Enable disk-to-disk recovery 59 Password 59 Using software 60 Playing DVD movies 60 Power management 61 Acer eRecovery Management 61 Create backup 62 Restore from backup 62 Create factory default image CD 63 Re-install bundled...
Aspire 5500Z User's Guide - EN
Page 17
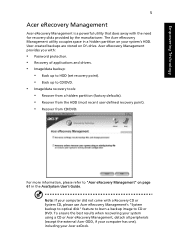
... stored on your system's HDD. The Acer eRecovery Management utility occupies space in the AcerSystem User's Guide. Empowering Technology 5 Acer eRecovery Management Acer eRecovery Management is a powerful utility that does away with : • Password protection. • Recovery of applications and drivers. • Image... your system using a CD or Acer eRecovery Management, detach all peripherals (except the external Acer ODD, if your computer has one), including your computer did not come with a Recovery CD or System CD, please use Acer eRecovery Management's "System backup to ...
... stored on your system's HDD. The Acer eRecovery Management utility occupies space in the AcerSystem User's Guide. Empowering Technology 5 Acer eRecovery Management Acer eRecovery Management is a powerful utility that does away with : • Password protection. • Recovery of applications and drivers. • Image... your system using a CD or Acer eRecovery Management, detach all peripherals (except the external Acer ODD, if your computer has one), including your computer did not come with a Recovery CD or System CD, please use Acer eRecovery Management's "System backup to ...
Aspire 5500Z User's Guide - EN
Page 46
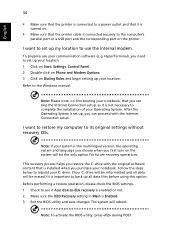
...modem. Note: If your system is the multilingual version, the operating system and language you choose when you purchase your notebook. This recovery process helps you need to set up my location to use your communication software (e.g. Note: To activate the BIOS utility, press during ...drive. (Your C: drive will be the only option for future recovery operations. Before performing a restore operation, please check the BIOS settings. 1 Check to see if Acer disk-to-disk recovery is enabled or not. 2 Make sure the D2D Recovery setting in Main is Enabled. 3 Exit the BIOS utility and ...
...modem. Note: If your system is the multilingual version, the operating system and language you choose when you purchase your notebook. This recovery process helps you need to set up my location to use your communication software (e.g. Note: To activate the BIOS utility, press during ...drive. (Your C: drive will be the only option for future recovery operations. Before performing a restore operation, please check the BIOS settings. 1 Check to see if Acer disk-to-disk recovery is enabled or not. 2 Make sure the D2D Recovery setting in Main is Enabled. 3 Exit the BIOS utility and ...

Aspire 5500Z User's Guide - EN
Page 47
...a helping hand. If the country you are required to provide the following information available when you need to perform system recovery. Please consult http://global.acer.com. You are traveling in does not have the following information: Name Address Telephone number Machine and model type Serial number..., authorized service centers is in contact with your problems efficiently. This passport contains all you call Acer for online service, and please be at the same time to enter the recovery process. 3 Refer to the onscreen instructions to know about the ITW program. A list of...
...a helping hand. If the country you are required to provide the following information available when you need to perform system recovery. Please consult http://global.acer.com. You are traveling in does not have the following information: Name Address Telephone number Machine and model type Serial number..., authorized service centers is in contact with your problems efficiently. This passport contains all you call Acer for online service, and please be at the same time to enter the recovery process. 3 Refer to the onscreen instructions to know about the ITW program. A list of...

Aspire 5500Z User's Guide - EN
Page 71
... boot, activate the BIOS utility, then select Security from the categories listed at the top of the screen and use the and keys to -disk recovery (hard disk recovery), activate the BIOS utility, then select Main from the categories listed at the top of the screen. Enable disk-to-disk... recovery To enable disk-to enable this feature. Find D2D Recovery at the top of the screen. However, if you encounter configuration problems, you do not need to run this value to...
... boot, activate the BIOS utility, then select Security from the categories listed at the top of the screen and use the and keys to -disk recovery (hard disk recovery), activate the BIOS utility, then select Main from the categories listed at the top of the screen. Enable disk-to-disk... recovery To enable disk-to enable this feature. Find D2D Recovery at the top of the screen. However, if you encounter configuration problems, you do not need to run this value to...

Aspire 5500Z User's Guide - EN
Page 74
... to Windows XP. 2 Press + to open the Acer eRecovery Management utility. 3 Enter the password to proceed. The default password is six zeros. 4 In the Acer eRecovery Management window, select Recovery settings and click Next. 5 In the Recovery settings window, select Backup snapshot image and click Next.... 6 Select the backup method. The default password is six zeros. 4 In the Acer eRecovery Management window, select Recovery actions and click Next. 5 Select the desired restore action and follow the onscreen instructions to the Create backup section....
... to Windows XP. 2 Press + to open the Acer eRecovery Management utility. 3 Enter the password to proceed. The default password is six zeros. 4 In the Acer eRecovery Management window, select Recovery settings and click Next. 5 In the Recovery settings window, select Backup snapshot image and click Next.... 6 Select the backup method. The default password is six zeros. 4 In the Acer eRecovery Management window, select Recovery actions and click Next. 5 Select the desired restore action and follow the onscreen instructions to the Create backup section....
Aspire 5500Z User's Guide - EN
Page 75
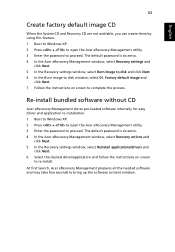
... instructions on screen to disk window, select 01. The default password is six zeros. 4 In the Acer eRecovery Management window, select Recovery settings and click Next. 5 In the Recovery settings window, select Burn image to disk and click Next. 6 In the Burn image to re-install... password to bring up the software content window. The default password is six zeros. 4 In the Acer eRecovery Management window, select Recovery actions and click Next. 5 In the Recovery settings window, select Reinstall applications/drivers and click Next. 6 Select the desired driver/application and follow the...
... instructions on screen to disk window, select 01. The default password is six zeros. 4 In the Acer eRecovery Management window, select Recovery settings and click Next. 5 In the Recovery settings window, select Burn image to disk and click Next. 6 In the Burn image to re-install... password to bring up the software content window. The default password is six zeros. 4 In the Acer eRecovery Management window, select Recovery actions and click Next. 5 In the Recovery settings window, select Reinstall applications/drivers and click Next. 6 Select the desired driver/application and follow the...

Aspire 5500Z User's Guide - EN
Page 76
... to Windows, you can be changed by the user. The default password is six zeros. 4 In the Acer eRecovery Management window, select Recovery settings and click Next. 5 In the Recovery settings window, select Password: Change Acer eRecovery Management password and click Next. 6 Follow the instructions on screen to proceed. Follow the steps below to...
... to Windows, you can be changed by the user. The default password is six zeros. 4 In the Acer eRecovery Management window, select Recovery settings and click Next. 5 In the Recovery settings window, select Password: Change Acer eRecovery Management password and click Next. 6 Follow the instructions on screen to proceed. Follow the steps below to...


