Aspire 5349, 5749, 5749Z Service Guide
Page 7
Using DMITools 2-23 Using STUUID 2-26 Using the LAN MAC EEPROM Utility 2-27 Crisis Disk Recovery 2-28 CHAPTER 3 Machine Maintenance Procedures Introduction 3-5 General Information 3-5 Recommended Equipment 3-5 Maintenance Flowchart 3-6 Getting Started 3-7 Battery Pack Removal 3-8 ... 3-9 Keyboard Removal 3-10 Keyboard Installation 3-11 UpperCase Screws and FFC Removal 3-12 UpperCase Screws and FFC Installation 3-12 ODD (Optical Disk Drive) Module Removal 3-13 ODD Module Installation 3-14 Base Cover Removal 3-15 Base Cover Installation 3-15 USB Module Removal 3-16 USB...
Using DMITools 2-23 Using STUUID 2-26 Using the LAN MAC EEPROM Utility 2-27 Crisis Disk Recovery 2-28 CHAPTER 3 Machine Maintenance Procedures Introduction 3-5 General Information 3-5 Recommended Equipment 3-5 Maintenance Flowchart 3-6 Getting Started 3-7 Battery Pack Removal 3-8 ... 3-9 Keyboard Removal 3-10 Keyboard Installation 3-11 UpperCase Screws and FFC Removal 3-12 UpperCase Screws and FFC Installation 3-12 ODD (Optical Disk Drive) Module Removal 3-13 ODD Module Installation 3-14 Base Cover Removal 3-15 Base Cover Installation 3-15 USB Module Removal 3-16 USB...
Aspire 5349, 5749, 5749Z Service Guide
Page 9
... Locations Mainboard Jumper and Connector Locations 5-3 Clearing Password Check and BIOS Recovery 5-5 Clearing Password Check 5-5 Clear CMOS Jumper 5-6 BIOS Recovery by Crisis Disk 5-6 CHAPTER 6 FRU (Field Replaceable Unit) List Exploded Diagrams 6-4 FRU List 6-7 Screw List 6-16 CHAPTER 7 Model Definition and Configuration Aspire 5349 7-1 Aspire 5749Z 7-3 Aspire 5749 7-5 CHAPTER 8 Test Compatible Components Microsoft® Windows® 7 Environment Test...
... Locations Mainboard Jumper and Connector Locations 5-3 Clearing Password Check and BIOS Recovery 5-5 Clearing Password Check 5-5 Clear CMOS Jumper 5-6 BIOS Recovery by Crisis Disk 5-6 CHAPTER 6 FRU (Field Replaceable Unit) List Exploded Diagrams 6-4 FRU List 6-7 Screw List 6-16 CHAPTER 7 Model Definition and Configuration Aspire 5349 7-1 Aspire 5749Z 7-3 Aspire 5749 7-5 CHAPTER 8 Test Compatible Components Microsoft® Windows® 7 Environment Test...
Aspire 5349, 5749, 5749Z Service Guide
Page 58
BIOS Setup Utility 2-3 Navigating the BIOS Utility 2-3 BIOS 2-4 Information 2-4 Main 2-6 Advanced 2-8 Security 2-9 Power 2-13 Boot 2-14 Exit 2-15 BIOS Flash Utilities 2-16 DOS Flash Utility 2-17 WinFlash Utility 2-18 Clearing BIOS Passwords 2-19 Removing BIOS Passwords 2-20 Removing Insyde HDD Password 2-22 Miscellaneous Tools 2-23 Using DMITools 2-23 Using STUUID 2-26 Using the LAN MAC EEPROM Utility 2-27 Crisis Disk Recovery 2-28 2-2
BIOS Setup Utility 2-3 Navigating the BIOS Utility 2-3 BIOS 2-4 Information 2-4 Main 2-6 Advanced 2-8 Security 2-9 Power 2-13 Boot 2-14 Exit 2-15 BIOS Flash Utilities 2-16 DOS Flash Utility 2-17 WinFlash Utility 2-18 Clearing BIOS Passwords 2-19 Removing BIOS Passwords 2-20 Removing Insyde HDD Password 2-22 Miscellaneous Tools 2-23 Using DMITools 2-23 Using STUUID 2-26 Using the LAN MAC EEPROM Utility 2-27 Crisis Disk Recovery 2-28 2-2
Aspire 5349, 5749, 5749Z Service Guide
Page 65
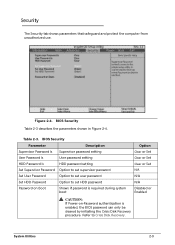
.... BIOS Security Table 2-3 describes the parameters shown in Figure 2-4. Table 2-3. Refer to set user password Set HDD Password Option to Crisis Disk Recovery. BIOS Security Parameter Description Supervisor Password Is Supervisor password setting User Password Is User password setting HDD Password Is HDD password setting Set Supervisor Password ...
.... BIOS Security Table 2-3 describes the parameters shown in Figure 2-4. Table 2-3. Refer to set user password Set HDD Password Option to Crisis Disk Recovery. BIOS Security Parameter Description Supervisor Password Is Supervisor password setting User Password Is User password setting HDD Password Is HDD password setting Set Supervisor Password ...
Aspire 5349, 5749, 5749Z Service Guide
Page 75
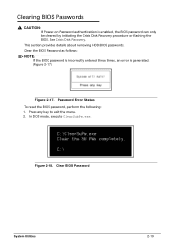
... password is incorrectly entered three times, an error is enabled, the BIOS password can only be cleared by initiating the Crisis Disk Recovery procedure or flashing the BIOS. Clear BIOS Password System Utilities 2-19 CAUTION: If Power-on Password authentication is generated. (Figure... 2-17) Figure 2-17. In DOS mode, execute ClearSubPw.exe. 76776356 Figure 2-18. See Crisis Disk Recovery. Password Error Status To reset the BIOS password, perform the following: 1. This section provides details about removing HDD/BIOS passwords. Press...
... password is incorrectly entered three times, an error is enabled, the BIOS password can only be cleared by initiating the Crisis Disk Recovery procedure or flashing the BIOS. Clear BIOS Password System Utilities 2-19 CAUTION: If Power-on Password authentication is generated. (Figure... 2-17) Figure 2-17. In DOS mode, execute ClearSubPw.exe. 76776356 Figure 2-18. See Crisis Disk Recovery. Password Error Status To reset the BIOS password, perform the following: 1. This section provides details about removing HDD/BIOS passwords. Press...
Aspire 5349, 5749, 5749Z Service Guide
Page 84
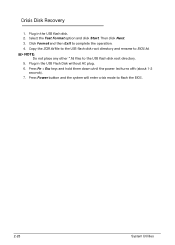
Select the Fast Format option and click Start. Click Format and then Exit to the USB flash disk root directory. 5. Then click Next. 3. Plug in the USB flash disk. 2. Plug in the USB Flash Disk without AC plug. 6. NOTE: NOTE: Do not place any other *.fd files to complete the operation. 4. Press Power ... system will enter crisis mode to BIOS.fd. Press Fn + Esc keys and hold them down utnil the power led turns offs (about 1-2 seconds). 7. Crisis Disk Recovery 0 1. Copy the ZQR.fd file to the USB flash disk root directory and rename to flash the BIOS. 2-28 System Utilities
Select the Fast Format option and click Start. Click Format and then Exit to the USB flash disk root directory. 5. Then click Next. 3. Plug in the USB flash disk. 2. Plug in the USB Flash Disk without AC plug. 6. NOTE: NOTE: Do not place any other *.fd files to complete the operation. 4. Press Power ... system will enter crisis mode to BIOS.fd. Press Fn + Esc keys and hold them down utnil the power led turns offs (about 1-2 seconds). 7. Crisis Disk Recovery 0 1. Copy the ZQR.fd file to the USB flash disk root directory and rename to flash the BIOS. 2-28 System Utilities

Aspire 5349, 5749, 5749Z Service Guide
Page 162
Mainboard Jumper and Connector Locations 5-3 Clearing Password Check and BIOS Recovery 5-5 Clearing Password Check 5-5 Clear CMOS Jumper 5-6 BIOS Recovery by Crisis Disk 5-6 5-2
Mainboard Jumper and Connector Locations 5-3 Clearing Password Check and BIOS Recovery 5-5 Clearing Password Check 5-5 Clear CMOS Jumper 5-6 BIOS Recovery by Crisis Disk 5-6 5-2
Aspire 5349, 5749, 5749Z Service Guide
Page 166
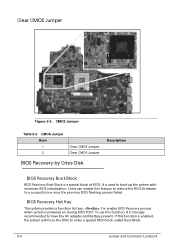
...system with minimum BIOS initialization. To use this function is powered on during BIOS POST. CMOS Jumper Table 5-3. BIOS Recovery Hot Key 0 The system provides a function hot key, , for enable BIOS Recovery process when system is enabled, the system will force the BIOS to a successful one once the previous BIOS flashing ...If this function, it is used to have the AC adapter and Battery present. CMOS Jumper Item 1 2 Clear CMOS Jumper Clear CMOS Jumper Description BIOS Recovery by Crisis Disk 0 BIOS Recovery Boot Block 0 BIOS Recovery Boot Block is a special block of BIOS.
...system with minimum BIOS initialization. To use this function is powered on during BIOS POST. CMOS Jumper Table 5-3. BIOS Recovery Hot Key 0 The system provides a function hot key, , for enable BIOS Recovery process when system is enabled, the system will force the BIOS to a successful one once the previous BIOS flashing ...If this function, it is used to have the AC adapter and Battery present. CMOS Jumper Item 1 2 Clear CMOS Jumper Clear CMOS Jumper Description BIOS Recovery by Crisis Disk 0 BIOS Recovery Boot Block 0 BIOS Recovery Boot Block is a special block of BIOS.

Aspire 5349, 5749, 5749Z Service Guide
Page 167
.... The Crisis USB key is created by regular BIOS flashing process. Jumper and Connector Locations 5-7 Press Power button to performing the recovery, prepare a Crisis USB key. Format the USB storage disk using the Fast Format option. 2. Save ROM file (file name: ZQR_EC.bin/BIOS_ME.bin) to the root directory of USB storage...
.... The Crisis USB key is created by regular BIOS flashing process. Jumper and Connector Locations 5-7 Press Power button to performing the recovery, prepare a Crisis USB key. Format the USB storage disk using the Fast Format option. 2. Save ROM file (file name: ZQR_EC.bin/BIOS_ME.bin) to the root directory of USB storage...


