Aspire 5349, 5749, 5749Z Service Guide
Page 5
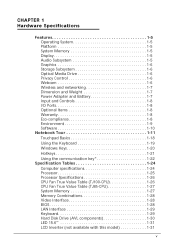
... Memory 1-5 Display 1-5 Audio Subsystem 1-5 Graphics 1-6 Storage Subsystem 1-6 Optical Media Drive 1-6 Privacy Control 1-6 Webcam 1-6 Wireless and networking 1-7 Dimension and Weight 1-7 Power Adapter and Battery 1-7 Input and Controls 1-8 I/O Ports 1-8 Optional Items 1-8 Warranty 1-8 Eco-compliance 1-8 Environment 1-9 Software 1-10 Notebook Tour 1-11 Touchpad Basics 1-18 Using the Keyboard 1-19 Windows Keys 1-20 Hotkeys 1-21 Using the communication key 1-22 Specification Tables 1-24 Computer specifications 1-24 Processor 1-25 Processor Specifications 1-26 CPU Fan...
... Memory 1-5 Display 1-5 Audio Subsystem 1-5 Graphics 1-6 Storage Subsystem 1-6 Optical Media Drive 1-6 Privacy Control 1-6 Webcam 1-6 Wireless and networking 1-7 Dimension and Weight 1-7 Power Adapter and Battery 1-7 Input and Controls 1-8 I/O Ports 1-8 Optional Items 1-8 Warranty 1-8 Eco-compliance 1-8 Environment 1-9 Software 1-10 Notebook Tour 1-11 Touchpad Basics 1-18 Using the Keyboard 1-19 Windows Keys 1-20 Hotkeys 1-21 Using the communication key 1-22 Specification Tables 1-24 Computer specifications 1-24 Processor 1-25 Processor Specifications 1-26 CPU Fan...
Aspire 5349, 5749, 5749Z Service Guide
Page 6
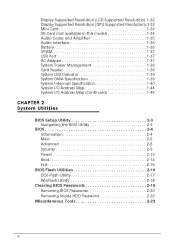
...model 1-34 Audio Codec and Amplifier 1-35 Audio Interface 1-36 Battery 1-36 VRAM 1-37 USB Port 1-37 AC Adapter 1-37 System Power Management 1-38 Card Reader 1-38 System LED Indicator 1-39 System DMA Specification 1-39 System Interrupt Specification 1-40 System I/O Address Map 1-44 System I/O Address Map (Continued 1-45 CHAPTER 2 System Utilities BIOS Setup Utility 2-3 Navigating the BIOS Utility 2-3 BIOS 2-4 Information 2-4 Main 2-6 Advanced 2-8 Security 2-9 Power 2-13 Boot 2-14 Exit 2-15 BIOS Flash Utilities 2-16 DOS Flash Utility 2-17 WinFlash Utility 2-18 Clearing...
...model 1-34 Audio Codec and Amplifier 1-35 Audio Interface 1-36 Battery 1-36 VRAM 1-37 USB Port 1-37 AC Adapter 1-37 System Power Management 1-38 Card Reader 1-38 System LED Indicator 1-39 System DMA Specification 1-39 System Interrupt Specification 1-40 System I/O Address Map 1-44 System I/O Address Map (Continued 1-45 CHAPTER 2 System Utilities BIOS Setup Utility 2-3 Navigating the BIOS Utility 2-3 BIOS 2-4 Information 2-4 Main 2-6 Advanced 2-8 Security 2-9 Power 2-13 Boot 2-14 Exit 2-15 BIOS Flash Utilities 2-16 DOS Flash Utility 2-17 WinFlash Utility 2-18 Clearing...
Aspire 5349, 5749, 5749Z Service Guide
Page 7
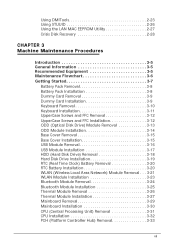
... 3-5 Maintenance Flowchart 3-6 Getting Started 3-7 Battery Pack Removal 3-8 Battery Pack Installation 3-8 Dummy Card Removal 3-9 Dummy Card Installation 3-9 Keyboard Removal 3-10 Keyboard Installation 3-11 UpperCase Screws and FFC Removal 3-12 UpperCase Screws and FFC Installation 3-12 ODD (Optical Disk Drive) Module Removal 3-13 ODD Module Installation 3-14 Base Cover Removal 3-15 Base Cover Installation 3-15 USB Module Removal 3-16 USB Module Installation 3-17 HDD (Hard Disk Drive) Removal 3-18 Hard Disk Drive Installation 3-19 RTC (Real Time Clock) Battery Removal 3-20...
... 3-5 Maintenance Flowchart 3-6 Getting Started 3-7 Battery Pack Removal 3-8 Battery Pack Installation 3-8 Dummy Card Removal 3-9 Dummy Card Installation 3-9 Keyboard Removal 3-10 Keyboard Installation 3-11 UpperCase Screws and FFC Removal 3-12 UpperCase Screws and FFC Installation 3-12 ODD (Optical Disk Drive) Module Removal 3-13 ODD Module Installation 3-14 Base Cover Removal 3-15 Base Cover Installation 3-15 USB Module Removal 3-16 USB Module Installation 3-17 HDD (Hard Disk Drive) Removal 3-18 Hard Disk Drive Installation 3-19 RTC (Real Time Clock) Battery Removal 3-20...
Aspire 5349, 5749, 5749Z Service Guide
Page 8
... Display) Module Removal 3-42 LCD Module Installation 3-43 LCD Bezel Removal 3-44 LCD Bezel Installation 3-45 Camera Module Removal 3-46 Camera Module Installation 3-47 LCD Panel Removal 3-48 LCD Panel Installation 3-49 LCD Hinge Removal 3-50 LCD Hinge Installation 3-50 LVDS Cable Removal 3-51 LVDS Cable Installation 3-52 CHAPTER 4 Troubleshooting Introduction 4-3 General Information 4-3 Power On Issues 4-4 No Display Issues 4-5 LCD Failure 4-8 Keyboard Failure 4-9 Touchpad Failure 4-10 Internal Speaker Failure 4-11 Microphone Failure 4-13 USB Failure 4-14 Other Functions...
... Display) Module Removal 3-42 LCD Module Installation 3-43 LCD Bezel Removal 3-44 LCD Bezel Installation 3-45 Camera Module Removal 3-46 Camera Module Installation 3-47 LCD Panel Removal 3-48 LCD Panel Installation 3-49 LCD Hinge Removal 3-50 LCD Hinge Installation 3-50 LVDS Cable Removal 3-51 LVDS Cable Installation 3-52 CHAPTER 4 Troubleshooting Introduction 4-3 General Information 4-3 Power On Issues 4-4 No Display Issues 4-5 LCD Failure 4-8 Keyboard Failure 4-9 Touchpad Failure 4-10 Internal Speaker Failure 4-11 Microphone Failure 4-13 USB Failure 4-14 Other Functions...

Aspire 5349, 5749, 5749Z Service Guide
Page 12
... Memory 1-5 Display 1-5 Audio Subsystem 1-5 Graphics 1-6 Storage Subsystem 1-6 Optical Media Drive 1-6 Privacy Control 1-6 Webcam 1-6 Wireless and networking 1-7 Dimension and Weight 1-7 Power Adapter and Battery 1-7 Input and Controls 1-8 I/O Ports 1-8 Optional Items 1-8 Warranty 1-8 Eco-compliance 1-8 Environment 1-9 Software 1-10 Notebook Tour 1-11 Touchpad Basics 1-18 Using the Keyboard 1-19 Windows Keys 1-20 Hotkeys 1-21 Using the communication key 1-22 Specification Tables 1-24 Computer specifications 1-24 Processor 1-25 Processor Specifications 1-26 CPU Fan...
... Memory 1-5 Display 1-5 Audio Subsystem 1-5 Graphics 1-6 Storage Subsystem 1-6 Optical Media Drive 1-6 Privacy Control 1-6 Webcam 1-6 Wireless and networking 1-7 Dimension and Weight 1-7 Power Adapter and Battery 1-7 Input and Controls 1-8 I/O Ports 1-8 Optional Items 1-8 Warranty 1-8 Eco-compliance 1-8 Environment 1-9 Software 1-10 Notebook Tour 1-11 Touchpad Basics 1-18 Using the Keyboard 1-19 Windows Keys 1-20 Hotkeys 1-21 Using the communication key 1-22 Specification Tables 1-24 Computer specifications 1-24 Processor 1-25 Processor Specifications 1-26 CPU Fan...

Aspire 5349, 5749, 5749Z Service Guide
Page 16
...-R, 24X CD-RW, 8X DVD-ROM, 8X DVD-R, 8X DVD+R, 6X DVD-ROM DL, 6X DVD-R DL, 6X DVD+R DL, 6X DVD-RW, 6X DVD+RW, 5X DVD-RAM Write: 24X CD-R, 16X CD-RW, 8X DVD-R, 8X DVD+R, 4X DVD-R DL, 4X DVD+R DL, 6X DVD-RW, 8X DVD+RW, 5X DVD-RAM Privacy Control 0 BIOS user, supervisor, HDD passwords Kensington lock slot Webcam 0 Acer Video Conference, featuring: Acer Crystal Eye webcam 1-6 Hardware Specifications and Configurations
...-R, 24X CD-RW, 8X DVD-ROM, 8X DVD-R, 8X DVD+R, 6X DVD-ROM DL, 6X DVD-R DL, 6X DVD+R DL, 6X DVD-RW, 6X DVD+RW, 5X DVD-RAM Write: 24X CD-R, 16X CD-RW, 8X DVD-R, 8X DVD+R, 4X DVD-R DL, 4X DVD+R DL, 6X DVD-RW, 8X DVD+RW, 5X DVD-RAM Privacy Control 0 BIOS user, supervisor, HDD passwords Kensington lock slot Webcam 0 Acer Video Conference, featuring: Acer Crystal Eye webcam 1-6 Hardware Specifications and Configurations
Aspire 5349, 5749, 5749Z Service Guide
Page 25
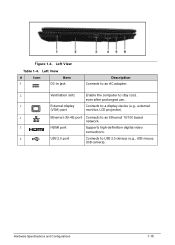
Hardware Specifications and Configurations 1-15 Left View # Icon Item 1 DC-in jack Description Connects to an AC adapter. 2 Ventilation slots Enable the computer to stay cool, even after prolonged use. 3 External display Connects to a display device (e.g., external (VGA) port monitor, LCD projector). 4 Ethernet (RJ-45) port Connects to an Ethernet 10/100 based network. 5 HDMI port Supports high-definition digital video connections. 6 USB 2.0 port Connects to USB 2.0 devices (e.g., USB mouse, USB camera). Left View Table 1-4. Figure 1-4.
Hardware Specifications and Configurations 1-15 Left View # Icon Item 1 DC-in jack Description Connects to an AC adapter. 2 Ventilation slots Enable the computer to stay cool, even after prolonged use. 3 External display Connects to a display device (e.g., external (VGA) port monitor, LCD projector). 4 Ethernet (RJ-45) port Connects to an Ethernet 10/100 based network. 5 HDMI port Supports high-definition digital video connections. 6 USB 2.0 port Connects to USB 2.0 devices (e.g., USB mouse, USB camera). Left View Table 1-4. Figure 1-4.
Aspire 5349, 5749, 5749Z Service Guide
Page 30
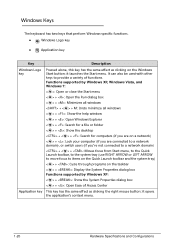
... a variety of Access Center Application key This key has the same effect as clicking on the Windows Start button; Windows Keys 0 The keyboard has two keys that perform Windows-specific functions. Windows Logo key Application key Key Description Windows Logo key Pressed alone, this key has the same effect as clicking the right mouse button; It can also be used with other keys to items on the Quick Launch toolbar and...
... a variety of Access Center Application key This key has the same effect as clicking on the Windows Start button; Windows Keys 0 The keyboard has two keys that perform Windows-specific functions. Windows Logo key Application key Key Description Windows Logo key Pressed alone, this key has the same effect as clicking the right mouse button; It can also be used with other keys to items on the Quick Launch toolbar and...

Aspire 5349, 5749, 5749Z Service Guide
Page 31
...key in Sleep mode. + + + Display toggle Display off Touchpad toggle Switches display output between the display screen, external monitor (if connected) and both. Turns the display screen backlight off . Press any key to access most of the computer's controls like screen brightness and volume output. Increases the screen brightness. + Brightness down Decreases the screen brightness. Hardware Specifications and Configurations 1-21 Hotkeys 0 The computer employs hotkeys or key combinations to return. Figure 1-9. Hot key + + Icon Function Communication Sleep...
...key in Sleep mode. + + + Display toggle Display off Touchpad toggle Switches display output between the display screen, external monitor (if connected) and both. Turns the display screen backlight off . Press any key to access most of the computer's controls like screen brightness and volume output. Increases the screen brightness. + Brightness down Decreases the screen brightness. Hardware Specifications and Configurations 1-21 Hotkeys 0 The computer employs hotkeys or key combinations to return. Figure 1-9. Hot key + + Icon Function Communication Sleep...
Aspire 5349, 5749, 5749Z Service Guide
Page 37
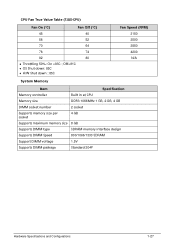
... H/W Shut down : 85C Fan Speed (RPM) 3150 3500 3850 4200 N/A System Memory Item Specification Memory controller Built in at CPU Memory size DDR3 1066MHz 1 GB, 2 GB, 4 GB DIMM socket number 2 socket Supports memory size per socket 4 GB Supports maximum memory size 8 GB Supports DIMM type SDRAM memory interface design Supports DIMM Speed 800/1066/1333 SDRAM Support DIMM voltage 1.5V Supports DIMM package Standard 204P Hardware Specifications and Configurations 1-27
... H/W Shut down : 85C Fan Speed (RPM) 3150 3500 3850 4200 N/A System Memory Item Specification Memory controller Built in at CPU Memory size DDR3 1066MHz 1 GB, 2 GB, 4 GB DIMM socket number 2 socket Supports memory size per socket 4 GB Supports maximum memory size 8 GB Supports DIMM type SDRAM memory interface design Supports DIMM Speed 800/1066/1333 SDRAM Support DIMM voltage 1.5V Supports DIMM package Standard 204P Hardware Specifications and Configurations 1-27
Aspire 5349, 5749, 5749Z Service Guide
Page 43
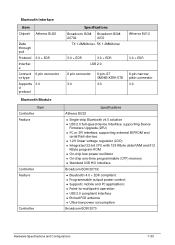
... 3.0 Specifications Atheros BU22 Single-chip Bluetooth v4.0 solution USB 2.0 full-speed device interface, supporting Device Firmware Upgrade (DFU) I²C or SPI interface, supporting external EEPROM and serial flash devices 1.2V linear voltage regulator (LDO) Integrated 32-bit CPU with 128 KByte data RAM and 512 KByte program ROM On-chip low power oscillator On-chip one-time programmable (OTP) memory ...
... 3.0 Specifications Atheros BU22 Single-chip Bluetooth v4.0 solution USB 2.0 full-speed device interface, supporting Device Firmware Upgrade (DFU) I²C or SPI interface, supporting external EEPROM and serial flash devices 1.2V linear voltage regulator (LDO) Integrated 32-bit CPU with 128 KByte data RAM and 512 KByte program ROM On-chip low power oscillator On-chip one-time programmable (OTP) memory ...

Aspire 5349, 5749, 5749Z Service Guide
Page 48
... Audio Power Down Hard Disk Power Down Super I/O Low Power mode Also called Hibernation Mode. System Power Management Item Mech. Off (G3) Soft Off (G2/S5) Working (G0/S0) Suspend to RAM (S3) Save to power off the whole system. System saves all system states and data onto the disc prior to Disk (S4) Specification Al devices in the system are turned off completely. Card Reader Item...
... Audio Power Down Hard Disk Power Down Super I/O Low Power mode Also called Hibernation Mode. System Power Management Item Mech. Off (G3) Soft Off (G2/S5) Working (G0/S0) Suspend to RAM (S3) Save to power off the whole system. System saves all system states and data onto the disc prior to Disk (S4) Specification Al devices in the system are turned off completely. Card Reader Item...
Aspire 5349, 5749, 5749Z Service Guide
Page 59
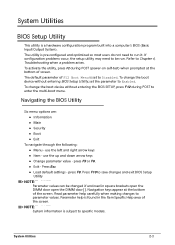
... open the DIMM door[ ]. To change the boot device without entering BIOS Setup Utility, set to specific models. press F5 or F6. Exit - Navigation keys appear at the bottom of F12 Boot Menu is subject to Disabled. Refer to enter the multi-boot menu. Press Esc Load default settings - System Utilities 2-3 If configuration problems occur, the setup utility may need to save changes and exit BIOS Setup Utility NOTE: NOTE: Parameter values can be run it. use...
... open the DIMM door[ ]. To change the boot device without entering BIOS Setup Utility, set to specific models. press F5 or F6. Exit - Navigation keys appear at the bottom of F12 Boot Menu is subject to Disabled. Refer to enter the multi-boot menu. Press Esc Load default settings - System Utilities 2-3 If configuration problems occur, the setup utility may need to save changes and exit BIOS Setup Utility NOTE: NOTE: Parameter values can be run it. use...

Aspire 5349, 5749, 5749Z Service Guide
Page 67
... Enter New Password field. The Set Supervisor Password dialog box appears. Type new password in Enter New Password and Confirm New Password fields. Changing a Password 0 1. Set Supervisor Password 2. Retype new password in Enter Current Password field and press Enter. 3. Press Enter. If the verification is complete after the user presses Enter. Figure 2-8. Press F10 to activate the password feature. 5. Setup Notice The password setting is OK, the screen will set to Enabled to save changes and exit BIOS Setup Utility. Use the and keys...
... Enter New Password field. The Set Supervisor Password dialog box appears. Type new password in Enter New Password and Confirm New Password fields. Changing a Password 0 1. Set Supervisor Password 2. Retype new password in Enter Current Password field and press Enter. 3. Press Enter. If the verification is complete after the user presses Enter. Figure 2-8. Press F10 to activate the password feature. 5. Setup Notice The password setting is OK, the screen will set to Enabled to save changes and exit BIOS Setup Utility. Use the and keys...
Aspire 5349, 5749, 5749Z Service Guide
Page 86
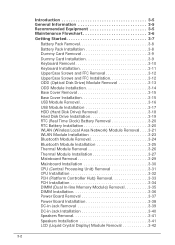
... 3-5 Maintenance Flowchart 3-6 Getting Started 3-7 Battery Pack Removal 3-8 Battery Pack Installation 3-8 Dummy Card Removal 3-9 Dummy Card Installation 3-9 Keyboard Removal 3-10 Keyboard Installation 3-11 UpperCase Screws and FFC Removal 3-12 UpperCase Screws and FFC Installation 3-12 ODD (Optical Disk Drive) Module Removal 3-13 ODD Module Installation 3-14 Base Cover Removal 3-15 Base Cover Installation 3-15 USB Module Removal 3-16 USB Module Installation 3-17 HDD (Hard Disk Drive) Removal 3-18 Hard Disk Drive Installation 3-19 RTC (Real Time Clock) Battery Removal 3-20...
... 3-5 Maintenance Flowchart 3-6 Getting Started 3-7 Battery Pack Removal 3-8 Battery Pack Installation 3-8 Dummy Card Removal 3-9 Dummy Card Installation 3-9 Keyboard Removal 3-10 Keyboard Installation 3-11 UpperCase Screws and FFC Removal 3-12 UpperCase Screws and FFC Installation 3-12 ODD (Optical Disk Drive) Module Removal 3-13 ODD Module Installation 3-14 Base Cover Removal 3-15 Base Cover Installation 3-15 USB Module Removal 3-16 USB Module Installation 3-17 HDD (Hard Disk Drive) Removal 3-18 Hard Disk Drive Installation 3-19 RTC (Real Time Clock) Battery Removal 3-20...
Aspire 5349, 5749, 5749Z Service Guide
Page 139
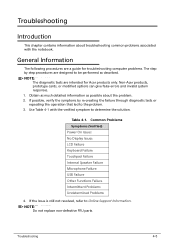
... much detailed information as described. Common Problems Symptoms (Verified) Power On Issues No Display Issues LCD Failure Keyboard Failure Touchpad Failure Internal Speaker Failure Microphone Failure USB Failure Other Functions Failure Intermittent Problems Undetermined Problems 4. Troubleshooting Introduction 0 This chapter contains information about the problem. 2. NOTE: NOTE: Do not replace non-defective FRU parts. Non-Acer products, prototype cards, or modified options can give false errors and invalid system responses. 1. If...
... much detailed information as described. Common Problems Symptoms (Verified) Power On Issues No Display Issues LCD Failure Keyboard Failure Touchpad Failure Internal Speaker Failure Microphone Failure USB Failure Other Functions Failure Intermittent Problems Undetermined Problems 4. Troubleshooting Introduction 0 This chapter contains information about the problem. 2. NOTE: NOTE: Do not replace non-defective FRU parts. Non-Acer products, prototype cards, or modified options can give false errors and invalid system responses. 1. If...
Aspire 5349, 5749, 5749Z Service Guide
Page 141
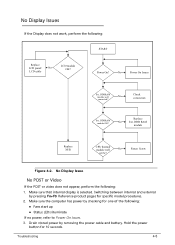
... 4-2. Switching between internal and external by removing the power cable and battery. Troubleshooting 4-5 Drain stored power by pressing Fn+F5. DDRRAM module well No connected? No Ext. Make sure that internal display is selected. Hold the power button for specific model procedures. 2. Make sure the computer has power by checking for one of the following : 1. No Power On Issues Ext. No Display Issues 0 If the Display does not work, perform the following: START Replace LCD panel/ No LCD cable LCD module OK? Power...
... 4-2. Switching between internal and external by removing the power cable and battery. Troubleshooting 4-5 Drain stored power by pressing Fn+F5. DDRRAM module well No connected? No Ext. Make sure that internal display is selected. Hold the power button for specific model procedures. 2. Make sure the computer has power by checking for one of the following : 1. No Power On Issues Ext. No Display Issues 0 If the Display does not work, perform the following: START Replace LCD panel/ No LCD cable LCD module OK? Power...
Aspire 5349, 5749, 5749Z Service Guide
Page 142
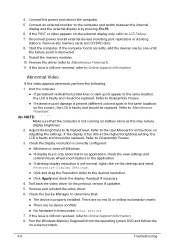
.... 3. Connect an external monitor to the User Manual for instructions on -screen prompts. 4-6 Troubleshooting Start the computer. If the display is too dim at the highest brightness setting, the LCD is not running on the screen), the LCD is listed under Other Devices 7. Readjust if necessary. 4. Remove and reinstall the video driver. 6. Refer to the computer and switch between the internal display and the external display is by one by pressing Fn+F5. 6. Check the Device Manager...
.... 3. Connect an external monitor to the User Manual for instructions on -screen prompts. 4-6 Troubleshooting Start the computer. If the display is too dim at the highest brightness setting, the LCD is not running on the screen), the LCD is listed under Other Devices 7. Readjust if necessary. 4. Remove and reinstall the video driver. 6. Refer to the computer and switch between the internal display and the external display is by one by pressing Fn+F5. 6. Check the Device Manager...
Aspire 5349, 5749, 5749Z Service Guide
Page 152
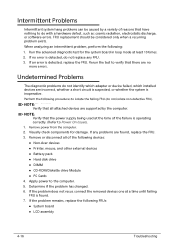
... an intermittent problem, perform the following devices: Non-Acer devices Printer, mouse, and other external devices Battery pack Hard disk drive DIMM CD-ROM/Diskette drive Module PC Cards 4. Remove power from the computer. 2. If the problem does not recur, connect the removed devices one at least 10 times. 2. If no more errors. Undetermined Problems 0 The diagnostic problems do not...
... an intermittent problem, perform the following devices: Non-Acer devices Printer, mouse, and other external devices Battery pack Hard disk drive DIMM CD-ROM/Diskette drive Module PC Cards 4. Remove power from the computer. 2. If the problem does not recur, connect the removed devices one at least 10 times. 2. If no more errors. Undetermined Problems 0 The diagnostic problems do not...
Aspire 5349, 5749, 5749Z Service Guide
Page 156
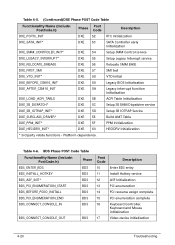
... POST Code Table Functionality Name (Include\ PostCode.h) Phase Post Code Description BDS_ENTER_BDS BDS 10 Enter BDS entry BDS_INSTALL_HOTKEY BDS 11 Install Hotkey service BDS_ASF_INIT* BDS 12 ASF Initialization BDS_PCI_ENUMERATION_START BDS 13 PCI enumeration BDS_BEFORE_PCIIO_INSTALL BDS 14 PCI resource assign complete BDS_PCI_ENUMERATION_END BDS 15 PCI enumeration complete BDS_CONNECT_CONSOLE_IN BDS 16 Keyboard Controller, Keyboard and Mouse initialization BDS_CONNECT_CONSOLE_OUT BDS 17 Video device initialization 4-20 Troubleshooting Table...
... POST Code Table Functionality Name (Include\ PostCode.h) Phase Post Code Description BDS_ENTER_BDS BDS 10 Enter BDS entry BDS_INSTALL_HOTKEY BDS 11 Install Hotkey service BDS_ASF_INIT* BDS 12 ASF Initialization BDS_PCI_ENUMERATION_START BDS 13 PCI enumeration BDS_BEFORE_PCIIO_INSTALL BDS 14 PCI resource assign complete BDS_PCI_ENUMERATION_END BDS 15 PCI enumeration complete BDS_CONNECT_CONSOLE_IN BDS 16 Keyboard Controller, Keyboard and Mouse initialization BDS_CONNECT_CONSOLE_OUT BDS 17 Video device initialization 4-20 Troubleshooting Table...


