
Service Guide
Page 4
Alerts you to do specific actions relevant to the accomplishment of additional information related to any damage that appear on screen. Conventions The following conventions are used in this manual: SCREEN MESSAGES Denotes actual messages that might result from doing or not doing specific actions. NOTE WARNING CAUTION IMPORTANT Gives bits and pieces of procedures. IV Gives precautionary measures to avoid possible hardware or software problems. Reminds you to the current topic.
Alerts you to do specific actions relevant to the accomplishment of additional information related to any damage that appear on screen. Conventions The following conventions are used in this manual: SCREEN MESSAGES Denotes actual messages that might result from doing or not doing specific actions. NOTE WARNING CAUTION IMPORTANT Gives bits and pieces of procedures. IV Gives precautionary measures to avoid possible hardware or software problems. Reminds you to the current topic.
Service Guide
Page 9
... Media Board Failure 159 Fingerprint Reader Failure 160 Thermal Unit Failure 160 External Mouse Failure 161 Other Failures 161 Intermittent Problems 162 Undetermined Problems 162 POST Codes Tables 163 Sec 163 Memory 163 BDS & Specific action 164 Each PEIM entry point used in ... Recovery by Crisis Disk 172 FRU (Field Replaceable Unit) List 173 Aspire 4935/4935G Exploded Diagrams 174 Main Module 174 Aspire 4935/4935G FRU List 175 Screw List 182 Model Definition and Configuration 184 Aspire 4935/4935G Series 184 Test Compatible Components 223 Microsoft® Windows® ...
... Media Board Failure 159 Fingerprint Reader Failure 160 Thermal Unit Failure 160 External Mouse Failure 161 Other Failures 161 Intermittent Problems 162 Undetermined Problems 162 POST Codes Tables 163 Sec 163 Memory 163 BDS & Specific action 164 Each PEIM entry point used in ... Recovery by Crisis Disk 172 FRU (Field Replaceable Unit) List 173 Aspire 4935/4935G Exploded Diagrams 174 Main Module 174 Aspire 4935/4935G FRU List 175 Screw List 182 Model Definition and Configuration 184 Aspire 4935/4935G Series 184 Test Compatible Components 223 Microsoft® Windows® ...

Service Guide
Page 39
... refer to parameter values. Read this menu, user can change boot device without entering BIOS SETUP Utility. However, if you encounter configuration problems, you want to "enabled". The default parameter of a parameter if it is prompted on the bottom of the screen. System Utilities ... menu. • In any changes made and exit the BIOS Setup Utility. In this carefully when making changes to Chapter 4 Troubleshooting when problem arises. Navigation keys for parameters are six menu options: Information, Main, Advanced, Security, Boot, and Exit. Chapter 2 29 Your computer...
... refer to parameter values. Read this menu, user can change boot device without entering BIOS SETUP Utility. However, if you encounter configuration problems, you want to "enabled". The default parameter of a parameter if it is prompted on the bottom of the screen. System Utilities ... menu. • In any changes made and exit the BIOS Setup Utility. In this carefully when making changes to Chapter 4 Troubleshooting when problem arises. Navigation keys for parameters are six menu options: Information, Main, Advanced, Security, Boot, and Exit. Chapter 2 29 Your computer...

Service Guide
Page 155
Obtain the failing symptoms in as much detail as a guide for computer problems. NOTE: The diagnostic tests are intended to test only Acer products. Verify the symptoms by repeating the same operation. 3. If the Issue is still not resolved, see "Online Support ... Page 161 Intermittent Failures Page 162 Undetermined Failures Page 162 4. Non-Acer products, prototype cards, or modified options can give false errors and invalid system responses. 1. Chapter 4 145 Troubleshooting Chapter 4 Common Problems Use the following table with the verified symptom to determine which page...
Obtain the failing symptoms in as much detail as a guide for computer problems. NOTE: The diagnostic tests are intended to test only Acer products. Verify the symptoms by repeating the same operation. 3. If the Issue is still not resolved, see "Online Support ... Page 161 Intermittent Failures Page 162 Undetermined Failures Page 162 4. Non-Acer products, prototype cards, or modified options can give false errors and invalid system responses. 1. Chapter 4 145 Troubleshooting Chapter 4 Common Problems Use the following table with the verified symptom to determine which page...

Service Guide
Page 156
... the power cable is still not resolved, see "Online Support Information" on , perform the following actions one at a time to correct the problem. 1. Remove all external and non-essential hardware connected to the computer that are free of obstructions. 5. Remove any recently installed software. 7. ...If the Issue is properly connected to check the Thermal Unit and fan airways are not necessary to boot the computer to correct the problem. Do not replace a non-defective FRUs: Computer Shutsdown Intermittently If the system powers off at intervals, perform the following actions one...
... the power cable is still not resolved, see "Online Support Information" on , perform the following actions one at a time to correct the problem. 1. Remove all external and non-essential hardware connected to the computer that are free of obstructions. 5. Remove any recently installed software. 7. ...If the Issue is properly connected to check the Thermal Unit and fan airways are not necessary to boot the computer to correct the problem. Do not replace a non-defective FRUs: Computer Shutsdown Intermittently If the system powers off at intervals, perform the following actions one...

Service Guide
Page 157
... there is no power, see "Disassembly Process" on page 52). 8. Make sure the computer has power by checking at a time to correct the problem. 1. Drain any memory cards and CD/DVD discs. Reseat the memory modules. 7. If the Issue is still not resolved, see "LCD Failure"...the external display, see "Online Support Information" on page 149. 5. Restart the computer. Chapter 4 147 Connect an external monitor to correct the problem. On this model). Remove the drives (see "Power On Issue" on this notebook model, switching between the internal display and the external display ...
... there is no power, see "Disassembly Process" on page 52). 8. Make sure the computer has power by checking at a time to correct the problem. 1. Drain any memory cards and CD/DVD discs. Reseat the memory modules. 7. If the Issue is still not resolved, see "LCD Failure"...the external display, see "Online Support Information" on page 149. 5. Restart the computer. Chapter 4 147 Connect an external monitor to correct the problem. On this model). Remove the drives (see "Power On Issue" on this notebook model, switching between the internal display and the external display ...
Service Guide
Page 158
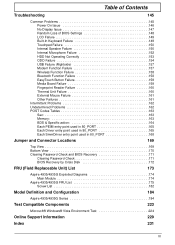
...If extensive pixel damage is present (different colored spots in the same location, the LCD is more than one at a time to correct the problem. 1. d. Run the Windows Memory Diagnostic from the BIOS, the drive may reduce display brightness. If the computer is faulty and should be ... is faulty and should be replaced. Abnormal Video Display If video displays abnormally, perform the following actions one at a time to correct the problem. 1. Random Loss of BIOS information, perform the following actions one year old, replace the CMOS battery. 2. See "Disassembly Process" on ...
...If extensive pixel damage is present (different colored spots in the same location, the LCD is more than one at a time to correct the problem. 1. d. Run the Windows Memory Diagnostic from the BIOS, the drive may reduce display brightness. If the computer is faulty and should be ... is faulty and should be replaced. Abnormal Video Display If video displays abnormally, perform the following actions one at a time to correct the problem. 1. Random Loss of BIOS information, perform the following actions one year old, replace the CMOS battery. 2. See "Disassembly Process" on ...

Service Guide
Page 159
Do not replace a nondefective FRUs: Built-In Keyboard Failure If the built-in Keyboard fails, perform the following actions one at a time to correct the problem. Do not replace a non-defective FRUs: Chapter 4 149 LCD Failure If the LCD fails, perform the following actions one at a time to correct the problem.
Do not replace a nondefective FRUs: Built-In Keyboard Failure If the built-in Keyboard fails, perform the following actions one at a time to correct the problem. Do not replace a non-defective FRUs: Chapter 4 149 LCD Failure If the LCD fails, perform the following actions one at a time to correct the problem.

Service Guide
Page 160
Do not replace a non-defective FRUs: Internal Speaker Failure If the internal Speakers fail, perform the following actions one at a time to correct the problem. Do not replace a non-defective FRUs: 150 Chapter 4 Touchpad Failure If the Touchpad doesn't work, perform the following actions one at a time to correct the problem.
Do not replace a non-defective FRUs: Internal Speaker Failure If the internal Speakers fail, perform the following actions one at a time to correct the problem. Do not replace a non-defective FRUs: 150 Chapter 4 Touchpad Failure If the Touchpad doesn't work, perform the following actions one at a time to correct the problem.
Service Guide
Page 161
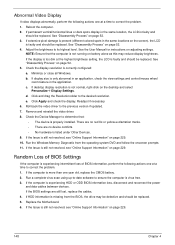
... and reinstall the audio driver. 5. Click the volume icon on the taskbar and drag the slider to correct the problem. 1. Ensure that the volume is listed under Other Devices. 3. Sound Problems If sound problems are experienced, perform the following actions one at a time to 50. Reboot the computer. 2. b. Restore system and file settings...
... and reinstall the audio driver. 5. Click the volume icon on the taskbar and drag the slider to correct the problem. 1. Ensure that the volume is listed under Other Devices. 3. Sound Problems If sound problems are experienced, perform the following actions one at a time to 50. Reboot the computer. 2. b. Restore system and file settings...

Service Guide
Page 162
...setting and click OK. 7. Right-click on the Recording tab and select Show Disabled Devices (clear by default). 3. Do not replace a non-defective FRUs: Microphone Problems If internal or external Microphones do no operate correctly, perform the following actions one at a time to correct the... problem. Check that the microphone is still not resolved, see "Online Support Information" on the Recording tab. 4. b. The microphone appears on page 229. 152 Chapter 4 ...
...setting and click OK. 7. Right-click on the Recording tab and select Show Disabled Devices (clear by default). 3. Do not replace a non-defective FRUs: Microphone Problems If internal or external Microphones do no operate correctly, perform the following actions one at a time to correct the... problem. Check that the microphone is still not resolved, see "Online Support Information" on the Recording tab. 4. b. The microphone appears on page 229. 152 Chapter 4 ...
Service Guide
Page 163
...correctly, perform the following actions one at a time to enter the BIOS Utility. b. e. Click Next. g. i. Restart the computer and press F2 to correct the problem. 1. Run Windows Check Disk by entering chkdsk /r from a known good date using up-to-date software to resolve the... problem. 4. See "Disassembly Process" on the Boot menu. 6. Run a complete virus scan using System Restore. Chapter 4 153 The Install Windows screen displays. For more ...
...correctly, perform the following actions one at a time to enter the BIOS Utility. b. e. Click Next. g. i. Restart the computer and press F2 to correct the problem. 1. Run Windows Check Disk by entering chkdsk /r from a known good date using up-to-date software to resolve the... problem. 4. See "Disassembly Process" on the Boot menu. 6. Run a complete virus scan using System Restore. Chapter 4 153 The Install Windows screen displays. For more ...

Service Guide
Page 164
... Removable Storage panel. 4. Navigate to Start´ Computer. ODD Failure If the ODD fails, perform the following general solutions one at a time to correct the problem. 1. Check that the ODD device is displayed in My Computer or the BIOS setup • LED does not flash when the computer starts up •...; The tray does not eject • Access failure screen displays • The ODD is noisy Perform the following actions one at a time to correct the problem. Reboot the computer and retry the operation. 2. Try an alternate disc. 3.
... Removable Storage panel. 4. Navigate to Start´ Computer. ODD Failure If the ODD fails, perform the following general solutions one at a time to correct the problem. 1. Check that the ODD device is displayed in My Computer or the BIOS setup • LED does not flash when the computer starts up •...; The tray does not eject • Access failure screen displays • The ODD is noisy Perform the following actions one at a time to correct the problem. Reboot the computer and retry the operation. 2. Try an alternate disc. 3.
Service Guide
Page 165
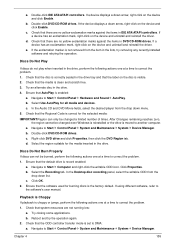
...limited number of times. c. Click OK. 2. Playback is Choppy If playback is correct for burning discs is set to correct the problem. 1. Try closing some applications. Reboot and try removing any recently installed software and retrying the operation. If a device has an exclamation... to the software's user manual. Right-click DVD drive and click Properties, then click the DVD Region tab. Navigate to correct the problem. 1. e. Try an alternate disc in the drive, perform the following actions one at a time to another computer. b. Check that...
...limited number of times. c. Click OK. 2. Playback is Choppy If playback is correct for burning discs is set to correct the problem. 1. Try closing some applications. Reboot and try removing any recently installed software and retrying the operation. If a device has an exclamation... to the software's user manual. Right-click DVD drive and click Properties, then click the DVD Region tab. Navigate to correct the problem. 1. e. Try an alternate disc in the drive, perform the following actions one at a time to another computer. b. Check that...

Service Guide
Page 166
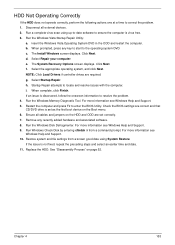
...alternate cable, if available. Drive Not Detected If Windows cannot detect the drive, perform the following actions one at a time to correct the problem. 1. NOTE: Check that the entry is probably defective and should be read when inserted in the ATAPI Model Name field on page 52... Replace the ODD. Check for broken connectors on page 52. 156 Chapter 4 Drive Read Failure If discs cannot be replaced. 3. Listen to correct the problem. 1. Check for broken connectors on page 18. 3. If the drive works with the new cable, the original cable should be replaced. 4. See "...
...alternate cable, if available. Drive Not Detected If Windows cannot detect the drive, perform the following actions one at a time to correct the problem. 1. NOTE: Check that the entry is probably defective and should be read when inserted in the ATAPI Model Name field on page 52... Replace the ODD. Check for broken connectors on page 52. 156 Chapter 4 Drive Read Failure If discs cannot be replaced. 3. Listen to correct the problem. 1. Check for broken connectors on page 18. 3. If the drive works with the new cable, the original cable should be replaced. 4. See "...

Service Guide
Page 167
Do not replace a non-defective FRUs: Chapter 4 157 Do not replace a non-defective FRUs: Modem Function Failure If the internal Modem fails, perform the following actions one at a time to correct the problem. USB Failure (Rightside) If the rightside USB port fails, perform the following actions one at a time to correct the problem.
Do not replace a non-defective FRUs: Chapter 4 157 Do not replace a non-defective FRUs: Modem Function Failure If the internal Modem fails, perform the following actions one at a time to correct the problem. USB Failure (Rightside) If the rightside USB port fails, perform the following actions one at a time to correct the problem.

Service Guide
Page 168
... a nondefective FRUs: Start Check BT cable connected OK NG OK Reconnect the cable to correct the problem. Wireless Function Failure If the WLAN/WiMAX fails, perform the following actions one at a time to correct the problem. Do not replace a non-defective FRUs: Start Check Antenna to WLAN/WiMAX C ard OK NG OK...
... a nondefective FRUs: Start Check BT cable connected OK NG OK Reconnect the cable to correct the problem. Wireless Function Failure If the WLAN/WiMAX fails, perform the following actions one at a time to correct the problem. Do not replace a non-defective FRUs: Start Check Antenna to WLAN/WiMAX C ard OK NG OK...

Service Guide
Page 169
EasyTouch Button Failure If the Acer EasyTouch buttons fail, perform the following actions one at a time to correct the problem. Do not replace a non-defective FRUs: Start OK Check Function/B to MB connection Reconnect the NG Function/B to MB FFC cable OK Check Function/B and FFC NG Swap the Function Board Swap Mainboard Media Board Failure If the Media Board fails, perform the following actions one at a time to correct the problem. Do not replace a non-defective FRUs: Chapter 4 159
EasyTouch Button Failure If the Acer EasyTouch buttons fail, perform the following actions one at a time to correct the problem. Do not replace a non-defective FRUs: Start OK Check Function/B to MB connection Reconnect the NG Function/B to MB FFC cable OK Check Function/B and FFC NG Swap the Function Board Swap Mainboard Media Board Failure If the Media Board fails, perform the following actions one at a time to correct the problem. Do not replace a non-defective FRUs: Chapter 4 159

Service Guide
Page 170
Do not replace a non-defective FRUs: Thermal Unit Failure If the Thermal Unit fails, perform the following actions one at a time to correct the problem. Do not replace a non-defective FRUs: Start OK Check Fan power cable NG OK Reconnect the cable to the Mainboard Check Fan NG Swap the Thermal Module OK CPU Heatink well seated? Fingerprint Reader Failure If the Fingerprint Reader fails, perform the following actions one at a time to correct the problem. NG Seat it well OK Check CPU NG Swap CPU 160 Swap Mainboard Chapter 4
Do not replace a non-defective FRUs: Thermal Unit Failure If the Thermal Unit fails, perform the following actions one at a time to correct the problem. Do not replace a non-defective FRUs: Start OK Check Fan power cable NG OK Reconnect the cable to the Mainboard Check Fan NG Swap the Thermal Module OK CPU Heatink well seated? Fingerprint Reader Failure If the Fingerprint Reader fails, perform the following actions one at a time to correct the problem. NG Seat it well OK Check CPU NG Swap CPU 160 Swap Mainboard Chapter 4
Service Guide
Page 171
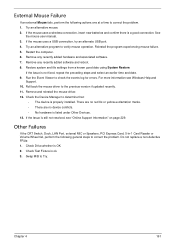
... recently added hardware and associated software. 7. Restore system and file settings from a known good date using System Restore. Run the Event Viewer to correct the problem. Other Failures If the CRT Switch, Dock, LAN Port, external MIC or Speakers, PCI Express Card, 5-in-1 Card Reader or Volume Wheel fail, perform the... check the events log for errors. Remove and reinstall the mouse driver. 12. Try an alternative mouse. 2. Roll back the mouse driver to correct the problem. 1.
... recently added hardware and associated software. 7. Restore system and file settings from a known good date using System Restore. Run the Event Viewer to correct the problem. Other Failures If the CRT Switch, Dock, LAN Port, external MIC or Speakers, PCI Express Card, 5-in-1 Card Reader or Volume Wheel fail, perform the... check the events log for errors. Remove and reinstall the mouse driver. 12. Try an alternative mouse. 2. Roll back the mouse driver to correct the problem. 1.


