
Aspire 4352, 4752, 4752G, 4752Z Service Guide
Page 5
... 1-6 Audio Subsystem 1-6 Communication 1-7 Privacy Control 1-7 Power Adapter and Battery 1-7 Keyboard and Pointing Device 1-7 I/O Ports 1-8 Software and Tools 1-8 Optional Items 1-10 Warranty 1-10 Dimensions and Weight 1-10 Environment 1-10 Notebook Tour 1-11 Open Front View 1-11 Close Front View 1-13 Left View 1-14 Right View 1-15 Base View 1-16 Touchpad Basics 1-17 Keyboard 1-18 D2D Recovery 1-22 System Block Diagram 1-22 Specification Tables 1-23 CHAPTER 2 System Utilities BIOS Setup Utility 2-3 Navigating the BIOS Utility 2-3 v
... 1-6 Audio Subsystem 1-6 Communication 1-7 Privacy Control 1-7 Power Adapter and Battery 1-7 Keyboard and Pointing Device 1-7 I/O Ports 1-8 Software and Tools 1-8 Optional Items 1-10 Warranty 1-10 Dimensions and Weight 1-10 Environment 1-10 Notebook Tour 1-11 Open Front View 1-11 Close Front View 1-13 Left View 1-14 Right View 1-15 Base View 1-16 Touchpad Basics 1-17 Keyboard 1-18 D2D Recovery 1-22 System Block Diagram 1-22 Specification Tables 1-23 CHAPTER 2 System Utilities BIOS Setup Utility 2-3 Navigating the BIOS Utility 2-3 v
Aspire 4352, 4752, 4752G, 4752Z Service Guide
Page 6
...12 DOS Flash Utility 2-13 WinFlash Utility 2-13 Remove HDD/BIOS Password Utilities 2-14 Removing the HDD Password 2-14 Removing the BIOS Passwords 2-15 Clearing the BIOS Passwords 2-16 Using DMI Tools 2-17 LAN EEPROM Utility 2-17 CHAPTER 3 Machine Maintenance Machine Disassembly and Replacement 3-5 Recommended Equipment 3-5 Replacement Requirements 3-5 Pre-disassembly Instructions 3-6 Disassembly Process 3-7 External Module Disassembly Process 3-8 External Modules Disassembly Flowchart 3-8 Removing the Battery Pack 3-9 Removing the ODD Module 3-10 Removing the Back Cover 3-12...
...12 DOS Flash Utility 2-13 WinFlash Utility 2-13 Remove HDD/BIOS Password Utilities 2-14 Removing the HDD Password 2-14 Removing the BIOS Passwords 2-15 Clearing the BIOS Passwords 2-16 Using DMI Tools 2-17 LAN EEPROM Utility 2-17 CHAPTER 3 Machine Maintenance Machine Disassembly and Replacement 3-5 Recommended Equipment 3-5 Replacement Requirements 3-5 Pre-disassembly Instructions 3-6 Disassembly Process 3-7 External Module Disassembly Process 3-8 External Modules Disassembly Flowchart 3-8 Removing the Battery Pack 3-9 Removing the ODD Module 3-10 Removing the Back Cover 3-12...
Aspire 4352, 4752, 4752G, 4752Z Service Guide
Page 7
... 3-50 Replacing the Camera Board 3-51 Replacing the LCD FPC Cable 3-52 Replacing the LCD Brackets 3-53 Replacing the LCD Panel 3-54 Replacing the LCD Bezel 3-56 Main Unit Reassembly Process 3-58 Replacing the LCD Module 3-58 Replacing the CPU 3-60 Replacing the Thermal Module 3-61 Replacing the Mainboard 3-63 Replacing the RTC Battery 3-65 Replacing the Bluetooth Module 3-66 Replacing the USB Board 3-67 Replacing the Power Button Board 3-68 Replacing the Left & Right Speakers 3-70 Replacing the Touchpad Board 3-72 Replacing the Palmrest Module/Upper Case 3-73 External Module...
... 3-50 Replacing the Camera Board 3-51 Replacing the LCD FPC Cable 3-52 Replacing the LCD Brackets 3-53 Replacing the LCD Panel 3-54 Replacing the LCD Bezel 3-56 Main Unit Reassembly Process 3-58 Replacing the LCD Module 3-58 Replacing the CPU 3-60 Replacing the Thermal Module 3-61 Replacing the Mainboard 3-63 Replacing the RTC Battery 3-65 Replacing the Bluetooth Module 3-66 Replacing the USB Board 3-67 Replacing the Power Button Board 3-68 Replacing the Left & Right Speakers 3-70 Replacing the Touchpad Board 3-72 Replacing the Palmrest Module/Upper Case 3-73 External Module...
Aspire 4352, 4752, 4752G, 4752Z Service Guide
Page 12
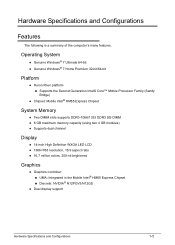
... 1-5 Operating System 1-5 Platform 1-5 System Memory 1-5 Display 1-5 Graphics 1-5 Storage Subsystem 1-6 Audio Subsystem 1-6 Communication 1-7 Privacy Control 1-7 Power Adapter and Battery 1-7 Keyboard and Pointing Device 1-7 I/O Ports 1-8 Software and Tools 1-8 Optional Items 1-10 Warranty 1-10 Dimensions and Weight 1-10 Environment 1-10 Notebook Tour 1-11 Open Front View 1-11 Close Front View 1-13 Left View 1-14 Right View 1-15 Base View 1-16 Touchpad Basics 1-17 Keyboard 1-18 D2D Recovery 1-22 System Block Diagram 1-22 Specification...
... 1-5 Operating System 1-5 Platform 1-5 System Memory 1-5 Display 1-5 Graphics 1-5 Storage Subsystem 1-6 Audio Subsystem 1-6 Communication 1-7 Privacy Control 1-7 Power Adapter and Battery 1-7 Keyboard and Pointing Device 1-7 I/O Ports 1-8 Software and Tools 1-8 Optional Items 1-10 Warranty 1-10 Dimensions and Weight 1-10 Environment 1-10 Notebook Tour 1-11 Open Front View 1-11 Close Front View 1-13 Left View 1-14 Right View 1-15 Base View 1-16 Touchpad Basics 1-17 Keyboard 1-18 D2D Recovery 1-22 System Block Diagram 1-22 Specification...
Aspire 4352, 4752, 4752G, 4752Z Service Guide
Page 15
...;Two DIMM slots supports DDR3-1066/1333 DDR3 SO-DIMM 8 GB maximum memory capacity (using two 4 GB modules) Supports dual channel Display 0 14-inch High Definition WXGA LED LCD 1366×768 resolution, 16:9 aspect ratio 16.7 million colors, 200-nit brightness Graphics 0 Graphics controller: UMA...
...;Two DIMM slots supports DDR3-1066/1333 DDR3 SO-DIMM 8 GB maximum memory capacity (using two 4 GB modules) Supports dual channel Display 0 14-inch High Definition WXGA LED LCD 1366×768 resolution, 16:9 aspect ratio 16.7 million colors, 200-nit brightness Graphics 0 Graphics controller: UMA...
Aspire 4352, 4752, 4752G, 4752Z Service Guide
Page 17
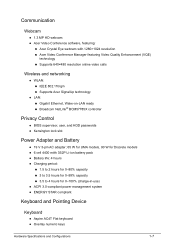
... resolution online video calls Wireless and networking 0 WLAN: IEEE 802.11b/g/n Supports Acer SignalUp technology LAN: Gigabit Ethernet, Wake-on-LAN ready Broadcom NetLink® BCM57785X controller Privacy Control 0 BIOS supervisor, user, and HDD passwords Kensington lock slot Power Adapter and Battery 0 19 V 3-pin AC adapter; 65 W for UMA models, 90 W for...
... resolution online video calls Wireless and networking 0 WLAN: IEEE 802.11b/g/n Supports Acer SignalUp technology LAN: Gigabit Ethernet, Wake-on-LAN ready Broadcom NetLink® BCM57785X controller Privacy Control 0 BIOS supervisor, user, and HDD passwords Kensington lock slot Power Adapter and Battery 0 19 V 3-pin AC adapter; 65 W for UMA models, 90 W for...
Aspire 4352, 4752, 4752G, 4752Z Service Guide
Page 18
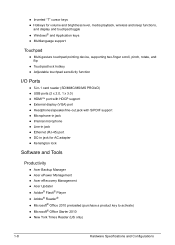
...volume and brightness level, media playback, wireless and sleep functions, and display and touchpad toggle Windows® and Application keys Multilanguage support Touchpad 0 Multi-gesture touchpad pointing device, supporting two-finger scroll, pinch, rotate, and flip Touchpad lock hotkey Adjustable touchpad sensitivity function I/O Ports 0 5-in-1 card reader (SD/MMC/MS/MS PRO/xD) USB ports (2 x 2.0, 1 x 3.0) HDMI™ port with HDCP support External...
...volume and brightness level, media playback, wireless and sleep functions, and display and touchpad toggle Windows® and Application keys Multilanguage support Touchpad 0 Multi-gesture touchpad pointing device, supporting two-finger scroll, pinch, rotate, and flip Touchpad lock hotkey Adjustable touchpad sensitivity function I/O Ports 0 5-in-1 card reader (SD/MMC/MS/MS PRO/xD) USB ports (2 x 2.0, 1 x 3.0) HDMI™ port with HDCP support External...
Aspire 4352, 4752, 4752G, 4752Z Service Guide
Page 24
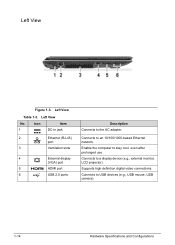
Connects to an 10/100/1000-based Ethernet network. Supports high definition digital video connections. Connects to a display device (e.g., external monitor, LCD projector). Left View No. Left View 0 Figure 1-3. Connects to stay cool, even after prolonged use. Left View Table 1-3. Enable the computer to USB devices (e.g., USB mouse, USB camera). 1-14 Hardware Specifications and Configurations Icon Item 1 DC-in jack 2 Ethernet (RJ-45) port 3 Ventilation slots 4 External display (VGA) port 5 HDMI port 6 USB 2.0 ports Description Connects to the AC adapter....
Connects to an 10/100/1000-based Ethernet network. Supports high definition digital video connections. Connects to a display device (e.g., external monitor, LCD projector). Left View No. Left View 0 Figure 1-3. Connects to stay cool, even after prolonged use. Left View Table 1-3. Enable the computer to USB devices (e.g., USB mouse, USB camera). 1-14 Hardware Specifications and Configurations Icon Item 1 DC-in jack 2 Ethernet (RJ-45) port 3 Ventilation slots 4 External display (VGA) port 5 HDMI port 6 USB 2.0 ports Description Connects to the AC adapter....

Aspire 4352, 4752, 4752G, 4752Z Service Guide
Page 25
... Item Headphones/speaker /line-out jack Microphone jack Description Connects to secure the lock. Right View Table 1-4. accepts CDs or DVDs. (ODD) 5 ODD access indicator Lights up when the optical drive is active. 6 ODD eject button Ejects the optical disc from an external microphone. 3 USB 3.0 port Connects to a Kensington-compatible computer security lock. Hardware Specifications and Configurations 1-15 Insert the lock into the notch and turn the key to audio line-out devices (e.g., speakers, headphone). Some keyless...
... Item Headphones/speaker /line-out jack Microphone jack Description Connects to secure the lock. Right View Table 1-4. accepts CDs or DVDs. (ODD) 5 ODD access indicator Lights up when the optical drive is active. 6 ODD eject button Ejects the optical disc from an external microphone. 3 USB 3.0 port Connects to a Kensington-compatible computer security lock. Hardware Specifications and Configurations 1-15 Insert the lock into the notch and turn the key to audio line-out devices (e.g., speakers, headphone). Some keyless...
Aspire 4352, 4752, 4752G, 4752Z Service Guide
Page 29
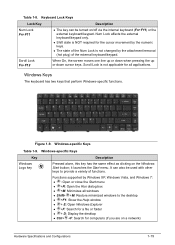
... screen moves one line up or down when pressing the up or down cursor keys. Functions supported by the attachment/removal (hot plug) of the Num Lock is not changed by Windows XP, Windows Vista, and Windows 7: : Open or close the Start menu +R: Open the Run dialog box +M: Minimizes all windows Shift+ +M: Restore minimized windows to provide a variety of functions. it launches the Start menu. Num Lock affects the external keyboard...
... screen moves one line up or down when pressing the up or down cursor keys. Functions supported by the attachment/removal (hot plug) of the Num Lock is not changed by Windows XP, Windows Vista, and Windows 7: : Open or close the Start menu +R: Open the Run dialog box +M: Minimizes all windows Shift+ +M: Restore minimized windows to provide a variety of functions. it launches the Start menu. Num Lock affects the external keyboard...

Aspire 4352, 4752, 4752G, 4752Z Service Guide
Page 30
... focus to access most computer controls. Hotkeys Hotkey Icon Function Fn+F3 Communication device toggle Fn+F4 Sleep Fn+F5 Display off the LCD back light Switches the display output between the display screen, external monitor (if connected) or both. Puts the computer in the combination. To activate hotkeys, press and hold the Fn key before pressing the key in Sleep mode. Turns the touchpad On or Off. 1-20 Hardware Specifications and Configurations Table 1-9. Hotkeys 0 The computer uses hotkeys or key combinations...
... focus to access most computer controls. Hotkeys Hotkey Icon Function Fn+F3 Communication device toggle Fn+F4 Sleep Fn+F5 Display off the LCD back light Switches the display output between the display screen, external monitor (if connected) or both. Puts the computer in the combination. To activate hotkeys, press and hold the Fn key before pressing the key in Sleep mode. Turns the touchpad On or Off. 1-20 Hardware Specifications and Configurations Table 1-9. Hotkeys 0 The computer uses hotkeys or key combinations...
Aspire 4352, 4752, 4752G, 4752Z Service Guide
Page 53
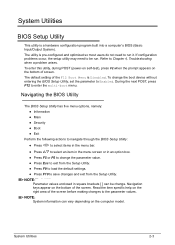
... next POST, press F12 to Enabled. Read the item specific help on the bottom of the screen before making changes to the parameter values. The default setting of the screen. To change . Navigation keys appear on the computer model. System Utilities BIOS Setup Utility 0 This utility is Disabled. The utility is pre-configured and optimized so most users do not need to save changes and exit from the Setup Utility. Refer to run . NOTE...
... next POST, press F12 to Enabled. Read the item specific help on the bottom of the screen before making changes to the parameter values. The default setting of the screen. To change . Navigation keys appear on the computer model. System Utilities BIOS Setup Utility 0 This utility is Disabled. The utility is pre-configured and optimized so most users do not need to save changes and exit from the Setup Utility. Refer to run . NOTE...
Aspire 4352, 4752, 4752G, 4752Z Service Guide
Page 70
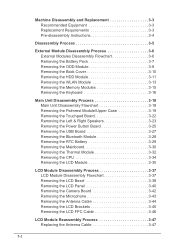
... Touchpad Board 3-22 Removing the Left & Right Speakers 3-23 Removing the Power Button Board 3-25 Removing the USB Board 3-27 Removing the Bluetooth Module 3-28 Removing the RTC Battery 3-29 Removing the Mainboard 3-30 Removing the Thermal Module 3-32 Removing the CPU 3-34 Removing the LCD Module 3-35 LCD Module Disassembly Process 3-37 LCD Module Disassembly Flowchart 3-37 Removing the LCD Bezel 3-38 Removing the LCD Panel 3-40 Removing the Camera Board 3-42 Removing the Microphone 3-43 Removing the Antenna Cable 3-44 Removing the LCD Brackets 3-45 Removing the LCD FPC Cable...
... Touchpad Board 3-22 Removing the Left & Right Speakers 3-23 Removing the Power Button Board 3-25 Removing the USB Board 3-27 Removing the Bluetooth Module 3-28 Removing the RTC Battery 3-29 Removing the Mainboard 3-30 Removing the Thermal Module 3-32 Removing the CPU 3-34 Removing the LCD Module 3-35 LCD Module Disassembly Process 3-37 LCD Module Disassembly Flowchart 3-37 Removing the LCD Bezel 3-38 Removing the LCD Panel 3-40 Removing the Camera Board 3-42 Removing the Microphone 3-43 Removing the Antenna Cable 3-44 Removing the LCD Brackets 3-45 Removing the LCD FPC Cable...
Aspire 4352, 4752, 4752G, 4752Z Service Guide
Page 157
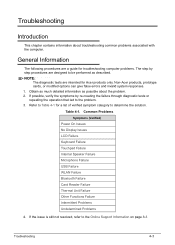
... re-creating the failure through diagnostic tests or repeating the operation that led to the Online Support Information on page 8-3 Troubleshooting 4-3 Obtain as much detailed information as described. Table 4-1. Common Problems Symptoms (Verified) Power On Issues No Display Issues LCD Failure Keyboard Failure Touchpad Failure Internal Speaker Failure Microphone Failure USB Failure WLAN Failure Bluetooth Failure Card Reader Failure Thermal Unit Failure Other Functions Failure Intermittent Problems Undetermined Problems 4. Troubleshooting Introduction...
... re-creating the failure through diagnostic tests or repeating the operation that led to the Online Support Information on page 8-3 Troubleshooting 4-3 Obtain as much detailed information as described. Table 4-1. Common Problems Symptoms (Verified) Power On Issues No Display Issues LCD Failure Keyboard Failure Touchpad Failure Internal Speaker Failure Microphone Failure USB Failure WLAN Failure Bluetooth Failure Card Reader Failure Thermal Unit Failure Other Functions Failure Intermittent Problems Undetermined Problems 4. Troubleshooting Introduction...
Aspire 4352, 4752, 4752G, 4752Z Service Guide
Page 160
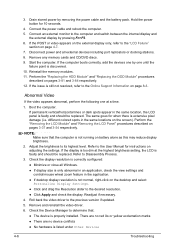
... "LCD Failure" section on adjusting the settings. Remove any memory cards and CD/DVD discs. 9. different colored spots in the same location, the LCD panel is faulty and should be replaced. NOTE: NOTE: Make sure that : The device is faulty and should be replaced. If the display is too dim at a time. 1. Check the Device Manager to the computer and switch between the internal display and the external display by removing the power cable...
... "LCD Failure" section on adjusting the settings. Remove any memory cards and CD/DVD discs. 9. different colored spots in the same location, the LCD panel is faulty and should be replaced. NOTE: NOTE: Make sure that : The device is faulty and should be replaced. If the display is too dim at a time. 1. Check the Device Manager to the computer and switch between the internal display and the external display by removing the power cable...
Aspire 4352, 4752, 4752G, 4752Z Service Guide
Page 173
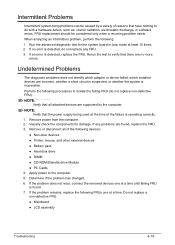
... the problem has changed. 6. If any FRU. 3. Apply power to verify that there are supported by a variety of the following FRUs one at least 10 times. 2. If no more errors. If the problem remains, replace the following devices: Non-Acer devices Printer, mouse, and other external devices Battery pack Hard disk drive DIMM CD-ROM/Diskette drive Module...
... the problem has changed. 6. If any FRU. 3. Apply power to verify that there are supported by a variety of the following FRUs one at least 10 times. 2. If no more errors. If the problem remains, replace the following devices: Non-Acer devices Printer, mouse, and other external devices Battery pack Hard disk drive DIMM CD-ROM/Diskette drive Module...
Aspire 4352, 4752, 4752G, 4752Z Service Guide
Page 176
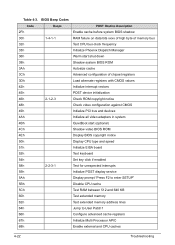
... ROM copyright notice 48h Check video configuration against CMOS 49h Initialize PCI bus and devices 4Ah Initialize all video adapters in system 4Bh QuietBoot start (optional) 4Ch Shadow video BIOS ROM 4Eh Display BIOS copyright notice 50h Display CPU type and speed 51h Initialize EISA board 52h Test keyboard 54h Set key click if enabled 58h 2-2-3-1 Test for unexpected interrupts 59h Initialize POST display service 5Ah Display prompt "Press F2 to enter SETUP" 5Bh Disable CPU cache 5Ch Test RAM...
... ROM copyright notice 48h Check video configuration against CMOS 49h Initialize PCI bus and devices 4Ah Initialize all video adapters in system 4Bh QuietBoot start (optional) 4Ch Shadow video BIOS ROM 4Eh Display BIOS copyright notice 50h Display CPU type and speed 51h Initialize EISA board 52h Test keyboard 54h Set key click if enabled 58h 2-2-3-1 Test for unexpected interrupts 59h Initialize POST display service 5Ah Display prompt "Press F2 to enter SETUP" 5Bh Disable CPU cache 5Ch Test RAM...
Aspire 4352, 4752, 4752G, 4752Z Service Guide
Page 180
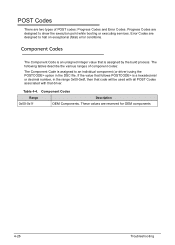
... POST codes: Progress Codes and Error Codes. If the value that follows POSTCODE= is assigned by the build process. Component Codes 0 The Component Code is an unsigned integer value that is a hexadecimal or decimal number, in the DSC file. POST Codes 0 There are two types of component codes: The Component Code is assigned to an individual component (or driver) using the POSTCODE= option in...
... POST codes: Progress Codes and Error Codes. If the value that follows POSTCODE= is assigned by the build process. Component Codes 0 The Component Code is an unsigned integer value that is a hexadecimal or decimal number, in the DSC file. POST Codes 0 There are two types of component codes: The Component Code is assigned to an individual component (or driver) using the POSTCODE= option in...
Aspire 4352, 4752, 4752G, 4752Z Service Guide
Page 184
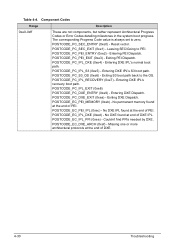
... DXE. 4-30 Troubleshooting POSTCODE_PC_IPL_RECOVERY (0xe7) - Reset vector. Exiting PEI Dispatch. POSTCODE_EC_PEI_IPL (0xec) - POSTCODE_PC_DXE_EXIT (0xea) - Exiting DXE Dispatch. Table 4-4. Component Codes Range 0xe0-0xff Description These are not components, but rather represent Architectural Progress Codes or Error Codes detailing milestones in the system boot progress. The corresponding Progress Code value is always set to zero. POSTCODE_PC_SEC_EXIT (0xe1) - Entering PEI Dispatch. POSTCODE_PC_IPL_DXE...
... DXE. 4-30 Troubleshooting POSTCODE_PC_IPL_RECOVERY (0xe7) - Reset vector. Exiting PEI Dispatch. POSTCODE_EC_PEI_IPL (0xec) - POSTCODE_PC_DXE_EXIT (0xea) - Exiting DXE Dispatch. Table 4-4. Component Codes Range 0xe0-0xff Description These are not components, but rather represent Architectural Progress Codes or Error Codes detailing milestones in the system boot progress. The corresponding Progress Code value is always set to zero. POSTCODE_PC_SEC_EXIT (0xe1) - Entering PEI Dispatch. POSTCODE_PC_IPL_DXE...
Aspire 4352, 4752, 4752G, 4752Z Service Guide
Page 194
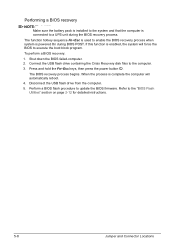
... the power button . When the process is complete the computer will force the BIOS to a UPS unit during BIOS POST. Refer to update the BIOS firmware. If this function is enabled, the system will automatically reboot. 4. Disconnect the USB flash drive from the computer. 5. Performing a BIOS recovery 0 NOTE: NOTE: Make sure the battery pack is installed to the system and that the computer is connected to execute the boot block...
... the power button . When the process is complete the computer will force the BIOS to a UPS unit during BIOS POST. Refer to update the BIOS firmware. If this function is enabled, the system will automatically reboot. 4. Disconnect the USB flash drive from the computer. 5. Performing a BIOS recovery 0 NOTE: NOTE: Make sure the battery pack is installed to the system and that the computer is connected to execute the boot block...


