
Acer Aspire 4349, 4749, 4749Z Notebook Service Guide
Page 5
... 1 Hardware Specifications Features 1-5 Operating System 1-5 CPU 1-5 Chipset 1-5 System Memory 1-5 Display 1-5 Audio 1-6 Graphics 1-6 Storage 1-6 Optical Media Drive 1-6 Webcam 1-6 Wireless and Networking 1-7 Privacy Control 1-7 Dimension and Weight 1-7 Power Adapter and Battery 1-7 Input and Control 1-8 Input and Output (I/O) Ports 1-8 Software 1-8 Optional Items 1-9 Warranty 1-9 Environment 1-9 Notebook Tour 1-10 Touchpad Basics 1-18 Using the Keyboard 1-19 Windows Keys 1-20 Hotkeys 1-21 System Block Diagram 1-23 Specification Tables 1-24 Computer specifications...
... 1 Hardware Specifications Features 1-5 Operating System 1-5 CPU 1-5 Chipset 1-5 System Memory 1-5 Display 1-5 Audio 1-6 Graphics 1-6 Storage 1-6 Optical Media Drive 1-6 Webcam 1-6 Wireless and Networking 1-7 Privacy Control 1-7 Dimension and Weight 1-7 Power Adapter and Battery 1-7 Input and Control 1-8 Input and Output (I/O) Ports 1-8 Software 1-8 Optional Items 1-9 Warranty 1-9 Environment 1-9 Notebook Tour 1-10 Touchpad Basics 1-18 Using the Keyboard 1-19 Windows Keys 1-20 Hotkeys 1-21 System Block Diagram 1-23 Specification Tables 1-24 Computer specifications...
Acer Aspire 4349, 4749, 4749Z Notebook Service Guide
Page 7
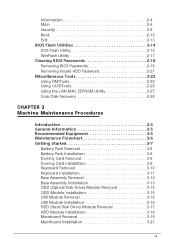
... Utility 2-27 Crisis Disk Recovery 2-28 CHAPTER 3 Machine Maintenance Procedures Introduction 3-5 General Information 3-5 Recommended Equipment 3-5 Maintenance Flowchart 3-6 Getting Started 3-7 Battery Pack Removal 3-8 Battery Pack Installation 3-8 Dummy Card Removal 3-9 Dummy Card Installation 3-9 Keyboard Removal 3-10 Keyboard Installation 3-11 Base Assembly Removal 3-12 Base Assembly Installation 3-13 ODD (Optical Disk Drive) Module Removal 3-14 ODD Module Installation 3-15 USB Module Removal 3-16 USB Module Installation 3-16 HDD (Hard Disk Drive) Module Removal 3-17 HDD...
... Utility 2-27 Crisis Disk Recovery 2-28 CHAPTER 3 Machine Maintenance Procedures Introduction 3-5 General Information 3-5 Recommended Equipment 3-5 Maintenance Flowchart 3-6 Getting Started 3-7 Battery Pack Removal 3-8 Battery Pack Installation 3-8 Dummy Card Removal 3-9 Dummy Card Installation 3-9 Keyboard Removal 3-10 Keyboard Installation 3-11 Base Assembly Removal 3-12 Base Assembly Installation 3-13 ODD (Optical Disk Drive) Module Removal 3-14 ODD Module Installation 3-15 USB Module Removal 3-16 USB Module Installation 3-16 HDD (Hard Disk Drive) Module Removal 3-17 HDD...
Acer Aspire 4349, 4749, 4749Z Notebook Service Guide
Page 9
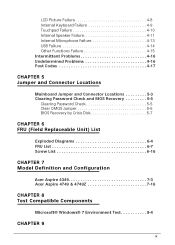
... Touchpad Failure 4-10 Internal Speaker Failure 4-11 Internal Microphone Failure 4-13 USB Failure 4-14 Other Functions Failure 4-15 Intermittent Problems 4-16 Undetermined Problems 4-16 Post Codes 4-17 CHAPTER 5 Jumper and Connector Locations Mainboard Jumper and Connector Locations 5-3 Clearing Password Check and BIOS Recovery 5-5 Clearing Password Check 5-5 Clear CMOS Jumper 5-6 BIOS Recovery by Crisis Disk 5-7 CHAPTER 6 FRU (Field Replaceable Unit) List Exploded Diagrams 6-4 FRU List 6-7 Screw List 6-16 CHAPTER 7 Model Definition and Configuration Acer Aspire 4349 7-3 Acer...
... Touchpad Failure 4-10 Internal Speaker Failure 4-11 Internal Microphone Failure 4-13 USB Failure 4-14 Other Functions Failure 4-15 Intermittent Problems 4-16 Undetermined Problems 4-16 Post Codes 4-17 CHAPTER 5 Jumper and Connector Locations Mainboard Jumper and Connector Locations 5-3 Clearing Password Check and BIOS Recovery 5-5 Clearing Password Check 5-5 Clear CMOS Jumper 5-6 BIOS Recovery by Crisis Disk 5-7 CHAPTER 6 FRU (Field Replaceable Unit) List Exploded Diagrams 6-4 FRU List 6-7 Screw List 6-16 CHAPTER 7 Model Definition and Configuration Acer Aspire 4349 7-3 Acer...
Acer Aspire 4349, 4749, 4749Z Notebook Service Guide
Page 12
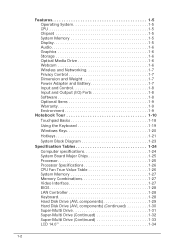
Features 1-5 Operating System 1-5 CPU 1-5 Chipset 1-5 System Memory 1-5 Display 1-5 Audio 1-6 Graphics 1-6 Storage 1-6 Optical Media Drive 1-6 Webcam 1-6 Wireless and Networking 1-7 Privacy Control 1-7 Dimension and Weight 1-7 Power Adapter and Battery 1-7 Input and Control 1-8 Input and Output (I/O) Ports 1-8 Software 1-8 Optional Items 1-9 Warranty 1-9 Environment 1-9 Notebook Tour 1-10 Touchpad Basics 1-18 Using the Keyboard 1-19 Windows Keys 1-20 Hotkeys 1-21 System Block Diagram 1-23 Specification Tables 1-24 Computer specifications 1-24 System Board Major ...
Features 1-5 Operating System 1-5 CPU 1-5 Chipset 1-5 System Memory 1-5 Display 1-5 Audio 1-6 Graphics 1-6 Storage 1-6 Optical Media Drive 1-6 Webcam 1-6 Wireless and Networking 1-7 Privacy Control 1-7 Dimension and Weight 1-7 Power Adapter and Battery 1-7 Input and Control 1-8 Input and Output (I/O) Ports 1-8 Software 1-8 Optional Items 1-9 Warranty 1-9 Environment 1-9 Notebook Tour 1-10 Touchpad Basics 1-18 Using the Keyboard 1-19 Windows Keys 1-20 Hotkeys 1-21 System Block Diagram 1-23 Specification Tables 1-24 Computer specifications 1-24 System Board Major ...

Acer Aspire 4349, 4749, 4749Z Notebook Service Guide
Page 25
...computer security lock. Hardware Specifications and Configurations 1-15 Left View # Icon Item Description Kensington lock slot Connects to secure the lock. Left View Table 1-5. Some keyless models are also available. 2 DC-in jack Connects to an AC adapter. 3 External display (VGA) port Connects to a display device (e.g., external monitor, LCD projector). 4 Ethernet (RJ-45) port Connects to an Ethernet 10/100/-based network. 5 HDMI port Supports high-definition digital video connections. 6 USB 2.0 port Connects to USB 2.0 devices (e.g., USB mouse, USB camera). Figure...
...computer security lock. Hardware Specifications and Configurations 1-15 Left View # Icon Item Description Kensington lock slot Connects to secure the lock. Left View Table 1-5. Some keyless models are also available. 2 DC-in jack Connects to an AC adapter. 3 External display (VGA) port Connects to a display device (e.g., external monitor, LCD projector). 4 Ethernet (RJ-45) port Connects to an Ethernet 10/100/-based network. 5 HDMI port Supports high-definition digital video connections. 6 USB 2.0 port Connects to USB 2.0 devices (e.g., USB mouse, USB camera). Figure...
Acer Aspire 4349, 4749, 4749Z Notebook Service Guide
Page 26
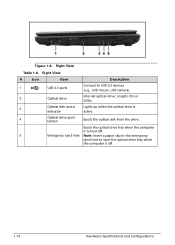
... Item Description Connect to eject the optical drive tray when the computer is off. 1-16 Hardware Specifications and Configurations Ejects the optical drive tray when the computer is 3 indicator active. 4 Optical drive eject button Ejects the optical disk from the drive. Optical disk access Lights up when the optical drive is turned off. 5 Emergency eject hole Note: Insert a paper clip to the emergency eject hole to USB 2.0 devices 1 USB 2.0 ports (e.g., USB mouse, USB camera). Right...
... Item Description Connect to eject the optical drive tray when the computer is off. 1-16 Hardware Specifications and Configurations Ejects the optical drive tray when the computer is 3 indicator active. 4 Optical drive eject button Ejects the optical disk from the drive. Optical disk access Lights up when the optical drive is turned off. 5 Emergency eject hole Note: Insert a paper clip to the emergency eject hole to USB 2.0 devices 1 USB 2.0 ports (e.g., USB mouse, USB camera). Right...

Acer Aspire 4349, 4749, 4749Z Notebook Service Guide
Page 29
... keypad, separate cursor, lock, function and special keys. It is on the upper right corner of numeric data entry. Main keyboard keys Hold while typing letters on the keys. Hold while using cursor-control keys. Using the Keyboard 0 The computer has a close-to connect an external keypad. Lock key Caps Lock Num Lock + Scroll Lock + Description When Caps Lock is indicated by small characters located on , all alphabetic characters typed are pressed respectively. To...
... keypad, separate cursor, lock, function and special keys. It is on the upper right corner of numeric data entry. Main keyboard keys Hold while typing letters on the keys. Hold while using cursor-control keys. Using the Keyboard 0 The computer has a close-to connect an external keypad. Lock key Caps Lock Num Lock + Scroll Lock + Description When Caps Lock is indicated by small characters located on , all alphabetic characters typed are pressed respectively. To...
Acer Aspire 4349, 4749, 4749Z Notebook Service Guide
Page 30
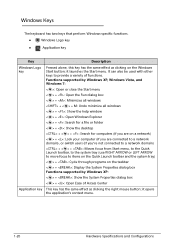
... right mouse button; it launches the Start menu. It can also be used with other keys to provide a variety of Access Center Application key This key has the same effect as clicking on the taskbar < > + : Display the System Properties dialog box Functions supported by Windows XP, Windows Vista, and Windows 7: < >: Open or close the Start menu < > + : Open the Run dialog box < > + : Minimizes all windows + < > + M: Undo minimize all windows < > + : Show the help window < > + : Open Windows Explorer...
... right mouse button; it launches the Start menu. It can also be used with other keys to provide a variety of Access Center Application key This key has the same effect as clicking on the taskbar < > + : Display the System Properties dialog box Functions supported by Windows XP, Windows Vista, and Windows 7: < >: Open or close the Start menu < > + : Open the Run dialog box < > + : Minimizes all windows + < > + M: Undo minimize all windows < > + : Show the help window < > + : Open Windows Explorer...
Acer Aspire 4349, 4749, 4749Z Notebook Service Guide
Page 31
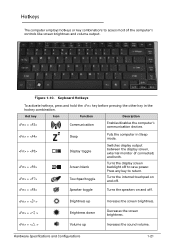
... key in Sleep mode. Hot key Icon Function Description + Communication Enables/disables the computer's communication devices. + + + + Sleep Display toggle Screen blank Touchpad toggle Puts the computer in the hockey combination. Turns the display screen backlight off . + Brightness up Increases the screen brightness. + + Brightness down Volume up Decreases the screen brightness. Increases the sound volume. Figure 1-10. Turns the internal touchpad on and off. + Speaker toggle Turns the speakers on and off to save power. Switches display output...
... key in Sleep mode. Hot key Icon Function Description + Communication Enables/disables the computer's communication devices. + + + + Sleep Display toggle Screen blank Touchpad toggle Puts the computer in the hockey combination. Turns the display screen backlight off . + Brightness up Increases the screen brightness. + + Brightness down Volume up Decreases the screen brightness. Increases the sound volume. Figure 1-10. Turns the internal touchpad on and off. + Speaker toggle Turns the speakers on and off to save power. Switches display output...
Acer Aspire 4349, 4749, 4749Z Notebook Service Guide
Page 52
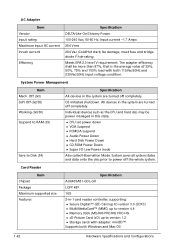
... adapter efficiency shall be power managed in the system are turned off the whole system. Off (G3) Soft Off (G2/S5) Working (G0/S0) Suspend to RAM (S3) Save to Disk (S4) Specification All devices in this state. CPU set power down VGA Suspend PCMCIA Suspend Audio Power Down Hard Disk Power Down CD-ROM Power Down Super I/O Low Power mode Also called Hibernation Mode. Card Reader...
... adapter efficiency shall be power managed in the system are turned off the whole system. Off (G3) Soft Off (G2/S5) Working (G0/S0) Suspend to RAM (S3) Save to Disk (S4) Specification All devices in this state. CPU set power down VGA Suspend PCMCIA Suspend Audio Power Down Hard Disk Power Down CD-ROM Power Down Super I/O Low Power mode Also called Hibernation Mode. Card Reader...
Acer Aspire 4349, 4749, 4749Z Notebook Service Guide
Page 63
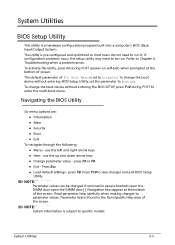
... open the DIMM door open the DIMM door[ ]. use the left and right arrow keys Item - Read parameter help is set the parameter to Enabled. Parameter help carefully when making changes to Chapter 4, Troubleshooting when a problem arises. To change the boot device without entering the BIOS SETUP, press F12 during POST (power-on self-test) when prompted at the bottom of screen. If configuration problems occur, the setup utility may need...
... open the DIMM door open the DIMM door[ ]. use the left and right arrow keys Item - Read parameter help is set the parameter to Enabled. Parameter help carefully when making changes to Chapter 4, Troubleshooting when a problem arises. To change the boot device without entering the BIOS SETUP, press F12 during POST (power-on self-test) when prompted at the bottom of screen. If configuration problems occur, the setup utility may need...
Acer Aspire 4349, 4749, 4749Z Notebook Service Guide
Page 71
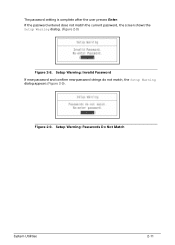
Figure 2-9. Setup Warning: Invalid Password If new password and confirm new password strings do not match, the Setup Warning dialog appears (Figure 2-9). If the password entered does not match the current password, the screen shows the Setup Warning dialog. (Figure 2-8) Figure 2-8. Setup Warning: Passwords Do Not Match System Utilities 2-11 The password setting is complete after the user presses Enter.
Figure 2-9. Setup Warning: Invalid Password If new password and confirm new password strings do not match, the Setup Warning dialog appears (Figure 2-9). If the password entered does not match the current password, the screen shows the Setup Warning dialog. (Figure 2-8) Figure 2-8. Setup Warning: Passwords Do Not Match System Utilities 2-11 The password setting is complete after the user presses Enter.
Acer Aspire 4349, 4749, 4749Z Notebook Service Guide
Page 73
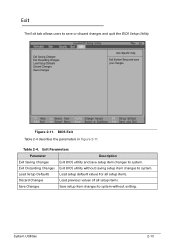
... Changes Exit BIOS utility and save setup item changes to save or discard changes and quit the BIOS Setup Utility. 3.5 Exit Saving Changes Exit Discarding Changes Load Setup Defaults Discard Changes Save Changes Item Specific Help Exit System Setup and save your changes. Exit Discarding Changes Exit BIOS utility without exiting. System Utilities 2-13 Table 2-4. Exit 0 The Exit tab allows users to system. BIOS Exit Table 2-4 describes the parameters in Figure 2-11. Load Setup Defaults Load setup default...
... Changes Exit BIOS utility and save setup item changes to save or discard changes and quit the BIOS Setup Utility. 3.5 Exit Saving Changes Exit Discarding Changes Load Setup Defaults Discard Changes Save Changes Item Specific Help Exit System Setup and save your changes. Exit Discarding Changes Exit BIOS utility without exiting. System Utilities 2-13 Table 2-4. Exit 0 The Exit tab allows users to system. BIOS Exit Table 2-4 describes the parameters in Figure 2-11. Load Setup Defaults Load setup default...
Acer Aspire 4349, 4749, 4749Z Notebook Service Guide
Page 90
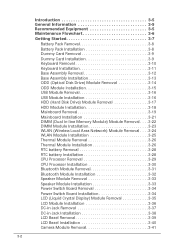
... Maintenance Flowchart 3-6 Getting Started 3-7 Battery Pack Removal 3-8 Battery Pack Installation 3-8 Dummy Card Removal 3-9 Dummy Card Installation 3-9 Keyboard Removal 3-10 Keyboard Installation 3-11 Base Assembly Removal 3-12 Base Assembly Installation 3-13 ODD (Optical Disk Drive) Module Removal 3-14 ODD Module Installation 3-15 USB Module Removal 3-16 USB Module Installation 3-16 HDD (Hard Disk Drive) Module Removal 3-17 HDD Module Installation 3-18 Mainboard Removal 3-19 Mainboard Installation 3-21 DIMM (Dual In-line Memory Module) Module Removal . . . .3-22 DIMM Module...
... Maintenance Flowchart 3-6 Getting Started 3-7 Battery Pack Removal 3-8 Battery Pack Installation 3-8 Dummy Card Removal 3-9 Dummy Card Installation 3-9 Keyboard Removal 3-10 Keyboard Installation 3-11 Base Assembly Removal 3-12 Base Assembly Installation 3-13 ODD (Optical Disk Drive) Module Removal 3-14 ODD Module Installation 3-15 USB Module Removal 3-16 USB Module Installation 3-16 HDD (Hard Disk Drive) Module Removal 3-17 HDD Module Installation 3-18 Mainboard Removal 3-19 Mainboard Installation 3-21 DIMM (Dual In-line Memory Module) Module Removal . . . .3-22 DIMM Module...
Acer Aspire 4349, 4749, 4749Z Notebook Service Guide
Page 141
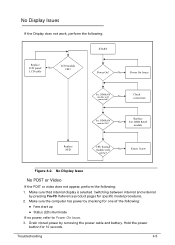
... Power On Issues. 3. No Display Issues 0 If the Display does not work, perform the following : 1. Reference product pages for 10 seconds. Hold the power button for specific model procedures. 2. No Display Issue No POST or Video 0 If the POST or video does not appear, perform the following : START Replace LCD panel/ No LCD cable LCD module OK? Make sure the computer has power by removing the power cable and battery. Fasten Screw Figure 4-2. Troubleshooting 4-5 Switching between internal and external...
... Power On Issues. 3. No Display Issues 0 If the Display does not work, perform the following : 1. Reference product pages for 10 seconds. Hold the power button for specific model procedures. 2. No Display Issue No POST or Video 0 If the POST or video does not appear, perform the following : START Replace LCD panel/ No LCD cable LCD module OK? Make sure the computer has power by removing the power cable and battery. Fasten Screw Figure 4-2. Troubleshooting 4-5 Switching between internal and external...
Acer Aspire 4349, 4749, 4749Z Notebook Service Guide
Page 142
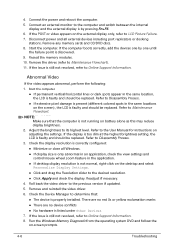
... the User Manual for instructions on -screen prompts. 4-6 Troubleshooting Run the Windows Memory Diagnostic from the operating system DVD and follow the on adjusting the settings. Refer to Disassembly Process. 3. Connect the power and reboot the computer. 5. Remove any memory cards and CD/DVD discs. 8. Reseat the memory modules. 10. Check the Device Manager to determine that the computer is still not resolved, refer to the previous version if updated. 5. 4. Roll back the video driver to Online Support...
... the User Manual for instructions on -screen prompts. 4-6 Troubleshooting Run the Windows Memory Diagnostic from the operating system DVD and follow the on adjusting the settings. Refer to Disassembly Process. 3. Connect the power and reboot the computer. 5. Remove any memory cards and CD/DVD discs. 8. Reseat the memory modules. 10. Check the Device Manager to determine that the computer is still not resolved, refer to the previous version if updated. 5. 4. Roll back the video driver to Online Support...
Acer Aspire 4349, 4749, 4749Z Notebook Service Guide
Page 152
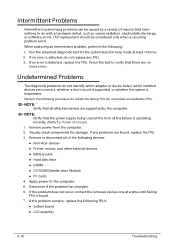
...;Printer, mouse, and other external devices Battery pack Hard disk drive DIMM CD-ROM/Diskette drive Module PC Cards 4. If the problem does not recur, connect the removed devices one at least 10 times. 2. Run the advanced diagnostic test for damage. Undetermined Problems 0 The diagnostic problems do not identify which adapter or device failed, which installed devices are no error is operating correctly...
...;Printer, mouse, and other external devices Battery pack Hard disk drive DIMM CD-ROM/Diskette drive Module PC Cards 4. If the problem does not recur, connect the removed devices one at least 10 times. 2. Run the advanced diagnostic test for damage. Undetermined Problems 0 The diagnostic problems do not identify which adapter or device failed, which installed devices are no error is operating correctly...
Acer Aspire 4349, 4749, 4749Z Notebook Service Guide
Page 156
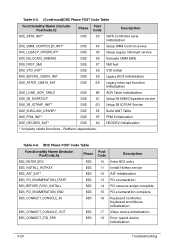
... 10 Enter BDS entry BDS_INSTALL_HOTKEY BDS 11 Install Hotkey service BDS_ASF_INIT* BDS 12 ASF Initialization BDS_PCI_ENUMERATION_START BDS 13 PCI enumeration BDS_BEFORE_PCIIO_INSTALL BDS 14 PCI resource assign complete BDS_PCI_ENUMERATION_END BDS 15 PCI enumeration complete BDS_CONNECT_CONSOLE_IN BDS 16 Keyboard Controller, Keyboard and Mouse initialization BDS_CONNECT_CONSOLE_OUT BDS 17 Video device initialization BDS_CONNECT_STD_ERR BDS 18 Error report device initialization 4-20 Troubleshooting Table 4-5. (Continued)DXE Phase POST Code Table Functionality...
... 10 Enter BDS entry BDS_INSTALL_HOTKEY BDS 11 Install Hotkey service BDS_ASF_INIT* BDS 12 ASF Initialization BDS_PCI_ENUMERATION_START BDS 13 PCI enumeration BDS_BEFORE_PCIIO_INSTALL BDS 14 PCI resource assign complete BDS_PCI_ENUMERATION_END BDS 15 PCI enumeration complete BDS_CONNECT_CONSOLE_IN BDS 16 Keyboard Controller, Keyboard and Mouse initialization BDS_CONNECT_CONSOLE_OUT BDS 17 Video device initialization BDS_CONNECT_STD_ERR BDS 18 Error report device initialization 4-20 Troubleshooting Table 4-5. (Continued)DXE Phase POST Code Table Functionality...
Acer Aspire 4349, 4749, 4749Z Notebook Service Guide
Page 167
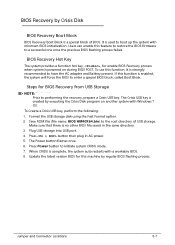
.... Update the latest version BIOS for enable BIOS Recovery process when system is powered on another system with Windows 7 OS. BIOS Recovery Hot Key 0 The system provides a function hot key, , for this function, it is enabled, the system will force the BIOS to enter a special BIOS block, called Boot Block. Format the USB storage disk using the Fast Format option. 2. Make sure that there is complete, the system auto restarts with minimum BIOS initialization. Plug USB storage into USB port. 4. Press Power button...
.... Update the latest version BIOS for enable BIOS Recovery process when system is powered on another system with Windows 7 OS. BIOS Recovery Hot Key 0 The system provides a function hot key, , for this function, it is enabled, the system will force the BIOS to enter a special BIOS block, called Boot Block. Format the USB storage disk using the Fast Format option. 2. Make sure that there is complete, the system auto restarts with minimum BIOS initialization. Plug USB storage into USB port. 4. Press Power button...
Acer Aspire 4349, 4749, 4749Z Notebook Service Guide
Page 223
However some information sources will require a user i.d. and password. Acer's Website offers convenient and valuable support resources. We are : Detailed information on all of Acer's Notebook, Desktop and Server models including: Service guides for all the support services we have included an Acrobat File to facilitate the problem-free downloading of telephone, fax and email contacts for ways to optimize and...
However some information sources will require a user i.d. and password. Acer's Website offers convenient and valuable support resources. We are : Detailed information on all of Acer's Notebook, Desktop and Server models including: Service guides for all the support services we have included an Acrobat File to facilitate the problem-free downloading of telephone, fax and email contacts for ways to optimize and...


