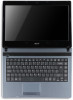
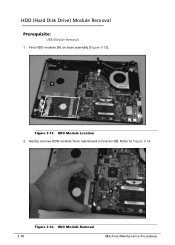
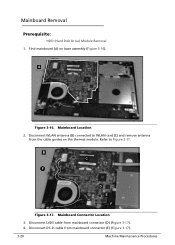
Acer Aspire 4339 4739 4739Z Notebook Series Service Guide
Page 7
... Flowchart 3-6 Getting Started 3-7 Battery Pack Removal 3-8 Battery Pack Installation 3-8 Dummy Card Removal 3-9 Dummy Card Installation 3-9 Keyboard Removal 3-10 Keyboard Installation 3-11 Base Assembly Removal 3-12 Base Assembly Installation 3-13 ODD (Optical Disk Drive) Module Removal 3-14 ODD Module Installation 3-15 USB Module Removal 3-16 USB Module Installation 3-17 HDD (Hard Disk Drive) Module Removal 3-18 HDD Module Installation 3-19 Mainboard...
Acer Aspire 4339 4739 4739Z Notebook Series Service Guide
Page 86
... Flowchart 3-6 Getting Started 3-7 Battery Pack Removal 3-8 Battery Pack Installation 3-8 Dummy Card Removal 3-9 Dummy Card Installation 3-9 Keyboard Removal 3-10 Keyboard Installation 3-11 Base Assembly Removal 3-12 Base Assembly Installation 3-13 ODD (Optical Disk Drive) Module Removal 3-14 ODD Module Installation 3-15 USB Module Removal 3-16 USB Module Installation 3-17 HDD (Hard Disk Drive) Module Removal 3-18 HDD Module Installation 3-19 Mainboard...
Acer Aspire 4339 4739 4739Z Notebook Series Service Guide
Page 102
A Figure 3-13. Gently remove HDD module from mainboard connector (B). HDD Module Removal Machine Maintenance Procedures HDD Module Location 2. HDD (Hard Disk Drive) Module Removal 0 Prerequisite: USB Module Removal 1. B 3-18 Figure 3-14. Refer to Figure 3-14. Find HDD module (A) on base assembly (Figure 3-13).
Acer Aspire 4339 4739 4739Z Notebook Series Service Guide
Page 104
A Figure 3-16. Mainboard Location 2. Disconnect DC-in cable from mainboard connector (D) (Figure 3-17). 4. B C F D E F Figure 3-17. Disconnect LVDS cable from mainboard connector (E) (Figure 3-17). 3-20 Machine Maintenance Procedures Find mainboard (A) on the thermal module. Disconnect WLAN antenna (B) connected to Figure 3-17. Mainboard Connector Location 3. Refer to WLAN card (C) and remove antenna from the cable guides on base assembly (Figure 3-16). Mainboard Removal 0 Prerequisite: HDD (Hard Disk Drive) Module Removal 1.
Acer Aspire 4339 4739 4739Z Notebook Series Service Guide
Page 146
... System board LCD assembly 4-16 Troubleshooting NOTE: NOTE: Verify that there are no error is found , replace the FRU. 3. Remove or disconnect all attached devices are supported by a variety of reasons that all of the failure is detected, replace the FRU.... such as: cosmic radiation, electrostatic discharge, or software errors. Perform the following devices: Non-Acer devices Printer, mouse, and other external devices Battery pack Hard disk drive DIMM CD-ROM/Diskette drive Module PC Cards 4. If the problem remains, replace the following : 1. Intermittent Problems 0 ...