
Acer Aspire 1820PT, Aspire 1820PTZ, Aspire 1420P Quick Guide
Page 11
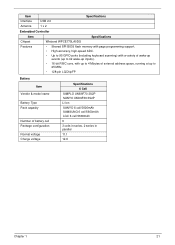
...-definition audio support S/PDIF (Sony/Philips Digital Interface) support for digital speakers MS-Sound compatible Built-in microphone 2.5" hard disk drive Multi-in-1 card reader BIOS user, supervisor, HDD passwords Kensington lock slot 285 (W) 208.9 (D) 28.5/34.5 (H) mm (11.22 x 8.22 x 1.12/1.36 inches) 1.72 kg (3.79 lbs...1066 MHz memory, upgradeable to 8 GB using two soDIMM modules 11.6" HD 1366 x 768 Convertible display Mobile Intel® GS45 Express Chipset Integrated Acer Crystal Eye webcam* WWAN: UMTS/HSPA at 850/900/1900/2100 MHz and quad-band GSM/GPRS/EDGE (850/900/1800/1900 MHz)* WLAN:...
...-definition audio support S/PDIF (Sony/Philips Digital Interface) support for digital speakers MS-Sound compatible Built-in microphone 2.5" hard disk drive Multi-in-1 card reader BIOS user, supervisor, HDD passwords Kensington lock slot 285 (W) 208.9 (D) 28.5/34.5 (H) mm (11.22 x 8.22 x 1.12/1.36 inches) 1.72 kg (3.79 lbs...1066 MHz memory, upgradeable to 8 GB using two soDIMM modules 11.6" HD 1366 x 768 Convertible display Mobile Intel® GS45 Express Chipset Integrated Acer Crystal Eye webcam* WWAN: UMTS/HSPA at 850/900/1900/2100 MHz and quad-band GSM/GPRS/EDGE (850/900/1800/1900 MHz)* WLAN:...
Aspire 1420P and 1820PT Service Guide
Page 7
... 13 Hardware Specifications and Configurations 14 System Utilities 23 BIOS Setup Utility 23 Navigating the BIOS Utility 23 Information 24 Main 25 Security 26 Boot 29 Exit 30 BIOS Flash Utility 31 DOS Flash Utility 32 WinFlash Utility 33 Remove HDD/BIOS Password Utilities 34 Removing BIOS Passwords 35 Miscellaneous Utilities 36 Machine Disassembly and...
... 13 Hardware Specifications and Configurations 14 System Utilities 23 BIOS Setup Utility 23 Navigating the BIOS Utility 23 Information 24 Main 25 Security 26 Boot 29 Exit 30 BIOS Flash Utility 31 DOS Flash Utility 32 WinFlash Utility 33 Remove HDD/BIOS Password Utilities 34 Removing BIOS Passwords 35 Miscellaneous Utilities 36 Machine Disassembly and...
Aspire 1420P and 1820PT Service Guide
Page 9
Table of Contents Troubleshooting 143 Common Problems 143 Power On Issue 144 No Display Issue 145 Random Loss of BIOS Settings 146 LCD Failure 147 Built-In Keyboard Failure 148 TouchPad Failure 149 Internal Speaker Failure 150 Internal Microphone Failure 151 HDD Not... 154 Post Codes 155 Jumper and Connector Locations 165 Mainboard Top View 165 Mainboard Bottom View 166 Clearing Password Check and BIOS Recovery 167 Mainboard CMOS Discharge 167 BIOS Recovery by Crisis Disk 168 FRU (Field Replaceable Unit) List 169 Exploded Diagram 169 Fru List 171 Model Definition and ...
Table of Contents Troubleshooting 143 Common Problems 143 Power On Issue 144 No Display Issue 145 Random Loss of BIOS Settings 146 LCD Failure 147 Built-In Keyboard Failure 148 TouchPad Failure 149 Internal Speaker Failure 150 Internal Microphone Failure 151 HDD Not... 154 Post Codes 155 Jumper and Connector Locations 165 Mainboard Top View 165 Mainboard Bottom View 166 Clearing Password Check and BIOS Recovery 167 Mainboard CMOS Discharge 167 BIOS Recovery by Crisis Disk 168 FRU (Field Replaceable Unit) List 169 Exploded Diagram 169 Fru List 171 Model Definition and ...

Aspire 1420P and 1820PT Service Guide
Page 12
Wake-on the model purchased. 2 Chapter 1 The exact configuration of the PC depends on -LAN ready Privacy control • BIOS user, supervisor, HDD passwords • Kensington lock slot Dimensions and Weight • 285 (W) 208.9 (D) 28.5/34.5 (H) mm (11.22 x 8.22 x 1.12/1.36 inches) • 1.72 ...
Wake-on the model purchased. 2 Chapter 1 The exact configuration of the PC depends on -LAN ready Privacy control • BIOS user, supervisor, HDD passwords • Kensington lock slot Dimensions and Weight • 285 (W) 208.9 (D) 28.5/34.5 (H) mm (11.22 x 8.22 x 1.12/1.36 inches) • 1.72 ...
Aspire 1420P and 1820PT Service Guide
Page 27
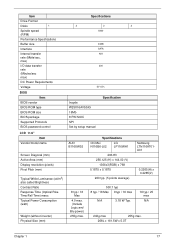
...) Performance Specifications Buffer size Interface Internal transfer rate (Mbits/sec, max) I/O data transfer rate (Mbytes/sec max) DC Power Requirements Voltage BIOS Item BIOS vendor BIOS ROM type BIOS ROM size BIOS package Supported Protocols BIOS password control LCD 11.6" Item Vendor/model name Screen Diagonal (mm) Active Area (mm) Display resolution (pixels) Pixel Pitch (mm...
...) Performance Specifications Buffer size Interface Internal transfer rate (Mbits/sec, max) I/O data transfer rate (Mbytes/sec max) DC Power Requirements Voltage BIOS Item BIOS vendor BIOS ROM type BIOS ROM size BIOS package Supported Protocols BIOS password control LCD 11.6" Item Vendor/model name Screen Diagonal (mm) Active Area (mm) Display resolution (pixels) Pixel Pitch (mm...
Aspire 1420P and 1820PT Service Guide
Page 31
Item Specifications Interface Antenna USB 2.0 1 x 2 Embedded Controller Item Specifications Chipset Features Winbond WPCE775LA0DG • Shared SPI BIOS flash memory with page programming support. • High-accuracy, high-speed ADC. • Up to 95 GPIO ports (including keyboard scanning) with a variety of wake-...
Item Specifications Interface Antenna USB 2.0 1 x 2 Embedded Controller Item Specifications Chipset Features Winbond WPCE775LA0DG • Shared SPI BIOS flash memory with page programming support. • High-accuracy, high-speed ADC. • Up to 95 GPIO ports (including keyboard scanning) with a variety of wake-...
Aspire 1420P and 1820PT Service Guide
Page 33
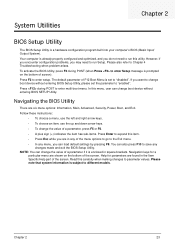
...can also press F10 to Chapter 4 Troubleshooting when problem arises. Please also refer to save any changes made and exit the BIOS Setup Utility. Navigating the BIOS Utility There are in any menu, you are six menu options: Information, Main, Advanced, Security, Power, Boot, and ...configured and optimized, and you want to "enabled". Please note that system information is a hardware configuration program built into your computer's BIOS (Basic Input/ Output System). Press during POST (when Press to run this carefully when making changes to enter multi-boot menu. Read...
...can also press F10 to Chapter 4 Troubleshooting when problem arises. Please also refer to save any changes made and exit the BIOS Setup Utility. Navigating the BIOS Utility There are in any menu, you are six menu options: Information, Main, Advanced, Security, Power, Boot, and ...configured and optimized, and you want to "enabled". Please note that system information is a hardware configuration program built into your computer's BIOS (Basic Input/ Output System). Press during POST (when Press to run this carefully when making changes to enter multi-boot menu. Read...
Aspire 1420P and 1820PT Service Guide
Page 34
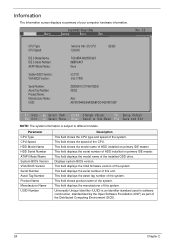
... Utility Security Boot Exit Rev. 3.5 CPU Type: CPU Speed: IDE 0 Model Name: IDE 0 Serial Number: ATAPI Model Name: System BIOS Version: VGA BIOS Version: Serial Number: Asset Tag Number: Product Name: Manufacturer Name : UUID: Genuine Intel (R) CPU 1.20GHz U2300 TOSHIBA MK2555GSX 89IBP6AKT None v0....2103 Intel V1800 ZE80SK01C191A0792500 20202 Acer A570A794A5554A0BABFDC44254EFC55F F1 Help Esc Exit Select Item F5/F6 ...
... Utility Security Boot Exit Rev. 3.5 CPU Type: CPU Speed: IDE 0 Model Name: IDE 0 Serial Number: ATAPI Model Name: System BIOS Version: VGA BIOS Version: Serial Number: Asset Tag Number: Product Name: Manufacturer Name : UUID: Genuine Intel (R) CPU 1.20GHz U2300 TOSHIBA MK2555GSX 89IBP6AKT None v0....2103 Intel V1800 ZE80SK01C191A0792500 20202 Acer A570A794A5554A0BABFDC44254EFC55F F1 Help Esc Exit Select Item F5/F6 ...
Aspire 1420P and 1820PT Service Guide
Page 36
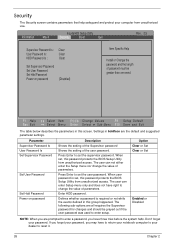
...menu nor change the value of parameters. If you forget your dealer to change the value of parameters. Settings in this password protects the BIOS Setup Utility from unauthorized access. Enter HDD password. Option Clear or Set Clear or Set Enabled or Disabled NOTE: When you are the ...Values F9 Setup Default Select Menu Enter Select Sub-Menu F10 Save and Exit The table below describes the parameters in this password protects the BIOS Setup Utility from unauthorized use. Press Enter to set , this group happened. When user password is required or not while the events defined...
...menu nor change the value of parameters. If you forget your dealer to change the value of parameters. Settings in this password protects the BIOS Setup Utility from unauthorized access. Enter HDD password. Option Clear or Set Clear or Set Enabled or Disabled NOTE: When you are the ...Values F9 Setup Default Select Menu Enter Select Sub-Menu F10 Save and Exit The table below describes the parameters in this password protects the BIOS Setup Utility from unauthorized use. Press Enter to set , this group happened. When user password is required or not while the events defined...
Aspire 1420P and 1820PT Service Guide
Page 37
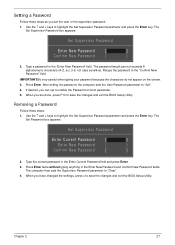
... the Password on the screen. 3. Press Enter. If desired, you have changed the settings, press u to save the changes and exit the BIOS Setup Utility. The computer then sets the Supervisor Password parameter to "Set". 4. Setting a Password Follow these steps: 1. Removing a Password Follow ...these steps as you are done, press F10 to save the changes and exit the BIOS Setup Utility. Type a password in the "Confirm New Password" field. Retype the password in the "Enter New Password" field. Use the ↑ ...
... the Password on the screen. 3. Press Enter. If desired, you have changed the settings, press u to save the changes and exit the BIOS Setup Utility. The computer then sets the Supervisor Password parameter to "Set". 4. Setting a Password Follow these steps: 1. Removing a Password Follow ...these steps as you are done, press F10 to save the changes and exit the BIOS Setup Utility. Type a password in the "Confirm New Password" field. Retype the password in the "Enter New Password" field. Use the ↑ ...
Aspire 1420P and 1820PT Service Guide
Page 38
... in the Enter Current Password field and press Enter. 3. Press Enter. If desired, you are done, press F10 to save the changes and exit the BIOS Setup Utility. If the current password entered does not match the actual current password, the screen will display as following message.
... in the Enter Current Password field and press Enter. 3. Press Enter. If desired, you are done, press F10 to save the changes and exit the BIOS Setup Utility. If the current password entered does not match the actual current password, the screen will display as following message.
Aspire 1420P and 1820PT Service Guide
Page 40
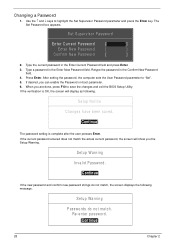
... Exit Discarding Changes Load Setup Default Discard Changes Save Changes Description Exit System Setup and save or discard any changes you made and quit the BIOS Utility. Exit The Exit screen allows you to save your changes. Information M a i n InsydelH20 Setup Utility Security Boot Exit Rev. 3.5 Exit Saving Changes Exit Discarding Changes...
... Exit Discarding Changes Load Setup Default Discard Changes Save Changes Description Exit System Setup and save or discard any changes you made and quit the BIOS Utility. Exit The Exit screen allows you to save your changes. Information M a i n InsydelH20 Setup Utility Security Boot Exit Rev. 3.5 Exit Saving Changes Exit Discarding Changes...

Aspire 1420P and 1820PT Service Guide
Page 41
On boot-up enter at the DOS prompt: C:\> flashit.exe v3106.fd /dc /beep:2000 Chapter 2 31 See "Boot" on page 29. 3. Copy the BIOS flash tool and the BIOS into a USB flash disk. 2. BIOS Flash Utility The BIOS flash memory update is required for the following conditions: • New versions of system programs • New features or options • Restore a BIOS when it becomes corrupted. To run the BIOS flash utility: 1. Set the computer to boot from the USB flash disk.
On boot-up enter at the DOS prompt: C:\> flashit.exe v3106.fd /dc /beep:2000 Chapter 2 31 See "Boot" on page 29. 3. Copy the BIOS flash tool and the BIOS into a USB flash disk. 2. BIOS Flash Utility The BIOS flash memory update is required for the following conditions: • New versions of system programs • New features or options • Restore a BIOS when it becomes corrupted. To run the BIOS flash utility: 1. Set the computer to boot from the USB flash disk.

Aspire 1420P and 1820PT Service Guide
Page 42
... Boot priority order : 1. Network Boot : Atheros Boot Agent 4. Plug in the AC power to enter the Setup Menu. 2. IDE0 : TOSHIBA MK2555GSX 2. Press to update BIOS. The flash process begins as shown. 4. IDE1 : 3. USB CDROM : 6. Execute the FLASH.BAT batch file to escape the menu F1 Help Esc Exit Select Item... F5/F6 Change Values F9 Setup Default Select Menu Enter Select Sub-Menu F10 Save and Exit 3. In flash BIOS, the message Please do not remove AC Power Source displays. Flash is not connected, the following steps to use the DOS Flash Utility: 1....
... Boot priority order : 1. Network Boot : Atheros Boot Agent 4. Plug in the AC power to enter the Setup Menu. 2. IDE0 : TOSHIBA MK2555GSX 2. Press to update BIOS. The flash process begins as shown. 4. IDE1 : 3. USB CDROM : 6. Execute the FLASH.BAT batch file to escape the menu F1 Help Esc Exit Select Item... F5/F6 Change Values F9 Setup Default Select Menu Enter Select Sub-Menu F10 Save and Exit 3. In flash BIOS, the message Please do not remove AC Power Source displays. Flash is not connected, the following steps to use the DOS Flash Utility: 1....

Aspire 1420P and 1820PT Service Guide
Page 43
Put the BIOS:ZE8_v3106.fd file under WinFlash file root. 1. When the process is complete, close all programs and applications and reboot the system. Click OK to use the WinFlash Utility: 1. Double click the WinFlash executable. 2. A progress screen displays. 3. Chapter 2 33 WinFlash Utility Perform the following steps to begin the update.
Put the BIOS:ZE8_v3106.fd file under WinFlash file root. 1. When the process is complete, close all programs and applications and reboot the system. Click OK to use the WinFlash Utility: 1. Double click the WinFlash executable. 2. A progress screen displays. 3. Chapter 2 33 WinFlash Utility Perform the following steps to begin the update.

Aspire 1420P and 1820PT Service Guide
Page 44
... Item screen. 8. Reboot to the hard disk and wait for example 46548274. 6. Select Enter Unlock Password and press Enter. Remove HDD/BIOS Password Utilities This section provide you with removing HDD/BIOS method: Remove HDD Password: When the user keys in the example. 4. An Unlock Password displays. 3. Make a note of the result... in the wrong password three times, the system reports the following steps: 1. Enter the unlock code generated by UnlockHD.EXE. 10. Save and exit the BIOS to complete the process. 34 Chapter 2
... Item screen. 8. Reboot to the hard disk and wait for example 46548274. 6. Select Enter Unlock Password and press Enter. Remove HDD/BIOS Password Utilities This section provide you with removing HDD/BIOS method: Remove HDD Password: When the user keys in the example. 4. An Unlock Password displays. 3. Make a note of the result... in the wrong password three times, the system reports the following steps: 1. Enter the unlock code generated by UnlockHD.EXE. 10. Save and exit the BIOS to complete the process. 34 Chapter 2

Aspire 1420P and 1820PT Service Guide
Page 45
Press 1 or 2 to clean the desired password shown on the screen. From a DOS prompt, Execute clnpwd.exe 2. The onscreen message determines whether the function is successful or not. Chapter 2 35 To reset the BIOS password, run clnpwd.exe as follows: 1. See the image below. Removing BIOS Passwords: If you key in the wrong Supervisor Password three times, System Disabled displays on the screen.
Press 1 or 2 to clean the desired password shown on the screen. From a DOS prompt, Execute clnpwd.exe 2. The onscreen message determines whether the function is successful or not. Chapter 2 35 To reset the BIOS password, run clnpwd.exe as follows: 1. See the image below. Removing BIOS Passwords: If you key in the wrong Supervisor Password three times, System Disabled displays on the screen.

Aspire 1420P and 1820PT Service Guide
Page 46
... a system reboot to display the usage screen. 3. Execute dmitools.exe. Using DMITools The DMI (Desktop Management Interface) Tool copies BIOS information to eeprom to be changes without accessing the BIOS. When the BIOS displays Verifying DMI pool data it is checking the table correlates with the hardware before sending to HDD|CD ROM...
... a system reboot to display the usage screen. 3. Execute dmitools.exe. Using DMITools The DMI (Desktop Management Interface) Tool copies BIOS information to eeprom to be changes without accessing the BIOS. When the BIOS displays Verifying DMI pool data it is checking the table correlates with the hardware before sending to HDD|CD ROM...
Aspire 1420P and 1820PT Service Guide
Page 156
...application, check the view settings and control/mouse wheel zoom feature in the application. c. Run the Windows Memory Diagnostic from the BIOS, the drive may reduce display brightness. Adjust the brightness to the desired resolution. If display size is correctly configured: a. If... the problem. 1. Run a complete virus scan using up-to-date software to determine that the computer is experiencing HDD or ODD BIOS information loss, disconnect and reconnect the power and data cables between devices. Minimize or close all Windows. d. Readjust if necessary. 6....
...application, check the view settings and control/mouse wheel zoom feature in the application. c. Run the Windows Memory Diagnostic from the BIOS, the drive may reduce display brightness. Adjust the brightness to the desired resolution. If display size is correctly configured: a. If... the problem. 1. Run a complete virus scan using up-to-date software to determine that the computer is experiencing HDD or ODD BIOS information loss, disconnect and reconnect the power and data cables between devices. Minimize or close all Windows. d. Readjust if necessary. 6....

Aspire 1420P and 1820PT Service Guide
Page 162
... command prompt. HDD Not Operating Correctly If the HDD does not operate correctly, perform the following actions one at a time to enter the BIOS Utility. insert the Windows 7 Operating System DVD in the ODD and restart the computer. d. The System Recovery Options screen displays. Select Startup...When complete, click Finish. NOTE: Click Load Drivers if controller drives are correct and that CD/DVD drive is set correctly. 7. Check the BIOS settings are required. For more information see Windows Help and Support. 9. h. Restore system and file settings from a known good date using up-...
... command prompt. HDD Not Operating Correctly If the HDD does not operate correctly, perform the following actions one at a time to enter the BIOS Utility. insert the Windows 7 Operating System DVD in the ODD and restart the computer. d. The System Recovery Options screen displays. Select Startup...When complete, click Finish. NOTE: Click Load Drivers if controller drives are correct and that CD/DVD drive is set correctly. 7. Check the BIOS settings are required. For more information see Windows Help and Support. 9. h. Restore system and file settings from a known good date using up-...


