
Aspire 1360 - 1520 Service Guide
Page 4
Gives precautionary measures to avoid possible hardware or software problems. Reminds you to any damage that appear on screen. IV Conventions The following conventions are used in this manual: Screen messages NOTE WARNING CAUTION IMPORTANT Denotes actual messages that might result from doing or not doing specific actions. Gives bits and pieces of additional information related to the accomplishment of procedures. Alerts you to do specific actions relevant to the current topic.
Gives precautionary measures to avoid possible hardware or software problems. Reminds you to any damage that appear on screen. IV Conventions The following conventions are used in this manual: Screen messages NOTE WARNING CAUTION IMPORTANT Denotes actual messages that might result from doing or not doing specific actions. Gives bits and pieces of additional information related to the accomplishment of procedures. Alerts you to do specific actions relevant to the current topic.

Aspire 1360 - 1520 Service Guide
Page 15
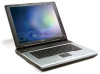
... and right mouse buttons, the center button serves as you use . 6 Chapter 1 The left and right buttons function like a computer mouse. Front View # 1 2 3 4 5 6 7 8 9 Item Display screen Status indicators Power button Launch Keys Palmrest Click buttons & 4-way scroll key Touchpad Keyboard Ventilation Slot Description Liquid-Crystal Display (LCD) provides visual output. Panel...
... and right mouse buttons, the center button serves as you use . 6 Chapter 1 The left and right buttons function like a computer mouse. Front View # 1 2 3 4 5 6 7 8 9 Item Display screen Status indicators Power button Launch Keys Palmrest Click buttons & 4-way scroll key Touchpad Keyboard Ventilation Slot Description Liquid-Crystal Display (LCD) provides visual output. Panel...

Aspire 1360 - 1520 Service Guide
Page 20
... can see the status of the computer and its components. Orange--WLAN; Indicators The computer provides an array of seven indicators located below the display screen, showing the status of the computer while the cover is activated.
... can see the status of the computer and its components. Orange--WLAN; Indicators The computer provides an array of seven indicators located below the display screen, showing the status of the computer while the cover is activated.
Aspire 1360 - 1520 Service Guide
Page 21
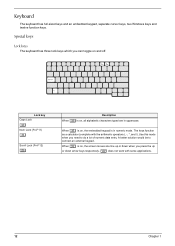
.... When ] is on, the embedded keypad is on and off. Use this mode when you need to connect an external keypad. When [ is on, the screen moves one line up or down when you can toggle on , all alphabetic characters typed are in numeric mode. Lock key Caps Lock @ Num Lock...
.... When ] is on, the embedded keypad is on and off. Use this mode when you need to connect an external keypad. When [ is on, the screen moves one line up or down when you can toggle on , all alphabetic characters typed are in numeric mode. Lock key Caps Lock @ Num Lock...

Aspire 1360 - 1520 Service Guide
Page 24
...Turns the internal touchpad on and off; mutes the sound. Fn-y Volume down Decreases the sound volume. Turns the display screen backlight off . Fn-x Brightness up Increases the sound volume. Press any key to save power. Accesses the notebook configuration utility. Display toggle...Fn-m Fn-n Fn-o Fn-p Fn-q Fn-r Fn-s Fn-w Icon Function Hotkey help Setup Description Displays a list of the computer's controls like screen contrast and brightness, volume output and the BIOS Utility. To activate hot keys, press and hold the Fn key before pressing the other key in...
...Turns the internal touchpad on and off; mutes the sound. Fn-y Volume down Decreases the sound volume. Turns the display screen backlight off . Fn-x Brightness up Increases the sound volume. Press any key to save power. Accesses the notebook configuration utility. Display toggle...Fn-m Fn-n Fn-o Fn-p Fn-q Fn-r Fn-s Fn-w Icon Function Hotkey help Setup Description Displays a list of the computer's controls like screen contrast and brightness, volume output and the BIOS Utility. To activate hot keys, press and hold the Fn key before pressing the other key in...

Aspire 1360 - 1520 Service Guide
Page 25
.... Double-click on Details. 4. Hold aGr and press the Euro symbol. 16 Chapter 1 Hot Key Fn-¨z Fn-{ Icon Function Brightness down Description Decreases the screen brightness. Fn-} End Functions as the g key. The Euro symbol If your keyboard layout is set when you can type the Euro symbol on your...
.... Double-click on Details. 4. Hold aGr and press the Euro symbol. 16 Chapter 1 Hot Key Fn-¨z Fn-{ Icon Function Brightness down Description Decreases the screen brightness. Fn-} End Functions as the g key. The Euro symbol If your keyboard layout is set when you can type the Euro symbol on your...

Aspire 1360 - 1520 Service Guide
Page 37
... 5 sec (@ 115Vac) 5ms (@115Vac, Full load) 28 Chapter 1 Vertical Stripe Normally White 185 1.4 (5pts) 400 5/20 391 331.2x207.0 1280x800 WXGA 0.2588x0.2588 R.G.B. LCD Item Screen Diagonal (mm) Active Area (mm) Display resolution (pixels) Pixel Pitch Pixel Arrangement Display Mode Typical White Luminance (cd/m2) also called Brightness Luminance Uniformity Contrast...
... 5 sec (@ 115Vac) 5ms (@115Vac, Full load) 28 Chapter 1 Vertical Stripe Normally White 185 1.4 (5pts) 400 5/20 391 331.2x207.0 1280x800 WXGA 0.2588x0.2588 R.G.B. LCD Item Screen Diagonal (mm) Active Area (mm) Display resolution (pixels) Pixel Pitch Pixel Arrangement Display Mode Typical White Luminance (cd/m2) also called Brightness Luminance Uniformity Contrast...
Aspire 1360 - 1520 Service Guide
Page 41
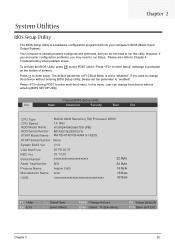
... BIOS Ver 90.F8.00.37 KBC Ver Serial Number 02.13.29 xxxxxxxxxxxxxxxxxxxxxx 22 Byte Asset Tag Number N/A 32 Byte Produce Name Aspire 1360 16 Byte Manufacturer Name: Acer UUID: xxxxxxxxxxxxxxxxxxxxxxxxxxxxxxxx 16 Byte 32 Byte F1 Help Esc Exit ↑ ↓ Select Item ← → Select Menu F5/F6 Change Values Enter..., if you encounter configuration problems, you want to change boot device without entering BIOS Setup Utility, please set to enter setup. The default parameter of screen). Info.
... BIOS Ver 90.F8.00.37 KBC Ver Serial Number 02.13.29 xxxxxxxxxxxxxxxxxxxxxx 22 Byte Asset Tag Number N/A 32 Byte Produce Name Aspire 1360 16 Byte Manufacturer Name: Acer UUID: xxxxxxxxxxxxxxxxxxxxxxxxxxxxxxxx 16 Byte 32 Byte F1 Help Esc Exit ↑ ↓ Select Item ← → Select Menu F5/F6 Change Values Enter..., if you encounter configuration problems, you want to change boot device without entering BIOS Setup Utility, please set to enter setup. The default parameter of screen). Info.
Aspire 1360 - 1520 Service Guide
Page 42
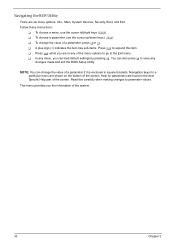
... exit the BIOS Setup Utility. Navigation keys for parameters are six menu options: Info., Main, System Devices, Security, Boot, and Exit. T In any of the screen. This menu provides you can also press u to the Exit menu. Follow these instructions: T To choose a menu, use the cursor up/down keys ( wy). You... cursor left/right keys (zx). NOTE: You can change the value of a parameter if it is enclosed in any menu, you the information of the screen.
... exit the BIOS Setup Utility. Navigation keys for parameters are six menu options: Info., Main, System Devices, Security, Boot, and Exit. T In any of the screen. This menu provides you can also press u to the Exit menu. Follow these instructions: T To choose a menu, use the cursor up/down keys ( wy). You... cursor left/right keys (zx). NOTE: You can change the value of a parameter if it is enclosed in any menu, you the information of the screen.

Aspire 1360 - 1520 Service Guide
Page 44
... Boot Menu: D2D Recovery Item Specific Help [15:56:48] [08/23/2004] , , or 640 KB selects field. Actual values may differ. Main The Main screen displays a summary of your computer hardware information, and also includes basic setup parameters. It allows the user to specify standard IBM PC AT system parameters...] [Enabled] [Disabled] [Enabled] F1 Help Esc Exit ↑ ↓ Select Item ← → Select Menu F5/F6 Change Values Enter Select 4 Sub-Menu NOTE: The screen above is for reference only.
... Boot Menu: D2D Recovery Item Specific Help [15:56:48] [08/23/2004] , , or 640 KB selects field. Actual values may differ. Main The Main screen displays a summary of your computer hardware information, and also includes basic setup parameters. It allows the user to specify standard IBM PC AT system parameters...] [Enabled] [Disabled] [Enabled] F1 Help Esc Exit ↑ ↓ Select Item ← → Select Menu F5/F6 Change Values Enter Select 4 Sub-Menu NOTE: The screen above is for reference only.

Aspire 1360 - 1520 Service Guide
Page 45
... System Date System Memory Extended Memory VGA Memory Fast Boot Power on display will be in these cases. Enabled: Customer Logo is displayed, and Summary Screen is enabled. Option: Auto or Both Determines if the system will be in boldface are displayed Format: HH:MM:SS with 24-hour format. ...(hour:minute:second) System Time Sets the system date. Otherwise it will automatically dim the LCD brightness in this screen. Memory size is fixed to save power when AC is set to disable or auto. If any display device is not allowed to Hard Disk...
... System Date System Memory Extended Memory VGA Memory Fast Boot Power on display will be in these cases. Enabled: Customer Logo is displayed, and Summary Screen is enabled. Option: Auto or Both Determines if the system will be in boldface are displayed Format: HH:MM:SS with 24-hour format. ...(hour:minute:second) System Time Sets the system date. Otherwise it will automatically dim the LCD brightness in this screen. Memory size is fixed to save power when AC is set to disable or auto. If any display device is not allowed to Hard Disk...

Aspire 1360 - 1520 Service Guide
Page 46
... Infrared Port Base I/O address Interrupt DMA channel Parallel Port Mode Base I /O address of the parallel port. Advanced The Advanced menu screen contains parameters involving your hardware devices. Settings in the screen. Enables, disables or auto detects the parallel port. Sets the interrupt request of the parallel port. Sets the interrupt request of...
... Infrared Port Base I/O address Interrupt DMA channel Parallel Port Mode Base I /O address of the parallel port. Advanced The Advanced menu screen contains parameters involving your hardware devices. Settings in the screen. Enables, disables or auto detects the parallel port. Sets the interrupt request of the parallel port. Sets the interrupt request of...

Aspire 1360 - 1520 Service Guide
Page 48
... Boot Exit User Password is : Supervisor Password is : Set User Password Set Supervisor Password Primary HardDisk Security Password on boot is enabled. Security The Security screen contains parameters that help safeguard and protect your computer from unauthorized use.
... Boot Exit User Password is : Supervisor Password is : Set User Password Set Supervisor Password Primary HardDisk Security Password on boot is enabled. Security The Security screen contains parameters that help safeguard and protect your computer from unauthorized use.
Aspire 1360 - 1520 Service Guide
Page 49
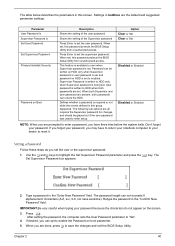
...passwords are done, press u to enabled. After setting the password, the computer sets the User Password parameter to set and password on the screen. 3. Press Enter to "Set". 4. If you forget your dealer to enable the Password on Boot Description Shows the setting of the Supervisor ... Supervisor password for changes and should be written on HDD only when Supervisor password or user password is being set , this screen. The Set Supervisor Password box appears: 2. Chapter 2 40 IMPORTANT:Be very careful when typing your password. The password length can unlock...
...passwords are done, press u to enabled. After setting the password, the computer sets the User Password parameter to set and password on the screen. 3. Press Enter to "Set". 4. If you forget your dealer to enable the Password on Boot Description Shows the setting of the Supervisor ... Supervisor password for changes and should be written on HDD only when Supervisor password or user password is being set , this screen. The Set Supervisor Password box appears: 2. Chapter 2 40 IMPORTANT:Be very careful when typing your password. The password length can unlock...

Aspire 1360 - 1520 Service Guide
Page 50
... and press the e key. Type the current password in the Enter New Password and Confirm New Password fields. Press e. The password setting is OK, the screen will display as following. Retype the password in the Enter Current Password field and press e. 3. If the verification is complete after the user presses u. 41...
... and press the e key. Type the current password in the Enter New Password and Confirm New Password fields. Press e. The password setting is OK, the screen will display as following. Retype the password in the Enter Current Password field and press e. 3. If the verification is complete after the user presses u. 41...

Aspire 1360 - 1520 Service Guide
Page 51
If the current password entered does not match the actual current password, the screen will display the following message. Chapter 2 42 If the new password and confirm new password strings do not match, the screen will show you the Setup Warning.
If the current password entered does not match the actual current password, the screen will display the following message. Chapter 2 42 If the new password and confirm new password strings do not match, the screen will show you the Setup Warning.
Aspire 1360 - 1520 Service Guide
Page 53
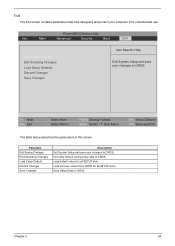
... Select Menu F5/F6 Change Values Enter Select 4 Sub-Menu F9 Setup Defaults F10 Save and Exit The table below describes the parameters in this screen. PhoenixBIOS Setup Utility Info. Exit utility without saving setup data to CMOS. Load default values for all SETUP item. Chapter 2 44 Parameter Exit ... Save Changes Item Specific Help Exit System Setup and save your changes to CMOS. Load previous values from unauthorized use. Exit The Exit screen contains parameters that help safeguard and protect your computer from CMOS for all SETUP items. Save Setup Data to CMOS.
... Select Menu F5/F6 Change Values Enter Select 4 Sub-Menu F9 Setup Defaults F10 Save and Exit The table below describes the parameters in this screen. PhoenixBIOS Setup Utility Info. Exit utility without saving setup data to CMOS. Load default values for all SETUP item. Chapter 2 44 Parameter Exit ... Save Changes Item Specific Help Exit System Setup and save your changes to CMOS. Load previous values from unauthorized use. Exit The Exit screen contains parameters that help safeguard and protect your computer from CMOS for all SETUP items. Save Setup Data to CMOS.

Aspire 1360 - 1520 Service Guide
Page 81
... (Verified) Power failure. (The power indicator does not go on or stay on screen. POST detects an error and displayed messages on .) POST does not complete. Symptoms cannot be re-created (intermittent problems). Non-Acer products, prototype cards, or modified options can give false errors and invalid system responses.... page 78 "Power-On Self-Test (POST) Error Message" on page 77 Use the customer-reported symptoms and go to test only Acer products. Chapter 4 Troubleshooting Use the following table with the verified symptom to determine which page to go to re-create the failure by...
... (Verified) Power failure. (The power indicator does not go on or stay on screen. POST detects an error and displayed messages on .) POST does not complete. Symptoms cannot be re-created (intermittent problems). Non-Acer products, prototype cards, or modified options can give false errors and invalid system responses.... page 78 "Power-On Self-Test (POST) Error Message" on page 77 Use the customer-reported symptoms and go to test only Acer products. Chapter 4 Troubleshooting Use the following table with the verified symptom to determine which page to go to re-create the failure by...
Aspire 1360 - 1520 Service Guide
Page 83
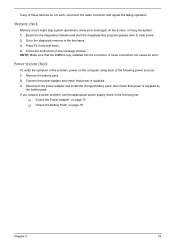
... a power problem, see the appropriate power supply check in the test items. 4. Memory check Memory errors might stop system operations, show error messages on the screen, or hang the system. 1. Disconnect the power adapter and install the charged battery pack; then check that power is fully installed into the connector. Remove...
... a power problem, see the appropriate power supply check in the test items. 4. Memory check Memory errors might stop system operations, show error messages on the screen, or hang the system. 1. Disconnect the power adapter and install the charged battery pack; then check that power is fully installed into the connector. Remove...

Aspire 1360 - 1520 Service Guide
Page 85
... recharging, replace the battery. Power off the computer. 2. Do not replace a non-defective FRU: 1. No service actions are correct. 3. If the voltage is on the screen for a short time. Re-install the battery pack. Replace the system board. Check the Battery Pack To check the battery pack, do the following actions... a time to correct the problem. After you identify first the problem is still less than 50% of time. Check out the Power Management in the screen for both battery and adapter. 4.
... recharging, replace the battery. Power off the computer. 2. Do not replace a non-defective FRU: 1. No service actions are correct. 3. If the voltage is on the screen for a short time. Re-install the battery pack. Replace the system board. Check the Battery Pack To check the battery pack, do the following actions... a time to correct the problem. After you identify first the problem is still less than 50% of time. Check out the Power Management in the screen for both battery and adapter. 4.


