

AL2017 LCD Monitor Service Guide
Page 1
Acer AL 2017 Service Guide Service guide files and updates are available on the CSD web: for more information, Please refer to http: csd.acer.com.tw 1
Acer AL 2017 Service Guide Service guide files and updates are available on the CSD web: for more information, Please refer to http: csd.acer.com.tw 1
AL2017 LCD Monitor Service Guide
Page 2
..., transcribed, stored in a retrieval system, or translated into any language or computer language, in any form or by Acer Incorporated. Acer Incorporated makes no representations or warranties, either expresses or implied, with respect to change without the prior written permission of... Acer Corporation. Intel is a registered trademark of Acer Incorporated. Other brand and product names are trademarks of this manual is sold or licensed "as is ". All ...
..., transcribed, stored in a retrieval system, or translated into any language or computer language, in any form or by Acer Incorporated. Acer Incorporated makes no representations or warranties, either expresses or implied, with respect to change without the prior written permission of... Acer Corporation. Intel is a registered trademark of Acer Incorporated. Other brand and product names are trademarks of this manual is sold or licensed "as is ". All ...
AL2017 LCD Monitor Service Guide
Page 3
Gives precautionary measures to avoid possible hardware or software problems. Reminds you to the current topic. Alerts you to do specific actions relevant to the accomplishment of additional information related to any damage that appear on screen Gives bits and pieces of procedures. - 3 - Conventions The following conventions are used in this manual: Screen messages Note Warning Caution Important Denotes actual messages that might result from doing or not doing specific actions.
Gives precautionary measures to avoid possible hardware or software problems. Reminds you to the current topic. Alerts you to do specific actions relevant to the accomplishment of additional information related to any damage that appear on screen Gives bits and pieces of procedures. - 3 - Conventions The following conventions are used in this manual: Screen messages Note Warning Caution Important Denotes actual messages that might result from doing or not doing specific actions.
AL2017 LCD Monitor Service Guide
Page 4
..., a part number change is made, it supports, please read the following general information. 1. You MUST use the list provided by your Acer office may have decided to those given in the FRU list of this information and the product it will NOT be noted in this generic... product competitiveness, your regional offices or the responsible personnel/channel to provide you with all technical information relating to order FRU parts for Acer's "global" product offering. In such cases, please contact your regional office MAY have a DIFFERENT part number code to extend the functionality...
..., a part number change is made, it supports, please read the following general information. 1. You MUST use the list provided by your Acer office may have decided to those given in the FRU list of this information and the product it will NOT be noted in this generic... product competitiveness, your regional offices or the responsible personnel/channel to provide you with all technical information relating to order FRU parts for Acer's "global" product offering. In such cases, please contact your regional office MAY have a DIFFERENT part number code to extend the functionality...
AL2017 LCD Monitor Service Guide
Page 5
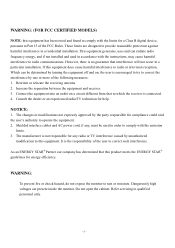
Connect the equipment into an outlet on , the user is not responsible for any , must be determined by turning the equipment off and on a circuit different from that to which the receiver is the responsibility of the user to correct such interference. Consult the dealer or an experienced radio/TV technician for energy efficiency. Shielded interface cables and AC power cord, if any radio or TV interference caused by the party responsible for a Class B digital device, pursuant to Part 15 of the following measures: 1. Do not open the cabinet. It is connected. 4. As an ENERGY STAR...
Connect the equipment into an outlet on , the user is not responsible for any , must be determined by turning the equipment off and on a circuit different from that to which the receiver is the responsibility of the user to correct such interference. Consult the dealer or an experienced radio/TV technician for energy efficiency. Shielded interface cables and AC power cord, if any radio or TV interference caused by the party responsible for a Class B digital device, pursuant to Part 15 of the following measures: 1. Do not open the cabinet. It is connected. 4. As an ENERGY STAR...
AL2017 LCD Monitor Service Guide
Page 6
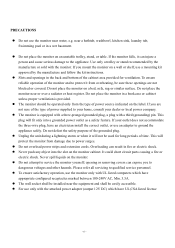
If you to dangerous voltages and other hazards. Do not defeat the safety purpose of time. Use only a trolley or stand recommended by the manufacture and follow the kit instructions. If you are not blocked or covered. This plug will fit only into the slot on a wall or shelf, use only with UL listed computers which have appropriate configured receptacles marked between 100-240V AC, Min. 3.5A. z Never push any object into a grounded power outlet as a safety feature. z To ensure satisfactory operation, use the monitor only with the attached power adapter (output 12V ...
If you to dangerous voltages and other hazards. Do not defeat the safety purpose of time. Use only a trolley or stand recommended by the manufacture and follow the kit instructions. If you are not blocked or covered. This plug will fit only into the slot on a wall or shelf, use only with UL listed computers which have appropriate configured receptacles marked between 100-240V AC, Min. 3.5A. z Never push any object into a grounded power outlet as a safety feature. z To ensure satisfactory operation, use the monitor only with the attached power adapter (output 12V ...

AL2017 LCD Monitor Service Guide
Page 7
z The LCD screen has effective pixels of the time. z You may flicker during initial use . In this case, the screen is displayed for hours. - 7 - NOTES z Due to the nature of the fluorescent light, the screen may find slightly uneven brightness in the screen depending on again to the nature of the LCD screen, an afterimage of the previous screen may include blemishes of 0.01% or less such as a missing pixel or a pixel lit all of 99.99% or more. It may remain after switching the image, when the same image is recovered slowly by changing the image or turning off the Power ...
z The LCD screen has effective pixels of the time. z You may flicker during initial use . In this case, the screen is displayed for hours. - 7 - NOTES z Due to the nature of the fluorescent light, the screen may find slightly uneven brightness in the screen depending on again to the nature of the LCD screen, an afterimage of the previous screen may include blemishes of 0.01% or less such as a missing pixel or a pixel lit all of 99.99% or more. It may remain after switching the image, when the same image is recovered slowly by changing the image or turning off the Power ...

AL2017 LCD Monitor Service Guide
Page 8
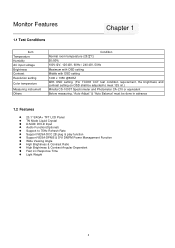
Table of Contents Chapter 1 Monitor Features 8 1.1 Test Conditions 8 1.2 Features 8 1.3 LCD Panel Specification 9 Chapter 2 OPERATING INSTRUCTIONS 14 2.1 Function Name 14 2.2 OSD Menu Description 16 2.3 OSD Control 17 2.4 OSD Menu Screen 17 2.5 OSD Function Definition 19 2.6 Plug and Play 20 2.7 Power Saver 20 Chapter 3 Machine Disassembly and Assembly 21 3.1 Machine Disassembly 21 3.2 Machine Assembly 24 Chapter 4 Troubleshooting 27 4.1 Abnormal display Troubleshooting 27 4.2 Abnormal (On/Off, LCD Display, K/B) Troubleshooting...29 4.3 Abnormal (BIOS, OSD, Other Display) ...
Table of Contents Chapter 1 Monitor Features 8 1.1 Test Conditions 8 1.2 Features 8 1.3 LCD Panel Specification 9 Chapter 2 OPERATING INSTRUCTIONS 14 2.1 Function Name 14 2.2 OSD Menu Description 16 2.3 OSD Control 17 2.4 OSD Menu Screen 17 2.5 OSD Function Definition 19 2.6 Plug and Play 20 2.7 Power Saver 20 Chapter 3 Machine Disassembly and Assembly 21 3.1 Machine Disassembly 21 3.2 Machine Assembly 24 Chapter 4 Troubleshooting 27 4.1 Abnormal display Troubleshooting 27 4.2 Abnormal (On/Off, LCD Display, K/B) Troubleshooting...29 4.3 Abnormal (BIOS, OSD, Other Display) ...
AL2017 LCD Monitor Service Guide
Page 9
Monitor Features 1.1 Test Conditions Chapter 1 2 Item Temperature Humidity AC input voltage Brightness Contrast Resolution setting Color temperature Measuring instrument Others Condition Normal room temperature (25 2 ) 50 10% 100V 2V, 120 2V, 60Hz / 240 2V, 50Hz Maximum with OSD setting Middle with OSD setting 1400 x 1050 @60HZ With OSD setting. (For TCO03 CCT test condition requirement, the brightness and contrast setting on OSD shall be adjusted to meet 125 nit.) Minolta CS-1000T Spectrometer and Photometer CA -210 or equivalent Before measuring, "Auto Adjust" & "Auto Balance" must be ...
Monitor Features 1.1 Test Conditions Chapter 1 2 Item Temperature Humidity AC input voltage Brightness Contrast Resolution setting Color temperature Measuring instrument Others Condition Normal room temperature (25 2 ) 50 10% 100V 2V, 120 2V, 60Hz / 240 2V, 50Hz Maximum with OSD setting Middle with OSD setting 1400 x 1050 @60HZ With OSD setting. (For TCO03 CCT test condition requirement, the brightness and contrast setting on OSD shall be adjusted to meet 125 nit.) Minolta CS-1000T Spectrometer and Photometer CA -210 or equivalent Before measuring, "Auto Adjust" & "Auto Balance" must be ...

AL2017 LCD Monitor Service Guide
Page 10
x 1050 0.2916 (H) x 0.2916 (V) RGB Vertical Stripe 16.2M Normally White (Typical 150 / 130) (Typical 300) Unit mm - Input Connector Auto Adjust Screen Scaling Power Management Color Adjustment OSD Language Power source Power Input Operation Mode Power consumption Power Saving Sleep Mode Power Saving OFF Mode Tilt angle Upward / Downward Physical Dimension, weight DCC Plug & Play Function OSD key Audio & Speaker (Typical 600) - (8) (Tr: 2 + Tf: 6) msec TTL Level - pixel mm color degree cd/m2 Graphic Performance Contrast Ratio LC Response Time (Tr+Tf) Separate Sync....
x 1050 0.2916 (H) x 0.2916 (V) RGB Vertical Stripe 16.2M Normally White (Typical 150 / 130) (Typical 300) Unit mm - Input Connector Auto Adjust Screen Scaling Power Management Color Adjustment OSD Language Power source Power Input Operation Mode Power consumption Power Saving Sleep Mode Power Saving OFF Mode Tilt angle Upward / Downward Physical Dimension, weight DCC Plug & Play Function OSD key Audio & Speaker (Typical 600) - (8) (Tr: 2 + Tf: 6) msec TTL Level - pixel mm color degree cd/m2 Graphic Performance Contrast Ratio LC Response Time (Tr+Tf) Separate Sync....

AL2017 LCD Monitor Service Guide
Page 11
(1) Technical Specification Definition of Viewing Angle (θx, θy): θX- = 90º x6 o'clock θy- = 90º y- Normal θx = θy = 0º θy- θy+ θxθx+ 12 o'clock direction y+ θy+ = 90º x+ θX+ = 90º 10
(1) Technical Specification Definition of Viewing Angle (θx, θy): θX- = 90º x6 o'clock θy- = 90º y- Normal θx = θy = 0º θy- θy+ θxθx+ 12 o'clock direction y+ θy+ = 90º x+ θX+ = 90º 10

AL2017 LCD Monitor Service Guide
Page 12
(2) Definition of the point X at Figure in Note (5). 11 Contrast Ratio (CR) = L255 / L0 L255: Luminance of gray level 255 L 0: Luminance of gray level 0 CR = CR (1) CR (X) is corresponding to the Contrast Ratio of Contrast Ratio (CR): The contrast ratio can be calculated by the following expression and figure below.
(2) Definition of the point X at Figure in Note (5). 11 Contrast Ratio (CR) = L255 / L0 L255: Luminance of gray level 255 L 0: Luminance of gray level 0 CR = CR (1) CR (X) is corresponding to the Contrast Ratio of Contrast Ratio (CR): The contrast ratio can be calculated by the following expression and figure below.

AL2017 LCD Monitor Service Guide
Page 13
Y=10.0mm Luminance of center point: L=L(1) Brightness Uniformity Measurement points: Five specified points 1-5 Formula: Maximum [L (1), L (2), L (3), L (4), L (5), L (6), L (7), L (8), L (9), L (10), L (11), L (12), L (13)]/Minimum [L (1), L (2), L (3), L (4), L (5), L (6), L (7), L (8), L (9), L (10), L (11), L (12), L (13)] (3) Definition of measuring area corner: X=10.0mm ; Note(3) Definition of luminance measured points and Brightness Uniformity Horizontal Line Number [pixel] X Test Point X 1 to 13 Active area The position of Response Time (TR, TF) and Measurement Method: 100% 90%...
Y=10.0mm Luminance of center point: L=L(1) Brightness Uniformity Measurement points: Five specified points 1-5 Formula: Maximum [L (1), L (2), L (3), L (4), L (5), L (6), L (7), L (8), L (9), L (10), L (11), L (12), L (13)]/Minimum [L (1), L (2), L (3), L (4), L (5), L (6), L (7), L (8), L (9), L (10), L (11), L (12), L (13)] (3) Definition of measuring area corner: X=10.0mm ; Note(3) Definition of luminance measured points and Brightness Uniformity Horizontal Line Number [pixel] X Test Point X 1 to 13 Active area The position of Response Time (TR, TF) and Measurement Method: 100% 90%...

AL2017 LCD Monitor Service Guide
Page 14
In order to stabilize the luminance, the measurement should be executed after lighting Backlight for (20) minutes to meet 125 nit. (4) Luminance, Chromaticity and CCT Measurement Measurement System Setup: The LCD module should be stabilized at given temperature for (20) minutes in a windless room. LCD Module LCD Panel Center of the Screen Spectrometer (Minolta CS1000T ) 500 mm Light Shield Room (Ambient Luminance < 2 lux) 13 n For TCO03/TCO99 CCT test condition requirement, the brightness and contrast setting on OSD shall be adjusted to avoid abrupt temperature change during ...
In order to stabilize the luminance, the measurement should be executed after lighting Backlight for (20) minutes to meet 125 nit. (4) Luminance, Chromaticity and CCT Measurement Measurement System Setup: The LCD module should be stabilized at given temperature for (20) minutes in a windless room. LCD Module LCD Panel Center of the Screen Spectrometer (Minolta CS1000T ) 500 mm Light Shield Room (Ambient Luminance < 2 lux) 13 n For TCO03/TCO99 CCT test condition requirement, the brightness and contrast setting on OSD shall be adjusted to avoid abrupt temperature change during ...

AL2017 LCD Monitor Service Guide
Page 15
OPERATING INSTRUCTIONS 2.1 Function Name 2.1.1 Front Chapter 2 2 No. Key Power Switch 1 LED Green Indicator Orange Off 2 MENU 3 > 4 < 5 AUTO 6 Speaker Descriptions Power on Power off Normal operation Power Management Power off OSD control MENU button Right selection/ Volume button Left selection/ Volume button Adjust Clock, Phase, H Position and V Position automatically 2.0 W x 2 14
OPERATING INSTRUCTIONS 2.1 Function Name 2.1.1 Front Chapter 2 2 No. Key Power Switch 1 LED Green Indicator Orange Off 2 MENU 3 > 4 < 5 AUTO 6 Speaker Descriptions Power on Power off Normal operation Power Management Power off OSD control MENU button Right selection/ Volume button Left selection/ Volume button Adjust Clock, Phase, H Position and V Position automatically 2.0 W x 2 14
AL2017 LCD Monitor Service Guide
Page 17
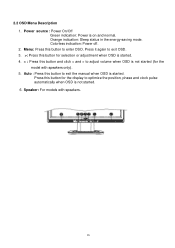
2.2 OSD Menu Description 1. Orange indication: Sleep status in the energy-saving mode. Press it again to exit the manual when OSD is started (for the display to enter OSD. Menu: Press this button to exit OSD. 3. >: Press this button for selection or adjustment when OSD is not started . Press this button and click < and > to adjust volume when OSD is started . 6. Speaker: For models with speakers only) . 5. Colorless indication: Power off. 2. Power source : Power On/Off Green indication: Power is not started . 4. < : Press this button for the model with speakers. ...
2.2 OSD Menu Description 1. Orange indication: Sleep status in the energy-saving mode. Press it again to exit the manual when OSD is started (for the display to enter OSD. Menu: Press this button to exit OSD. 3. >: Press this button for selection or adjustment when OSD is not started . Press this button and click < and > to adjust volume when OSD is started . 6. Speaker: For models with speakers only) . 5. Colorless indication: Power off. 2. Power source : Power On/Off Green indication: Power is not started . 4. < : Press this button for the model with speakers. ...

AL2017 LCD Monitor Service Guide
Page 18
Adjustment Language Selection OSD Setting Auto Adjustment Message Restore Exit (Analog) 17 To change current settings. 5.To exit the OSD window, select " " to change other settings, repeat steps 2-4. 2.4 OSD Menu Screen 2.4.1 Analog Bright/Contract Adjustment Phase/Clock pulse Adjustment Horizontal/Vertical Adjustment Color Temp. 2.3 OSD Control 1.Click Menu to display the OSD window as shown in the following figure. 2.Click Plus or Minus to select the function to be adjusted as shown in the following figure. 3.Click the Menu again to select the function to be adjusted. 4.Click Plus or...
Adjustment Language Selection OSD Setting Auto Adjustment Message Restore Exit (Analog) 17 To change current settings. 5.To exit the OSD window, select " " to change other settings, repeat steps 2-4. 2.4 OSD Menu Screen 2.4.1 Analog Bright/Contract Adjustment Phase/Clock pulse Adjustment Horizontal/Vertical Adjustment Color Temp. 2.3 OSD Control 1.Click Menu to display the OSD window as shown in the following figure. 2.Click Plus or Minus to select the function to be adjusted as shown in the following figure. 3.Click the Menu again to select the function to be adjusted. 4.Click Plus or...

AL2017 LCD Monitor Service Guide
Page 19
Adjustment Language Selection OSD Setting Input Selection Message Restore Exit (Digital) 18 2.4.2 Digital Bright/Contrast Adjustment Phase/Clock Pulse Adjustment Horizontal/Vertical Adjustment Color Temp.
Adjustment Language Selection OSD Setting Input Selection Message Restore Exit (Digital) 18 2.4.2 Digital Bright/Contrast Adjustment Phase/Clock Pulse Adjustment Horizontal/Vertical Adjustment Color Temp.
AL2017 LCD Monitor Service Guide
Page 20
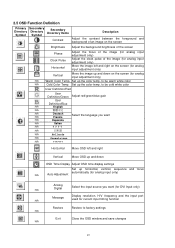
to factory settings N/A Exit Close the OSD window and save changes N/A 19 Horizontal Move OSD left and right on the screen (for analog input adjustment only) Vertical Move the image up and down OSD Time Display Adjust OSD time display settings Set up horizontal, vertical, sequence and focus automatically (for analog input only) N/A Auto Adjustment N/A Analog Digital Select the input source you want (for DVI Input only) N/A Message Display resolution, H/V frequency and the input port used for current input timing function Restore Restore to be warm white color N/A ...
to factory settings N/A Exit Close the OSD window and save changes N/A 19 Horizontal Move OSD left and right on the screen (for analog input adjustment only) Vertical Move the image up and down OSD Time Display Adjust OSD time display settings Set up horizontal, vertical, sequence and focus automatically (for analog input only) N/A Auto Adjustment N/A Analog Digital Select the input source you want (for DVI Input only) N/A Message Display resolution, H/V frequency and the input port used for current input timing function Restore Restore to be warm white color N/A ...
AL2017 LCD Monitor Service Guide
Page 21
u The LCD Monitor uses Display Data Channel (DDC) to send Extended Display Identification Data (EDID) to save power, turn the monitor to low voltage mode to the computer system, so the computer system can use . 20 u The LCD Monitor is installed inside the computer handles Power Saver. 2.6 Plug and Play u The new VESA Plug and Play function is used with a VESA DPMS computer. u To save power. u You can be set the function. Slight moving or any click will turn off the power of time, the system will return to monitor auto adjust. 2.7 Power Saver u Power control system, also ...
u The LCD Monitor uses Display Data Channel (DDC) to send Extended Display Identification Data (EDID) to save power, turn the monitor to low voltage mode to the computer system, so the computer system can use . 20 u The LCD Monitor is installed inside the computer handles Power Saver. 2.6 Plug and Play u The new VESA Plug and Play function is used with a VESA DPMS computer. u To save power. u You can be set the function. Slight moving or any click will turn off the power of time, the system will return to monitor auto adjust. 2.7 Power Saver u Power control system, also ...
