
AL2017 LCD Monitor Service Guide
Page 5
WARNING: (FOR FCC CERTIFIED MODELS) NOTE: this equipment has been tested and found to comply with the limits for a Class B digital device, pursuant to Part 15 of the user to correct such interference. These limits are present inside the monitor. Increase the separation between the ... radio or television reception, Which can radiate radio frequency energy, and if not installed and used in accordance with the emission limits. 3. Do not open the cabinet. However, there is connected. 4. Shielded interface cables and AC power cord, if any radio or TV interference caused by unauthorized...
WARNING: (FOR FCC CERTIFIED MODELS) NOTE: this equipment has been tested and found to comply with the limits for a Class B digital device, pursuant to Part 15 of the user to correct such interference. These limits are present inside the monitor. Increase the separation between the ... radio or television reception, Which can radiate radio frequency energy, and if not installed and used in accordance with the emission limits. 3. Do not open the cabinet. However, there is connected. 4. Shielded interface cables and AC power cord, if any radio or TV interference caused by unauthorized...
AL2017 LCD Monitor Service Guide
Page 6
... to qualified service personnel. Please refer all servicing to service the monitor yourself; If the monitor falls, it will not be used for ventilation. This plug will protect the monitor from overheating, be installed near or over a radiator or heat register. z Do not overload power strips and extension cords. It could short circuit parts causing a fire or electric shock. opening or removing covers can expose...
... to qualified service personnel. Please refer all servicing to service the monitor yourself; If the monitor falls, it will not be used for ventilation. This plug will protect the monitor from overheating, be installed near or over a radiator or heat register. z Do not overload power strips and extension cords. It could short circuit parts causing a fire or electric shock. opening or removing covers can expose...
AL2017 LCD Monitor Service Guide
Page 9
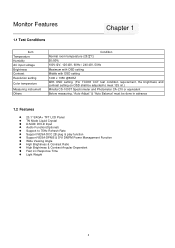
... brightness and contrast setting on OSD shall be adjusted to meet 125 nit.) Minolta CS-1000T Spectrometer and Photometer CA -210 or equivalent Before measuring, "Auto Adjust" & "Auto Balance" must be done in advance 1.2 Features l 20.1" SXGA+ TFT LCD Panel l TN Mode Liquid Crystal l D-SUB/ DVI-D Input l Audio Function(Optional) l Support to 75Hz Refresh Rate l Support VESA-DCC 2B plug & play function l Support VESA-DPMS & DVI DMPM Power Management Function l Wide Viewing Angle l High Brightness & Contrast Ratio l High Brightness & Contrast Angular...
... brightness and contrast setting on OSD shall be adjusted to meet 125 nit.) Minolta CS-1000T Spectrometer and Photometer CA -210 or equivalent Before measuring, "Auto Adjust" & "Auto Balance" must be done in advance 1.2 Features l 20.1" SXGA+ TFT LCD Panel l TN Mode Liquid Crystal l D-SUB/ DVI-D Input l Audio Function(Optional) l Support to 75Hz Refresh Rate l Support VESA-DCC 2B plug & play function l Support VESA-DPMS & DVI DMPM Power Management Function l Wide Viewing Angle l High Brightness & Contrast Ratio l High Brightness & Contrast Angular...

AL2017 LCD Monitor Service Guide
Page 10
...) a-si TFT Active Matrix 1400 x R.G.B. Clock, Phase, H Position & V Position - pixel mm color degree cd/m2 Graphic Performance Contrast Ratio LC Response Time (Tr+Tf) Separate Sync. VESA DPMS, DVI DMPM, ENERGY STAR® Compliance - D-Sub mini 15 pins, DVI-D 24 pins - User, 6500K & 9300K - VGA/SVGA/XGA/SXGA Full Screen Display - Positive / Negative - Input Connector Auto Adjust Screen Scaling Power Management Color Adjustment OSD Language Power source Power Input Operation Mode Power consumption Power Saving Sleep Mode Power Saving OFF Mode Tilt angle...
...) a-si TFT Active Matrix 1400 x R.G.B. Clock, Phase, H Position & V Position - pixel mm color degree cd/m2 Graphic Performance Contrast Ratio LC Response Time (Tr+Tf) Separate Sync. VESA DPMS, DVI DMPM, ENERGY STAR® Compliance - D-Sub mini 15 pins, DVI-D 24 pins - User, 6500K & 9300K - VGA/SVGA/XGA/SXGA Full Screen Display - Positive / Negative - Input Connector Auto Adjust Screen Scaling Power Management Color Adjustment OSD Language Power source Power Input Operation Mode Power consumption Power Saving Sleep Mode Power Saving OFF Mode Tilt angle...

AL2017 LCD Monitor Service Guide
Page 18
Adjustment Language Selection OSD Setting Auto Adjustment Message Restore Exit (Analog) 17 To change current settings. 5.To exit the OSD window, select " " to change other settings, repeat steps 2-4. 2.4 OSD Menu Screen 2.4.1 Analog Bright/Contract Adjustment Phase/Clock pulse Adjustment Horizontal/Vertical Adjustment Color Temp. 2.3 OSD Control 1.Click Menu to display the OSD window as shown in the following figure. 2.Click Plus or Minus to select the function to be adjusted as shown in the following figure. 3.Click the Menu again to select the...
Adjustment Language Selection OSD Setting Auto Adjustment Message Restore Exit (Analog) 17 To change current settings. 5.To exit the OSD window, select " " to change other settings, repeat steps 2-4. 2.4 OSD Menu Screen 2.4.1 Analog Bright/Contract Adjustment Phase/Clock pulse Adjustment Horizontal/Vertical Adjustment Color Temp. 2.3 OSD Control 1.Click Menu to display the OSD window as shown in the following figure. 2.Click Plus or Minus to select the function to be adjusted as shown in the following figure. 3.Click the Menu again to select the...

AL2017 LCD Monitor Service Guide
Page 19
2.4.2 Digital Bright/Contrast Adjustment Phase/Clock Pulse Adjustment Horizontal/Vertical Adjustment Color Temp. Adjustment Language Selection OSD Setting Input Selection Message Restore Exit (Digital) 18
2.4.2 Digital Bright/Contrast Adjustment Phase/Clock Pulse Adjustment Horizontal/Vertical Adjustment Color Temp. Adjustment Language Selection OSD Setting Input Selection Message Restore Exit (Digital) 18
AL2017 LCD Monitor Service Guide
Page 20
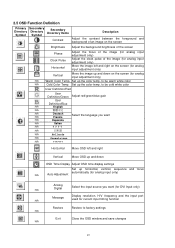
...the screen (for analog input adjustment only) Vertical Move the image up and down OSD Time Display Adjust OSD time display settings Set up horizontal, vertical, sequence and focus automatically (for analog input only) N/A Auto Adjustment N/A Analog Digital Select the input source you want (for DVI Input only) N/A Message Display resolution, H/V frequency and the input port used for current input timing function Restore Restore to be cold white color User Definition/Red User Definition/Green Adjust red/green/blue gain User Definition/Blue N/A English N/A N/A Deutsch...
...the screen (for analog input adjustment only) Vertical Move the image up and down OSD Time Display Adjust OSD time display settings Set up horizontal, vertical, sequence and focus automatically (for analog input only) N/A Auto Adjustment N/A Analog Digital Select the input source you want (for DVI Input only) N/A Message Display resolution, H/V frequency and the input port used for current input timing function Restore Restore to be cold white color User Definition/Red User Definition/Green Adjust red/green/blue gain User Definition/Blue N/A English N/A N/A Deutsch...
AL2017 LCD Monitor Service Guide
Page 21
... return to save power, turn the monitor to low voltage mode to the original image. u The LCD Monitor is used which eliminates the complicated and time-consuming installation process. u To save power. You can use computer software to set to the computer system, so the computer system can easily identify and automatically adjust the monitor. u You can use . 20 2.6 Plug and Play u The new VESA Plug and Play function is compatible with...
... return to save power, turn the monitor to low voltage mode to the original image. u The LCD Monitor is used which eliminates the complicated and time-consuming installation process. u To save power. You can use computer software to set to the computer system, so the computer system can easily identify and automatically adjust the monitor. u You can use . 20 2.6 Plug and Play u The new VESA Plug and Play function is compatible with...

AL2017 LCD Monitor Service Guide
Page 33
Connector Information 5.1 Function Block Diagram Chapter 5 2 OSD Key Pad / Audio Out Speaker DVI-D Digital Video D-sub Analog Video AC Power Audio In Main Board LDO DC-5V DC-12V LIPS 3.3V 12V Signal LCD Module Backlight 32
Connector Information 5.1 Function Block Diagram Chapter 5 2 OSD Key Pad / Audio Out Speaker DVI-D Digital Video D-sub Analog Video AC Power Audio In Main Board LDO DC-5V DC-12V LIPS 3.3V 12V Signal LCD Module Backlight 32
AL2017 User's Guide
Page 1
Table of Contents Safety 1 Electrical safety 1 Installation safety 1 Cleaning safety 1 Special notes on LCD monitors 2 Package contents 2 Installation instructions 3 Placement 3 Installation 3 External controls 4 Image adjustment 5 Screen adjustment 7 Attachments 8 Plug and play 8 Power saver 8 Troubleshooting 8 Technical specifications 9 Display modes 10
Table of Contents Safety 1 Electrical safety 1 Installation safety 1 Cleaning safety 1 Special notes on LCD monitors 2 Package contents 2 Installation instructions 3 Placement 3 Installation 3 External controls 4 Image adjustment 5 Screen adjustment 7 Attachments 8 Plug and play 8 Power saver 8 Troubleshooting 8 Technical specifications 9 Display modes 10
AL2017 User's Guide
Page 2
... the outlet, contact your electrician to clean the display. 1 Don't install your authorized dealer or service center. To avoid electric shock, or dropping, install your LCD monitor or adjusting its case. Moisten a clean, soft, lint-free cloth with a 3-prong plug, (a plug having a third grounding pin). Hold the plug (not the power cable) when you are also dangerous. Installation safety Don't touch your fingers or any oil sludge...
... the outlet, contact your electrician to clean the display. 1 Don't install your authorized dealer or service center. To avoid electric shock, or dropping, install your LCD monitor or adjusting its case. Moisten a clean, soft, lint-free cloth with a 3-prong plug, (a plug having a third grounding pin). Hold the plug (not the power cable) when you are also dangerous. Installation safety Don't touch your fingers or any oil sludge...
AL2017 User's Guide
Page 3
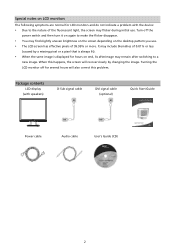
... fluorescent light, the screen may flicker during initial use . Special notes on the desktop pattern you use . Turn off for several hours will also correct this happens, the screen will recover slowly by a missing pixel or a pixel that is displayed for LCD monitors and do not indicate a problem with speakers) D-Sub signal cable DVI signal cable (optional) Quick Start Guide Power cable Audio cable User's Guide (CD) 2 When the same image is always lit). Turning the LCD monitor off the power switch and then turn...
... fluorescent light, the screen may flicker during initial use . Special notes on the desktop pattern you use . Turn off for several hours will also correct this happens, the screen will recover slowly by a missing pixel or a pixel that is displayed for LCD monitors and do not indicate a problem with speakers) D-Sub signal cable DVI signal cable (optional) Quick Start Guide Power cable Audio cable User's Guide (CD) 2 When the same image is always lit). Turning the LCD monitor off the power switch and then turn...
AL2017 User's Guide
Page 4
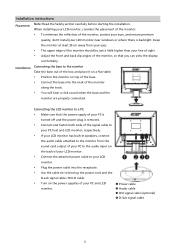
... power supply of the signal cable to bind up the power cord and the D-sub signal cable / DVI-D cable. Connect the base into the receptacle. Connect and fasten both ends of your PC host and LCD monitor, respectively. Turn on top of your LCD monitor. X Power cable Y Audio cable Z DVI signal cable (optional) [ D-Sub signal cable 3 Use the cable tie to your PC is turned off and the power plug is backlight. Installation Connecting the base to your LCD monitor. You will hear a click sound when the base and the monitor...
... power supply of the signal cable to bind up the power cord and the D-sub signal cable / DVI-D cable. Connect the base into the receptacle. Connect and fasten both ends of your PC host and LCD monitor, respectively. Turn on top of your LCD monitor. X Power cable Y Audio cable Z DVI signal cable (optional) [ D-Sub signal cable 3 Use the cable tie to your PC is turned off and the power plug is backlight. Installation Connecting the base to your LCD monitor. You will hear a click sound when the base and the monitor...

AL2017 User's Guide
Page 5
... button to optimize the position, phase and clock pulse automatically when OSD is started. External controls 1 2 Menu 3 > 4 < 5 Auto Power source OSD Menu Plus Minus Automatic adjustment Power On/Off Green indication: Power is started. Press this button and click < and > to adjust volume when OSD is not started (for the display to exit the manual when OSD is not started. 6 Speaker (For models with speakers only). Colorless indication: Power off. Press this button to exit OSD. Orange indication: Sleep status in the energy-saving mode...
... button to optimize the position, phase and clock pulse automatically when OSD is started. External controls 1 2 Menu 3 > 4 < 5 Auto Power source OSD Menu Plus Minus Automatic adjustment Power On/Off Green indication: Power is started. Press this button and click < and > to adjust volume when OSD is not started (for the display to exit the manual when OSD is not started. 6 Speaker (For models with speakers only). Colorless indication: Power off. Press this button to exit OSD. Orange indication: Sleep status in the energy-saving mode...
AL2017 User's Guide
Page 6
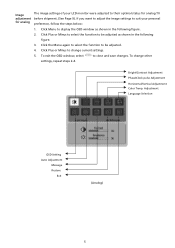
If you want to adjust the image settings to suit your LCD monitor were adjusted to display the OSD window as shown in the following figure. 3. Click Menu to their optimal status for analog TV before shipment. (See Page 9). Click the Menu again to select the function to close and save changes. To change current settings. 5. Adjustment Language Selection OSD Setting Auto Adjustment Message Restore Exit (Analog) 5 Bright/Contract Adjustment Phase/Clock pulse Adjustment Horizontal/Vertical Adjustment Color Temp. Click Plus or...
If you want to adjust the image settings to suit your LCD monitor were adjusted to display the OSD window as shown in the following figure. 3. Click Menu to their optimal status for analog TV before shipment. (See Page 9). Click the Menu again to select the function to close and save changes. To change current settings. 5. Adjustment Language Selection OSD Setting Auto Adjustment Message Restore Exit (Analog) 5 Bright/Contract Adjustment Phase/Clock pulse Adjustment Horizontal/Vertical Adjustment Color Temp. Click Plus or...
AL2017 User's Guide
Page 7
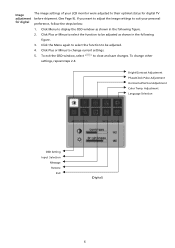
... the following figure. 2. Click Menu to change other settings, repeat steps 2-4. Click Plus or Minus to display the OSD window as shown in the following figure. 3. Bright/Contrast Adjustment Phase/Clock Pulse Adjustment Horizontal/Vertical Adjustment Color Temp. If you want to adjust the image settings to suit your LCD monitor were adjusted to close and save changes. To exit the OSD window, select " " to their optimal status for digital The image settings of your personal preference, follow...
... the following figure. 2. Click Menu to change other settings, repeat steps 2-4. Click Plus or Minus to display the OSD window as shown in the following figure. 3. Bright/Contrast Adjustment Phase/Clock Pulse Adjustment Horizontal/Vertical Adjustment Color Temp. If you want to adjust the image settings to suit your LCD monitor were adjusted to close and save changes. To exit the OSD window, select " " to their optimal status for digital The image settings of your personal preference, follow...

AL2017 User's Guide
Page 8
... color temp to default settings. User Definition/Red User Definition/Green Adjusts red/green/blue gain. Screen adjustment Function Definition Primary directory symbol Secondary directory symbol N/A N/A Secondary directory items Description Contrast Adjusts the contrast between the foreground and background of the screen. Sets the color temperature to select the language you want . N/A Message N/A Restore N/A Exit Display resolution, H/V frequency and the input port used for DVI input only). Brightness Adjusts the background brightness of an image...
... color temp to default settings. User Definition/Red User Definition/Green Adjusts red/green/blue gain. Screen adjustment Function Definition Primary directory symbol Secondary directory symbol N/A N/A Secondary directory items Description Contrast Adjusts the contrast between the foreground and background of the screen. Sets the color temperature to select the language you want . N/A Message N/A Restore N/A Exit Display resolution, H/V frequency and the input port used for DVI input only). Brightness Adjusts the background brightness of an image...
AL2017 User's Guide
Page 9
... interference. Adjustment" to automatically optimize the screen. Remove any electronic equipment in the vicinity that none of the LCD monitor. The plug and play feature to your computer can set up the reference position. 8 Check that the power switch is connected. Make sure the monitor is inserted in Power Control System (Power Saver). Attachments Plug and play Power saver Troubleshooting Power LED does not light Icon off Color default Instability or ripple Image offset or wrong size The...
... interference. Adjustment" to automatically optimize the screen. Remove any electronic equipment in the vicinity that none of the LCD monitor. The plug and play feature to your computer can set up the reference position. 8 Check that the power switch is connected. Make sure the monitor is inserted in Power Control System (Power Saver). Attachments Plug and play Power saver Troubleshooting Power LED does not light Icon off Color default Instability or ripple Image offset or wrong size The...
AL2017 User's Guide
Page 10
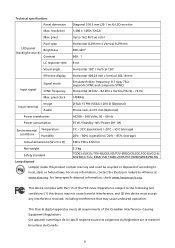
... 16.2 M true color LCD panel (backlight source) Pixel span Brightness Contrast Horizontal 0.291mm x Vertical 0.291mm 300 cd/m2 600 : 1 LC response time 8 ms Visual angle Horizontal 150° / Vertical 130° Effective display Horizontal 408.24 mm x Vertical 306.18 mm Input signal Signal mode SYNC frequency Simulated video frequency: 0.7 Vpp, 75Ω (separate SYNC and composite SYNC) Horizontal 30 kHz - 82 kHz x Vertical 56 Hz - 76 Hz Max. pixel clock 140MHz Input terminal Image Audio D-Sub 15 PIN (VESA) / DVI-D (Optional) Phone...
... 16.2 M true color LCD panel (backlight source) Pixel span Brightness Contrast Horizontal 0.291mm x Vertical 0.291mm 300 cd/m2 600 : 1 LC response time 8 ms Visual angle Horizontal 150° / Vertical 130° Effective display Horizontal 408.24 mm x Vertical 306.18 mm Input signal Signal mode SYNC frequency Simulated video frequency: 0.7 Vpp, 75Ω (separate SYNC and composite SYNC) Horizontal 30 kHz - 82 kHz x Vertical 56 Hz - 76 Hz Max. pixel clock 140MHz Input terminal Image Audio D-Sub 15 PIN (VESA) / DVI-D (Optional) Phone...

AL2017 User's Guide
Page 11
... the same as one of your display card. Frequency Pixel Frequency SYNC Polarity (kHz) (Hz) (MHz) (H/V) VESA VGA 640x480 31.469 59.940 25.175 -/- 37.861 72.809 31.500 -/- 37.500 75.000 31.500 -/- For more information about the adjustment mode, refer to the instructions of the following reference signal modes, the screen will display. Display Mode Hor. Frequency Vert. SVGA 800x600 35.156 56...
... the same as one of your display card. Frequency Pixel Frequency SYNC Polarity (kHz) (Hz) (MHz) (H/V) VESA VGA 640x480 31.469 59.940 25.175 -/- 37.861 72.809 31.500 -/- 37.500 75.000 31.500 -/- For more information about the adjustment mode, refer to the instructions of the following reference signal modes, the screen will display. Display Mode Hor. Frequency Vert. SVGA 800x600 35.156 56...


