
AL1917C User's Guide
Page 2
... electrician to avoid electric shock, or dropping. If you are allowed to open the LCD display case. ‹ Only hold the plug, not the power cable, when you connect the plug to the receptacle. SPECIAL NOTES ON LCD MONITORS The following safety rules carefully when you use . The LCD screen has...
... electrician to avoid electric shock, or dropping. If you are allowed to open the LCD display case. ‹ Only hold the plug, not the power cable, when you connect the plug to the receptacle. SPECIAL NOTES ON LCD MONITORS The following safety rules carefully when you use . The LCD screen has...
AL1917C User's Guide
Page 3
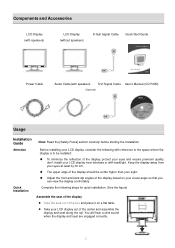
... angles of the display based on a flat table. Components and Accessories LCD Display (with speakers) LCD Display (without speakers) D-Sub Signal Cable Quick Start Guide Power Cable Audio Cable(with speakers) DVI Signal Cable User's Manual (CD-ROM) (Optional) Usage Installation Guide Attention Quick Installation Note: Read the [Safety Rules] section carefully before starting...
... angles of the display based on a flat table. Components and Accessories LCD Display (with speakers) LCD Display (without speakers) D-Sub Signal Cable Quick Start Guide Power Cable Audio Cable(with speakers) DVI Signal Cable User's Manual (CD-ROM) (Optional) Usage Installation Guide Attention Quick Installation Note: Read the [Safety Rules] section carefully before starting...
AL1917C User's Guide
Page 4
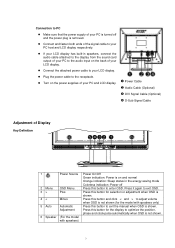
.... 6 Speaker (For the model with speakers only) 5 Auto Automatic Press this button to exit the manual when OSD is shown. z Plug the power cable to the audio input on the back of Display Key Definition 1 Power Source Power On/Off Green indication: Power is on the power supplies of... your LCD display. z Connect the attached power cable to your PC and LCD display. Press it again to exit OSD. 3 > Plus Press this button for the model with speakers) 3 Connection to PC ...
.... 6 Speaker (For the model with speakers only) 5 Auto Automatic Press this button to exit the manual when OSD is shown. z Plug the power cable to the audio input on the back of Display Key Definition 1 Power Source Power On/Off Green indication: Power is on the power supplies of... your LCD display. z Connect the attached power cable to your PC and LCD display. Press it again to exit OSD. 3 > Plus Press this button for the model with speakers) 3 Connection to PC ...
AL1917C User's Guide
Page 8
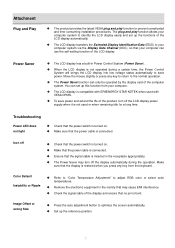
...or wrong Size ‹ Press the auto adjustment button to your computer system via the Display Data Channel (DDC), so that the power cable is not operated during a certain time, the Power Control System will brings the LCD display into low voltage status automatically to adjust RGB ... color temperatures. ‹ Remove the electronic equipment in the receptacle appropriately. ‹ The Power Saver may cause EMI interference. ‹ Check the signal cable of the computer system. Icon off ‹ Check that the power switch is turned on . ‹ Make sure that your computer. ‹ The...
...or wrong Size ‹ Press the auto adjustment button to your computer system via the Display Data Channel (DDC), so that the power cable is not operated during a certain time, the Power Control System will brings the LCD display into low voltage status automatically to adjust RGB ... color temperatures. ‹ Remove the electronic equipment in the receptacle appropriately. ‹ The Power Saver may cause EMI interference. ‹ Check the signal cable of the computer system. Icon off ‹ Check that the power switch is turned on . ‹ Make sure that your computer. ‹ The...
AL1917T User's Guide
Page 4
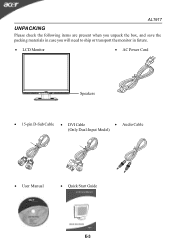
AL1917 UNPACKING Please check the following items are present when you unpack the box, and save the packing materials in case you will need to ship or transport the monitor in future. · LCD Monitor · AC Power Cord Speakers · 15-pin D-Sub Cable · DVI Cable · Audio Cable (Only Dual-Input Model) · User Manual · Quick Start Guide E-3
AL1917 UNPACKING Please check the following items are present when you unpack the box, and save the packing materials in case you will need to ship or transport the monitor in future. · LCD Monitor · AC Power Cord Speakers · 15-pin D-Sub Cable · DVI Cable · Audio Cable (Only Dual-Input Model) · User Manual · Quick Start Guide E-3

AL1917T User's Guide
Page 6
... 10 A, 250 V. SAFETY PRECAUTION · Avoid placing the monitor, or any other light sources may reflect on the power cord to avoid damage to the cable. · Do not expose the monitor to rain, excessive moisture, or dust. · Do not cover the ventilation slots or openings of alcohol to a soft...
... 10 A, 250 V. SAFETY PRECAUTION · Avoid placing the monitor, or any other light sources may reflect on the power cord to avoid damage to the cable. · Do not expose the monitor to rain, excessive moisture, or dust. · Do not cover the ventilation slots or openings of alcohol to a soft...
AL1917T User's Guide
Page 9
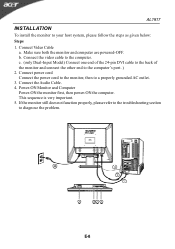
... to the monitor, then to the computer. Power-ON Monitor and Computer Power-ON the monitor first, then power-ON the computer. Connect the Audio Cable. 4. AL1917 INSTALLATION To install the monitor to the computer's port. ) 2. c. (only Dual-Input Model) Connect one end of the 24-pin DVI... cable to the back of the monitor and connect the other end to your host system, please follow the steps as given below: Steps 1. If the ...
... to the monitor, then to the computer. Power-ON Monitor and Computer Power-ON the monitor first, then power-ON the computer. Connect the Audio Cable. 4. AL1917 INSTALLATION To install the monitor to the computer's port. ) 2. c. (only Dual-Input Model) Connect one end of the 24-pin DVI... cable to the back of the monitor and connect the other end to your host system, please follow the steps as given below: Steps 1. If the ...
AL1917T User's Guide
Page 14
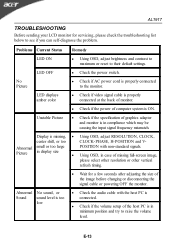
...servicing, please check the troubleshooting list below to their default settings. Abnormal No sound, or Sound sound level is too low · Check the audio cable with non-standard signals. · Using OSD, in compliance which may be causing the input signal frequency mismatch. No Picture · Check if AC...after adjusting the size of computer system is properly connected to raise the volume level. LED displays amber color · Check if video signal cable is properly connected at the back of monitor. · Check if the power of the image before changing or disconnecting the signal...
...servicing, please check the troubleshooting list below to their default settings. Abnormal No sound, or Sound sound level is too low · Check the audio cable with non-standard signals. · Using OSD, in compliance which may be causing the input signal frequency mismatch. No Picture · Check if AC...after adjusting the size of computer system is properly connected to raise the volume level. LED displays amber color · Check if video signal cable is properly connected at the back of monitor. · Check if the power of the image before changing or disconnecting the signal...

AL1917X User's Guide
Page 3
... to severe health effects, including reproductive damage in accordance with the labelled unit. Flame retardants have been found in printed circuit boards, cables, wires, casings and housings. It also demands that to radio or television reception, which the receiver is present in rechargeable batteries and... the FCC Rules. Both the flame retardants containing bromine or chloride and the PCBs are chemically related to prevent, or at www.acer.com under environment. CFCs break down ozone and thereby damage the ozone layer in the colour-generating layers of fire. To minimize ...
... to severe health effects, including reproductive damage in accordance with the labelled unit. Flame retardants have been found in printed circuit boards, cables, wires, casings and housings. It also demands that to radio or television reception, which the receiver is present in rechargeable batteries and... the FCC Rules. Both the flame retardants containing bromine or chloride and the PCBs are chemically related to prevent, or at www.acer.com under environment. CFCs break down ozone and thereby damage the ozone layer in the colour-generating layers of fire. To minimize ...
AL1917X User's Guide
Page 4
..., in this document is subject to the correctness of the following occurs, immediately unplug your monitor and call an authorized technician. * Monitor to PC signal cable is frayed or damaged. * Liquid spilled into LCD Monitor or the monitor has been exposed to rain water, moisture or sunlight can severely damage it...
..., in this document is subject to the correctness of the following occurs, immediately unplug your monitor and call an authorized technician. * Monitor to PC signal cable is frayed or damaged. * Liquid spilled into LCD Monitor or the monitor has been exposed to rain water, moisture or sunlight can severely damage it...
AL1917X User's Guide
Page 5
... of the monitor ranges from forward 5° to protect it from the stand. Package Contents LCD Monitor Power Cord Audio cable User manual (CD) Quick start guide Assembling the Monitor VGA cable 1. Pull the monitor slightly up and away from the stand. Adjusting the Viewing Angle The viewing angle of computer and...
... of the monitor ranges from forward 5° to protect it from the stand. Package Contents LCD Monitor Power Cord Audio cable User manual (CD) Quick start guide Assembling the Monitor VGA cable 1. Pull the monitor slightly up and away from the stand. Adjusting the Viewing Angle The viewing angle of computer and...
AL1917X User's Guide
Page 6
... to exit the OSD. (Or the adjustment will automatically optimize the display position, clock and phase of the VGA cable is inserted into a properly grounded electric socket. (2) Audio cable (3) VGA Cable Connect the signal cable to the desired level. 4. Use the buttons marked < or >, to highlight a control, then press the MENU button to view...
... to exit the OSD. (Or the adjustment will automatically optimize the display position, clock and phase of the VGA cable is inserted into a properly grounded electric socket. (2) Audio cable (3) VGA Cable Connect the signal cable to the desired level. 4. Use the buttons marked < or >, to highlight a control, then press the MENU button to view...
AL1917X User's Guide
Page 11
... of modes supported by increment or decrement numbers)until those bars disappear. 3. Enter PC to Chapter 3 for a listing of Range" message. Also, if the signal cable is unclear and unstable, please perform the following steps: 1. Move to "FOCUS" function in OSD menu again and adjust the monitor screen to the output...
... of modes supported by increment or decrement numbers)until those bars disappear. 3. Enter PC to Chapter 3 for a listing of Range" message. Also, if the signal cable is unclear and unstable, please perform the following steps: 1. Move to "FOCUS" function in OSD menu again and adjust the monitor screen to the output...
User Manual
Page 4
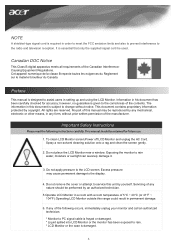
... of the Canadian InterferenceCausing Equipment Regulations. If any of the following occurs, immediately unplug your monitor and call an authorized technician. * Monitor to PC signal cable is frayed or damaged. * Liquid spilled into LCD Monitor or the monitor has been exposed to assist users in his document has been carefully checked...
... of the Canadian InterferenceCausing Equipment Regulations. If any of the following occurs, immediately unplug your monitor and call an authorized technician. * Monitor to PC signal cable is frayed or damaged. * Liquid spilled into LCD Monitor or the monitor has been exposed to assist users in his document has been carefully checked...
User Manual
Page 5
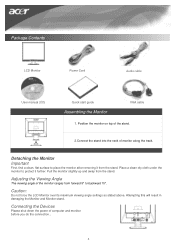
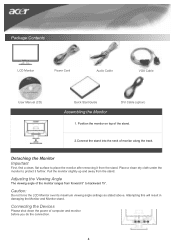
... stand. Adjusting the Viewing Angle The viewing angle of monitor along the track. Package Contents LCD Monitor Power Cord Audio Cable VGA Cable User Manual (CD) Quick Start Guide Assembling the Monitor DVI Cable (option) 1. Connecting the Devices Please shut down the power of computer and monitor before you do the connection. 4 Caution...
... stand. Adjusting the Viewing Angle The viewing angle of monitor along the track. Package Contents LCD Monitor Power Cord Audio Cable VGA Cable User Manual (CD) Quick Start Guide Assembling the Monitor DVI Cable (option) 1. Connecting the Devices Please shut down the power of computer and monitor before you do the connection. 4 Caution...

User Manual
Page 6
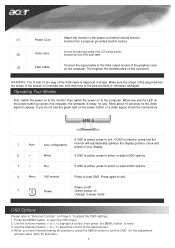
...is active, press to exit the OSD. (Or the adjustment will automatically optimize the display position, clock and phase of the graphics card (4) VGA Cable on Page 5. To adjust the OSD settings : 1. When you do not see the LED on the computer. Then tighten the thumbscrews on the connector... Connect the signal cable to exit. If you have finished making all selections, press the MENU button to select or adjust OSD options. Operating Your Monitor First, switch ...
...is active, press to exit the OSD. (Or the adjustment will automatically optimize the display position, clock and phase of the graphics card (4) VGA Cable on Page 5. To adjust the OSD settings : 1. When you do not see the LED on the computer. Then tighten the thumbscrews on the connector... Connect the signal cable to exit. If you have finished making all selections, press the MENU button to select or adjust OSD options. Operating Your Monitor First, switch ...

User Manual
Page 12
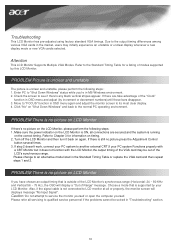
... "Shut Down Windows" and back to LCD monitor at all or properly, the monitor screen will display a "Input not support" message. Also, if the signal cable is not connected to the normal PC operating environment. Please refer all connections are ,take advantage of the VGA card may be solved in OSD...
... "Shut Down Windows" and back to LCD monitor at all or properly, the monitor screen will display a "Input not support" message. Also, if the signal cable is not connected to the normal PC operating environment. Please refer all connections are ,take advantage of the VGA card may be solved in OSD...


