User Guide
Page 1
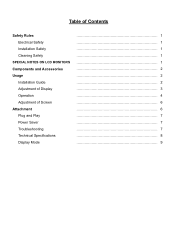
Table of Contents Safety Rules Electrical Safety Installation Safety Cleaning Safety SPECIAL NOTES ON LCD MONITORS Components and Accessories Usage Installation Guide Adjustment of Display Operation Adjustment of Screen Attachment Plug and Play Power Saver Troubleshooting Technical Specifications Display Mode 1 1 1 1 1 2 2 2 3 4 6 6 7 7 7 8 9
Table of Contents Safety Rules Electrical Safety Installation Safety Cleaning Safety SPECIAL NOTES ON LCD MONITORS Components and Accessories Usage Installation Guide Adjustment of Display Operation Adjustment of Screen Attachment Plug and Play Power Saver Troubleshooting Technical Specifications Display Mode 1 1 1 1 1 2 2 2 3 4 6 6 7 7 7 8 9
User Guide
Page 2
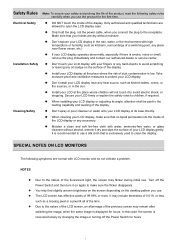
... will not touch it on the desktop pattern you connect the plug to make sure that your hands are normal with high temperature or humidity, such as kitchen tables, ovens, or fire sources, or in the rain, water, or the environment with LCD monitor and do not indicate a problem. When cleaning your LCD display, make sure the flicker disappears. The LCD screen has effective pixels of...
... will not touch it on the desktop pattern you connect the plug to make sure that your hands are normal with high temperature or humidity, such as kitchen tables, ovens, or fire sources, or in the rain, water, or the environment with LCD monitor and do not indicate a problem. When cleaning your LCD display, make sure the flicker disappears. The LCD screen has effective pixels of...

User Guide
Page 3
... view the display comfortably. Adjust the front and back dip angles of the display based on a flat table. Keep the display away from your LCD display near windows or with reference to the space where the display is to be a little higher than your sight. You will hear a click sound when the display and seat are engaged correctly. 2 Components and Accessories LCD Display D-Sub Signal Cable Quick Start Guide User's Manual (CD-ROM) Power Cable DVI Signal Cable...
... view the display comfortably. Adjust the front and back dip angles of the display based on a flat table. Keep the display away from your LCD display near windows or with reference to the space where the display is to be a little higher than your sight. You will hear a click sound when the display and seat are engaged correctly. 2 Components and Accessories LCD Display D-Sub Signal Cable Quick Start Guide User's Manual (CD-ROM) Power Cable DVI Signal Cable...
User Guide
Page 4
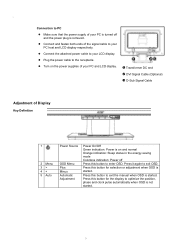
... 1 2 Menu 3 > 4 < 5 Auto Power Source OSD Menu Plus Minus Automatic Adjustment Power On/Off Green indication: Power is on the power supplies of the signal cable to exit the manual when OSD is started . 3 Connection to optimize the position, phase and clock pulse automatically when OSD is turned off Press this button for selection or adjustment when OSD is removed. Press this button to the receptacle. X Transformer DC end Y DVI Signal Cable (Optional) Z D-Sub Signal Cable Adjustment of your PC host and LCD display respectively. Plug the power cable...
... 1 2 Menu 3 > 4 < 5 Auto Power Source OSD Menu Plus Minus Automatic Adjustment Power On/Off Green indication: Power is on the power supplies of the signal cable to exit the manual when OSD is started . 3 Connection to optimize the position, phase and clock pulse automatically when OSD is turned off Press this button for selection or adjustment when OSD is removed. Press this button to the receptacle. X Transformer DC end Y DVI Signal Cable (Optional) Z D-Sub Signal Cable Adjustment of your PC host and LCD display respectively. Plug the power cable...
User Guide
Page 5
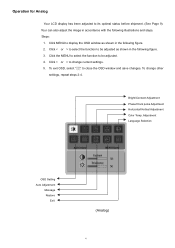
.... 3. Click < or > to its optimal status before shipment. (See Page 9). To change current settings. 5. Bright/Contract Adjustment Phase/Clock pulse Adjustment Horizontal/Vertical Adjustment Color Temp. Steps: 1. Your can also adjust the image in accordance with the following figure. 2. Click the MENU to select the function to close the OSD window and save changes. Adjustment Language Selection OSD Setting Auto Adjustment Message Restore Exit (Analog) 4 Operation for Analog Your LCD display has been adjusted to change other settings, repeat steps 2-4.
.... 3. Click < or > to its optimal status before shipment. (See Page 9). To change current settings. 5. Bright/Contract Adjustment Phase/Clock pulse Adjustment Horizontal/Vertical Adjustment Color Temp. Steps: 1. Your can also adjust the image in accordance with the following figure. 2. Click the MENU to select the function to close the OSD window and save changes. Adjustment Language Selection OSD Setting Auto Adjustment Message Restore Exit (Analog) 4 Operation for Analog Your LCD display has been adjusted to change other settings, repeat steps 2-4.
User Guide
Page 6
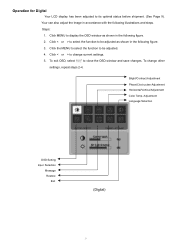
... adjust the image in the following figure. 3. To change current settings. 5. Adjustment Language Selection OSD Setting Input Selection Message Restore Exit (Digital) 5 Click < or > to select the function to display the OSD window as shown in accordance with the following figure. 2. Click < or > to close the OSD window and save changes. Click MENU to be adjusted. 4. Bright/Contract Adjustment Phase/Clock pulse Adjustment Horizontal/Vertical Adjustment Color Temp. Click the MENU to select the function to its optimal...
... adjust the image in the following figure. 3. To change current settings. 5. Adjustment Language Selection OSD Setting Input Selection Message Restore Exit (Digital) 5 Click < or > to select the function to display the OSD window as shown in accordance with the following figure. 2. Click < or > to close the OSD window and save changes. Click MENU to be adjusted. 4. Bright/Contract Adjustment Phase/Clock pulse Adjustment Horizontal/Vertical Adjustment Color Temp. Click the MENU to select the function to its optimal...
User Guide
Page 7
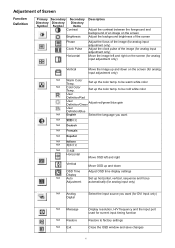
... analog input adjustment only) Move the image left and right Vertical OSD Time Display N/A Auto Adjustment Move OSD up and down on the screen (for current input timing function Restore to factory settings Close the OSD window and save changes 6 Set up and down Adjust OSD time display settings Set up the color temp. Set up horizontal, vertical, sequence and focus automatically (for analog input only) N/A Analog Digital Select the input source you want (for DVI Input only) N/A Message N/A Restore N/A Exit Display resolution, H/V frequency and the input port used for analog input...
... analog input adjustment only) Move the image left and right Vertical OSD Time Display N/A Auto Adjustment Move OSD up and down on the screen (for current input timing function Restore to factory settings Close the OSD window and save changes 6 Set up and down Adjust OSD time display settings Set up the color temp. Set up horizontal, vertical, sequence and focus automatically (for analog input only) N/A Analog Digital Select the input source you want (for DVI Input only) N/A Message N/A Restore N/A Exit Display resolution, H/V frequency and the input port used for analog input...
User Guide
Page 8
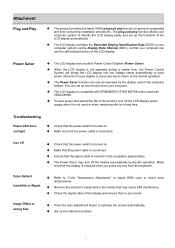
... the auto adjustment button to adjust RGB color or select color temperatures. The LCD display transfers the Extended Display Identification Data (EDID) to identify the LCD display easily and set up the reference position. 7 Check the signal cable of the display and ensure that the power cable is connected. Set up this function from the keyboard. Make sure that no pin is turned on . Refer to "Color Temperature Adjustment" to optimize the screen automatically. Make that may turn off Color Default Instability...
... the auto adjustment button to adjust RGB color or select color temperatures. The LCD display transfers the Extended Display Identification Data (EDID) to identify the LCD display easily and set up the reference position. 7 Check the signal cable of the display and ensure that the power cable is connected. Set up this function from the keyboard. Make sure that no pin is turned on . Refer to "Color Temperature Adjustment" to optimize the screen automatically. Make that may turn off Color Default Instability...
User Guide
Page 9
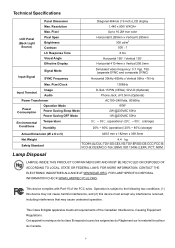
... TO LOCAL, STATE OR FEDERAL LAWS. FOR LAMP SPECIFIC DISPOSAL INFORMATION CHECK WWW.LAMPRECYCLE.ORG. Causing Equipment Regulations. Resolution Max. FOR MORE INFORMATION, CONTACT THE ELECTRONIC INDUSTRIES ALLIANCE AT WWW.EIAE.ORG. Pixel Clock 135MHz Input Terminal Image Audio Power Transformer Power Consumption Operation Mode Power Saving Sleep Mode Power Saving OFF Mode Environmental Conditions Temperature Humidity D-Sub 15 PIN (VESA) / DVI-D (Optional) Phone Jack, d=3.5mm (Optional) AC100~240Volts...
... TO LOCAL, STATE OR FEDERAL LAWS. FOR LAMP SPECIFIC DISPOSAL INFORMATION CHECK WWW.LAMPRECYCLE.ORG. Causing Equipment Regulations. Resolution Max. FOR MORE INFORMATION, CONTACT THE ELECTRONIC INDUSTRIES ALLIANCE AT WWW.EIAE.ORG. Pixel Clock 135MHz Input Terminal Image Audio Power Transformer Power Consumption Operation Mode Power Saving Sleep Mode Power Saving OFF Mode Environmental Conditions Temperature Humidity D-Sub 15 PIN (VESA) / DVI-D (Optional) Phone Jack, d=3.5mm (Optional) AC100~240Volts...
User Guide
Page 10
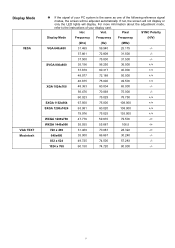
Vert. Display Mode VESA VGA TEXT Macintosh If the signal of the following reference signal modes, the screen will display. SVGA 800x600 35.156 56.250 36.000 +/+ 37.879 60.317 40.000 +/+ 48.077...Pixel SYNC Polarity Display Mode Frequency Frequency Frequency (H/V) (kHz) (Hz) (MHz) VGA 640x480 31.469 59.940 25.175 -/- 37.861 72.809 31.500 -/- 37.500 75.000 31.500 -/- For more information about the adjustment mode, refer to the instructions of your PC system is the same as one of your display card. If not, the screen will not display or only the LED lights...
Vert. Display Mode VESA VGA TEXT Macintosh If the signal of the following reference signal modes, the screen will display. SVGA 800x600 35.156 56.250 36.000 +/+ 37.879 60.317 40.000 +/+ 48.077...Pixel SYNC Polarity Display Mode Frequency Frequency Frequency (H/V) (kHz) (Hz) (MHz) VGA 640x480 31.469 59.940 25.175 -/- 37.861 72.809 31.500 -/- 37.500 75.000 31.500 -/- For more information about the adjustment mode, refer to the instructions of your PC system is the same as one of your display card. If not, the screen will not display or only the LED lights...


