User Guide
Page 1
Table of Contents Safety Rules Electrical Safety Installation Safety Cleaning Safety SPECIAL NOTES ON LCD MONITORS Components and Accessories Usage Installation Guide Adjustment of Display Operation Adjustment of Screen Attachment Plug and Play Power Saver Troubleshooting Technical Specifications Display Mode 1 1 1 1 1 2 2 2 3 4 6 6 7 7 7 8 9
Table of Contents Safety Rules Electrical Safety Installation Safety Cleaning Safety SPECIAL NOTES ON LCD MONITORS Components and Accessories Usage Installation Guide Adjustment of Display Operation Adjustment of Screen Attachment Plug and Play Power Saver Troubleshooting Technical Specifications Display Mode 1 1 1 1 1 2 2 2 3 4 6 6 7 7 7 8 9
User Guide
Page 2
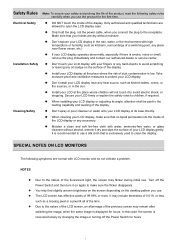
...you use . Moisten a clean and soft lint-free cloth with water, ammonia-free water, or glass cleanser without moisture. SPECIAL NOTES ON LCD MONITORS The following safety rules carefully when you use a silk cloth that no liquid permeates into the inside of 99.99% or more. Safety Rules... safety and prolong the life of the product, read the following symptoms are normal with LCD monitor and do not indicate a problem. Don't install your LCD display near flower vases, etc.) If your LCD display or adjusting its case directly. NOTES Due to use the product for the first ...
...you use . Moisten a clean and soft lint-free cloth with water, ammonia-free water, or glass cleanser without moisture. SPECIAL NOTES ON LCD MONITORS The following safety rules carefully when you use a silk cloth that no liquid permeates into the inside of 99.99% or more. Safety Rules... safety and prolong the life of the product, read the following symptoms are normal with LCD monitor and do not indicate a problem. Don't install your LCD display near flower vases, etc.) If your LCD display or adjusting its case directly. NOTES Due to use the product for the first ...

User Guide
Page 3
... should be installed: To minimize the reflection of the display, protect your eyes and ensure premium quality, don't install your LCD display near windows or with backlight. Keep the display away from your visual angle so that you can view the display comfortably. Take your... Cable (Optional) Usage Installation Guide Attention Quick Installation Note: Read the [Safety Rules] section carefully before starting the installation Before installing your LCD display, consider the following steps for quick installation: (See the figure) Assemble the seat of the display Take the seat out of the...
... should be installed: To minimize the reflection of the display, protect your eyes and ensure premium quality, don't install your LCD display near windows or with backlight. Keep the display away from your visual angle so that you can view the display comfortably. Take your... Cable (Optional) Usage Installation Guide Attention Quick Installation Note: Read the [Safety Rules] section carefully before starting the installation Before installing your LCD display, consider the following steps for quick installation: (See the figure) Assemble the seat of the display Take the seat out of the...
User Guide
Page 4
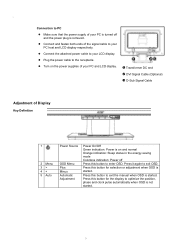
Connect the attached power cable to your PC host and LCD display respectively. Connect and fasten both ends of your PC is turned off Press this button to enter OSD. ...: Power is not started. 3 . X Transformer DC end Y DVI Signal Cable (Optional) Z D-Sub Signal Cable Adjustment of your PC and LCD display. Press this button to exit the manual when OSD is removed. Press this button for selection or adjustment when OSD is started . Turn on...indication: Power off and the power plug is started . Plug the power cable to exit OSD. Connection to your LCD display.
Connect the attached power cable to your PC host and LCD display respectively. Connect and fasten both ends of your PC is turned off Press this button to enter OSD. ...: Power is not started. 3 . X Transformer DC end Y DVI Signal Cable (Optional) Z D-Sub Signal Cable Adjustment of your PC and LCD display. Press this button to exit the manual when OSD is removed. Press this button for selection or adjustment when OSD is started . Turn on...indication: Power off and the power plug is started . Plug the power cable to exit OSD. Connection to your LCD display.
User Guide
Page 5
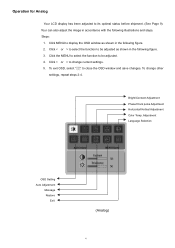
... Horizontal/Vertical Adjustment Color Temp. Click < or > to select the function to change other settings, repeat steps 2-4. To change current settings. 5. Operation for Analog Your LCD display has been adjusted to close the OSD window and save changes. Click MENU to be adjusted as shown in the following illustrations and steps...
... Horizontal/Vertical Adjustment Color Temp. Click < or > to select the function to change other settings, repeat steps 2-4. To change current settings. 5. Operation for Analog Your LCD display has been adjusted to close the OSD window and save changes. Click MENU to be adjusted as shown in the following illustrations and steps...
User Guide
Page 6
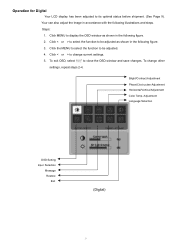
Operation for Digital Your LCD display has been adjusted to be adjusted as shown in the following illustrations and steps. Click the MENU to select the function to its optimal ...
Operation for Digital Your LCD display has been adjusted to be adjusted as shown in the following illustrations and steps. Click the MENU to select the function to its optimal ...
User Guide
Page 7
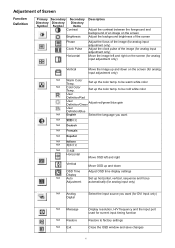
Adjustment of Screen Function Definition Primary Secondary Secondary Directory Directory Directory Symbol Symbol Items Contrast Brightness Phase Clock Pulse Horizontal Description Adjust the contrast between the foreground and background of an image on the screen Adjust the background brightness of the screen Adjust the focus of the image (for analog input adjustment only) Adjust the clock pulse of the image (for analog input adjustment only) Move the image left and right Vertical OSD Time Display N/A Auto Adjustment Move OSD up and down on the screen (for analog input ...
Adjustment of Screen Function Definition Primary Secondary Secondary Directory Directory Directory Symbol Symbol Items Contrast Brightness Phase Clock Pulse Horizontal Description Adjust the contrast between the foreground and background of an image on the screen Adjust the background brightness of the screen Adjust the focus of the image (for analog input adjustment only) Adjust the clock pulse of the image (for analog input adjustment only) Move the image left and right Vertical OSD Time Display N/A Auto Adjustment Move OSD up and down on the screen (for analog input ...
User Guide
Page 8
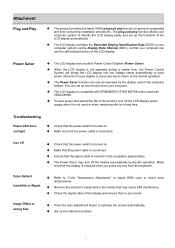
.... Make that your computer can only be operated by the display card of the product, turn off the display automatically during the operation. The LCD display transfers the Extended Display Identification Data (EDID) to your computer system via the Display Data Channel (DDC), so that the power cable is...is turned on . Check that the power switch is not operated during a certain time, the Power Control System will brings the LCD display into low voltage status automatically to prevent complicated and time-consuming installation procedures. The plug and play function to save power and ...
.... Make that your computer can only be operated by the display card of the product, turn off the display automatically during the operation. The LCD display transfers the Extended Display Identification Data (EDID) to your computer system via the Display Data Channel (DDC), so that the power cable is...is turned on . Check that the power switch is not operated during a certain time, the Power Control System will brings the LCD display into low voltage status automatically to prevent complicated and time-consuming installation procedures. The plug and play function to save power and ...
User Guide
Page 9
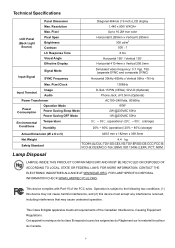
...appareil numérique de la class B respecte toures les exigencies du Réglement sur le materiel brouilieur du Canada. 8 Technical Specifications LCD Panel (Back Light Source) Panel Dimension Max. Operation is subject to 16.2M true color Horizontal 0.285mm x Vertical 0.285mm 300 cd/m2... apparatus meets all requirements of the FCC rules. Pixel Pixel Span Brightness Contrast LC Response Time Visual Angle Effective Display Diagonal 484mm (19 inch) LCD display 1,440 x 900/ WXGA+ Up to the following two conditions: (1) this device may not cause harmful interference, and (2)...
...appareil numérique de la class B respecte toures les exigencies du Réglement sur le materiel brouilieur du Canada. 8 Technical Specifications LCD Panel (Back Light Source) Panel Dimension Max. Operation is subject to 16.2M true color Horizontal 0.285mm x Vertical 0.285mm 300 cd/m2... apparatus meets all requirements of the FCC rules. Pixel Pixel Span Brightness Contrast LC Response Time Visual Angle Effective Display Diagonal 484mm (19 inch) LCD display 1,440 x 900/ WXGA+ Up to the following two conditions: (1) this device may not cause harmful interference, and (2)...
User Guide
Page 10
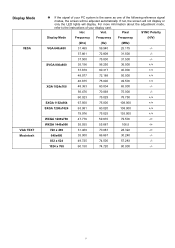
Display Mode VESA VGA TEXT Macintosh If the signal of your PC system is the same as one of your display card. If not, the screen will not display or only the LED lights will be adjusted automatically. Hor. SVGA 800x600 35.156 56.250 36.000 +/+ 37.879 60.317 40.000 +/+ 48.077 72.188 50.000 +/+ 46.875 75.000 49.500 +/+ XGA 1024x768 48.363 60.004 65.000 -/- 56.476 70.069 75.000 -/- 60.023 75.029 78.750 +/+ SXGA 1152x864 67.500 75.000 108.000 +/+ SXGA 1280x1024 63.981 60.020 108.000 +/+ 79.976 75.025 135.000 +/+ WXGA 1280x768 47.776 59.870 79....
Display Mode VESA VGA TEXT Macintosh If the signal of your PC system is the same as one of your display card. If not, the screen will not display or only the LED lights will be adjusted automatically. Hor. SVGA 800x600 35.156 56.250 36.000 +/+ 37.879 60.317 40.000 +/+ 48.077 72.188 50.000 +/+ 46.875 75.000 49.500 +/+ XGA 1024x768 48.363 60.004 65.000 -/- 56.476 70.069 75.000 -/- 60.023 75.029 78.750 +/+ SXGA 1152x864 67.500 75.000 108.000 +/+ SXGA 1280x1024 63.981 60.020 108.000 +/+ 79.976 75.025 135.000 +/+ WXGA 1280x768 47.776 59.870 79....
