Acer X173Wb - 17" LCD Monitor Support and Manuals
Get Help and Manuals for this Acer Computers item

Popular Acer X173Wb Manual Pages
User Guide - Page 1

... OF CONTENTS
Special notes on LCD monitors 1 Information for your safety and comfort 2 Unpacking 5 Attaching/Removing the base 6 Screen position adjustment 6 Connecting the power cord 7 Safety precaution 7 Cleaning your monitor 7 Power saving 8 DDC 8 Connector Pin Assingment 9 Standard Timing Table 11 Installation 12 User controls 13 How to adjust a setting 14 Troubleshooting 20
User Guide - Page 2

... nature of the fluorescent light, the screen may flicker during initial use .
· The LCD screen has effective pixels of the previous screen may remain after switching the image, when the ...to the nature of the LCD screen, an afterimage of 99.99% or more. X173
SPECIAL NOTES ON LCD MONITORS
The following symptoms are normal with LCD monitor and do not indicate a problem. Turn off the Power ...
User Guide - Page 3

...instructions, suggested by hearing experts,to protect your safety and comfort
Safety instructions
Read these instructions carefully.
Keep this document for accessibility
Be sure that could
result in installation... voltage points or short-out parts that the power outlet you can hear it clearly and comfortably and
without distortion.
•
After setting the volume level, do
not...
User Guide - Page 4

... and safety department.
Observe the following the operating instructions
Note: Adjust only those controls that are
also... is produced with high-precision manufacturing techniques. LCD Pixel Statement
The LCD unit is damaged, cut or frayed
•...servicing to qualified service person-
Tips and information for more comfortable computer use
Computer users may complain of the monitor...
User Guide - Page 5

... shrugging your shoulders
•
install the external display, keyboard and mouse properly and within comfort
able reach
•
if you view your monitor more relaxing and
productive:
...recycling, please visit the following work habits
Develop the following websites: Worldwide: http://global.acer.com/about/sustainability.htm
EN-4 X173
•
take breaks regularly, and do not ...
User Guide - Page 8

... rated 10 A, 250 V. lways unplug the monitor before cleaning.
The cord set should have the appropriate safety approvals for your area.
· This monitor has a universal power supply that allows operation in which the equipment will be installed. light or other heavy object, on the face of the monitor. se a soft cloth to the screen...
User Guide - Page 9

... Plug and Play with your system if your system also supports DDC protocol. DDC
To make your installation easier, the monitor is a communication protocol through which the monitor automatically informs the host system about its capabilities, for example, supported resolutions and corresponding timing.
EN-8 The monitor supports DDC2B standard.
The recovery time from the display controller...
User Guide - Page 11

... VESA 5 VESA 6 VESA 7 VESA 8 VESA 9 VESA 10 VESA 11 VESA 12 VESA 13 VESA 14 VESA 15 MAC 16 MAC 17 MAC
Resolution
640 x 480 640 x 480 640 x 480 800 x 600 800 x 600 800 x 600 800 x 600 1024 x ... Auto Setup under Windows "Full Screen" pattern or using the pattern in the user modes. X173
Standard Timing Table
To reduce the need for adjustment for different modes, the monitor has default setting modes ...
User Guide - Page 12

..., then power-ON the computer. EN-11 X173
INSTALLATION
To install the monitor to the computer.
2.
b. Connect power cord Connect the power cord to the monitor, then to diagnose the problem. If the monitor still does not function properly, please refer to the troubleshooting section to a properly grounded AC outlet.
3. Connect Video Cable
a. This sequence is very...
User Guide - Page 13

...this button for 2 seconds to activate the AutoAdjustment function.The Auto Adjustment function is used to set the HPos, VPos, Clock and Focus.
5.< / > Press < or > to select the desired function.Press < or > ...to change the settings of the current function.
6.MENU / ENTER: Activate OSD menu when OSD is OFF or activate/de-activate ...
User Guide - Page 14

... want to adjust. 4. Acer eColor Management
If selected to change the settings of the current function. 5. Press the MENU-button to select the function that you want to adjust any other function, repeat steps 2-4.
·
P/X Series OSD behave
When user press "MENU" button on front bezel
1 2
1. Press < or > to "Acer eColor Management " item...
User Guide - Page 15
... Management OSD
X173
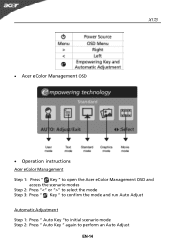
· Operation instructions
Acer eColor Management
Step 1: Press " Key " to open the Acer eColor Management OSD and access the scenario modes
Step 2: Press "" to select the mode Step 3: Press " Key " to confirm the mode and run Auto Adjust
...
User Guide - Page 18

...
Espanol
N/A
Italiano
N/A
N/A
N/A
Suomi
N/A
Nederlands EMEA version OSD only
N/A
Pyccknn
EN-17 User /Red
User /Green Adjusts Red/Green/Blue intensity.
Position
N/A
Warm
N/A
Cool
Description
... Adjust the vertical position. (available in Analog mode only) Set the color temperature to cool white.
Set the color temperature to warm white. X173
Main Menu Icon
Sub Menu ...
User Guide - Page 19

... current input timing. N/A
Exit
Save user adjustment and OSD disappear. V.
N/A
Reset
Clear each old status of the OSD. Position
Adjust the horizontal position of Autoconfigurationand set the color temperature to Cool. OSD Timeout
Adjust the OSD timeout.
EN-18
N/A
Analog Select input signal from analog (D-Sub)
Digital
N/A
(only
Select input signal...
User Guide - Page 20

... LED OFF
· Check the power switch. X173
TROUBLESHOOTING
Before sending your LCD monitor for a few seconds after adjusting the size of the image before changing or disconnecting the signal cable or powering OFF the monitor.
Unstable Picture
· Check if the specification of graphics adapter and monitor is in display
·
POSITION with non-standard...
Acer X173Wb Reviews
We have not received any reviews for Acer yet.