
AL1706 Service Guide
Page 7
User only a trolley or stand recommended by the manufacturer and following symptoms are not sure of the type of the time. If you mount the monitor on again to qualified ... the unit during initial use the monitor only with LCD monitor and do not indicated a problem. Do not place the monitor on an unstable trolley, stand, or table. It could short circuit parts causing a fire or electric shock. To ensure satisfactory operation, use . PRECAUTIONS Do not use . Do not place the...
User only a trolley or stand recommended by the manufacturer and following symptoms are not sure of the type of the time. If you mount the monitor on again to qualified ... the unit during initial use the monitor only with LCD monitor and do not indicated a problem. Do not place the monitor on an unstable trolley, stand, or table. It could short circuit parts causing a fire or electric shock. To ensure satisfactory operation, use . PRECAUTIONS Do not use . Do not place the...
AL1706 Service Guide
Page 26
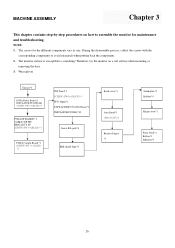
...)*4 FFC(30pin)*1 TAPE,ACE#LP1701(40x20mm)*1 INSULATOR PC#LE1710 Insert B/L jack*4 PCBA Control Board *1 SCREW (PW 3*4,M,ZN) *2 EMI shield Tape*2 Back cover*1 Arm Stand*1 (M4x10,ZN)*4 Bracket Finger *1 Stand plate*1 Rubber*4 Hinge cover*1 Front bezel*1 Button*1 Indicator*1 26 During the disassembly process, collect the screws with the corresponding components to scratching! MACHINE...
...)*4 FFC(30pin)*1 TAPE,ACE#LP1701(40x20mm)*1 INSULATOR PC#LE1710 Insert B/L jack*4 PCBA Control Board *1 SCREW (PW 3*4,M,ZN) *2 EMI shield Tape*2 Back cover*1 Arm Stand*1 (M4x10,ZN)*4 Bracket Finger *1 Stand plate*1 Rubber*4 Hinge cover*1 Front bezel*1 Button*1 Indicator*1 26 During the disassembly process, collect the screws with the corresponding components to scratching! MACHINE...
AL1706 Service Guide
Page 30
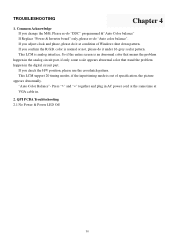
... input timing mode is an abnormal color that means the problem happen in the analog circuit part, if only some scale appears abnormal color that stand the problem happen in the digital circuit part. Common Acknowledge If you adjust clock and phase, please do "Auto color balance". TROUBLESHOOTING Chapter...
... input timing mode is an abnormal color that means the problem happen in the analog circuit part, if only some scale appears abnormal color that stand the problem happen in the digital circuit part. Common Acknowledge If you adjust clock and phase, please do "Auto color balance". TROUBLESHOOTING Chapter...
AL1706 Service Guide
Page 41
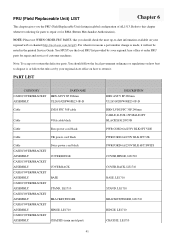
...it will not be noted in global configuration of customer machines. You MUST use the local FRU list provided by your regional Acer office on your regional Acer office ot order FRU parts for RMA (Return Merchandise Authorization). For whatever reasons a part number change is made, it ,...COVER/BRACKET ASSEMBLY CASE/COVER/BRACKET ASSEMBLY CASE/COVER/BRACKET ASSEMBLY CASE/COVER/BRACKET ASSEMBLY Swiss power cord black COVER,HINGE COVER,BACK BASE STAND, LE1710 BRACKET,FINGER HINGE, LE1710 CHASSIS (main metal part) 41 DESCRIPTION HRN ASS'Y 8P 280mm UL2651#28FW08E23-0F-D HRN LVDS FFC...
...it will not be noted in global configuration of customer machines. You MUST use the local FRU list provided by your regional Acer office on your regional Acer office ot order FRU parts for RMA (Return Merchandise Authorization). For whatever reasons a part number change is made, it ,...COVER/BRACKET ASSEMBLY CASE/COVER/BRACKET ASSEMBLY CASE/COVER/BRACKET ASSEMBLY CASE/COVER/BRACKET ASSEMBLY Swiss power cord black COVER,HINGE COVER,BACK BASE STAND, LE1710 BRACKET,FINGER HINGE, LE1710 CHASSIS (main metal part) 41 DESCRIPTION HRN ASS'Y 8P 280mm UL2651#28FW08E23-0F-D HRN LVDS FFC...
AL1706 User's Guide
Page 4
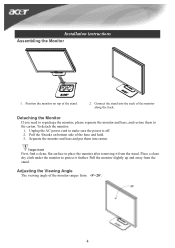
... them to repackage the monitor, please separate the monitor and base, and restore them into the neck of the stand. 2. Position the monitor on bottom side of the monitor ranges from the stand. Adjusting the Viewing Angle The viewing angle of the base and hold. 3. Unplug the AC power cord to protect... sure the power is off. 2. Pull the 4 hooks on top of the monitor along the track. Pull the monitor slightly up and away from the stand. Connect the stand into carton. Installation instructions Assembling the Monitor 1.
... them to repackage the monitor, please separate the monitor and base, and restore them into the neck of the stand. 2. Position the monitor on bottom side of the monitor ranges from the stand. Adjusting the Viewing Angle The viewing angle of the base and hold. 3. Unplug the AC power cord to protect... sure the power is off. 2. Pull the 4 hooks on top of the monitor along the track. Pull the monitor slightly up and away from the stand. Connect the stand into carton. Installation instructions Assembling the Monitor 1.
AL1706 User's Guide
Page 10
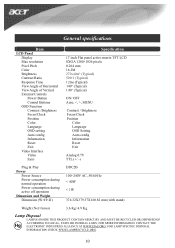
... during active off operation Dimension and Weight Dimension (W×H×D) DDC2B 100~240V AC, 50/60 Hz < 40W < 1W 374.32X379.37X160.82 mm (with stand) Weight (Net/ Gross) 3.6 Kg/ 4.9 Kg Lamp Disposal LAMP(S) INSIDE THIS PRODUCT CONTAIN MERCURY AND MUST BE RECYCLED OR DISPOSED OF ACCORDING TO LOCAL, STATE OR...
... during active off operation Dimension and Weight Dimension (W×H×D) DDC2B 100~240V AC, 50/60 Hz < 40W < 1W 374.32X379.37X160.82 mm (with stand) Weight (Net/ Gross) 3.6 Kg/ 4.9 Kg Lamp Disposal LAMP(S) INSIDE THIS PRODUCT CONTAIN MERCURY AND MUST BE RECYCLED OR DISPOSED OF ACCORDING TO LOCAL, STATE OR...


