

AL1706 Service Guide
Page 6
WARNING: To prevent fire or shock hazard, do not expose the monitor to qualified personnel only 6 Dangerously high voltages are present inside the monitor. Do not open the cabinet. Refer servicing to rain or moisture.
WARNING: To prevent fire or shock hazard, do not expose the monitor to qualified personnel only 6 Dangerously high voltages are present inside the monitor. Do not open the cabinet. Refer servicing to rain or moisture.
AL1706 Service Guide
Page 7
... storm or when it from overheating, be sure these openings are provide for long periods of the time. Unplug the unit during initial use the monitor near a bathtub, washbowl, kitchen sink, laundry tub, swimming pool or in the back and bottom of power supplied to your home, consult your ...or shelf, use an adapter to dangerous voltages and other hazards. Turn off the Power Switch and then turn it can expose you mount the monitor on again to qualified service personnel. Do not overload power strips and extension cords. Please refer all of time. If your dealer or local...
... storm or when it from overheating, be sure these openings are provide for long periods of the time. Unplug the unit during initial use the monitor near a bathtub, washbowl, kitchen sink, laundry tub, swimming pool or in the back and bottom of power supplied to your home, consult your ...or shelf, use an adapter to dangerous voltages and other hazards. Turn off the Power Switch and then turn it can expose you mount the monitor on again to qualified service personnel. Do not overload power strips and extension cords. Please refer all of time. If your dealer or local...
AL1706 Service Guide
Page 9
... Diagram Interface Board Diagram Software Flow Chart Interface Board PCB Layout Front Bezel Rear Cover Chapter 2 Operating Instruction 20 Front Bezel Control Adjusting the Monitor How to Optimize the DOS-Mode Chapter 3 Machine Assembly 27 Chapter 4 Troubleshooting 31 Common Acknowledge Interface Board Troubleshooting QPI PCBA Troubleshooting Chapter 5 Connector Information 40 ...
... Diagram Interface Board Diagram Software Flow Chart Interface Board PCB Layout Front Bezel Rear Cover Chapter 2 Operating Instruction 20 Front Bezel Control Adjusting the Monitor How to Optimize the DOS-Mode Chapter 3 Machine Assembly 27 Chapter 4 Troubleshooting 31 Common Acknowledge Interface Board Troubleshooting QPI PCBA Troubleshooting Chapter 5 Connector Information 40 ...
AL1706 Service Guide
Page 10
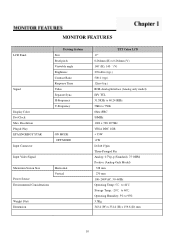
... 1/2B < 35W Resolution Plug & Play EPA ENGERGY STAR Input Connector Driving System Size Pixel pitch Viewable angle Brightness Contrast Ratio Response Time Video Separate Sync. MONITOR FEATURES LCD Panel Signal Display Color Dot Clock Max.
... 1/2B < 35W Resolution Plug & Play EPA ENGERGY STAR Input Connector Driving System Size Pixel pitch Viewable angle Brightness Contrast Ratio Response Time Video Separate Sync. MONITOR FEATURES LCD Panel Signal Display Color Dot Clock Max.
AL1706 Service Guide
Page 12
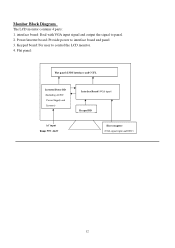
Power/inverter board: Provide power to control the LCD monitor. 4. Keypad board: For user to interface board and panel 3. Monitor Block Diagram The LCD monitor contains 4 parts: 1. interface board: Deal with VGA input signal and output the signal to panel. 2. Flat panel: Flat panel (LVDS interface) and CCFL Inverter/Power BD (Including AC/DC Power Supply and Inverter) Interface Board (VGA input) Keypad BD AC input Range 90V~264V Host computer (VGA signal input and DDC) 12
Power/inverter board: Provide power to control the LCD monitor. 4. Keypad board: For user to interface board and panel 3. Monitor Block Diagram The LCD monitor contains 4 parts: 1. interface board: Deal with VGA input signal and output the signal to panel. 2. Flat panel: Flat panel (LVDS interface) and CCFL Inverter/Power BD (Including AC/DC Power Supply and Inverter) Interface Board (VGA input) Keypad BD AC input Range 90V~264V Host computer (VGA signal input and DDC) 12

AL1706 Service Guide
Page 15
MONITOR INTERFACE BOARD PCB LAYOUT 15
MONITOR INTERFACE BOARD PCB LAYOUT 15
AL1706 Service Guide
Page 19
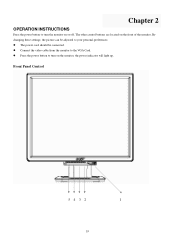
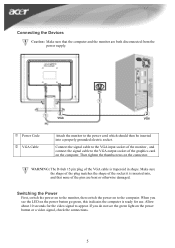
The power cord should be adjusted to your personal preferences. Front Panel Control 5 4 3 2 1 19 The other control buttons are located on the front of the monitor. Press the power button to turn the monitor on or off. By changing these settings, the picture can be connected. Connect the video cable from the monitor to the VGA Card. Chapter 2 OPERATION INSTRUCTIONS Press the power button to turn on the monitor, the power indicator will light up.
The power cord should be adjusted to your personal preferences. Front Panel Control 5 4 3 2 1 19 The other control buttons are located on the front of the monitor. Press the power button to turn the monitor on or off. By changing these settings, the picture can be connected. Connect the video cable from the monitor to the VGA Card. Chapter 2 OPERATION INSTRUCTIONS Press the power button to turn on the monitor, the power indicator will light up.
AL1706 Service Guide
Page 20
... button for 2seconds to activate the "Auto Adjustment" which is ON or Exit OSD menu when in handy if you ever have to ship your monitor as radiators or air ducts, or in the factory. Stubborn stains may be removed with a cloth lightly dampened with a soft cloth. For maximum... through adjustments icons when OSD is ON. 3. No Symbol 1 Power key/LED 2 Menu/Enter 3 > 4 < 5 Auto/Exit Function Press this button to turn the monitor on or off or activate/de-activate adjustment function when OSD is used to set the H.Pos., V Pos., Clock and Phase. Off mode Activate OSD...
... button for 2seconds to activate the "Auto Adjustment" which is ON or Exit OSD menu when in handy if you ever have to ship your monitor as radiators or air ducts, or in the factory. Stubborn stains may be removed with a cloth lightly dampened with a soft cloth. For maximum... through adjustments icons when OSD is ON. 3. No Symbol 1 Power key/LED 2 Menu/Enter 3 > 4 < 5 Auto/Exit Function Press this button to turn the monitor on or off or activate/de-activate adjustment function when OSD is used to set the H.Pos., V Pos., Clock and Phase. Off mode Activate OSD...

AL1706 Service Guide
Page 21
ADJUSTING THE MONITOR 1.) Main OSD Menu a. Outline b. Description for OSD Main Sub Menu Sub Menu Menu Icon Item Icon Contrast Description Contrast from digital register Adjustment Range 0-100 50 Reset Value Brightness Backlight Adjustment 0-100 100 Phase Clock H. Position Adjust picture phase to reduce horizontal line noise Adjust picture clock to reduce vertical line noise Adjust picture horizontal position 0-100 0-100 0-100 Do auto config Do Auto Config Do Auto Config 21
ADJUSTING THE MONITOR 1.) Main OSD Menu a. Outline b. Description for OSD Main Sub Menu Sub Menu Menu Icon Item Icon Contrast Description Contrast from digital register Adjustment Range 0-100 50 Reset Value Brightness Backlight Adjustment 0-100 100 Phase Clock H. Position Adjust picture phase to reduce horizontal line noise Adjust picture clock to reduce vertical line noise Adjust picture horizontal position 0-100 0-100 0-100 Do auto config Do Auto Config Do Auto Config 21
AL1706 Service Guide
Page 24
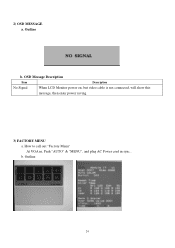
b. Outline 24 How to call out "Factory Menu" At VGA in, Push "AUTO" & "MENU", and plug AC Power cord in sync.. OSD Message Description Item Description No Signal When LCD Monitor power on, but video cable is not connected, will show this message, then enter power saving. 3) FACTORY MENU a. Outline b. 2) OSD MESSAGE a.
b. Outline 24 How to call out "Factory Menu" At VGA in, Push "AUTO" & "MENU", and plug AC Power cord in sync.. OSD Message Description Item Description No Signal When LCD Monitor power on, but video cable is not connected, will show this message, then enter power saving. 3) FACTORY MENU a. Outline b. 2) OSD MESSAGE a.
AL1706 Service Guide
Page 25
... the video input signal is restored, full power is restored and the display is defined in two levels, DDC1 and DDC2B. IN ORDER FOR THIS MONITOR OT OPERATE PROPERLY, THERE MUST BE A VIDEO INPUT SIGNAL. This feature is designed to conserve electrical energy by reducing power consumption when there is no... BE NON-FUNCTIONAL IF THERE IS NO VIDEO INPUT SIGNAL. HOW TO OPTIMIZE THE DOS-MODE PLUG AND PLAY Plug & Play DDC1/2B Feature This monitor is equipped with NEMA 5*15 style and is UL listed and CSA labeled. When there is similar to the host that continuously transmits EDID information...
... the video input signal is restored, full power is restored and the display is defined in two levels, DDC1 and DDC2B. IN ORDER FOR THIS MONITOR OT OPERATE PROPERLY, THERE MUST BE A VIDEO INPUT SIGNAL. This feature is designed to conserve electrical energy by reducing power consumption when there is no... BE NON-FUNCTIONAL IF THERE IS NO VIDEO INPUT SIGNAL. HOW TO OPTIMIZE THE DOS-MODE PLUG AND PLAY Plug & Play DDC1/2B Feature This monitor is equipped with NEMA 5*15 style and is UL listed and CSA labeled. When there is similar to the host that continuously transmits EDID information...
AL1706 Service Guide
Page 26
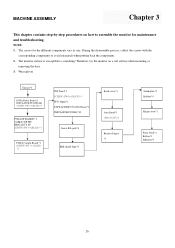
... is susceptible to assemble the monitor for the different components vary in size. Wear gloves Chassis*1 PCBA Power Board *1 INSULATOR PC,MYLAR SCREW (PW 3*6,M,ZN) *3 PCBA I/F BOARD *1 CABLE 30P FFC HRN ...*1 Arm Stand*1 (M4x10,ZN)*4 Bracket Finger *1 Stand plate*1 Rubber*4 Hinge cover*1 Front bezel*1 Button*1 Indicator*1 26 The screws for maintenance and troubleshooting. Therefore, lay the monitor on how to scratching! MACHINE ASSEMBLY Chapter 3 This chapter contains step-by-step procedures on a soft surface when mounting or removing the base. 3. During the...
... is susceptible to assemble the monitor for the different components vary in size. Wear gloves Chassis*1 PCBA Power Board *1 INSULATOR PC,MYLAR SCREW (PW 3*6,M,ZN) *3 PCBA I/F BOARD *1 CABLE 30P FFC HRN ...*1 Arm Stand*1 (M4x10,ZN)*4 Bracket Finger *1 Stand plate*1 Rubber*4 Hinge cover*1 Front bezel*1 Button*1 Indicator*1 26 The screws for maintenance and troubleshooting. Therefore, lay the monitor on how to scratching! MACHINE ASSEMBLY Chapter 3 This chapter contains step-by-step procedures on a soft surface when mounting or removing the base. 3. During the...

AL1706 User's Guide
Page 1
Table of Contents Precautions ...2 Special notes on LCD monitors 3 Package contents ...3 Installation instructions 4 Assembling the Monitor...4 Detaching the Monitor ...4 Adjusting the Viewing Angle...4 Connecting the Devices...5 Switching the Power ...5 Adjusting display settings 6 External Controls ...6 OSD options ...7 OSD Menu ...7 Troubleshooting ...9 General specifications 10 1
Table of Contents Precautions ...2 Special notes on LCD monitors 3 Package contents ...3 Installation instructions 4 Assembling the Monitor...4 Detaching the Monitor ...4 Adjusting the Viewing Angle...4 Connecting the Devices...5 Switching the Power ...5 Adjusting display settings 6 External Controls ...6 OSD options ...7 OSD Menu ...7 Troubleshooting ...9 General specifications 10 1
AL1706 User's Guide
Page 2
... knives, pens, or pencils near a source of electrocution. it from the display screen, including sprays. Recycling Information We, the Acer Incorporated. If you find the troubleshooting section does not help. These devices contain recyclable materials, which can be permanently scratched. Be ...aware of the location of the monitor. United State : http://www.ciwmb.ca.gov/electronics/act2003/Recovery/Approved/ Asia : http://recycle.epa.gov.tw/public/public4_2.htm ...
... knives, pens, or pencils near a source of electrocution. it from the display screen, including sprays. Recycling Information We, the Acer Incorporated. If you find the troubleshooting section does not help. These devices contain recyclable materials, which can be permanently scratched. Be ...aware of the location of the monitor. United State : http://www.ciwmb.ca.gov/electronics/act2003/Recovery/Approved/ Asia : http://recycle.epa.gov.tw/public/public4_2.htm ...
AL1706 User's Guide
Page 3
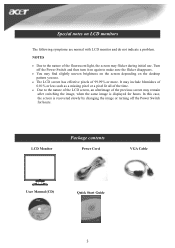
... is recovered slowly by changing the image or turning off the Power Switch and then turn it on LCD monitors The following symptoms are normal with LCD monitor and do not indicate a problem. LCD Monitor Package contents Power Cord VGA Cable User Manual (CD) Quick Start Guide 3 It may find slightly uneven brightness...
... is recovered slowly by changing the image or turning off the Power Switch and then turn it on LCD monitors The following symptoms are normal with LCD monitor and do not indicate a problem. LCD Monitor Package contents Power Cord VGA Cable User Manual (CD) Quick Start Guide 3 It may find slightly uneven brightness...
AL1706 User's Guide
Page 4
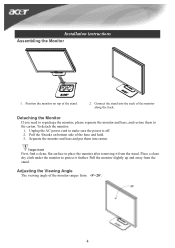
...into carton. To detach the monitor: 1. Pull the 4 hooks on top of the monitor along the track. Place a clean dry cloth under the monitor to protect it from the stand. Separate the monitor and base and put them to repackage the monitor, please separate the monitor and base, and restore them ...into the neck of the stand. 2. Pull the monitor slightly up and away from -5°~20°...
...into carton. To detach the monitor: 1. Pull the 4 hooks on top of the monitor along the track. Place a clean dry cloth under the monitor to protect it from the stand. Separate the monitor and base and put them to repackage the monitor, please separate the monitor and base, and restore them ...into the neck of the stand. 2. Pull the monitor slightly up and away from -5°~20°...
AL1706 User's Guide
Page 5
... indicates the computer is ready for the video signal to the power cord which should then be inserted into , and that the computer and the monitor are bent or otherwise damaged. When you do not see the LED on the power button or a video signal, check the connections. 5 Allow about 10... seconds for use. Connect the signal cable to the VGA input socket of the monitor , and connect the signal cable to the computer. Then tighten the thumbscrews on to the VGA output socket of the VGA cable is inserted into...
... indicates the computer is ready for the video signal to the power cord which should then be inserted into , and that the computer and the monitor are bent or otherwise damaged. When you do not see the LED on the power button or a video signal, check the connections. 5 Allow about 10... seconds for use. Connect the signal cable to the VGA input socket of the monitor , and connect the signal cable to the computer. Then tighten the thumbscrews on to the VGA output socket of the VGA cable is inserted into...
AL1706 User's Guide
Page 6
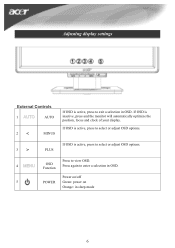
If OSD is active, press to select or adjust OSD options. 3 > PLUS If OSD is inactive, press and the monitor will automatically optimize the position, focus and clock of your display. Power on/off 5 POWER Green: power on Orange: in sleep mode 6 Press to view OSD. 4 OSD Function Press again to exit a selection in OSD. If OSD is active, press to select or adjust OSD options. Adjusting display settings External Controls 1 AUTO 2 < MINUS If OSD is active, press to enter a selection in OSD.
If OSD is active, press to select or adjust OSD options. 3 > PLUS If OSD is inactive, press and the monitor will automatically optimize the position, focus and clock of your display. Power on/off 5 POWER Green: power on Orange: in sleep mode 6 Press to view OSD. 4 OSD Function Press again to exit a selection in OSD. If OSD is active, press to select or adjust OSD options. Adjusting display settings External Controls 1 AUTO 2 < MINUS If OSD is active, press to enter a selection in OSD.
AL1706 User's Guide
Page 9
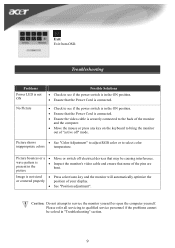
... select color inappropriate colors temperature. Image is present in "Troubleshooting" section. 9 wave pattern is not sized • Press select/auto key and the monitor will automatically optimize the or centered properly position of your display. • See "Position adjustment". Picture bounces or a • Move or switch off...Cord is connected. • Check to see if the power switch is in the ON position. • Ensure that none of the monitor and the computer. • Move the mouse or press any key on the keyboard to qualified service personnel if the problems cannot be ...
... select color inappropriate colors temperature. Image is present in "Troubleshooting" section. 9 wave pattern is not sized • Press select/auto key and the monitor will automatically optimize the or centered properly position of your display. • See "Position adjustment". Picture bounces or a • Move or switch off...Cord is connected. • Check to see if the power switch is in the ON position. • Ensure that none of the monitor and the computer. • Move the mouse or press any key on the keyboard to qualified service personnel if the problems cannot be ...


