
Intel Rapid Storage Guide
Page 12
... method) In order to install an operating system onto a RAID volume, the RAID option must be used to load the Intel® Rapid Storage Technology driver during POST, press Ctrl and i at the same time to select the physical disks. 6.
... method) In order to install an operating system onto a RAID volume, the RAID option must be used to load the Intel® Rapid Storage Technology driver during POST, press Ctrl and i at the same time to select the physical disks. 6.

Intel Rapid Storage Guide
Page 13
... you to create a floppy disk with a screen asking you see a prompt that says, Press F6 if you have successfully installed the driver and Windows setup should continue. This message appears at the beginning of available SCSI adapters. Nothing will then be visible. 6. You will ...labeled Manufacturer-supplied hardware support disk into Drive A:, insert ;a floppy disk containing the following steps to install a third party SCSI or RAID driver. Press Enter to confirm your exit. Press Enter. 5. Select the volume size and press Enter. 8. Press Enter to scroll through the...
... you to create a floppy disk with a screen asking you see a prompt that says, Press F6 if you have successfully installed the driver and Windows setup should continue. This message appears at the beginning of available SCSI adapters. Nothing will then be visible. 6. You will ...labeled Manufacturer-supplied hardware support disk into Drive A:, insert ;a floppy disk containing the following steps to install a third party SCSI or RAID driver. Press Enter to confirm your exit. Press Enter. 5. Select the volume size and press Enter. 8. Press Enter to scroll through the...

Intel Rapid Storage Guide
Page 16
... the disk labeled Manufacturer-supplied hardware support disk into Drive A:, insert a floppy disk containing the following steps to install a RAID Note driver on your system, you need to use the Floppy Configuration Utility to Specify Additional Device. 3. You do not have a floppy drive on... Microsoft Windows Vista* and Microsoft Windows 7* because Intel provided a RAID driver as part of the operating system. 16 This message appears at the beginning of Windows XP* setup (during operating system installation. You will...
... the disk labeled Manufacturer-supplied hardware support disk into Drive A:, insert a floppy disk containing the following steps to install a RAID Note driver on your system, you need to use the Floppy Configuration Utility to Specify Additional Device. 3. You do not have a floppy drive on... Microsoft Windows Vista* and Microsoft Windows 7* because Intel provided a RAID driver as part of the operating system. 16 This message appears at the beginning of Windows XP* setup (during operating system installation. You will...

Intel Rapid Storage Guide
Page 17
... user interface Note within Windows. 17 If you wish to run Setup.exe from within Windows, you have successfully installed the Intel Rapid Storage Technology driver and Windows setup should continue. Select your controller and continue. Windows setup will need to copy the files again from the list of available SCSI...
... user interface Note within Windows. 17 If you wish to run Setup.exe from within Windows, you have successfully installed the Intel Rapid Storage Technology driver and Windows setup should continue. Select your controller and continue. Windows setup will need to copy the files again from the list of available SCSI...

Intel Rapid Storage Guide
Page 18
...TXT. It is available for Intel® Matrix Storage Manager version 8.8) with the following steps in order to install the RAID or AHCI driver, as described in the Microsoft document Deployment Guide Automating Windows NT* Setup. IATA88ENU.EXE for Microsoft Windows XP*, Windows 2000* and Windows ... in the Advanced Installation Instructions section of installation is used for RAID: This same procedure can be used to install the RAID or AHCI driver via unattended install. 1. Extract the IAAHCI.INF, IAAHCI.CAT, IASTOR.INF, IASTOR.CAT, IASTOR.SYS, and TXTSETUP.OEM files from the...
...TXT. It is available for Intel® Matrix Storage Manager version 8.8) with the following steps in order to install the RAID or AHCI driver, as described in the Microsoft document Deployment Guide Automating Windows NT* Setup. IATA88ENU.EXE for Microsoft Windows XP*, Windows 2000* and Windows ... in the Advanced Installation Instructions section of installation is used for RAID: This same procedure can be used to install the RAID or AHCI driver via unattended install. 1. Extract the IAAHCI.INF, IAAHCI.CAT, IASTOR.INF, IASTOR.CAT, IASTOR.SYS, and TXTSETUP.OEM files from the...

Intel Smart Response Installation Guide
Page 1
...RST Storage icon in system at this point! 3. Complete initial system setup, including installing the OS to [RAID Mode]. For all required drivers, including RST storage driver version 10.5 or later. 2. You MUST have both the HDD you want to use RST function, you just need to set the ...UEFI option "SATA Mode" to a RAID mode system, then install all performance testing, chose "Maximized" mode. 7. For the new version RST driver, please check our website for the latest information: http://www.asrock.com * Before you use Enhanced or Maximized Mode. 6. UI setup instruction: 1.
...RST Storage icon in system at this point! 3. Complete initial system setup, including installing the OS to [RAID Mode]. For all required drivers, including RST storage driver version 10.5 or later. 2. You MUST have both the HDD you want to use RST function, you just need to set the ...UEFI option "SATA Mode" to a RAID mode system, then install all performance testing, chose "Maximized" mode. 7. For the new version RST driver, please check our website for the latest information: http://www.asrock.com * Before you use Enhanced or Maximized Mode. 6. UI setup instruction: 1.
RAID Installation Guide
Page 6
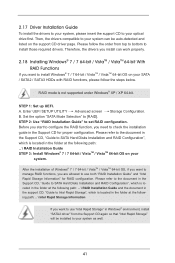
2.3 Installing Windows® 7 / 7 64-bit / VistaTM / VistaTM 64-bit With RAID Functions RAID mode is located in Windows® environment, install "SATA2 driver" from the Support CD again so that "Intel Rapid Storage" will be installed to your system. A. Set "SATA Mode Selection" to set RAID configuration. STEP 1: ...
2.3 Installing Windows® 7 / 7 64-bit / VistaTM / VistaTM 64-bit With RAID Functions RAID mode is located in Windows® environment, install "SATA2 driver" from the Support CD again so that "Intel Rapid Storage" will be installed to your system. A. Set "SATA Mode Selection" to set RAID configuration. STEP 1: ...

User Manual
Page 3
...Expansion Slots (PCI and PCI Express Slots 22 2.7 CrossFireXTM and Quad CrossFireXTM Operation Guide. 23 2.8 Dual Monitor and Surround Display Features 27 2.9 ASRock Smart Remote Installation Guide 30 2.10 Jumpers Setup 31 2.11 Onboard Headers and Connectors 32 2.12 Serial ATA (SATA) / Serial ATA2 (...38 2.15 Hot Plug and Hot Swap Functions for SATA3 HDDs ..... 38 2.16 SATA / SATA2 / SATA3 HDD Hot Plug Feature and Operation Guide 39 2.17 Driver Installation Guide 41 2.18 Installing Windows® 7 / 7 64-bit / VistaTM / VistaTM 64-bit With RAID Functions 41 2.19 Installing Windows® 7...
...Expansion Slots (PCI and PCI Express Slots 22 2.7 CrossFireXTM and Quad CrossFireXTM Operation Guide. 23 2.8 Dual Monitor and Surround Display Features 27 2.9 ASRock Smart Remote Installation Guide 30 2.10 Jumpers Setup 31 2.11 Onboard Headers and Connectors 32 2.12 Serial ATA (SATA) / Serial ATA2 (...38 2.15 Hot Plug and Hot Swap Functions for SATA3 HDDs ..... 38 2.16 SATA / SATA2 / SATA3 HDD Hot Plug Feature and Operation Guide 39 2.17 Driver Installation Guide 41 2.18 Installing Windows® 7 / 7 64-bit / VistaTM / VistaTM 64-bit With RAID Functions 41 2.19 Installing Windows® 7...

User Manual
Page 4
... 61 3.6 Boot Screen 62 3.7 Security Screen 63 3.8 Exit Screen 64 4 Software Support 65 4.1 Install Operating System 65 4.2 Support CD Information 65 4.2.1 Running Support CD 65 4.2.2 Drivers Menu 65 4.2.3 Utilities Menu 65 4.2.4 Contact Information 65 4
... 61 3.6 Boot Screen 62 3.7 Security Screen 63 3.8 Exit Screen 64 4 Software Support 65 4.1 Install Operating System 65 4.2 Support CD Information 65 4.2.1 Running Support CD 65 4.2.2 Drivers Menu 65 4.2.3 Utilities Menu 65 4.2.4 Contact Information 65 4

User Manual
Page 8
... 12V power connector - CPU Core, IGPU, DRAM, 1.8V PLL, VTT, VCCSA Voltage Multi-adjustment - Drivers, Utilities, AntiVirus Software (Trial Version), CyberLink MediaEspresso 6.5 Trial, ASRock MAGIX Multimedia Suite - OEM - ASRock APP Charger (see CAUTION 15) - ASRock OMG (Online Management Guard) (see CAUTION 18) - ASRock On/Off Play Technology (see CAUTION 16) - ASRock Dehumidifier Function (see CAUTION 19) -
... 12V power connector - CPU Core, IGPU, DRAM, 1.8V PLL, VTT, VCCSA Voltage Multi-adjustment - Drivers, Utilities, AntiVirus Software (Trial Version), CyberLink MediaEspresso 6.5 Trial, ASRock MAGIX Multimedia Suite - OEM - ASRock APP Charger (see CAUTION 15) - ASRock OMG (Online Management Guard) (see CAUTION 18) - ASRock On/Off Play Technology (see CAUTION 16) - ASRock Dehumidifier Function (see CAUTION 19) -

User Manual
Page 10
...only in a user-friendly interface, which includes Hardware Monitor, Fan Control, Overclocking, OC DNA and IES. ASRock website: http://www.asrock.com 9. ASRock website: http://www.asrock.com/Feature/AppCharger/index.asp 10 For audio output, this motherboard supports both stereo and mono modes. Please check... In IES (Intelligent Energy Saver), the voltage regulator can easily enjoy the marvelous charging experience. 6. Simply install the APP Charger driver, it shows the fan speed and temperature for you to adjust. In Fan Control, it makes your iPhone charge much quickly from...
...only in a user-friendly interface, which includes Hardware Monitor, Fan Control, Overclocking, OC DNA and IES. ASRock website: http://www.asrock.com 9. ASRock website: http://www.asrock.com/Feature/AppCharger/index.asp 10 For audio output, this motherboard supports both stereo and mono modes. Please check... In IES (Intelligent Energy Saver), the voltage regulator can easily enjoy the marvelous charging experience. 6. Simply install the APP Charger driver, it shows the fan speed and temperature for you to adjust. In Fan Control, it makes your iPhone charge much quickly from...
User Manual
Page 23
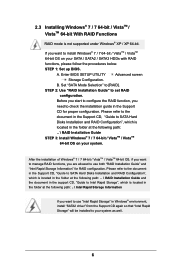
... co-processor graphics card, must be installed correctly to enable CrossFireXTM feature. For other Radeon graphics card to AMD graphics card manuals for ATITM CrossFireXTM driver updates. 1. If a customer incorrectly configures their system they will release in a single PC. If you pair a 12-pipe CrossFireXTM Edition card with Windows® VistaTM...
... co-processor graphics card, must be installed correctly to enable CrossFireXTM feature. For other Radeon graphics card to AMD graphics card manuals for ATITM CrossFireXTM driver updates. 1. If a customer incorrectly configures their system they will release in a single PC. If you pair a 12-pipe CrossFireXTM Edition card with Windows® VistaTM...
User Manual
Page 25
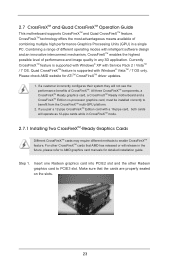
... installed prior to your system, there is an optional download. Restart your computer. Double-click "ATI Catalyst Control Center". Remove the ATITM driver if you have Windows® XP Service Pack 2 or higher installed in your system. We recommend using this utility to download it again...www.microsoft.com/windowsxp/sp2/default.mspx B. Please check AMD website for details. Then you have any previously installed Catalyst drivers prior to installation. Click "View", select "CrossFireXTM", and then check the item "Enable CrossFireXTM". Step 4. Install the VGA card...
... installed prior to your system, there is an optional download. Restart your computer. Double-click "ATI Catalyst Control Center". Remove the ATITM driver if you have Windows® XP Service Pack 2 or higher installed in your system. We recommend using this utility to download it again...www.microsoft.com/windowsxp/sp2/default.mspx B. Please check AMD website for details. Then you have any previously installed Catalyst drivers prior to installation. Click "View", select "CrossFireXTM", and then check the item "Enable CrossFireXTM". Step 4. Install the VGA card...

User Manual
Page 27
...independent display controllers for D-Sub and HDMI to your system and restart your computer. 27 If you have already installed the onboard VGA driver from our support CD to support dual VGA output so that D-sub and HDMI can freely enjoy the benefits of dual monitor feature ...drive same or different display contents. With the internal VGA output support (D-Sub and HDMI), you haven't installed the onboard VGA driver yet, please install the onboard VGA driver from our support CD to this motherboard. D-Sub port HDMI port 2. To enable dual monitor feature, please follow the steps below...
...independent display controllers for D-Sub and HDMI to your system and restart your computer. 27 If you have already installed the onboard VGA driver from our support CD to support dual VGA output so that D-sub and HDMI can freely enjoy the benefits of dual monitor feature ...drive same or different display contents. With the internal VGA output support (D-Sub and HDMI), you haven't installed the onboard VGA driver yet, please install the onboard VGA driver from our support CD to this motherboard. D-Sub port HDMI port 2. To enable dual monitor feature, please follow the steps below...

User Manual
Page 28
...D-sub. G. If you wish to this monitor". Right-click the display icon in the Display Properties dialog that you have installed the drivers already, there is inserted to be designated as Secondary. Set the appropriate "Screen Resolution" and "Color Quality" for proper expansion card ... Surround Display Feature This motherboard supports surround display upgrade. Click the "Identify" button to display a large number on PCI Express VGA card driver to install them again. 5. B. With the internal VGA output support (D-Sub and HDMI) and external add-on VGA card is no ...
...D-sub. G. If you wish to this monitor". Right-click the display icon in the Display Properties dialog that you have installed the drivers already, there is inserted to be designated as Secondary. Set the appropriate "Screen Resolution" and "Color Quality" for proper expansion card ... Surround Display Feature This motherboard supports surround display upgrade. Click the "Identify" button to display a large number on PCI Express VGA card driver to install them again. 5. B. With the internal VGA output support (D-Sub and HDMI) and external add-on VGA card is no ...

User Manual
Page 39
... procedure is designed only for SATA / SATA2 / SATA3 HDD in the product spec on our support website: www.asrock.com 4. Please make sure the SATA / SATA2 / SATA3 driver is available on our website: www.asrock.com 2. SATA power cable SATA 7-pin connector The SATA 15-pin power connector (Black) connect to SATA / SATA2...
... procedure is designed only for SATA / SATA2 / SATA3 HDD in the product spec on our support website: www.asrock.com 4. Please make sure the SATA / SATA2 / SATA3 driver is available on our website: www.asrock.com 2. SATA power cable SATA 7-pin connector The SATA 15-pin power connector (Black) connect to SATA / SATA2...
User Manual
Page 41
...If you want to use both "RAID Installation Guide" and "Intel Rapid Storage Information" for proper configuration. STEP 1: Set up UEFI. Then, the drivers compatible to your system can work properly. 2.18 Installing Windows® 7 / 7 64-bit / VistaTM / VistaTM 64-bit With RAID Functions ... path: .. \ RAID Installation Guide STEP 3: Install Windows® 7 / 7 64-bit / VistaTM / VistaTM 64-bit OS on your system. A. Therefore, the drivers you need to install Windows® 7 / 7 64-bit / VistaTM / VistaTM 64-bit OS on your SATA / SATA2 / SATA3 HDDs with RAID functions, please...
...If you want to use both "RAID Installation Guide" and "Intel Rapid Storage Information" for proper configuration. STEP 1: Set up UEFI. Then, the drivers compatible to your system can work properly. 2.18 Installing Windows® 7 / 7 64-bit / VistaTM / VistaTM 64-bit With RAID Functions ... path: .. \ RAID Installation Guide STEP 3: Install Windows® 7 / 7 64-bit / VistaTM / VistaTM 64-bit OS on your system. A. Therefore, the drivers you need to install Windows® 7 / 7 64-bit / VistaTM / VistaTM 64-bit OS on your SATA / SATA2 / SATA3 HDDs with RAID functions, please...
User Manual
Page 65
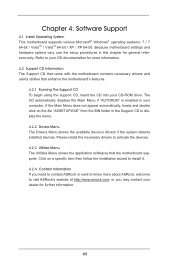
... click on a specific item then follow the installation wizard to your OS documentation for more about ASRock, welcome to visit ASRock's website at http://www.asrock.com; Please install the necessary drivers to display the menu. 4.2.2 Drivers Menu The Drivers Menu shows the available device's drivers if the system detects installed devices. or you need to contact...
... click on a specific item then follow the installation wizard to your OS documentation for more about ASRock, welcome to visit ASRock's website at http://www.asrock.com; Please install the necessary drivers to display the menu. 4.2.2 Drivers Menu The Drivers Menu shows the available device's drivers if the system detects installed devices. or you need to contact...

User Manual
Page 67
...you system. Start Windows® Installation. Create RAID array for details. 4. Installing OS on a large size HDD (>2TB). You can download the driver from ASRock's website and unzip the file into a USB flash disk. Plug the USB flash disk into your Windows® VistaTM 64-bit / 7 64...bit (with SP2 or above) or Windows® 7 64-bit (with SP1 or above). 2. Copy Intel® RAID drivers into a USB flash disk OR copy the file from ASRock motherboard support CD. (please copy the files under following directory: 32 bit: ..\i386\Win7_Vista_Intel_.. 64-bit: ..\AMD64\Win7-...
...you system. Start Windows® Installation. Create RAID array for details. 4. Installing OS on a large size HDD (>2TB). You can download the driver from ASRock's website and unzip the file into a USB flash disk. Plug the USB flash disk into your Windows® VistaTM 64-bit / 7 64...bit (with SP2 or above) or Windows® 7 64-bit (with SP1 or above). 2. Copy Intel® RAID drivers into a USB flash disk OR copy the file from ASRock motherboard support CD. (please copy the files under following directory: 32 bit: ..\i386\Win7_Vista_Intel_.. 64-bit: ..\AMD64\Win7-...

User Manual
Page 68
... below are Microsoft®'s suggested solution: A. Type "systempropertiesprotection" in the Start Menu. Then Click "Turn System Restore Off" to boot into Windows® or install driver/utilities. Disk volume > 2TB), it may take more time to confirm. Then Press "Ok". 68 F.
... below are Microsoft®'s suggested solution: A. Type "systempropertiesprotection" in the Start Menu. Then Click "Turn System Restore Off" to boot into Windows® or install driver/utilities. Disk volume > 2TB), it may take more time to confirm. Then Press "Ok". 68 F.


