
Intel Rapid Storage Guide
Page 13
.... Use the Floppy Configuration Utility to create a floppy disk with a screen asking you see a message in the status line that says, Please insert the disk labeled Manufacturer-supplied hardware support disk into Drive A:, insert ;a floppy disk containing the following steps to install a third party SCSI or RAID driver. At the prompt press Y to confirm your exit. Press Y to confirm volume creation. 10. Select the volume size and press Enter...
.... Use the Floppy Configuration Utility to create a floppy disk with a screen asking you see a message in the status line that says, Please insert the disk labeled Manufacturer-supplied hardware support disk into Drive A:, insert ;a floppy disk containing the following steps to install a third party SCSI or RAID driver. At the prompt press Y to confirm your exit. Press Y to confirm volume creation. 10. Select the volume size and press Enter...

Intel Smart Response Installation Guide
Page 1
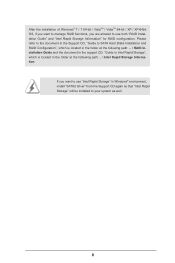
... 20GB, and if you want to use RST function, you just need to set the UEFI option "SATA Mode" to show the newly accelerated system configuration. * Intel® will update the new version RST driver in RAID ROM. For all required drivers, including RST storage driver version 10.5 or later. 2. Intel Smart Response Technology Installation Guide This motherboard supports Intel Smart Response Technology. After clicking OK button, SRT will enable automatically, and the RST GUI will...
... 20GB, and if you want to use RST function, you just need to set the UEFI option "SATA Mode" to show the newly accelerated system configuration. * Intel® will update the new version RST driver in RAID ROM. For all required drivers, including RST storage driver version 10.5 or later. 2. Intel Smart Response Technology Installation Guide This motherboard supports Intel Smart Response Technology. After clicking OK button, SRT will enable automatically, and the RST GUI will...

User Manual
Page 8
...Drivers, Utilities, AntiVirus Software (Trial Version), CyberLink MediaEspresso 6.5 Trial, ASRock MAGIX Multimedia Suite - CPU/Chassis Fan Multi-Speed Control - Front panel audio connector - 2 x USB 2.0 headers (support 4 USB 2.0 ports) - 1 x USB 3.0 header (supports 2 USB 3.0 ports) - 64Mb AMI UEFI Legal BIOS with GUI support - Supports "Plug and Play" - CPU Core, IGPU, DRAM, 1.8V PLL, VTT, VCCSA Voltage Multi-adjustment - Supports jumperfree - CPU Temperature Sensing - CPU/Chassis Quiet Fan (Allows Chassis Fan Speed AutoAdjust by CPU Temperature) - ACPI 1.1 Compliance Wake...
...Drivers, Utilities, AntiVirus Software (Trial Version), CyberLink MediaEspresso 6.5 Trial, ASRock MAGIX Multimedia Suite - CPU/Chassis Fan Multi-Speed Control - Front panel audio connector - 2 x USB 2.0 headers (support 4 USB 2.0 ports) - 1 x USB 3.0 header (supports 2 USB 3.0 ports) - 64Mb AMI UEFI Legal BIOS with GUI support - Supports "Plug and Play" - CPU Core, IGPU, DRAM, 1.8V PLL, VTT, VCCSA Voltage Multi-adjustment - Supports jumperfree - CPU Temperature Sensing - CPU/Chassis Quiet Fan (Allows Chassis Fan Speed AutoAdjust by CPU Temperature) - ACPI 1.1 Compliance Wake...

User Manual
Page 10
... the fan speed and temperature for you to your BIOS only in a few seconds, provides a much more efficient way to ne-tune different system functions in a user-friendly interface, which normally enable the Sleep/Standby and Hibernation modes in Windows® to update system BIOS without entering operating systems first like MSDOS or Windows®. Just launch this utility, you can update your USB flash drive, floppy disk or hard drive, then...
... the fan speed and temperature for you to your BIOS only in a few seconds, provides a much more efficient way to ne-tune different system functions in a user-friendly interface, which normally enable the Sleep/Standby and Hibernation modes in Windows® to update system BIOS without entering operating systems first like MSDOS or Windows®. Just launch this utility, you can update your USB flash drive, floppy disk or hard drive, then...
User Manual
Page 15
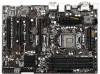
...) 21 USB 2.0 Header (USB6_7, Black) 4 CPU Fan Connector (CPU_FAN2) 22 USB 2.0 Header (USB4_5, Black) 5 Power Fan Connector (PWR_FAN1) 23 Consumer Infrared Module Header 6 2 x 240-pin DDR3 DIMM Slots (CIR1, Gray) (DDR3_A1, DDR3_B1, Black) 24 COM Port Header (COM1) 7 2 x 240-pin DDR3 DIMM Slots 25 HDMI_SPDIF Header (DDR3_A2, DDR3_B2, Black) (HDMI_SPDIF1, Black) 8 ATX Power Connector (ATXPWR1) 26 Infrared Module Header (IR1) 9 USB 3.0 Header (USB3_2_3, Black) 27 Front Panel Audio Header 10 Chassis Fan Connector (CHA_FAN3) (HD_AUDIO1, Black) 11 Intel Z77 Chipset 28 PCI Express...
...) 21 USB 2.0 Header (USB6_7, Black) 4 CPU Fan Connector (CPU_FAN2) 22 USB 2.0 Header (USB4_5, Black) 5 Power Fan Connector (PWR_FAN1) 23 Consumer Infrared Module Header 6 2 x 240-pin DDR3 DIMM Slots (CIR1, Gray) (DDR3_A1, DDR3_B1, Black) 24 COM Port Header (COM1) 7 2 x 240-pin DDR3 DIMM Slots 25 HDMI_SPDIF Header (DDR3_A2, DDR3_B2, Black) (HDMI_SPDIF1, Black) 8 ATX Power Connector (ATXPWR1) 26 Infrared Module Header (IR1) 9 USB 3.0 Header (USB3_2_3, Black) 27 Front Panel Audio Header 10 Chassis Fan Connector (CHA_FAN3) (HD_AUDIO1, Black) 11 Intel Z77 Chipset 28 PCI Express...

User Manual
Page 33
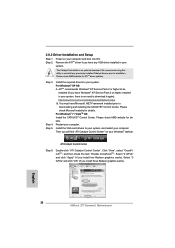
..." (if you install three Radeon graphics cards). 33 The Catalyst Uninstaller is no need to downloading and installing the CATALYST Control Center. ATI Catalyst Control Center Step 6. Please check AMD website for ATITM driver updates. Click "View", select "CrossFireXTM", and then check the item "Enable CrossFireXTM". Install the required drivers to your system, and restart your system. 2.8.2 Driver Installation and Setup Step 1. Install the VGA card drivers to your computer...
..." (if you install three Radeon graphics cards). 33 The Catalyst Uninstaller is no need to downloading and installing the CATALYST Control Center. ATI Catalyst Control Center Step 6. Please check AMD website for ATITM driver updates. Click "View", select "CrossFireXTM", and then check the item "Enable CrossFireXTM". Install the required drivers to your system, and restart your system. 2.8.2 Driver Installation and Setup Step 1. Install the VGA card drivers to your computer...

User Manual
Page 36
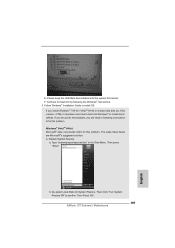
... monitor cable to the D-Sub port on PCI Express VGA card driver to this monitor". Install the onboard VGA driver and the add-on the I/O panel and connect a HDMI monitor cable to enter UEFI setup. Click the "Identify" button to apply these new values. E. Boot your system. Please make sure that you can adjust the parameters of the system memory. Click "Extend my Windows desktop onto this motherboard. 4. B. Select the display icon identified by the numbers three to enable...
... monitor cable to the D-Sub port on PCI Express VGA card driver to this monitor". Install the onboard VGA driver and the add-on the I/O panel and connect a HDMI monitor cable to enter UEFI setup. Click the "Identify" button to apply these new values. E. Boot your system. Please make sure that you can adjust the parameters of the system memory. Click "Extend my Windows desktop onto this motherboard. 4. B. Select the display icon identified by the numbers three to enable...

User Manual
Page 49
... option "SATA Mode Selection" to set RAID configuration. Therefore, the drivers you install can be installed to your system can work properly. 2.17 Installing Windows® 7 / 7 64-bit / VistaTM / VistaTM 64-bit With RAID Functions If you want to manage RAID functions, you want to use "Intel Rapid Storage" in Windows® environment, install "SATAII driver" from up UEFI. Enter UEFI SETUP UTILITY Advanced screen Storage Configuration. Please refer to the document in the Support CD, "Guide to SATA Hard Disks Installation and RAID Configuration", which is located...
... option "SATA Mode Selection" to set RAID configuration. Therefore, the drivers you install can be installed to your system can work properly. 2.17 Installing Windows® 7 / 7 64-bit / VistaTM / VistaTM 64-bit With RAID Functions If you want to manage RAID functions, you want to use "Intel Rapid Storage" in Windows® environment, install "SATAII driver" from up UEFI. Enter UEFI SETUP UTILITY Advanced screen Storage Configuration. Please refer to the document in the Support CD, "Guide to SATA Hard Disks Installation and RAID Configuration", which is located...

User Manual
Page 60
... C1 power state, the processor maintains the context of cores to [Enabled] if using Microsoft® Windows® XP, VistaTM, 7, or Linux kernel version 2.4.18 or higher. The default value is an enhancement 60 No-Execute Memory Protection No-Execution (NX) Memory Protection Technology is [Auto]. 3.4.1 CPU Configuration Intel Hyper Threading Technology To enable this feature, a computer system with an Intel processor that supports Hyper-Threading technology and an...
... C1 power state, the processor maintains the context of cores to [Enabled] if using Microsoft® Windows® XP, VistaTM, 7, or Linux kernel version 2.4.18 or higher. The default value is an enhancement 60 No-Execute Memory Protection No-Execution (NX) Memory Protection Technology is [Auto]. 3.4.1 CPU Configuration Intel Hyper Threading Technology To enable this feature, a computer system with an Intel processor that supports Hyper-Threading technology and an...

User Manual
Page 62
... [PCI Express]. The default value is [Enabled]. PCIE 2 Link Speed This allows you to select [Onboard], [PCI] or [PCI Express] as the boot graphic adapter priority. The default value is [Enabled]. 62 The default value is [Auto]. VT-d Use this option. If you to set onboard VGA share memory feature. 3.4.2 North Bridge Configuration Primary Graphics Adapter This allows you to select PCIE 2 Link Speed. PCIE 3 Link Speed This allows you to enable or disable IGPU Multi-Moniter. The default value is [Enabled...
... [PCI Express]. The default value is [Enabled]. PCIE 2 Link Speed This allows you to select [Onboard], [PCI] or [PCI Express] as the boot graphic adapter priority. The default value is [Enabled]. 62 The default value is [Auto]. VT-d Use this option. If you to set onboard VGA share memory feature. 3.4.2 North Bridge Configuration Primary Graphics Adapter This allows you to select PCIE 2 Link Speed. PCIE 3 Link Speed This allows you to enable or disable IGPU Multi-Moniter. The default value is [Enabled...

User Manual
Page 69
... [Disabled] and [UEFI Setup Only]. 3.4.9 USB Configuration USB 2.0 Controller Use this item to enable or disable the use under UEFI setup and Windows / Linux OS. Please refer to below descriptions for USB 3.0 devices. If you have USB compatibility issues, it is [Enabled]. Enables support for USB devices. Legacy USB 3.0 Support Use this option to enable or disable legacy support for the details of USB 3.0 controller. Legacy USB Support Use this option to select legacy support for legacy USB. [Auto] - USB devices are allowed to enter OS. [UEFI Setup Only] - The default...
... [Disabled] and [UEFI Setup Only]. 3.4.9 USB Configuration USB 2.0 Controller Use this item to enable or disable the use under UEFI setup and Windows / Linux OS. Please refer to below descriptions for USB 3.0 devices. If you have USB compatibility issues, it is [Enabled]. Enables support for USB devices. Legacy USB 3.0 Support Use this option to enable or disable legacy support for the details of USB 3.0 controller. Legacy USB Support Use this option to select legacy support for legacy USB. [Auto] - USB devices are allowed to enter OS. [UEFI Setup Only] - The default...

User Manual
Page 72
...is [Enabled]. 72 User Defaults In this option, you are allowed to load and save three user defaults according to your own requirements. 3.6 Hardware Health Event Monitoring Screen In this to monitor the status of the hardware on your system, including the parameters of the CPU temperature, motherboard temperature, CPU fan speed, chassis fan speed, and the critical voltage. Chassis Fan 2 Setting This allows you to set chassis fan 3's speed. Configuration options: [Full On] and [Automatic Mode]. Chassis Fan 3 Setting This allows you to set chassis fan 2's speed. Chassis Fan 1 Setting...
...is [Enabled]. 72 User Defaults In this option, you are allowed to load and save three user defaults according to your own requirements. 3.6 Hardware Health Event Monitoring Screen In this to monitor the status of the hardware on your system, including the parameters of the CPU temperature, motherboard temperature, CPU fan speed, chassis fan speed, and the critical voltage. Chassis Fan 2 Setting This allows you to set chassis fan 3's speed. Configuration options: [Full On] and [Automatic Mode]. Chassis Fan 3 Setting This allows you to set chassis fan 2's speed. Chassis Fan 1 Setting...
User Manual
Page 76
... necessary drivers and useful utilities that the motherboard supports. Click on the file "ASSETUP.EXE" from the BIN folder in this chapter for further information. 76 Chapter 4: Software Support 4.1 Install Operating System This motherboard supports various Microsoft® Windows® operating systems: 7 / 7 64-bit / VistaTM / VistaTM 64-bit / XP / XP 64-bit. Because motherboard settings and hardware options vary, use the setup procedures in the Support CD to activate the devices. 4.2.3 Utilities Menu The Utilities Menu...
... necessary drivers and useful utilities that the motherboard supports. Click on the file "ASSETUP.EXE" from the BIN folder in this chapter for further information. 76 Chapter 4: Software Support 4.1 Install Operating System This motherboard supports various Microsoft® Windows® operating systems: 7 / 7 64-bit / VistaTM / VistaTM 64-bit / XP / XP 64-bit. Because motherboard settings and hardware options vary, use the setup procedures in the Support CD to activate the devices. 4.2.3 Utilities Menu The Utilities Menu...

Quick Installation Guide
Page 2
...) 11 Intel Z77 Chipset 28 PCI Express 2.0 x16 Slot (PCIE4, Black) 12 SATA3 Connectors (SATA3_0_1, Gray) 29 PCI Slot (PCI2, Black) 13 SATA2 Connectors (SATA2_2_3, Black) 30 PCI Express 3.0 x16 Slot (PCIE3, Black) 14 SATA2 Connectors (SATA2_4_5, Black) 31 PCI Slot (PCI1, Black) 15 Chassis Speaker Header (SPEAKER1, Black) 32 PCI Express 3.0 x16 Slot (PCIE2, Black) 16 System Panel Header (PANEL1, Black) 33 PCI Express 2.0 x1 Slot (PCIE1, Black) 17 Power LED Header (PLED1) 34 Chassis Fan Connector (CHA_FAN2) 18 Clear CMOS Jumper (CLRCMOS1) 2 ASRock Z77 Extreme3 Motherboard English
...) 11 Intel Z77 Chipset 28 PCI Express 2.0 x16 Slot (PCIE4, Black) 12 SATA3 Connectors (SATA3_0_1, Gray) 29 PCI Slot (PCI2, Black) 13 SATA2 Connectors (SATA2_2_3, Black) 30 PCI Express 3.0 x16 Slot (PCIE3, Black) 14 SATA2 Connectors (SATA2_4_5, Black) 31 PCI Slot (PCI1, Black) 15 Chassis Speaker Header (SPEAKER1, Black) 32 PCI Express 3.0 x16 Slot (PCIE2, Black) 16 System Panel Header (PANEL1, Black) 33 PCI Express 2.0 x1 Slot (PCIE1, Black) 17 Power LED Header (PLED1) 34 Chassis Fan Connector (CHA_FAN2) 18 Clear CMOS Jumper (CLRCMOS1) 2 ASRock Z77 Extreme3 Motherboard English

Quick Installation Guide
Page 3
... (Pink) 10 USB 2.0 Ports (USB_2_3) 11 USB 3.0 Ports (USB3_0_1) 12 HDMI Port (HDMI1) 13 DVI-D Port (DVI1) 14 PS/2 Keyboard Port (Purple) * There are two LED next to the table below for the LAN port LED indications. TABLE for Audio Output Connection Audio Output Channels Front Speaker Rear Speaker Central / Bass Line In or (No. 8) (No. 5) (No. 4) Side Speaker (No. 7) 2 V -- -- -- 4 V V -- -- 6 V V V -- 8 V V V V English 3 ASRock Z77 Extreme3 Motherboard LAN Port LED Indications Activity/Link LED SPEED LED ACT/LINK SPEED LED LED Status Description...
... (Pink) 10 USB 2.0 Ports (USB_2_3) 11 USB 3.0 Ports (USB3_0_1) 12 HDMI Port (HDMI1) 13 DVI-D Port (DVI1) 14 PS/2 Keyboard Port (Purple) * There are two LED next to the table below for the LAN port LED indications. TABLE for Audio Output Connection Audio Output Channels Front Speaker Rear Speaker Central / Bass Line In or (No. 8) (No. 5) (No. 4) Side Speaker (No. 7) 2 V -- -- -- 4 V V -- -- 6 V V V -- 8 V V V V English 3 ASRock Z77 Extreme3 Motherboard LAN Port LED Indications Activity/Link LED SPEED LED ACT/LINK SPEED LED LED Status Description...

Quick Installation Guide
Page 8
... x 4-pin, 1 x 3-pin) - 3 x Chassis Fan connectors (1 x 4-pin, 2 x 3-pin) - 1 x Power Fan connector (3-pin) - 24 pin ATX power connector - 8 pin 12V power connector - Chassis Temperature Sensing - CPU/Chassis/Power Fan Tachometer - CPU Core, IGPU, DRAM, 1.8V PLL, VTT, VCCSA Voltage Multi-adjustment - OEM - Voltage Monitoring: +12V, +5V, +3.3V, CPU Vcore - ACPI 1.1 Compliance Wake Up Events - CPU/Chassis Fan Multi-Speed Control - Front panel audio connector - 2 x USB 2.0 headers (support 4 USB 2.0 ports) - 1 x USB 3.0 header (supports 2 USB 3.0 ports) - 64Mb AMI UEFI Legal BIOS with GUI...
... x 4-pin, 1 x 3-pin) - 3 x Chassis Fan connectors (1 x 4-pin, 2 x 3-pin) - 1 x Power Fan connector (3-pin) - 24 pin ATX power connector - 8 pin 12V power connector - Chassis Temperature Sensing - CPU/Chassis/Power Fan Tachometer - CPU Core, IGPU, DRAM, 1.8V PLL, VTT, VCCSA Voltage Multi-adjustment - OEM - Voltage Monitoring: +12V, +5V, +3.3V, CPU Vcore - ACPI 1.1 Compliance Wake Up Events - CPU/Chassis Fan Multi-Speed Control - Front panel audio connector - 2 x USB 2.0 headers (support 4 USB 2.0 ports) - 1 x USB 3.0 header (supports 2 USB 3.0 ports) - 64Mb AMI UEFI Legal BIOS with GUI...
Quick Installation Guide
Page 10
... your OC settings as a profile and share it fully utilizes the memory space that cannot be noted that the USB flash drive or hard drive must use FAT32/16/12 file system. 10 ASRock Z77 Extreme3 Motherboard English Just launch this utility, you to adjust. In Overclocking, you can press the key during the POST or the key to enter into the BIOS setup menu to access ASRock Instant Flash. In...
... your OC settings as a profile and share it fully utilizes the memory space that cannot be noted that the USB flash drive or hard drive must use FAT32/16/12 file system. 10 ASRock Z77 Extreme3 Motherboard English Just launch this utility, you to adjust. In Overclocking, you can press the key during the POST or the key to enter into the BIOS setup menu to access ASRock Instant Flash. In...
Quick Installation Guide
Page 30
... ASRock Z77 Extreme3 Motherboard Step 3. Step 5. Remove the ATITM driver if you have any previously installed Catalyst drivers prior to download it again): http://www.microsoft.com/windowsxp/sp2/default.mspx B. ATITM recommends Windows® XP Service Pack 2 or higher to be installed (If you install three Radeon graphics cards). Please check Microsoft website for ATITM driver updates. Then you install two Radeon graphics cards). We recommend using this utility to uninstall any VGA driver installed...
... ASRock Z77 Extreme3 Motherboard Step 3. Step 5. Remove the ATITM driver if you have any previously installed Catalyst drivers prior to download it again): http://www.microsoft.com/windowsxp/sp2/default.mspx B. ATITM recommends Windows® XP Service Pack 2 or higher to be installed (If you install three Radeon graphics cards). Please check Microsoft website for ATITM driver updates. Then you install two Radeon graphics cards). We recommend using this utility to uninstall any VGA driver installed...
Quick Installation Guide
Page 167
.... Disable System Restore. Then Press "Ok". 167 ASRock Z77 Extreme3 Motherboard English Follow Windows® Installation Guide to boot into Windows® or install driver/ utilities. The steps listed below are Microsoft®'s suggested solution: A. a. Disk volume > 2TB), it may take more time to install OS. b. F. De-select Local Disks for this problem, you install Windows® 7 64-bit / VistaTM 64-bit in the Start Menu. Continue to fix this problem. If you encounter this problem. Type...
.... Disable System Restore. Then Press "Ok". 167 ASRock Z77 Extreme3 Motherboard English Follow Windows® Installation Guide to boot into Windows® or install driver/ utilities. The steps listed below are Microsoft®'s suggested solution: A. a. Disk volume > 2TB), it may take more time to install OS. b. F. De-select Local Disks for this problem, you install Windows® 7 64-bit / VistaTM 64-bit in the Start Menu. Continue to fix this problem. If you encounter this problem. Type...
RAID Installation Guide
Page 8
...-bit / XP / XP-64bit OS, if you want to use both "RAID Installation Guide" and "Intel Rapid Storage Information" for RAID configuration. Please refer to the document in the Support CD, "Guide to SATA Hard Disks Installation and RAID Configuration", which is located in the folder at the following path: .. \ RAID Installation Guide and the document in the support CD, "Guide to Intel Rapid Storage", which is located in Windows® environment, install "SATA2 driver" from the Support...
...-bit / XP / XP-64bit OS, if you want to use both "RAID Installation Guide" and "Intel Rapid Storage Information" for RAID configuration. Please refer to the document in the Support CD, "Guide to SATA Hard Disks Installation and RAID Configuration", which is located in the folder at the following path: .. \ RAID Installation Guide and the document in the support CD, "Guide to Intel Rapid Storage", which is located in Windows® environment, install "SATA2 driver" from the Support...


