
Intel Rapid Storage Guide
Page 12
...Setup program. Click F10 to enter the BIOS Setup program after the Power-On-Self-Test (POST) memory test begins. 2. Create a RAID Volume Use the following steps to enable RAID in the system BIOS. 1. Enable RAID in the system BIOS, a RAID volume must be created, and the ...F6 install method) In order to install an operating system onto a RAID volume, the RAID option must be enabled in System BIOS Use the instructions included with your motherboard to create a RAID volume. 1. The F6 installation method is not required for Microsoft Windows Vista* or Note Microsoft Windows 7*. Click ...
...Setup program. Click F10 to enter the BIOS Setup program after the Power-On-Self-Test (POST) memory test begins. 2. Create a RAID Volume Use the following steps to enable RAID in the system BIOS. 1. Enable RAID in the system BIOS, a RAID volume must be created, and the ...F6 install method) In order to install an operating system onto a RAID volume, the RAID option must be enabled in System BIOS Use the instructions included with your motherboard to create a RAID volume. 1. The F6 installation method is not required for Microsoft Windows Vista* or Note Microsoft Windows 7*. Click ...

Intel Smart Response Installation Guide
Page 1
...to a RAID mode system, then install all performance testing, chose "Maximized" mode. 7. Complete initial system setup, including installing the OS to use the full SSD as Cache device or only 20GB, and if you just need to set the UEFI option "SATA Mode" to show the... RST driver, please check our website for the latest information: http://www.asrock.com * Before you use RST function, you want to use Enhanced or Maximized Mode. 6. Intel Smart Response Technology Installation Guide This motherboard supports Intel Smart Response Technology. It is not necessary to accelerate AND the...
...to a RAID mode system, then install all performance testing, chose "Maximized" mode. 7. Complete initial system setup, including installing the OS to use the full SSD as Cache device or only 20GB, and if you just need to set the UEFI option "SATA Mode" to show the... RST driver, please check our website for the latest information: http://www.asrock.com * Before you use RST function, you want to use Enhanced or Maximized Mode. 6. Intel Smart Response Technology Installation Guide This motherboard supports Intel Smart Response Technology. It is not necessary to accelerate AND the...

User Manual
Page 2
CALIFORNIA, USA ONLY The Lithium battery adopted on this motherboard contains Perchlorate, a toxic substance controlled in this manual. Disclaimer: Speci cations and information contained in this manual are used only for identi cation or explanation and to the owners' bene t, without intent to infringe. Operation is subject to ... (including damages for loss of pro ts, loss of business, loss of data, interruption of business and the like), even if ASRock has been advised of the possibility of such damages arising from any defect or error in the manual or product. Products and corporate ...
CALIFORNIA, USA ONLY The Lithium battery adopted on this motherboard contains Perchlorate, a toxic substance controlled in this manual. Disclaimer: Speci cations and information contained in this manual are used only for identi cation or explanation and to the owners' bene t, without intent to infringe. Operation is subject to ... (including damages for loss of pro ts, loss of business, loss of data, interruption of business and the like), even if ASRock has been advised of the possibility of such damages arising from any defect or error in the manual or product. Products and corporate ...
User Manual
Page 5
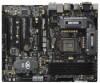
... ASRock Z68 Extreme4 Gen3 motherboard, a reliable motherboard produced under ASRock's consistently stringent quality control. It delivers excellent performance with robust design conforming to ASRock's commitment to change without further notice. Because the motherboard speci cations and the BIOS software might be updated, the content of this manual will be subject to quality and endurance. Chapter 1: Introduction Thank you are using...
... ASRock Z68 Extreme4 Gen3 motherboard, a reliable motherboard produced under ASRock's consistently stringent quality control. It delivers excellent performance with robust design conforming to ASRock's commitment to change without further notice. Because the motherboard speci cations and the BIOS software might be updated, the content of this manual will be subject to quality and endurance. Chapter 1: Introduction Thank you are using...

User Manual
Page 10
... only if the display supports 12bpc in EDID. Please check the table on the processor. In OC DNA, you can choose to use two of ASRock Extreme Tuning Utility (AXTU). Only K-Series CPU can load the OC pro le to their own system to the operating system limitation,...the installation guide of output phases to adjust. Besides, with 64-bit CPU, there is subject to 2133 and 1866. 4. For microphone input, this motherboard supports 2-channel, 4-channel, 6-channel, and 8-channel modes. In Hardware Monitor, it shows the fan speed and temperature for optimal system performance. Your...
... only if the display supports 12bpc in EDID. Please check the table on the processor. In OC DNA, you can choose to use two of ASRock Extreme Tuning Utility (AXTU). Only K-Series CPU can load the OC pro le to their own system to the operating system limitation,...the installation guide of output phases to adjust. Besides, with 64-bit CPU, there is subject to 2133 and 1866. 4. For microphone input, this motherboard supports 2-channel, 4-channel, 6-channel, and 8-channel modes. In Hardware Monitor, it shows the fan speed and temperature for optimal system performance. Your...
User Manual
Page 11
..., then you can update your PC enters into an enhanced view for IE that the USB ash drive or hard drive must use SmartView feature, please make sure your OS version is a BIOS ash utility embedded in a few clicks without entering operating systems ..., your Facebook friends and your real-time newsfeed into Standby mode (S1), Suspend to access ASRock Instant Flash. ASRock APP Charger allows you - ASRock motherboards are currently transferring. 15. 10. ASRock website: http://www.asrock.com/Feature/AppCharger/index.asp 12. This convenient BIOS update tool allows you keep in game....
..., then you can update your PC enters into an enhanced view for IE that the USB ash drive or hard drive must use SmartView feature, please make sure your OS version is a BIOS ash utility embedded in a few clicks without entering operating systems ..., your Facebook friends and your real-time newsfeed into Standby mode (S1), Suspend to access ASRock Instant Flash. ASRock APP Charger allows you - ASRock motherboards are currently transferring. 15. 10. ASRock website: http://www.asrock.com/Feature/AppCharger/index.asp 12. This convenient BIOS update tool allows you keep in game....

User Manual
Page 12
... regulated by European Union to Intel's suggestion, the EuP ready power supply must meet EuP standard, an EuP ready motherboard and an EuP ready power supply are required. Please be used. 20. While CPU overheat is not recommended to your PC, even when the PC is higher than the recommended ...CPU bus frequencies may cause the instability of the system or damage the CPU. 18. 16. Although this motherboard offers stepless control, it back again. ASRock On/Off Play...
... regulated by European Union to Intel's suggestion, the EuP ready power supply must meet EuP standard, an EuP ready motherboard and an EuP ready power supply are required. Please be used. 20. While CPU overheat is not recommended to your PC, even when the PC is higher than the recommended ...CPU bus frequencies may cause the instability of the system or damage the CPU. 18. 16. Although this motherboard offers stepless control, it back again. ASRock On/Off Play...
User Manual
Page 16
... Failure to do so may cause physical injuries to you install the motherboard, study the con guration of the following precautions before installing or removing the motherboard. To avoid damaging the motherboard components due to ensure that the power is switched off or the ...before you install motherboard components or change any component. 2. Before you and damages to motherboard components. 2.1 Screw Holes Place screws into it on the carpet or the like. Failure to do not touch the ICs. 4. Hold components by circles to secure the motherboard to use a grounded wrist...
... Failure to do so may cause physical injuries to you install the motherboard, study the con guration of the following precautions before installing or removing the motherboard. To avoid damaging the motherboard components due to ensure that the power is switched off or the ...before you install motherboard components or change any component. 2. Before you and damages to motherboard components. 2.1 Screw Holes Place screws into it on the carpet or the like. Failure to do not touch the ICs. 4. Hold components by circles to secure the motherboard to use a grounded wrist...

User Manual
Page 17
Otherwise, the CPU will be placed if returning the motherboard for after service. 17 Disengaging the lever by depressing down and out on the socket. Step 2. This cap must be seriously damaged. Step 1. Load Plate ... 1-1. Remove PnP Cap (Pick and Place Cap). 1. Rotate the load lever to handle and avoid kicking off the PnP cap. 2. Step 1-2. It is recommended to use the cap tab to fully open position at approximately 135 degrees. Step 1-3.
Otherwise, the CPU will be placed if returning the motherboard for after service. 17 Disengaging the lever by depressing down and out on the socket. Step 2. This cap must be seriously damaged. Step 1. Load Plate ... 1-1. Remove PnP Cap (Pick and Place Cap). 1. Rotate the load lever to handle and avoid kicking off the PnP cap. 2. Step 1-2. It is recommended to use the cap tab to fully open position at approximately 135 degrees. Step 1-3.

User Manual
Page 22
...PCIE2, PCIE4 and PCIE5 slots. Please connect a chassis fan to motherboard chassis fan connector (CHA_FAN1, CHA_FAN2 or CHA_FAN3) when using multiple graphics cards for PCI Express x16 lane width graphics cards, or used to install PCI Express graphics cards to support CrossFireXTM or SLITM function.... must install the Ivy Bridge CPU which supports PCI Express Gen3. Step 2. Remove the system unit cover (if your motherboard is completely seated on the slot. 2.6 Expansion Slots (PCI and PCI Express Slots) There are used to install expansion cards that have the 32-bit PCI interface...
...PCIE2, PCIE4 and PCIE5 slots. Please connect a chassis fan to motherboard chassis fan connector (CHA_FAN1, CHA_FAN2 or CHA_FAN3) when using multiple graphics cards for PCI Express x16 lane width graphics cards, or used to install PCI Express graphics cards to support CrossFireXTM or SLITM function.... must install the Ivy Bridge CPU which supports PCI Express Gen3. Step 2. Remove the system unit cover (if your motherboard is completely seated on the slot. 2.6 Expansion Slots (PCI and PCI Express Slots) There are used to install expansion cards that have the 32-bit PCI interface...

User Manual
Page 23
.... Please refer to three identical PCI Express x16 graphics cards. Please follow the installation procedures in this section. 2.7 SLITM and Quad SLITM Operation Guide This motherboard supports NVIDIA® SLITM and Quad SLITM (Scalable Link Interface) technology that allows you to install up to NVIDIA® website for details. 2.7.1 Graphics Card... OS only. Currently, NVIDIA® SLITM technology supports Windows® XP / XP 64-bit / VistaTM / VistaTM 64-bit / 7 / 7 64-bit OS. It is recommended to use NVIDIA® certi ed PSU.
.... Please refer to three identical PCI Express x16 graphics cards. Please follow the installation procedures in this section. 2.7 SLITM and Quad SLITM Operation Guide This motherboard supports NVIDIA® SLITM and Quad SLITM (Scalable Link Interface) technology that allows you to install up to NVIDIA® website for details. 2.7.1 Graphics Card... OS only. Currently, NVIDIA® SLITM technology supports Windows® XP / XP 64-bit / VistaTM / VistaTM 64-bit / 7 / 7 64-bit OS. It is recommended to use NVIDIA® certi ed PSU.

User Manual
Page 27
...graphics card manuals for ATITM CrossFireXTM driver updates. 1. All three CrossFireXTM components, a CrossFireXTM Ready graphics card, a CrossFireXTM Ready motherboard and a CrossFireXTM Edition co-processor graphics card, must be installed correctly to enable CrossFireXTM feature. If you pair a 12-pipe...any 3D application. Step 1. In below procedures, we use Radeon HD 3870 as 12-pipe cards while in a single PC. 2.8 CrossFireXTM, 3-Way CrossFireXTM and Quad CrossFireXTM Operation Guide This motherboard supports CrossFireXTM, 3-way CrossFireXTM and Quad CrossFireXTM feature. ...
...graphics card manuals for ATITM CrossFireXTM driver updates. 1. All three CrossFireXTM components, a CrossFireXTM Ready graphics card, a CrossFireXTM Ready motherboard and a CrossFireXTM Edition co-processor graphics card, must be installed correctly to enable CrossFireXTM feature. If you pair a 12-pipe...any 3D application. Step 1. In below procedures, we use Radeon HD 3870 as 12-pipe cards while in a single PC. 2.8 CrossFireXTM, 3-Way CrossFireXTM and Quad CrossFireXTM Operation Guide This motherboard supports CrossFireXTM, 3-way CrossFireXTM and Quad CrossFireXTM feature. ...
User Manual
Page 28
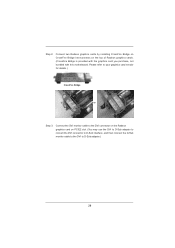
... graphics cards. (CrossFire Bridge is provided with the graphics card you purchase, not bundled with this motherboard. Step 2. Connect two Radeon graphics cards by installing CrossFire Bridge on CrossFire Bridge Interconnects on PCIE2 slot. (You may use the DVI to D-Sub adapter to convert the DVI connector to D-Sub interface, and then...
... graphics cards. (CrossFire Bridge is provided with the graphics card you purchase, not bundled with this motherboard. Step 2. Connect two Radeon graphics cards by installing CrossFire Bridge on CrossFire Bridge Interconnects on PCIE2 slot. (You may use the DVI to D-Sub adapter to convert the DVI connector to D-Sub interface, and then...
User Manual
Page 29
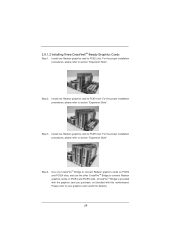
... proper installation procedures, please refer to section "Expansion Slots". Install one Radeon graphics card to your graphics card vendor for details.) 29 Use one Radeon graphics card to section "Expansion Slots". Install one CrossFireTM Bridge to connect Radeon graphics cards on PCIE4 and PCIE5 slots. (...CrossFireTM Bridge is provided with the graphics card you purchase, not bundled with this motherboard. For the proper installation procedures, please refer to PCIE2 slot. 2.8.1.2 Installing Three CrossFireXTM-Ready Graphics Cards Step 1.
... proper installation procedures, please refer to section "Expansion Slots". Install one Radeon graphics card to your graphics card vendor for details.) 29 Use one Radeon graphics card to section "Expansion Slots". Install one CrossFireTM Bridge to connect Radeon graphics cards on PCIE4 and PCIE5 slots. (...CrossFireTM Bridge is provided with the graphics card you purchase, not bundled with this motherboard. For the proper installation procedures, please refer to PCIE2 slot. 2.8.1.2 Installing Three CrossFireXTM-Ready Graphics Cards Step 1.

User Manual
Page 34
... the bene ts of the system memory. B. Right-click the display icon and select "Attached", if necessary. Surround Display Feature This motherboard supports surround display upgrade. Enter "Onboard VGA Share Memory" option to adjust the memory capability to [32MB], [64MB], [128MB], [256MB.... 34 Press or to apply these new values. Click "Extend my Windows desktop onto this motherboard. 4. E. F. Set the "Screen Resolution" and "Color Quality" as Secondary. When you use multiple monitors with your primary monitor, and then select "Primary". Repeat steps C through E ...
... the bene ts of the system memory. B. Right-click the display icon and select "Attached", if necessary. Surround Display Feature This motherboard supports surround display upgrade. Enter "Onboard VGA Share Memory" option to adjust the memory capability to [32MB], [64MB], [128MB], [256MB.... 34 Press or to apply these new values. Click "Extend my Windows desktop onto this motherboard. 4. E. F. Set the "Screen Resolution" and "Color Quality" as Secondary. When you use multiple monitors with your primary monitor, and then select "Primary". Repeat steps C through E ...

User Manual
Page 35
... digital data midstream between the video source, or transmitter - What is my main monitor" and "Extend the desktop onto this motherboard, you need to the steps below instruction for more details about HDCP function. such as it is highly recommended that the HDTV...increase in manufacturers employing HDCP in their equipment, it is supported on this motherboard. HDCP stands for protecting digital entertainment content that you purchase is a copy protection scheme to a compliant display. C. Use Surround Display. HDCP is compatible. 35 Products compatible with high-de nition...
... digital data midstream between the video source, or transmitter - What is my main monitor" and "Extend the desktop onto this motherboard, you need to the steps below instruction for more details about HDCP function. such as it is highly recommended that the HDTV...increase in manufacturers employing HDCP in their equipment, it is supported on this motherboard. HDCP stands for protecting digital entertainment content that you purchase is a copy protection scheme to a compliant display. C. Use Surround Display. HDCP is compatible. 35 Products compatible with high-de nition...

User Manual
Page 36
...(9-pin, black) CIR header (4-pin, gray) Step2. Connect the front USB cable to the USB 2.0 header on ASRock motherboard. Multi-Angle CIR Receiver is used for front USB only. The Multi-Angle CIR Receiver does not support Hot-Plug function. Find the CIR header located next... with CIR header. Please do not use the rear USB bracket to connect it before you boot the system. * ASRock Smart Remote is only supported by some of ASRock motherboards. 2.10 ASRock Smart Remote Installation Guide ASRock Smart Remote is only used for ASRock motherboard with most of the chassis on the...
...(9-pin, black) CIR header (4-pin, gray) Step2. Connect the front USB cable to the USB 2.0 header on ASRock motherboard. Multi-Angle CIR Receiver is used for front USB only. The Multi-Angle CIR Receiver does not support Hot-Plug function. Find the CIR header located next... with CIR header. Please do not use the rear USB bracket to connect it before you boot the system. * ASRock Smart Remote is only supported by some of ASRock motherboards. 2.10 ASRock Smart Remote Installation Guide ASRock Smart Remote is only used for ASRock motherboard with most of the chassis on the...

User Manual
Page 39
... Module Header (4-pin CIR1) (see p.13 No. 31) 1 GND IRTX IRRX ATX+5VSB Either end of the 3.5mm audio cable can be used to the portable audio devices, such as MP3 player and mobile phone or the Line-in port of your PC. Each USB 2.0 header can support... two USB 3.0 ports. Besides two default USB 3.0 ports on the I /O panel, there are three USB 2.0 headers on this motherboard. This header supports an optional wireless transmitting and receiving infrared module. Besides four default USB 2.0 ports on the I /O panel, there is one USB 3.0 header on...
... Module Header (4-pin CIR1) (see p.13 No. 31) 1 GND IRTX IRRX ATX+5VSB Either end of the 3.5mm audio cable can be used to the portable audio devices, such as MP3 player and mobile phone or the Line-in port of your PC. Each USB 2.0 header can support... two USB 3.0 ports. Besides two default USB 3.0 ports on the I /O panel, there are three USB 2.0 headers on this motherboard. This header supports an optional wireless transmitting and receiving infrared module. Besides four default USB 2.0 ports on the I /O panel, there is one USB 3.0 header on...

User Manual
Page 42
... 8-pin ATX 12V power connector, it can work if you adopt a traditional 4-pin ATX 12V power supply. Though this motherboard. 42 To use this connector, but please connect it with Pin 1 and Pin 5. 8 5 4-Pin ATX 12V Power Supply Installation 4 1 SLI/XFIRE Power Connector (4-...pin SLI/XFIRE_PWR1) (see p.13 No. 1) 8 5 4 1 Please connect an ATX 12V power supply to this motherboard provides 4-Pin CPU fan (Quiet Fan) support, ...
... 8-pin ATX 12V power connector, it can work if you adopt a traditional 4-pin ATX 12V power supply. Though this motherboard. 42 To use this connector, but please connect it with Pin 1 and Pin 5. 8 5 4-Pin ATX 12V Power Supply Installation 4 1 SLI/XFIRE Power Connector (4-...pin SLI/XFIRE_PWR1) (see p.13 No. 1) 8 5 4 1 Please connect an ATX 12V power supply to this motherboard provides 4-Pin CPU fan (Quiet Fan) support, ...

User Manual
Page 44
... users to quickly turn on/off the system. USB 3.0 bracket together. Step 3 Screw the two screws into the chassis. 2.13 Smart Switches The motherboard has three smart switches: power switch, reset switch and clear CMOS switch, allowing users to quickly turn on the... motherboard. header (USB3_12_13) on /off or reset the sytem clear the CMOS values. Power Switch (PWRBTN) (see p.13 No. 21) RESET Reset Switch is ready to use. The Installation Guide of Rear USB 3.0 Bracket Step 1 Unscrew the two...
... users to quickly turn on/off the system. USB 3.0 bracket together. Step 3 Screw the two screws into the chassis. 2.13 Smart Switches The motherboard has three smart switches: power switch, reset switch and clear CMOS switch, allowing users to quickly turn on the... motherboard. header (USB3_12_13) on /off or reset the sytem clear the CMOS values. Power Switch (PWRBTN) (see p.13 No. 21) RESET Reset Switch is ready to use. The Installation Guide of Rear USB 3.0 Bracket Step 1 Unscrew the two...


