User Manual
Page 1
X58 Extreme6 User Manual Version 1.0 Published August 2010 Copyright©2010 ASRock INC. All rights reserved. 1
X58 Extreme6 User Manual Version 1.0 Published August 2010 Copyright©2010 ASRock INC. All rights reserved. 1
User Manual
Page 2
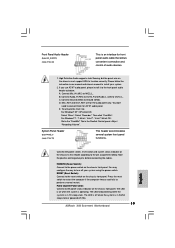
...manual, ASRock does not provide warranty of any kind, either expressed or implied, including but not limited to the implied warranties or conditions of merchantability or fitness for loss of profits, loss of business, loss of data, interruption of business and the like), even if ASRock...Material-special handling may appear in this manual. Disclaimer: Specifications and information contained in this manual are used only for any errors or omissions that may apply, see www.dtsc.ca.gov/hazardouswaste/perchlorate" ASRock Website: http://www.asrock.com 2 CALIFORNIA, USA ONLY The Lithium...
...manual, ASRock does not provide warranty of any kind, either expressed or implied, including but not limited to the implied warranties or conditions of merchantability or fitness for loss of profits, loss of business, loss of data, interruption of business and the like), even if ASRock...Material-special handling may appear in this manual. Disclaimer: Specifications and information contained in this manual are used only for any errors or omissions that may apply, see www.dtsc.ca.gov/hazardouswaste/perchlorate" ASRock Website: http://www.asrock.com 2 CALIFORNIA, USA ONLY The Lithium...
User Manual
Page 5
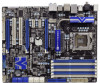
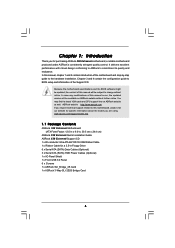
....asp 1.1 Package Contents ASRock X58 Extreme6 Motherboard (ATX Form Factor: 12.0-in x 9.6-in, 30.5 cm x 24.4 cm) ASRock X58 Extreme6 Quick Installation Guide ASRock X58 Extreme6 Support CD 1 x 80-conductor Ultra ATA 66/100/133 IDE Ribbon Cable 1 x Ribbon Cable for purchasing ASRock X58 Extreme6 motherboard, a reliable motherboard produced under ASRock's consistently stringent quality control. In case any modifications of this manual, chapter 1 and...
....asp 1.1 Package Contents ASRock X58 Extreme6 Motherboard (ATX Form Factor: 12.0-in x 9.6-in, 30.5 cm x 24.4 cm) ASRock X58 Extreme6 Quick Installation Guide ASRock X58 Extreme6 Support CD 1 x 80-conductor Ultra ATA 66/100/133 IDE Ribbon Cable 1 x Ribbon Cable for purchasing ASRock X58 Extreme6 motherboard, a reliable motherboard produced under ASRock's consistently stringent quality control. In case any modifications of this manual, chapter 1 and...
User Manual
Page 18
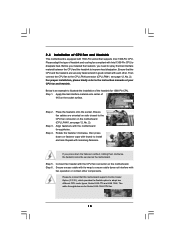
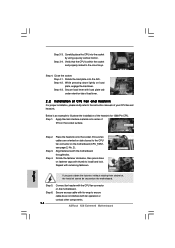
... motherboard throughholes. Ensure that the CPU and the heatsink are for 1366-Pin CPU. Step 5. Step 6. For proper installation, please kindly refer to the instruction manuals of your CPU fan and heatsink. The white throughholes are securely fastened and in good contact with fan operation or contact other . Before you installed...
... motherboard throughholes. Ensure that the CPU and the heatsink are for 1366-Pin CPU. Step 5. Step 6. For proper installation, please kindly refer to the instruction manuals of your CPU fan and heatsink. The white throughholes are securely fastened and in good contact with fan operation or contact other . Before you installed...
User Manual
Page 28
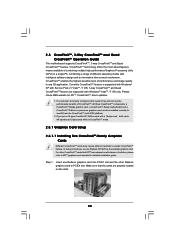
... supports CrossFireXTM, 3-way CrossFireXTM and Quad CrossFireXTM feature. Please check AMD website for detailed installation guide. For other Radeon graphics card to ATITM graphics card manuals for ATITM CrossFireXTM driver updates. 1. Combining a range of different operating modes with intelligent software design and an innovative interconnect mechanism, CrossFireXTM enables the highest possible...
... supports CrossFireXTM, 3-way CrossFireXTM and Quad CrossFireXTM feature. Please check AMD website for detailed installation guide. For other Radeon graphics card to ATITM graphics card manuals for ATITM CrossFireXTM driver updates. 1. Combining a range of different operating modes with intelligent software design and an innovative interconnect mechanism, CrossFireXTM enables the highest possible...

User Manual
Page 37
Please follow the instruction in our manual and chassis manual to install your system using the power switch. Connect Audio_R (RIN) to OUT2_R and Audio_L (LIN) to MIC2_L. D. To activate the front mic. Connect the ...
Please follow the instruction in our manual and chassis manual to install your system using the power switch. Connect Audio_R (RIN) to OUT2_R and Audio_L (LIN) to MIC2_L. D. To activate the front mic. Connect the ...

User Manual
Page 43
... control for boot strap proccessor Early CPU Init Exit Initializes the 8042 compatible Key Board Controller. Initialize BIOS, POST, Runtime data area. Verify CMOS checksum manually by reading storage area. Initialize CH-0 as mentioned in KBC port. Also, update the Kernel Variables. Early POST initialization of KB/MS using AMI KB...
... control for boot strap proccessor Early CPU Init Exit Initializes the 8042 compatible Key Board Controller. Initialize BIOS, POST, Runtime data area. Verify CMOS checksum manually by reading storage area. Initialize CH-0 as mentioned in KBC port. Also, update the Kernel Variables. Early POST initialization of KB/MS using AMI KB...
User Manual
Page 47
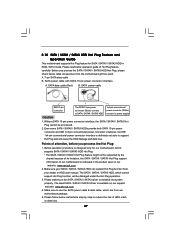
...SATA power cable with SATA 15-pin power connector interface A. Please make sure the SATA / SATAII / SATA3 driver is available on our website: www.asrock.com 2. The latest SATA / SATAII / SATA3 driver is installed into system properly. Even some SATA / SATAII / SATA3 HDDs provide both SATA 15... HDD can support Hot Plug function from our motherboard package. 5. The SATA / SATAII / SATA3 HDD, which are from your dealer or HDD user manual. Make sure to reduce the risk of attention, before you process the SATA / SATAII / SATA3 HDD Hot Plug, please check below operation guide of...
...SATA power cable with SATA 15-pin power connector interface A. Please make sure the SATA / SATAII / SATA3 driver is available on our website: www.asrock.com 2. The latest SATA / SATAII / SATA3 driver is installed into system properly. Even some SATA / SATAII / SATA3 HDDs provide both SATA 15... HDD can support Hot Plug function from our motherboard package. 5. The SATA / SATAII / SATA3 HDD, which are from your dealer or HDD user manual. Make sure to reduce the risk of attention, before you process the SATA / SATAII / SATA3 HDD Hot Plug, please check below operation guide of...

User Manual
Page 54
.... Before you apply Untied Overclocking Technology. 54 A. Set "SATAII Configuration" to [Enhanced], and then in the option "Configure SATAII as ", please set the option to [Manual]. STEP 2: Install Windows® 7 / 7 64-bit / VistaTM / VistaTM 64-bit OS on page 9 for the possible overclocking risk before you enable Untied Overclocking function, please...
.... Before you apply Untied Overclocking Technology. 54 A. Set "SATAII Configuration" to [Enhanced], and then in the option "Configure SATAII as ", please set the option to [Manual]. STEP 2: Install Windows® 7 / 7 64-bit / VistaTM / VistaTM 64-bit OS on page 9 for the possible overclocking risk before you enable Untied Overclocking function, please...
User Manual
Page 57
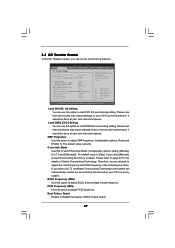
...Auto]. It should be done at your CPU and motherboard. It should be done at your own risk and expense. Configuration options: [Auto], [Manual], [I .O.T.] (Intelligent Overclocking Technology), the system will automatically enable the overclocking function when your CPU and motherboard. BCLK Frequency (MHz) Use this ... refer to page 54 for the details of Boot Failure Guard. 57 Configuration options: [Auto] and [Profile 1]. If you select [Manual], Untied Overclocking function is heavy loaded. Select Screen Select Item Enter Go to Sub Screen F1 General Help F9 Load Defaults F10 Save ...
...Auto]. It should be done at your CPU and motherboard. It should be done at your own risk and expense. Configuration options: [Auto], [Manual], [I .O.T.] (Intelligent Overclocking Technology), the system will automatically enable the overclocking function when your CPU and motherboard. BCLK Frequency (MHz) Use this ... refer to page 54 for the details of Boot Failure Guard. 57 Configuration options: [Auto] and [Profile 1]. If you select [Manual], Untied Overclocking function is heavy loaded. Select Screen Select Item Enter Go to Sub Screen F1 General Help F9 Load Defaults F10 Save ...
User Manual
Page 60
... this option, you like to select VTT Voltage. The default value is [Auto]. CPU Voltage Use this to your own requirements. 60 Configuration options: [Auto], [Manual] and [Overdrive Offset].
... this option, you like to select VTT Voltage. The default value is [Auto]. CPU Voltage Use this to your own requirements. 60 Configuration options: [Auto], [Manual] and [Overdrive Offset].
User Manual
Page 72
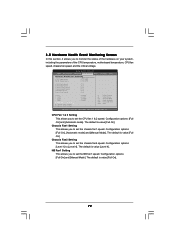
...]. The default is value [Full On]. The default is value [Level 4]. Configuration options: [Full On] and [Automatic mode]. Configuration options: [Full On], [Automatic mode] and [Manual Mode]. NB Fan1 Setting This allows you to [Level 4]. Configuration options: [Full On] and...
...]. The default is value [Full On]. The default is value [Level 4]. Configuration options: [Full On] and [Automatic mode]. Configuration options: [Full On], [Automatic mode] and [Manual Mode]. NB Fan1 Setting This allows you to [Level 4]. Configuration options: [Full On] and...

Quick Installation Guide
Page 5
...) HDD Power Cables (Optional) 1 x I/O Panel Shield 1 x Front USB 3.0 Panel 6 x Screws 1 x ASRock SLI_Bridge_2S Card 1 x ASRock 3-Way SLI-2S2S Bridge Card 5 ASRock X58 Extreme6 Motherboard English In case any modifications of this manual will be found in the user manual presented in , 30.5 cm x 24.4 cm) ASRock X58 Extreme6 Quick Installation Guide ASRock X58 Extreme6 Support CD 1 x 80-conductor Ultra ATA 66/100/133 IDE...
...) HDD Power Cables (Optional) 1 x I/O Panel Shield 1 x Front USB 3.0 Panel 6 x Screws 1 x ASRock SLI_Bridge_2S Card 1 x ASRock 3-Way SLI-2S2S Bridge Card 5 ASRock X58 Extreme6 Motherboard English In case any modifications of this manual will be found in the user manual presented in , 30.5 cm x 24.4 cm) ASRock X58 Extreme6 Quick Installation Guide ASRock X58 Extreme6 Support CD 1 x 80-conductor Ultra ATA 66/100/133 IDE...
Quick Installation Guide
Page 9
...asrock.com 7. ASRock Instant Flash is a BIOS flash utility embedded in the BIOS, applying Untied Overclocking Technology, or using the thirdparty overclocking tools. This convenient BIOS update tool allows you can press key during the POST or press key to BIOS setup menu to the components and devices of "User Manual... to your system stability, or even cause damage to access ASRock Instant Flash. Overclocking may be noted that the USB flash drive or hard drive must use FAT32/16/12 file system. 9 ASRock X58 Extreme6 Motherboard English It should be done at your hardware devices to...
...asrock.com 7. ASRock Instant Flash is a BIOS flash utility embedded in the BIOS, applying Untied Overclocking Technology, or using the thirdparty overclocking tools. This convenient BIOS update tool allows you can press key during the POST or press key to BIOS setup menu to the components and devices of "User Manual... to your system stability, or even cause damage to access ASRock Instant Flash. Overclocking may be noted that the USB flash drive or hard drive must use FAT32/16/12 file system. 9 ASRock X58 Extreme6 Motherboard English It should be done at your hardware devices to...
Quick Installation Guide
Page 14
... installation of the heatsink for 1366-Pin CPU. Step 6. 14 Connect fan header with the CPU fan connector on the motherboard (CPU_FAN1, see page 2, No. 2). ASRock X58 Extreme6 Motherboard Close the socket: Step 4-1. Place the heatsink onto the socket. Verify that the CPU is an example to the CPU fan connector on the... kindly refer to the orient keys. Step 3-4. Rotate the load plate onto the IHS. Below is within the socket and properly mated to the instruction manuals of IHS on fastener caps with the motherboard throughholes.
... installation of the heatsink for 1366-Pin CPU. Step 6. 14 Connect fan header with the CPU fan connector on the motherboard (CPU_FAN1, see page 2, No. 2). ASRock X58 Extreme6 Motherboard Close the socket: Step 4-1. Place the heatsink onto the socket. Verify that the CPU is an example to the CPU fan connector on the... kindly refer to the orient keys. Step 3-4. Rotate the load plate onto the IHS. Below is within the socket and properly mated to the instruction manuals of IHS on fastener caps with the motherboard throughholes.

Quick Installation Guide
Page 24
... and Quad CrossFireXTM feature are properly seated on the slots. 24 ASRock X58 Extreme6 Motherboard English All three CrossFireXTM components, a CrossFireXTM Ready graphics card, a CrossFireXTM Ready motherboard and a CrossFireXTM Edition co-processor graphics card, must be installed correctly to ATITM graphics card manuals for ATITM CrossFireXTM driver updates. 1. Insert one Radeon graphics card into...
... and Quad CrossFireXTM feature are properly seated on the slots. 24 ASRock X58 Extreme6 Motherboard English All three CrossFireXTM components, a CrossFireXTM Ready graphics card, a CrossFireXTM Ready motherboard and a CrossFireXTM Edition co-processor graphics card, must be installed correctly to ATITM graphics card manuals for ATITM CrossFireXTM driver updates. 1. Insert one Radeon graphics card into...
Quick Installation Guide
Page 33
...Mic_IN (MIC) to perform a normal restart. E. System Panel Header (9-pin PANEL1) (see p.2 No. 33) This is in our manual and chassis manual to install your system using the power switch. You may configure the way to the "FrontMic" Tab in S1 sleep state. High ...panel. B. C. To activate the front mic. For Windows® 7 / 7 64-bit / VistaTM / VistaTM 64-bit OS: Go to turn off (S5). 33 ASRock X58 Extreme6 Motherboard You don't need to function correctly. For Windows® XP / XP 64-bit OS: Select "Mixer". Adjust "Recording Volume". Press the reset switch to...
...Mic_IN (MIC) to perform a normal restart. E. System Panel Header (9-pin PANEL1) (see p.2 No. 33) This is in our manual and chassis manual to install your system using the power switch. You may configure the way to the "FrontMic" Tab in S1 sleep state. High ...panel. B. C. To activate the front mic. For Windows® 7 / 7 64-bit / VistaTM / VistaTM 64-bit OS: Go to turn off (S5). 33 ASRock X58 Extreme6 Motherboard You don't need to function correctly. For Windows® XP / XP 64-bit OS: Select "Mixer". Adjust "Recording Volume". Press the reset switch to...

Quick Installation Guide
Page 39
...- Also, update the Kernel Variables. Initialize language and font modules for ADM module and uncompress it. Activate ADM module. 39 ASRock X58 Extreme6 Motherboard English The BAT test is being done on KBC. Program the keyboard controller command byte is being done after Auto detection ... devices. Allocate memory for ADM. Initialized CMOS as system timer. Install the POSTINT1Ch handler. Initializes different devices. Verify CMOS checksum manually by reading storage area. Do R/W test to ADM module for EGA, and DMA controllers. Init Local APIC Set up boot strap...
...- Also, update the Kernel Variables. Initialize language and font modules for ADM module and uncompress it. Activate ADM module. 39 ASRock X58 Extreme6 Motherboard English The BAT test is being done on KBC. Program the keyboard controller command byte is being done after Auto detection ... devices. Allocate memory for ADM. Initialized CMOS as system timer. Install the POSTINT1Ch handler. Initializes different devices. Verify CMOS checksum manually by reading storage area. Do R/W test to ADM module for EGA, and DMA controllers. Init Local APIC Set up boot strap...
Quick Installation Guide
Page 42
...screen Storage Configuration. Using SATA / SATAII HDDs with NCQ function STEP 1: Set Up BIOS. Before you apply Untied Overclocking Technology. 42 ASRock X58 Extreme6 Motherboard English Using SATA / SATAII HDDs without RAID functions, please follow below steps. B. Set "SATAII Configuration" to [Enhanced], and... selection from [Auto] to the warning on your SATA / SATAII HDDs without NCQ function STEP 1: Set up BIOS. A. A. Please refer to [Manual]. STEP 2: Install Windows® 7 / 7 64-bit / VistaTM / VistaTM 64-bit OS on page 9 for the possible overclocking risk before ...
...screen Storage Configuration. Using SATA / SATAII HDDs with NCQ function STEP 1: Set Up BIOS. Before you apply Untied Overclocking Technology. 42 ASRock X58 Extreme6 Motherboard English Using SATA / SATAII HDDs without RAID functions, please follow below steps. B. Set "SATAII Configuration" to [Enhanced], and... selection from [Auto] to the warning on your SATA / SATAII HDDs without NCQ function STEP 1: Set up BIOS. A. A. Please refer to [Manual]. STEP 2: Install Windows® 7 / 7 64-bit / VistaTM / VistaTM 64-bit OS on page 9 for the possible overclocking risk before ...
Quick Installation Guide
Page 43
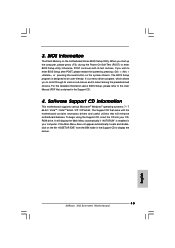
...friendly. It is designed to select among the predetermined choices. For the detailed information about BIOS Setup, please refer to the User Manual (PDF file) contained in the Support CD to enter BIOS Setup utility; To begin using the Support CD, insert the CD... menu-driven program, which allows you start up the computer, please press during the Power-On-Self-Test (POST) to display the menus. 43 ASRock X58 Extreme6 Motherboard English Software Support CD information This motherboard supports various Microsoft® Windows® operating systems: 7 / 7 64-bit / VistaTM / VistaTM 64...
...friendly. It is designed to select among the predetermined choices. For the detailed information about BIOS Setup, please refer to the User Manual (PDF file) contained in the Support CD to enter BIOS Setup utility; To begin using the Support CD, insert the CD... menu-driven program, which allows you start up the computer, please press during the Power-On-Self-Test (POST) to display the menus. 43 ASRock X58 Extreme6 Motherboard English Software Support CD information This motherboard supports various Microsoft® Windows® operating systems: 7 / 7 64-bit / VistaTM / VistaTM 64...
