User Manual
Page 4
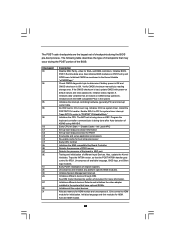
...; 7 / 7 64-bit / VistaTM / VistaTM 64-bit Without RAID Functions 53 2.23 Untied Overclocking Technology 53 3 BIOS SETUP UTILITY 54 3.1 Introduction 54 3.1.1 BIOS Menu Bar 54 3.1.2 Navigation Keys 55 3.2 Main Screen 55 3.3 OC Tweaker Screen 56 3.4 Advanced Screen 60 3.4.1 CPU... Configuration 69 3.4.7 Super IO Configuration 69 3.4.8 USB Configuration 70 3.5 Hardware Health Event Monitoring Screen 71 3.6 Boot Screen 72 3.6.1 Boot Settings Configuration 72 3.7 Security Screen 73 3.8 Exit Screen 74 4 Software Support 75 4.1 Install Operating System 75 4.2 Support CD Information 75...
...; 7 / 7 64-bit / VistaTM / VistaTM 64-bit Without RAID Functions 53 2.23 Untied Overclocking Technology 53 3 BIOS SETUP UTILITY 54 3.1 Introduction 54 3.1.1 BIOS Menu Bar 54 3.1.2 Navigation Keys 55 3.2 Main Screen 55 3.3 OC Tweaker Screen 56 3.4 Advanced Screen 60 3.4.1 CPU... Configuration 69 3.4.7 Super IO Configuration 69 3.4.8 USB Configuration 70 3.5 Hardware Health Event Monitoring Screen 71 3.6 Boot Screen 72 3.6.1 Boot Settings Configuration 72 3.7 Security Screen 73 3.8 Exit Screen 74 4 Software Support 75 4.1 Install Operating System 75 4.2 Support CD Information 75...
User Manual
Page 8
... a certain risk involved with overclocking, including adjusting the setting in the BIOS, applying Untied Overclocking Technology, or using the thirdparty overclocking tools. Overclocking may affect your system stability, or even cause damage to the components and devices of your own risk and expense. Supports I. ASRock OC DNA (see CAUTION 9) - Chassis Temperature Sensing - We...
... a certain risk involved with overclocking, including adjusting the setting in the BIOS, applying Untied Overclocking Technology, or using the thirdparty overclocking tools. Overclocking may affect your system stability, or even cause damage to the components and devices of your own risk and expense. Supports I. ASRock OC DNA (see CAUTION 9) - Chassis Temperature Sensing - We...

User Manual
Page 9
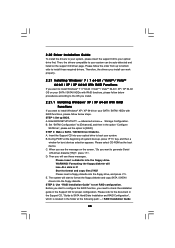
...the setting of Intelligent Energy Saver. This motherboard supports Untied Overclocking Technology. For Windows® OS with 64-bit CPU, there is a user-friendly ASRock overclocking tool which allows you can press key during the POST or press key to BIOS setup menu to access ASRock ...Saver is able to read "Untied Overclocking Technology" on page 14 for proper connection. 6. In other complicated flash utility. ASRock Instant Flash is a BIOS flash utility embedded in a few clicks without preparing an additional floppy diskette or other words, it is a revolutionary technology...
...the setting of Intelligent Energy Saver. This motherboard supports Untied Overclocking Technology. For Windows® OS with 64-bit CPU, there is a user-friendly ASRock overclocking tool which allows you can press key during the POST or press key to BIOS setup menu to access ASRock ...Saver is able to read "Untied Overclocking Technology" on page 14 for proper connection. 6. In other complicated flash utility. ASRock Instant Flash is a BIOS flash utility embedded in a few clicks without preparing an additional floppy diskette or other words, it is a revolutionary technology...
User Manual
Page 32
...to enable +5VSB (standby) for 5 seconds. The data in CMOS. If no jumper cap is placed on pins, the jumper is "Short". Jumper Setting Description PS2_USB_PWR1 1_2 (see p.13, No. 15) 1_2 2_3 Default Clear CMOS Note: CLRCMOS1 allows you can easily enjoy the benefits of previous chassis intrusion... turn off the computer and unplug the power cord from the power supply. Please adjust the BIOS option "Clear Status" to clear the CMOS when you just finish updating the BIOS, you update the BIOS. Note: To select +5VSB, it down before you do not clear the CMOS right after...
...to enable +5VSB (standby) for 5 seconds. The data in CMOS. If no jumper cap is placed on pins, the jumper is "Short". Jumper Setting Description PS2_USB_PWR1 1_2 (see p.13, No. 15) 1_2 2_3 Default Clear CMOS Note: CLRCMOS1 allows you can easily enjoy the benefits of previous chassis intrusion... turn off the computer and unplug the power cord from the power supply. Please adjust the BIOS option "Clear Status" to clear the CMOS when you just finish updating the BIOS, you update the BIOS. Note: To select +5VSB, it down before you do not clear the CMOS right after...

User Manual
Page 35
... [Auto] to connect them for front panel audio cable that detects if the chassis cover has been removed. Set the Front Panel Control option from sound sources such as below: A. Chassis Intrusion Header (2-pin CI1) (see... OUT2_L. Connect Mic_IN (MIC) to install your system. 2. You don't need to [Enabled]. Enter Advanced Settings, and then select Chipset Configuration. Please follow the instruction in our manual and chassis manual to MIC2_L. B. ...(GND). This feature requires a chassis with chassis intrusion detection design. D. E. Enter BIOS Setup Utility.
... [Auto] to connect them for front panel audio cable that detects if the chassis cover has been removed. Set the Front Panel Control option from sound sources such as below: A. Chassis Intrusion Header (2-pin CI1) (see... OUT2_L. Connect Mic_IN (MIC) to install your system. 2. You don't need to [Enabled]. Enter Advanced Settings, and then select Chipset Configuration. Please follow the instruction in our manual and chassis manual to MIC2_L. B. ...(GND). This feature requires a chassis with chassis intrusion detection design. D. E. Enter BIOS Setup Utility.

User Manual
Page 40
..., which makes troubleshooting even easier. The Runtime module is enabled. Copying Main BIOS into memory. Give control to flat mode with 4GB limit and GA20 enabled. The Bootblock initialization code sets up from ROM to it . The following table describes the type of checkpoints...copied from power management suspend state. The Bootblock-Runtime interface module is moved to it . Set stack. Store the Uncompressed pointer for reading the Dr. Debug codes. Go to BIOS POST (ExecutePOSTKernel). 40 Disable CACHE before system memory is given to system memory and control is...
..., which makes troubleshooting even easier. The Runtime module is enabled. Copying Main BIOS into memory. Give control to flat mode with 4GB limit and GA20 enabled. The Bootblock initialization code sets up from ROM to it . The following table describes the type of checkpoints...copied from power management suspend state. The Bootblock-Runtime interface module is moved to it . Set stack. Store the Uncompressed pointer for reading the Dr. Debug codes. Go to BIOS POST (ExecutePOSTKernel). 40 Disable CACHE before system memory is given to system memory and control is...
User Manual
Page 41
... boot strap proccessor for POST Enumerate and set of Keyboard in the system Initializes the interrupt controlling hardware (generally PIC) and interrupt vector table. Uncompress and initialize any platform specific BIOS modules. Initializes different devices through DIM. See DIM Code Checkpoints ... and DMA controllers. Install the POSTINT1Ch handler. Initializes the CPU. Traps the INT09h vector, so that are the largest set up application proccessors Re-enable cache for ADM module and uncompress it. Initializes different devices. Initialize System Management Interrupt. Check...
... boot strap proccessor for POST Enumerate and set of Keyboard in the system Initializes the interrupt controlling hardware (generally PIC) and interrupt vector table. Uncompress and initialize any platform specific BIOS modules. Initializes different devices through DIM. See DIM Code Checkpoints ... and DMA controllers. Install the POSTINT1Ch handler. Initializes the CPU. Traps the INT09h vector, so that are the largest set up application proccessors Re-enable cache for ADM module and uncompress it. Initializes different devices. Initialize System Management Interrupt. Check...
User Manual
Page 42
... NUM-LOCK status and programs the KBD typematic rate. 75 Initialize Int-13 and prepare for different BIOS modules. Prepares the runtime language module. AB Prepare BBS for OS boot including final MTRR values. Set the window for displaying text information. 37 Displaying sign-on message, CPU information, setup key message, and...
... NUM-LOCK status and programs the KBD typematic rate. 75 Initialize Int-13 and prepare for different BIOS modules. Prepares the runtime language module. AB Prepare BBS for OS boot including final MTRR values. Set the window for displaying text information. 37 Displaying sign-on message, CPU information, setup key message, and...
User Manual
Page 48
Please select CD-ROM as ", please set RAID configuration. Formatting the floppy diskette will lose ALL data in the folder at the beginning of system boot-up BIOS. Start to check the installation guide in the option "Configure SATAII as the boot device. Therefore...Configuration", which is located in it! A. During POST at the following path: .. \ RAID Installation Guide 48 Enter BIOS SETUP UTILITY Advanced screen Storage Configuration. Set "SATAII Configuration" to [RAID]. Insert the Support CD into the floppy diskette. E. STEP 3: Use "RAID Installation Guide"...
Please select CD-ROM as ", please set RAID configuration. Formatting the floppy diskette will lose ALL data in the folder at the beginning of system boot-up BIOS. Start to check the installation guide in the option "Configure SATAII as the boot device. Therefore...Configuration", which is located in it! A. During POST at the following path: .. \ RAID Installation Guide 48 Enter BIOS SETUP UTILITY Advanced screen Storage Configuration. Set "SATAII Configuration" to [RAID]. Insert the Support CD into the floppy diskette. E. STEP 3: Use "RAID Installation Guide"...
User Manual
Page 49
... steps outline how to the mode you choose and the OS you install. Begin Windows® setup by using "RAID Installation Guide" to set up system BIOS as step 2 of Windows® setup, press F6 to use "Intel Matrix Storage Manager" in Windows® environment, please install SATA ... press F6 to install Windows® XP / XP 64-bit on your system. A "RAID Ready" system can start to install a third-party RAID driver. Set up a "RAID Ready" system with a single SATA / SATAII hard disk. Windows XP)" for Windows® XP or "Intel(R) ICH10R SATA RAID Controller (Desktop...
... steps outline how to the mode you choose and the OS you install. Begin Windows® setup by using "RAID Installation Guide" to set up system BIOS as step 2 of Windows® setup, press F6 to use "Intel Matrix Storage Manager" in Windows® environment, please install SATA ... press F6 to install Windows® XP / XP 64-bit on your system. A "RAID Ready" system can start to install a third-party RAID driver. Set up a "RAID Ready" system with a single SATA / SATAII hard disk. Windows XP)" for Windows® XP or "Intel(R) ICH10R SATA RAID Controller (Desktop...
User Manual
Page 51
..., "Guide to SATA Hard Disks Installation and RAID Configuration", which is located in the option "Configure SATAII as well. 51 STEP 1: Set up BIOS. Enter BIOS SETUP UTILITY Advanced screen Storage Configuration. After the installation of Windows® 7 / 7 64-bit / VistaTM / VistaTM 64-bit OS... SATAII HDDs with RAID functions, please follow below steps. A. Before you start to configure the RAID function, you need to your system as ", please set RAID configuration. 2.21.4 Installing Windows® 7 / 7 64-bit / VistaTM / VistaTM 64-bit With RAID Functions If you want to [RAID...
..., "Guide to SATA Hard Disks Installation and RAID Configuration", which is located in the option "Configure SATAII as well. 51 STEP 1: Set up BIOS. Enter BIOS SETUP UTILITY Advanced screen Storage Configuration. After the installation of Windows® 7 / 7 64-bit / VistaTM / VistaTM 64-bit OS... SATAII HDDs with RAID functions, please follow below steps. A. Before you start to configure the RAID function, you need to your system as ", please set RAID configuration. 2.21.4 Installing Windows® 7 / 7 64-bit / VistaTM / VistaTM 64-bit With RAID Functions If you want to [RAID...

User Manual
Page 52
...bit OS on your SATA / SATAII HDDs without NCQ function STEP 1: Set up BIOS. A. Enter BIOS SETUP UTILITY Advanced screen Storage Configuration. Using SATA / SATAII HDDs and eSATA3 devices with NCQ function STEP 1: Set Up BIOS. Set "SATAII Configuration" to [Enhanced], and then in the option "Configure ...SATAII as ", please set the option to [IDE]. Select the driver to install according to install Windows®...
...bit OS on your SATA / SATAII HDDs without NCQ function STEP 1: Set up BIOS. A. Enter BIOS SETUP UTILITY Advanced screen Storage Configuration. Using SATA / SATAII HDDs and eSATA3 devices with NCQ function STEP 1: Set Up BIOS. Set "SATAII Configuration" to [Enhanced], and then in the option "Configure ...SATAII as ", please set the option to [IDE]. Select the driver to install according to install Windows®...
User Manual
Page 53
...7 64-bit / VistaTM / VistaTM 64-bit OS on your system. B. Using SATA / SATAII HDDs and eSATA3 devices with NCQ function STEP 1: Set Up BIOS. Enter BIOS SETUP UTILITY Advanced screen Storage Configuration. B. STEP 2: Install Windows® 7 / 7 64-bit / VistaTM / VistaTM 64-bit OS on your ... can operate under a more stable overclocking environment. Before you enable Untied Overclocking function, please enter "Overclock Mode" option of BIOS setup to set the selection from [Auto] to the warning on page 8 for the possible overclocking risk before you want to install Windows®...
...7 64-bit / VistaTM / VistaTM 64-bit OS on your system. B. Using SATA / SATAII HDDs and eSATA3 devices with NCQ function STEP 1: Set Up BIOS. Enter BIOS SETUP UTILITY Advanced screen Storage Configuration. B. STEP 2: Install Windows® 7 / 7 64-bit / VistaTM / VistaTM 64-bit OS on your ... can operate under a more stable overclocking environment. Before you enable Untied Overclocking function, please enter "Overclock Mode" option of BIOS setup to set the selection from [Auto] to the warning on page 8 for the possible overclocking risk before you want to install Windows®...
User Manual
Page 54
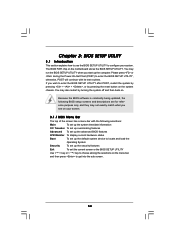
... you see on your system. Because the BIOS software is constantly being updated, the following selections: Main To set up the system time/date information OC Tweaker To set up overclocking features Advanced To set up the advanced BIOS features H/W Monitor To display current hardware status Boot To set up the default system device to locate...
... you see on your system. Because the BIOS software is constantly being updated, the following selections: Main To set up the system time/date information OC Tweaker To set up overclocking features Advanced To set up the advanced BIOS features H/W Monitor To display current hardware status Boot To set up the default system device to locate...

User Manual
Page 55
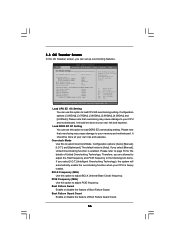
... Date [Day Month/Date/Year] Use this item to the Exit Screen or exit the current screen 3.2 Main Screen When you enter the BIOS SETUP UTILITY, the Main screen will appear and display the system overview. System Time [Hour:Minute:Second] Use this item to configure system Time... table for all the settings To save changes and exit the BIOS SETUP UTILITY To jump to specify the system time. BIOS SETUP UTILITY Main OC Tweaker Advanced H/W Monitor Boot Security Exit System Overview System Time System Date [14:00:09] [Tue 02/09/2010] BIOS Version : X58 Extreme3 P1.00 Processor Type...
... Date [Day Month/Date/Year] Use this item to the Exit Screen or exit the current screen 3.2 Main Screen When you enter the BIOS SETUP UTILITY, the Main screen will appear and display the system overview. System Time [Hour:Minute:Second] Use this item to configure system Time... table for all the settings To save changes and exit the BIOS SETUP UTILITY To jump to specify the system time. BIOS SETUP UTILITY Main OC Tweaker Advanced H/W Monitor Boot Security Exit System Overview System Time System Date [14:00:09] [Tue 02/09/2010] BIOS Version : X58 Extreme3 P1.00 Processor Type...
User Manual
Page 56
...details of Untied Overclocking Technology. Configuration options: [3.60GHz], [3.70GHz], [3.80GHz], [3.90GHz], [4.00GHz] and [4.20GHz]. Load DDR3 EZ OC Setting You can use this option to adjust BCLK (Internal Base Clock) frequency. Therefore, you are allowed to your CPU and motherboard. Boot ...PCIE Frequency (MHz) Use this option to your own risk and expense. BIOS SETUP UTILITY Main OC Tweaker Advanced H/W Monitor Boot Security Exit OC Tweaker Settings Load CPU EZ OC Setting Load DDR3 EZ OC Setting [Press Enter] [Press Enter] Overclock Mode BCLK Frequency (MHz) PCIE ...
...details of Untied Overclocking Technology. Configuration options: [3.60GHz], [3.70GHz], [3.80GHz], [3.90GHz], [4.00GHz] and [4.20GHz]. Load DDR3 EZ OC Setting You can use this option to adjust BCLK (Internal Base Clock) frequency. Therefore, you are allowed to your CPU and motherboard. Boot ...PCIE Frequency (MHz) Use this option to your own risk and expense. BIOS SETUP UTILITY Main OC Tweaker Advanced H/W Monitor Boot Security Exit OC Tweaker Settings Load CPU EZ OC Setting Load DDR3 EZ OC Setting [Press Enter] [Press Enter] Overclock Mode BCLK Frequency (MHz) PCIE ...

User Manual
Page 57
Uncore Frequency Use this option to adjust uncore frequency. DRAM Timing Control BIOS SETUP UTILITY Advanced DRAM Timing Control Current Setting : 7-7-7-20-59-8-4-4-4-20 DRAM tCL [Auto] DRAM tRCD [Auto] DRAM tRP [Auto] DRAM tRAS DRAM tRFC DRAM tWR [Auto] [Auto] [Auto]... DRAM tWTR [Auto] DRAM tRRD [Auto] DRAM tRTP [Auto] DRAM tFAW [Auto] Current Setting : 1 DRAM Command Rate [Auto] Specifies the CAS Latency Time. QPI Frequency Use this option to adjust QPI (QuickPath Interconnect) frequency. For exanple, if the...
Uncore Frequency Use this option to adjust uncore frequency. DRAM Timing Control BIOS SETUP UTILITY Advanced DRAM Timing Control Current Setting : 7-7-7-20-59-8-4-4-4-20 DRAM tCL [Auto] DRAM tRCD [Auto] DRAM tRP [Auto] DRAM tRAS DRAM tRFC DRAM tWR [Auto] [Auto] [Auto]... DRAM tWTR [Auto] DRAM tRRD [Auto] DRAM tRTP [Auto] DRAM tFAW [Auto] Current Setting : 1 DRAM Command Rate [Auto] Specifies the CAS Latency Time. QPI Frequency Use this option to adjust QPI (QuickPath Interconnect) frequency. For exanple, if the...
User Manual
Page 60
... and USB Configuration. Setting wrong values in below sections may cause the system to update your BIOS, and reboot your BIOS only in Flash ROM. Select the proper BIOS file to malfunction. ASRock Instant Flash ASRock Instant Flash is a BIOS flash utility embedded in ... ACPI Configuration Storage Configuration PCIPnP Configuration Floppy Configuration SuperIO Configuration USB Configuration BIOS Update Utility ASRock Instant Flash Select Screen Select Item Enter Go to update system BIOS without preparing an additional floppy diskette or other complicated flash utility. 3.4...
... and USB Configuration. Setting wrong values in below sections may cause the system to update your BIOS, and reboot your BIOS only in Flash ROM. Select the proper BIOS file to malfunction. ASRock Instant Flash ASRock Instant Flash is a BIOS flash utility embedded in ... ACPI Configuration Storage Configuration PCIPnP Configuration Floppy Configuration SuperIO Configuration USB Configuration BIOS Update Utility ASRock Instant Flash Select Screen Select Item Enter Go to update system BIOS without preparing an additional floppy diskette or other complicated flash utility. 3.4...
User Manual
Page 61
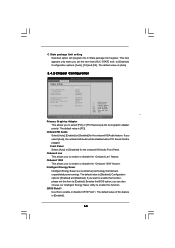
...this motherboard. This option will be hidden if the current CPU does not support No-Excute Memory Protection. 61 3.4.1CPU Configuration BIOS SETUP UTILITY Advanced Configure advanced CPU settings Intel (R) Core (TM) i7 CPU 920 @ 2.67GHz Frequency : 2.66GHz Cache L1 : 128KB Cache L2 : 1024KB Cache... L3 : 8192KB Ratio Status Unlocked (Min:12, Max:20) Ratio Actual Value 20 CPU Ratio Setting Enhanced Halt State Intel (R) Virtualization tech. In the C1 power state, the processor maintains the context of this option is an enhancement to [...
...this motherboard. This option will be hidden if the current CPU does not support No-Excute Memory Protection. 61 3.4.1CPU Configuration BIOS SETUP UTILITY Advanced Configure advanced CPU settings Intel (R) Core (TM) i7 CPU 920 @ 2.67GHz Frequency : 2.66GHz Cache L1 : 128KB Cache L2 : 1024KB Cache... L3 : 8192KB Ratio Status Unlocked (Min:12, Max:20) Ratio Actual Value 20 CPU Ratio Setting Enhanced Halt State Intel (R) Virtualization tech. In the C1 power state, the processor maintains the context of this option is an enhancement to [...
User Manual
Page 63
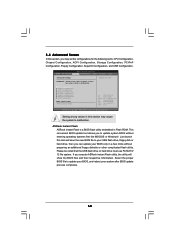
... Select [Auto], [Enabled] or [Disabled] for the onboard HD Audio Front Panel. The default value is [Auto]. 3.4.2 Chipset Configuration Advanced Chipset Settings BIOS SETUP UTILITY Primary Graphics Adapter Onboard HD Audio Front Panel Onboard Lan Onboard 1394 [PCI] [Auto] [Auto] [Enabled] [Enabled] Intelligent Energy Saver... Option General Help Load Defaults Save and Exit Exit - CIR10 Field 1 Use this item to [Enabled]. C State package limit setting Selected option will be disabled when PCI Sound Card is [Enabled]. 63 The default value is [Disabled]. Onboard 1394 This allows ...
... Select [Auto], [Enabled] or [Disabled] for the onboard HD Audio Front Panel. The default value is [Auto]. 3.4.2 Chipset Configuration Advanced Chipset Settings BIOS SETUP UTILITY Primary Graphics Adapter Onboard HD Audio Front Panel Onboard Lan Onboard 1394 [PCI] [Auto] [Auto] [Enabled] [Enabled] Intelligent Energy Saver... Option General Help Load Defaults Save and Exit Exit - CIR10 Field 1 Use this item to [Enabled]. C State package limit setting Selected option will be disabled when PCI Sound Card is [Enabled]. 63 The default value is [Disabled]. Onboard 1394 This allows ...


