User Manual
Page 5
... to change without further notice. Chapter 3 and 4 contain the configuration guide to quality and endurance. ASRock website http://www.asrock.com If you for a 3.5-in , 30.5 cm x 24.4 cm) ASRock X58 Extreme Quick Installation Guide ASRock X58 Extreme Support CD... 1 x 80-conductor Ultra ATA 66/100/133 IDE Ribbon Cable 1 x Ribbon Cable for purchasing ASRock X58 Extreme motherboard, a reliable motherboard produced under ASRock's consistently stringent quality control. Because the motherboard specifications and the BIOS...
... to change without further notice. Chapter 3 and 4 contain the configuration guide to quality and endurance. ASRock website http://www.asrock.com If you for a 3.5-in , 30.5 cm x 24.4 cm) ASRock X58 Extreme Quick Installation Guide ASRock X58 Extreme Support CD... 1 x 80-conductor Ultra ATA 66/100/133 IDE Ribbon Cable 1 x Ribbon Cable for purchasing ASRock X58 Extreme motherboard, a reliable motherboard produced under ASRock's consistently stringent quality control. Because the motherboard specifications and the BIOS...
User Manual
Page 33
...174; XP / XP 64-bit OS: Click "Audio I/O", select "Connector Settings" , choose "Disable front panel jack detection", and save the change by clicking "OK". G. Connect Ground (GND) to function correctly. E. High Definition Audio supports Jack Sensing, but the panel wire on the lower...: A. Connect Audio_R (RIN) to OUT2_R and Audio_L (LIN) to [Enabled]. Enter Advanced Settings, and then select Chipset Configuration. Enter BIOS Setup Utility. To activate the front mic. Set the Front Panel Control option from [Auto] to OUT2_L. Please follow the instruction in the...
...174; XP / XP 64-bit OS: Click "Audio I/O", select "Connector Settings" , choose "Disable front panel jack detection", and save the change by clicking "OK". G. Connect Ground (GND) to function correctly. E. High Definition Audio supports Jack Sensing, but the panel wire on the lower...: A. Connect Audio_R (RIN) to OUT2_R and Audio_L (LIN) to [Enabled]. Enter Advanced Settings, and then select Chipset Configuration. Enter BIOS Setup Utility. To activate the front mic. Set the Front Panel Control option from [Auto] to OUT2_L. Please follow the instruction in the...
User Manual
Page 54
... UTILITY Main OC Tweaker Advanced H/W Monitor Boot Security Exit System Overview System Time System Date [14:00:09] [Mon 07/20/2009] BIOS Version : X58 Extreme P1.00 Processor Type : Intel (R) CPU 000 @ 3.20GHz (64bit) Processor Speed : 3200MHz Microcode Update : 106A4/10 Cache Size : 8192KB ...None : None : None Use [Enter], [TAB] or [SHIFT-TAB] to configure system Time. +Tab F1 F9 F10 ESC Select Screen Select Item Change Field Select Field General Help Load Defaults Save and Exit Exit v02.54 (C) Copyright 1985-2005, American Megatrends, Inc. System Time [Hour:Minute:Second] Use...
... UTILITY Main OC Tweaker Advanced H/W Monitor Boot Security Exit System Overview System Time System Date [14:00:09] [Mon 07/20/2009] BIOS Version : X58 Extreme P1.00 Processor Type : Intel (R) CPU 000 @ 3.20GHz (64bit) Processor Speed : 3200MHz Microcode Update : 106A4/10 Cache Size : 8192KB ...None : None : None Use [Enter], [TAB] or [SHIFT-TAB] to configure system Time. +Tab F1 F9 F10 ESC Select Screen Select Item Change Field Select Field General Help Load Defaults Save and Exit Exit v02.54 (C) Copyright 1985-2005, American Megatrends, Inc. System Time [Hour:Minute:Second] Use...
User Manual
Page 56
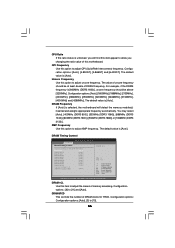
... value is [800MHz (DDR3 1600)], uncore frequency should be above [3200MHz]. CPU Ratio If the ratio status is [Auto]. DRAM Timing Control BIOS SETUP UTILITY Advanced DRAM Timing Control Current Setting : 8-8-8-20-48-8-4-6-5-21 DRAM tCL [Auto] DRAM tRCD [Auto] DRAM tRP [Auto] DRAM tRAS...[Auto] Current Setting : 1-0 DRAM Command Rate [Auto] DRAM tCL Min = 6 Max = 11 +F1 F9 F10 ESC Select Screen Select Item Change Option General Help Load Defaults Save and Exit Exit v02.54 (C) Copyright 1985-2005, American Megatrends, Inc. QPI Frequency Use this option to adjust the...
... value is [800MHz (DDR3 1600)], uncore frequency should be above [3200MHz]. CPU Ratio If the ratio status is [Auto]. DRAM Timing Control BIOS SETUP UTILITY Advanced DRAM Timing Control Current Setting : 8-8-8-20-48-8-4-6-5-21 DRAM tCL [Auto] DRAM tRCD [Auto] DRAM tRP [Auto] DRAM tRAS...[Auto] Current Setting : 1-0 DRAM Command Rate [Auto] DRAM tCL Min = 6 Max = 11 +F1 F9 F10 ESC Select Screen Select Item Change Option General Help Load Defaults Save and Exit Exit v02.54 (C) Copyright 1985-2005, American Megatrends, Inc. QPI Frequency Use this option to adjust the...
User Manual
Page 60
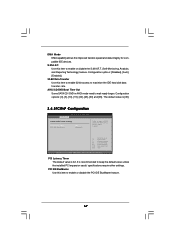
...[Disabled] [Auto] [Enabled] Select the ration between CPU Core Clock and the FSB Frequency. +F1 F9 F10 ESC Select Screen Select Item Change Option General Help Load Defaults Save and Exit Exit v02.54 (C) Copyright 1985-2005, American Megatrends, Inc. Enhance Halt State All processors support... the Halt State (C1). When this option is an enhancement to keep the CPU from the chipset. 3.4.1CPU Configuration BIOS SETUP UTILITY Advanced Configure advanced CPU settings Intel (R) Core (TM) i7 CPU 920 @ 2.67GHz Frequency : 2.66GHz Cache L1 : 128KB Cache...
...[Disabled] [Auto] [Enabled] Select the ration between CPU Core Clock and the FSB Frequency. +F1 F9 F10 ESC Select Screen Select Item Change Option General Help Load Defaults Save and Exit Exit v02.54 (C) Copyright 1985-2005, American Megatrends, Inc. Enhance Halt State All processors support... the Halt State (C1). When this option is an enhancement to keep the CPU from the chipset. 3.4.1CPU Configuration BIOS SETUP UTILITY Advanced Configure advanced CPU settings Intel (R) Core (TM) i7 CPU 920 @ 2.67GHz Frequency : 2.66GHz Cache L1 : 128KB Cache...
User Manual
Page 63
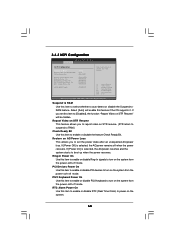
... Configuration Advanced Chipset Settings BIOS SETUP UTILITY Primary Graphics Adapter Onboard HD Audio Front Panel OnBoard Lan [PCI] [Auto] [Enabled] [Enabled] Intelligent Energy Saver CIR10 Field 1 PCIE Max Payload Size Intel VT-d [Disabled] [Enabled] [128B] [Disabled] +F1 F9 F10 ESC Select Screen Select Item Change Option General Help Load ... please set this feature is [128B]. OnBoard Lan This allows you can be disabled when PCI Sound Card is [Disabled]. Besides the BIOS option, you to enable this to select [PCI] or [PCI Express] as the boot graphic adapter priority.
... Configuration Advanced Chipset Settings BIOS SETUP UTILITY Primary Graphics Adapter Onboard HD Audio Front Panel OnBoard Lan [PCI] [Auto] [Enabled] [Enabled] Intelligent Energy Saver CIR10 Field 1 PCIE Max Payload Size Intel VT-d [Disabled] [Enabled] [128B] [Disabled] +F1 F9 F10 ESC Select Screen Select Item Change Option General Help Load ... please set this feature is [128B]. OnBoard Lan This allows you can be disabled when PCI Sound Card is [Disabled]. Besides the BIOS option, you to enable this to select [PCI] or [PCI Express] as the boot graphic adapter priority.
User Manual
Page 64
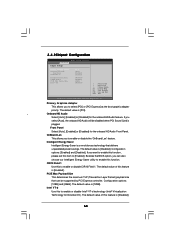
...Power Off] [Disabled] [Disabled] [Disabled] [Disabled] [Disabled] Select auto-detect or disable the STR feature. +F1 F9 F10 ESC Select Screen Select Item Change Option General Help Load Defaults Save and Exit Exit v02.54 (C) Copyright 1985-2005, American Megatrends, Inc. PS/2 Keyboard Power On Use this item to...auto-detect or disable the Suspend-toRAM feature. If [Power On] is selected, the AC/power remains off mode. 3.4.3 ACPI Configuration BIOS SETUP UTILITY Advanced ACPI Configuration Suspend To RAM Repost Video on STR Resume Check Ready Bit Restore on the system from the power-soft...
...Power Off] [Disabled] [Disabled] [Disabled] [Disabled] [Disabled] Select auto-detect or disable the STR feature. +F1 F9 F10 ESC Select Screen Select Item Change Option General Help Load Defaults Save and Exit Exit v02.54 (C) Copyright 1985-2005, American Megatrends, Inc. PS/2 Keyboard Power On Use this item to...auto-detect or disable the Suspend-toRAM feature. If [Power On] is selected, the AC/power remains off mode. 3.4.3 ACPI Configuration BIOS SETUP UTILITY Advanced ACPI Configuration Suspend To RAM Repost Video on STR Resume Check Ready Bit Restore on the system from the power-soft...

User Manual
Page 65
...have these advantages. The default value is [IDE]. ACPI HPET Table Use this motherboard to submit Windows® VistaTM certification. 3.4.4IDE Configuration BIOS SETUP UTILITY Advanced IDE Configuration SATAII Configuration Configure SATAII as Onboard IDE and 1394 Onboard eSATAII eSATAII Operation Mode SATAII 1 SATAII 2 SATAII ... [Not Detected] [Not Detected] [Not Detected] [35] Options Disabled Compatible Enhanced +F1 F9 F10 ESC Select Screen Select Item Change Option General Help Load Defaults Save and Exit Exit v02.54 (C) Copyright 1985-2003, American Megatrends, Inc.
...have these advantages. The default value is [IDE]. ACPI HPET Table Use this motherboard to submit Windows® VistaTM certification. 3.4.4IDE Configuration BIOS SETUP UTILITY Advanced IDE Configuration SATAII Configuration Configure SATAII as Onboard IDE and 1394 Onboard eSATAII eSATAII Operation Mode SATAII 1 SATAII 2 SATAII ... [Not Detected] [Not Detected] [Not Detected] [35] Options Disabled Compatible Enhanced +F1 F9 F10 ESC Select Screen Select Item Change Option General Help Load Defaults Save and Exit Exit v02.54 (C) Copyright 1985-2003, American Megatrends, Inc.
User Manual
Page 66
... UTILITY Advanced Primary IDE Master Device Vendor Size LBA Mode Block Mode PIO Mode Async DMA Ultra DMA S.M.A.R.T. After selecting the hard disk information into BIOS, use a disk utility, such as FDISK, to configure the type of device connected to active. [CD/DVD]: This is used for IDE ...Block (Multi-Sector Transfer) The default value of the Primary IDE hard disk drives to the system. +F1 F9 F10 ESC Select Screen Select Item Change Option General Help Load Defaults Save and Exit Exit v02.54 (C) Copyright 1985-2005, American Megatrends, Inc. Type LBA/Large Mode Block (Multi-Sector...
... UTILITY Advanced Primary IDE Master Device Vendor Size LBA Mode Block Mode PIO Mode Async DMA Ultra DMA S.M.A.R.T. After selecting the hard disk information into BIOS, use a disk utility, such as FDISK, to configure the type of device connected to active. [CD/DVD]: This is used for IDE ...Block (Multi-Sector Transfer) The default value of the Primary IDE hard disk drives to the system. +F1 F9 F10 ESC Select Screen Select Item Change Option General Help Load Defaults Save and Exit Exit v02.54 (C) Copyright 1985-2005, American Megatrends, Inc. Type LBA/Large Mode Block (Multi-Sector...
User Manual
Page 67
...capability allows the improved transfer-speed and data-integrity for PCI device latency timer register. +F1 F9 F10 ESC Select Screen Select Item Change Option General Help Load Defaults Save and Exit Exit v02.54 (C) Copyright 1985-2005, American Megatrends, Inc. The default value is [35...]. 3.4.5PCIPnP Configuration BIOS SETUP UTILITY Advanced Advanced PCI / PnP Settings PCI Latency Timer PCI IDE BusMaster [64] [Enabled] Value in AHCI mode need to enable...
...capability allows the improved transfer-speed and data-integrity for PCI device latency timer register. +F1 F9 F10 ESC Select Screen Select Item Change Option General Help Load Defaults Save and Exit Exit v02.54 (C) Copyright 1985-2005, American Megatrends, Inc. The default value is [35...]. 3.4.5PCIPnP Configuration BIOS SETUP UTILITY Advanced Advanced PCI / PnP Settings PCI Latency Timer PCI IDE BusMaster [64] [Enabled] Value in AHCI mode need to enable...
User Manual
Page 68
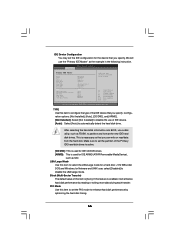
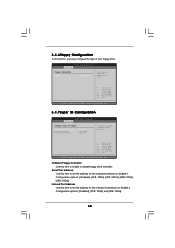
... drive controller. Serial Port Address Use this item to Enable or Disable Floppy Controller. +F1 F9 F10 ESC Select Screen Select Item Change Option General Help Load Defaults Save and Exit Exit v02.54 (C) Copyright 1985-2005, American Megatrends, Inc. 3.4.6Floppy Configuration In this... to the system. +F1 F9 F10 ESC Select Screen Select Item Change Option General Help Load Defaults Save and Exit Exit v02.54 (C) Copyright 1985-2005, American Megatrends, Inc. 3.4.7Super IO Configuration BIOS SETUP UTILITY Advanced Configure Super IO Chipset OnBoard Floppy Controller Serial Port ...
... drive controller. Serial Port Address Use this item to Enable or Disable Floppy Controller. +F1 F9 F10 ESC Select Screen Select Item Change Option General Help Load Defaults Save and Exit Exit v02.54 (C) Copyright 1985-2005, American Megatrends, Inc. 3.4.6Floppy Configuration In this... to the system. +F1 F9 F10 ESC Select Screen Select Item Change Option General Help Load Defaults Save and Exit Exit v02.54 (C) Copyright 1985-2005, American Megatrends, Inc. 3.4.7Super IO Configuration BIOS SETUP UTILITY Advanced Configure Super IO Chipset OnBoard Floppy Controller Serial Port ...
User Manual
Page 69
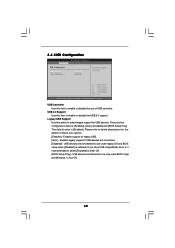
...have USB compatibility issue, it is recommended to select [Disabled] to select legacy support for legacy USB. [Auto] - 3.4.8USB Configuration BIOS SETUP UTILITY Advanced USB Configuration USB Controller USB 2.0 Support Legacy USB Support [Enabled] [Enabled] [Enabled] To enable or disable the onboard... USB controllers. +F1 F9 F10 ESC Select Screen Select Item Change Option General Help Load Defaults Save and Exit Exit v02.54 (C) Copyright 1985-2005, American Megatrends, Inc. There are connected. [Disabled...
...have USB compatibility issue, it is recommended to select [Disabled] to select legacy support for legacy USB. [Auto] - 3.4.8USB Configuration BIOS SETUP UTILITY Advanced USB Configuration USB Controller USB 2.0 Support Legacy USB Support [Enabled] [Enabled] [Enabled] To enable or disable the onboard... USB controllers. +F1 F9 F10 ESC Select Screen Select Item Change Option General Help Load Defaults Save and Exit Exit v02.54 (C) Copyright 1985-2005, American Megatrends, Inc. There are connected. [Disabled...
User Manual
Page 71
...settings and the boot priority. CD - Enabled: Displays OEM Logo instead of POST messages. +F1 F9 F10 ESC Select Screen Select Item Change Option General Help Load Defaults Save and Exit Exit v02.54 (C) Copyright 1985-2003, American Megatrends, Inc. The default value is [Enabled].... ROM Display. Full Screen Logo Use this item to see the AddOn ROM information when the system boots, please select [Enabled]. BIOS SETUP UTILITY Main OC Tweaker Advanced H/W Monitor Boot Security Exit Boot Settings Boot Settings Configuration Configure Settings during System Boot. 1st Boot...
...settings and the boot priority. CD - Enabled: Displays OEM Logo instead of POST messages. +F1 F9 F10 ESC Select Screen Select Item Change Option General Help Load Defaults Save and Exit Exit v02.54 (C) Copyright 1985-2003, American Megatrends, Inc. The default value is [Enabled].... ROM Display. Full Screen Logo Use this item to see the AddOn ROM information when the system boots, please select [Enabled]. BIOS SETUP UTILITY Main OC Tweaker Advanced H/W Monitor Boot Security Exit Boot Settings Boot Settings Configuration Configure Settings during System Boot. 1st Boot...

User Manual
Page 72
... Boot From Onboard LAN Use this option to [On], it . Configuration options: [Auto], [PCIE2.0 Revolution], [Scenery] and [ASRock]. Boot Up Num-Lock If this item is set or change the supervisor/user password for the system. Currently, the option [Auto] is [Auto]. This option only appears when you may... In this section, you enable the option "Full Screen Logo". For the user password, you may set to select logo in POST screen. BIOS SETUP UTILITY Main OC Tweaker Advanced H/W Monitor Boot Security Exit Security Settings Supervisor Password : Not Installed User Password : Not Installed...
... Boot From Onboard LAN Use this option to [On], it . Configuration options: [Auto], [PCIE2.0 Revolution], [Scenery] and [ASRock]. Boot Up Num-Lock If this item is set or change the supervisor/user password for the system. Currently, the option [Auto] is [Auto]. This option only appears when you may... In this section, you enable the option "Full Screen Logo". For the user password, you may set to select logo in POST screen. BIOS SETUP UTILITY Main OC Tweaker Advanced H/W Monitor Boot Security Exit Security Settings Supervisor Password : Not Installed User Password : Not Installed...
User Manual
Page 73
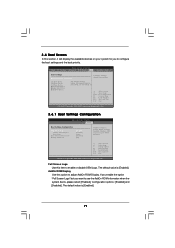
...Screen Select Item Enter Go to exit the BIOS SETUP UTILITY without saving any changes. Select [OK] to discard all the setup questions. Select [OK] to save the changes and exit the BIOS SETUP UTILITY. Load BIOS Defaults Load BIOS default values for this operation. If system... boot failure occurs after saving the changes. F6 key can be used for all changes. 3.8 Exit Screen BIOS SETUP UTILITY Main OC Tweaker Advanced H/W Monitor Boot Security Exit Exit Options Save Changes and Exit Discard Changes and Exit Discard Changes Load BIOS Defaults Load Performance Setup Default (IDE...
...Screen Select Item Enter Go to exit the BIOS SETUP UTILITY without saving any changes. Select [OK] to discard all the setup questions. Select [OK] to save the changes and exit the BIOS SETUP UTILITY. Load BIOS Defaults Load BIOS default values for this operation. If system... boot failure occurs after saving the changes. F6 key can be used for all changes. 3.8 Exit Screen BIOS SETUP UTILITY Main OC Tweaker Advanced H/W Monitor Boot Security Exit Exit Options Save Changes and Exit Discard Changes and Exit Discard Changes Load BIOS Defaults Load Performance Setup Default (IDE...

Quick Installation Guide
Page 4
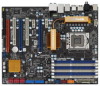
... ASRock SLI_Bridge_2S Card 4 ASRock X58 Extreme Motherboard English 1. This Quick Installation Guide contains introduction of this motherboard, please visit our website for specific information about the model you are using. In case any modifications of the motherboard can be subject to change ... and the BIOS software might be available on ASRock website as well. www.asrock.com/support/index.asp 1.1 Package Contents ASRock X58 Extreme Motherboard (ATX Form Factor: 12.0-in x 9.6-in, 30.5 cm x 24.4 cm) ASRock X58 Extreme Quick Installation Guide ASRock X58 Extreme Support CD ...
... ASRock SLI_Bridge_2S Card 4 ASRock X58 Extreme Motherboard English 1. This Quick Installation Guide contains introduction of this motherboard, please visit our website for specific information about the model you are using. In case any modifications of the motherboard can be subject to change ... and the BIOS software might be available on ASRock website as well. www.asrock.com/support/index.asp 1.1 Package Contents ASRock X58 Extreme Motherboard (ATX Form Factor: 12.0-in x 9.6-in, 30.5 cm x 24.4 cm) ASRock X58 Extreme Quick Installation Guide ASRock X58 Extreme Support CD ...

Quick Installation Guide
Page 27
..." icon in "Front Mic" of audio devices. 1. Please follow the instruction in the Realtek Control panel. B. Enter BIOS Setup Utility. Enter Windows system. English 27 ASRock X58 Extreme Motherboard Connect Ground (GND) to [Enabled]. D. If you use AC'97 audio panel, please install it to hear ...® XP / XP 64-bit OS: Click "Audio I/O", select "Connector Settings" , choose "Disable front panel jack detection", and save the change by clicking "OK". To activate the front mic. E. For Windows® VistaTM / VistaTM 64-bit OS: Click the right-top "Folder" ...
..." icon in "Front Mic" of audio devices. 1. Please follow the instruction in the Realtek Control panel. B. Enter BIOS Setup Utility. Enter Windows system. English 27 ASRock X58 Extreme Motherboard Connect Ground (GND) to [Enabled]. D. If you use AC'97 audio panel, please install it to hear ...® XP / XP 64-bit OS: Click "Audio I/O", select "Connector Settings" , choose "Disable front panel jack detection", and save the change by clicking "OK". To activate the front mic. E. For Windows® VistaTM / VistaTM 64-bit OS: Click the right-top "Folder" ...
RAID Installation Guide
Page 11
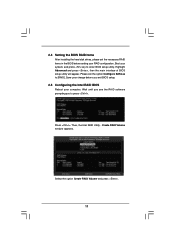
... the hard disk drives, please set the option Configure SATA as to [RAID]. Highlight Advanced and press , then the main interface of BIOS setup utility will appear. Save your change before setting your system, and press key to press . Then, the Intel RAID Utility - Select the option Create RAID Volume and press...
... the hard disk drives, please set the option Configure SATA as to [RAID]. Highlight Advanced and press , then the main interface of BIOS setup utility will appear. Save your change before setting your system, and press key to press . Then, the Intel RAID Utility - Select the option Create RAID Volume and press...


