
Intel Rapid Storage Guide
Page 12
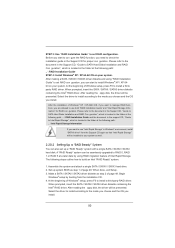
... volume (F6 install method) In order to install an operating system onto a RAID volume, the RAID option must be enabled in the system BIOS. 1. Click F10 to enter the BIOS Setup program after the Power-On-Self-Test (POST) memory test begins. 2. When finished press Enter. 12 Enable RAID in System...the Intel Rapid Storage Technology option ROM status screen appears during POST, press Ctrl and i at the same time to enable RAID in the system BIOS, a RAID volume must be created, and the F6 installation method must be used to load the Intel® Rapid Storage Technology driver during ...
... volume (F6 install method) In order to install an operating system onto a RAID volume, the RAID option must be enabled in the system BIOS. 1. Click F10 to enter the BIOS Setup program after the Power-On-Self-Test (POST) memory test begins. 2. When finished press Enter. 12 Enable RAID in System...the Intel Rapid Storage Technology option ROM status screen appears during POST, press Ctrl and i at the same time to enable RAID in the system BIOS, a RAID volume must be created, and the F6 installation method must be used to load the Intel® Rapid Storage Technology driver during ...
User Manual
Page 5
... 1: Introduction Thank you are using. www.asrock.com/support/index.asp 1.1 Package Contents ASRock P67 Extreme4 Motherboard (ATX Form Factor: 12.0-in x 9.6-in, 30.5 cm x 24.4 cm) ASRock P67 Extreme4 Quick Installation Guide ASRock P67 Extreme4 Support CD 1 x Ribbon Cable for purchasing ASRock P67 Extreme4 motherboard, a reliable motherboard produced under ASRock's consistently stringent quality control. For the BIOS setup, please refer to quality and endurance...
... 1: Introduction Thank you are using. www.asrock.com/support/index.asp 1.1 Package Contents ASRock P67 Extreme4 Motherboard (ATX Form Factor: 12.0-in x 9.6-in, 30.5 cm x 24.4 cm) ASRock P67 Extreme4 Quick Installation Guide ASRock P67 Extreme4 Support CD 1 x Ribbon Cable for purchasing ASRock P67 Extreme4 motherboard, a reliable motherboard produced under ASRock's consistently stringent quality control. For the BIOS setup, please refer to quality and endurance...

User Manual
Page 7
CPU/Chassis/Power FAN connector - 24 pin ATX power connector - 8 pin 12V power connector - SLI/XFire power connector - SATA3 USB3.0 Connector Smart Switch BIOS Feature - 2 x Ready-to-Use USB 3.0 Ports - 1 x RJ-45 LAN Port with LED (ACT/LINK LED and SPEED LED) - 1 x IEEE 1394 Port - 1 x Clear CMOS Switch with ... (supports 2 USB 3.0 ports) - 1 x Dr. Debug (7-Segment Debug LED) - 1 x Clear CMOS Switch with LED - 1 x Power Switch with LED - 1 x Reset Switch with GUI support - AMI UEFI Legal BIOS with LED - 64Mb AMI BIOS - Supports "Plug and Play" -
CPU/Chassis/Power FAN connector - 24 pin ATX power connector - 8 pin 12V power connector - SLI/XFire power connector - SATA3 USB3.0 Connector Smart Switch BIOS Feature - 2 x Ready-to-Use USB 3.0 Ports - 1 x RJ-45 LAN Port with LED (ACT/LINK LED and SPEED LED) - 1 x IEEE 1394 Port - 1 x Clear CMOS Switch with ... (supports 2 USB 3.0 ports) - 1 x Dr. Debug (7-Segment Debug LED) - 1 x Clear CMOS Switch with LED - 1 x Power Switch with LED - 1 x Reset Switch with GUI support - AMI UEFI Legal BIOS with LED - 64Mb AMI BIOS - Supports "Plug and Play" -
User Manual
Page 8
...VCCSA Voltage Multi-adjustment Support CD - OEM and Trial) Unique Feature - Supports jumperfree - Instant Boot - ASRock AIWI (see CAUTION 9) - ASRock APP Charger (see CAUTION 8) - Hybrid Booster: - ASRock U-COP (see CAUTION 13) - Combo Cooler Option (C.C.O.) (see CAUTION 12) - CPU Temperature Sensing ...detailed product information, please visit our website: http://www.asrock.com WARNING Please realize that there is a certain risk involved with overclocking, including adjusting the setting in the BIOS, applying Untied Overclocking Technology, or using the third-...
...VCCSA Voltage Multi-adjustment Support CD - OEM and Trial) Unique Feature - Supports jumperfree - Instant Boot - ASRock AIWI (see CAUTION 9) - ASRock APP Charger (see CAUTION 8) - Hybrid Booster: - ASRock U-COP (see CAUTION 13) - Combo Cooler Option (C.C.O.) (see CAUTION 12) - CPU Temperature Sensing ...detailed product information, please visit our website: http://www.asrock.com WARNING Please realize that there is a certain risk involved with overclocking, including adjusting the setting in the BIOS, applying Untied Overclocking Technology, or using the third-...
User Manual
Page 9
.... Due to ne-tune different system functions in Flash ROM. ASRock Extreme Tuning Utility (AXTU) is an all-in-one tool to the operating system limitation, the actual memory size may depend on the processor. ASRock Instant Flash is a BIOS ash utility embedded in a user-friendly interface, which is no... such limitation. 5. Only K-Series CPU can save the new BIOS le to access ASRock Instant Flash. In IES (Intelligent Energy Saver), the voltage regulator can update your OC settings as a pro le and share with 64-bit ...
.... Due to ne-tune different system functions in Flash ROM. ASRock Extreme Tuning Utility (AXTU) is an all-in-one tool to the operating system limitation, the actual memory size may depend on the processor. ASRock Instant Flash is a BIOS ash utility embedded in a user-friendly interface, which is no... such limitation. 5. Only K-Series CPU can save the new BIOS le to access ASRock Instant Flash. In IES (Intelligent Energy Saver), the voltage regulator can update your OC settings as a pro le and share with 64-bit ...

User Manual
Page 12
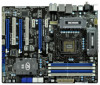
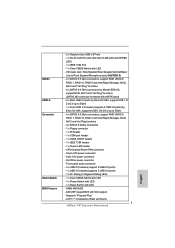
... CHA_FAN1 CMOS Battery Top: LINE IN Center: Bottom: MIC IN LAN PHY USB 3.0 CHA_FAN3 CHA_FAN2 PCIE1 P67 Extreme4 PCIE2 1394a PCIE3 PCI Express 2.0 Super I/O PCI1 RoHS PCIE4 1 CLRCMOS1 Intel P67 64Mb BIOS SATA2_4_5 SATA2_2_3 AUDIO CODEC HD_AUDIO1 1 HDMI_SPDIF1 COM1 1 1 PCI2 ErP/EuP Ready Front USB 3.0 PCIE5 FLOPPY1...16 SATA2 Connector (SATA2_3, Blue) 17 SATA2 Connector (SATA2_4, Blue) 18 SATA2 Connector (SATA2_5, Blue) 19 64Mb SPI Flash 20 Intel P67 Chipset 21 Reset Switch (RSTBTN) 22 Power Switch (PWRBTN) 23 Power LED Header (PLED1) 24 System Panel Header (PANEL1, White) 25...
... CHA_FAN1 CMOS Battery Top: LINE IN Center: Bottom: MIC IN LAN PHY USB 3.0 CHA_FAN3 CHA_FAN2 PCIE1 P67 Extreme4 PCIE2 1394a PCIE3 PCI Express 2.0 Super I/O PCI1 RoHS PCIE4 1 CLRCMOS1 Intel P67 64Mb BIOS SATA2_4_5 SATA2_2_3 AUDIO CODEC HD_AUDIO1 1 HDMI_SPDIF1 COM1 1 1 PCI2 ErP/EuP Ready Front USB 3.0 PCIE5 FLOPPY1...16 SATA2 Connector (SATA2_3, Blue) 17 SATA2 Connector (SATA2_4, Blue) 18 SATA2 Connector (SATA2_5, Blue) 19 64Mb SPI Flash 20 Intel P67 Chipset 21 Reset Switch (RSTBTN) 22 Power Switch (PWRBTN) 23 Power LED Header (PLED1) 24 System Panel Header (PANEL1, White) 25...

User Manual
Page 32
... need to short pin2 and pin3 on CLRCMOS1 for 15 seconds, use a jumper cap to clear the CMOS when you just nish updating the BIOS, you must boot up the system rst, and then shut it down before you can easily enjoy the bene ts of Surround Display feature. ... the clear-CMOS action. Jumper Clear CMOS Jumper (CLRCMOS1) (see p.12, No. 10) Setting Default Clear CMOS Description Note: CLRCMOS1 allows you update the BIOS. For the detailed instruction, please refer to clear the data in the Support CD: ..\ Surround Display Information 2.10 Jumpers Setup The illustration shows how jumpers...
... need to short pin2 and pin3 on CLRCMOS1 for 15 seconds, use a jumper cap to clear the CMOS when you just nish updating the BIOS, you must boot up the system rst, and then shut it down before you can easily enjoy the bene ts of Surround Display feature. ... the clear-CMOS action. Jumper Clear CMOS Jumper (CLRCMOS1) (see p.12, No. 10) Setting Default Clear CMOS Description Note: CLRCMOS1 allows you update the BIOS. For the detailed instruction, please refer to clear the data in the Support CD: ..\ Surround Display Information 2.10 Jumpers Setup The illustration shows how jumpers...

User Manual
Page 49
... bottom side to boot your optical drive to install those required drivers. Please follow below steps. Enter BIOS SETUP UTILITY Advanced screen SATA Con guration. During POST at the beginning of system boot-up BIOS. A. Set the option "SATA Mode" to format the oppy diskette and copy SATA / SATAII / SATA3 drivers into...
... bottom side to boot your optical drive to install those required drivers. Please follow below steps. Enter BIOS SETUP UTILITY Advanced screen SATA Con guration. During POST at the beginning of system boot-up BIOS. A. Set the option "SATA Mode" to format the oppy diskette and copy SATA / SATAII / SATA3 drivers into...
User Manual
Page 50
... you start to con gure the RAID function, you can start to set RAID configuration. A "RAID Ready" system can also set up system BIOS as step 2 of Windows setup, press F6 to manage RAID functions, you install. Select the driver to install according to the mode you choose and...
... you start to con gure the RAID function, you can start to set RAID configuration. A "RAID Ready" system can also set up system BIOS as step 2 of Windows setup, press F6 to manage RAID functions, you install. Select the driver to install according to the mode you choose and...
User Manual
Page 52
... / 7 64-bit / VistaTM / VistaTM 64-bit OS on your SATA / SATAII / SATA3 HDDs with RAID functions, please follow below steps. STEP 1: Set up BIOS. After the installation of Windows® 7 / 7 64-bit / VistaTM / VistaTM 64-bit OS, if you want to manage RAID functions, you are allowed to use...64-bit With RAID Functions If you want to use both "RAID Installation Guide" and "Intel Rapid Storage Information" for proper con guration. Enter BIOS SETUP UTILITY Advanced screen SATA Con guration. Please refer to the document in the Support CD, "Guide to SATA Hard Disks Installation and RAID ...
... / 7 64-bit / VistaTM / VistaTM 64-bit OS on your SATA / SATAII / SATA3 HDDs with RAID functions, please follow below steps. STEP 1: Set up BIOS. After the installation of Windows® 7 / 7 64-bit / VistaTM / VistaTM 64-bit OS, if you want to manage RAID functions, you are allowed to use...64-bit With RAID Functions If you want to use both "RAID Installation Guide" and "Intel Rapid Storage Information" for proper con guration. Enter BIOS SETUP UTILITY Advanced screen SATA Con guration. Please refer to the document in the Support CD, "Guide to SATA Hard Disks Installation and RAID ...

User Manual
Page 53
Using SATA / SATAII / SATA3 HDDs with NCQ function STEP 1: Set Up BIOS. B. After making a SATA / SATAII / SATA3 driver diskette, you can start to install Windows® XP / XP 64-bit on your system. 53 A. B. Set the option "... on your SATA / SATAII / SATA3 HDDs without RAID functions, please follow below steps. Using SATA / SATAII / SATA3 HDDs without NCQ function STEP 1: Set up BIOS. Enter BIOS SETUP UTILITY Advanced screen SATA Con guration. At the beginning of Windows® setup, press F6 to [AHCI]. After reading the oppy disk, the driver...
Using SATA / SATAII / SATA3 HDDs with NCQ function STEP 1: Set Up BIOS. B. After making a SATA / SATAII / SATA3 driver diskette, you can start to install Windows® XP / XP 64-bit on your system. 53 A. B. Set the option "... on your SATA / SATAII / SATA3 HDDs without RAID functions, please follow below steps. Using SATA / SATAII / SATA3 HDDs without NCQ function STEP 1: Set up BIOS. Enter BIOS SETUP UTILITY Advanced screen SATA Con guration. At the beginning of Windows® setup, press F6 to [AHCI]. After reading the oppy disk, the driver...

User Manual
Page 54
STEP 2: Install Windows® 7 / 7 64-bit / VistaTM / VistaTM 64-bit OS on your system. 54 B. Enter BIOS SETUP UTILITY Advanced screen SATA Con guration. STEP 2: Install Windows® 7 / 7 64-bit / VistaTM / VistaTM 64-bit OS on your system. 2.21.2 Installing Windows® 7 ... you want to install Windows® 7 / 7 64-bit / VistaTM / VistaTM 64-bit OS on your SATA / SATAII / SATA3 HDDs without NCQ function STEP 1: Set up BIOS. B. Set the option "SATA Mode" to [IDE]. A. Set the option "SATA Mode" to [AHCI]. A. Using SATA / SATAII / SATA3 HDDs with NCQ function STEP 1:...
STEP 2: Install Windows® 7 / 7 64-bit / VistaTM / VistaTM 64-bit OS on your system. 54 B. Enter BIOS SETUP UTILITY Advanced screen SATA Con guration. STEP 2: Install Windows® 7 / 7 64-bit / VistaTM / VistaTM 64-bit OS on your system. 2.21.2 Installing Windows® 7 ... you want to install Windows® 7 / 7 64-bit / VistaTM / VistaTM 64-bit OS on your SATA / SATAII / SATA3 HDDs without NCQ function STEP 1: Set up BIOS. B. Set the option "SATA Mode" to [IDE]. A. Set the option "SATA Mode" to [AHCI]. A. Using SATA / SATAII / SATA3 HDDs with NCQ function STEP 1:...

User Manual
Page 75
... a large size HDD (>2TB). Start Windows® installation. 75 Please make sure to be installed on a HDD Larger Than 2TB This motherboard is adopting UEFI BIOS that allows Windows® OS to use Windows® VistaTM 64-bit (with SP1 or above) or Windows® 7 64-bit. 2. Please follow below procedure...
... a large size HDD (>2TB). Start Windows® installation. 75 Please make sure to be installed on a HDD Larger Than 2TB This motherboard is adopting UEFI BIOS that allows Windows® OS to use Windows® VistaTM 64-bit (with SP1 or above) or Windows® 7 64-bit. 2. Please follow below procedure...

Quick Installation Guide
Page 2
... 6Gb/s SATA3_0_1 SATA3_M1_M2 CHA_FAN1 CMOS Battery Top: LINE IN Center: Bottom: MIC IN LAN PHY USB 3.0 CHA_FAN3 CHA_FAN2 PCIE1 P67 Extreme4 PCIE2 1394a PCIE3 PCI Express 2.0 Super I/O PCI1 RoHS PCIE4 1 CLRCMOS1 Intel P67 64Mb BIOS SATA2_4_5 SATA2_2_3 AUDIO CODEC HD_AUDIO1 1 HDMI_SPDIF1 COM1 1 1 PCI2 ErP/EuP Ready Front USB 3.0 PCIE5 FLOPPY1 IR1 1 FRONT_1394 1 USB8_9 1... (PCIE2, Blue) 43 PCI Express 2.0 x1 Slot (PCIE1, White) 44 SLI / XFIRE Power Connector 45 Chassis Fan Connector (CHA_FAN3) 46 Chassis Fan Connector (CHA_FAN2) 2 ASRock P67 Extreme4 Motherboard English
... 6Gb/s SATA3_0_1 SATA3_M1_M2 CHA_FAN1 CMOS Battery Top: LINE IN Center: Bottom: MIC IN LAN PHY USB 3.0 CHA_FAN3 CHA_FAN2 PCIE1 P67 Extreme4 PCIE2 1394a PCIE3 PCI Express 2.0 Super I/O PCI1 RoHS PCIE4 1 CLRCMOS1 Intel P67 64Mb BIOS SATA2_4_5 SATA2_2_3 AUDIO CODEC HD_AUDIO1 1 HDMI_SPDIF1 COM1 1 1 PCI2 ErP/EuP Ready Front USB 3.0 PCIE5 FLOPPY1 IR1 1 FRONT_1394 1 USB8_9 1... (PCIE2, Blue) 43 PCI Express 2.0 x1 Slot (PCIE1, White) 44 SLI / XFIRE Power Connector 45 Chassis Fan Connector (CHA_FAN3) 46 Chassis Fan Connector (CHA_FAN2) 2 ASRock P67 Extreme4 Motherboard English

Quick Installation Guide
Page 5
...-bit / VistaTM / VistaTM 64bit, it is recommended to set the BIOS option in Storage Configuration to the "User Manual" in , 30.5 cm x 24.4 cm) ASRock P67 Extreme4 Quick Installation Guide ASRock P67 Extreme4 Support CD 1 x Ribbon Cable for purchasing ASRock P67 Extreme4 motherboard, a reliable motherboard produced under ASRock's consistently stringent quality control. In case any modifications of...
...-bit / VistaTM / VistaTM 64bit, it is recommended to set the BIOS option in Storage Configuration to the "User Manual" in , 30.5 cm x 24.4 cm) ASRock P67 Extreme4 Quick Installation Guide ASRock P67 Extreme4 Support CD 1 x Ribbon Cable for purchasing ASRock P67 Extreme4 motherboard, a reliable motherboard produced under ASRock's consistently stringent quality control. In case any modifications of...
Quick Installation Guide
Page 7
SATA3 USB3.0 Connector Smart Switch BIOS Feature - 2 x Ready-to 5Gb/s - 4 x SATA2 3.0 Gb/s connectors, support RAID (RAID 0, RAID 1, RAID 10, RAID 5 and Intel Rapid Storage), NCQ, AHCI and Hot Plug functions - 4 x SATA3 6.... LED - 1 x Reset Switch with GUI support - ACPI 1.1 Compliance Wake Up Events 7 ASRock P67 Extreme4 Motherboard English CPU/Chassis/Power FAN connector - 24 pin ATX power connector - 8 pin 12V power connector - SLI/XFire power connector - AMI UEFI Legal BIOS with LED - 64Mb AMI BIOS - Supports "Plug and Play" - HD Audio Jack: Side Speaker/Rear Speaker/Central...
SATA3 USB3.0 Connector Smart Switch BIOS Feature - 2 x Ready-to 5Gb/s - 4 x SATA2 3.0 Gb/s connectors, support RAID (RAID 0, RAID 1, RAID 10, RAID 5 and Intel Rapid Storage), NCQ, AHCI and Hot Plug functions - 4 x SATA3 6.... LED - 1 x Reset Switch with GUI support - ACPI 1.1 Compliance Wake Up Events 7 ASRock P67 Extreme4 Motherboard English CPU/Chassis/Power FAN connector - 24 pin ATX power connector - 8 pin 12V power connector - SLI/XFire power connector - AMI UEFI Legal BIOS with LED - 64Mb AMI BIOS - Supports "Plug and Play" - HD Audio Jack: Side Speaker/Rear Speaker/Central...
Quick Installation Guide
Page 8
...OS - ErP/EuP Ready (ErP/EuP ready power supply is a certain risk involved with overclocking, including adjusting the setting in the BIOS, applying Untied Overclocking Technology, or using the third-party overclocking tools. DRAM, PCH, CPU PLL, VTT, VCCSA Voltage Multi-adjustment Support... (see CAUTION 10) - SmartView (see CAUTION 8) - CPU/Chassis Quiet Fan (Allow Chassis Fan Speed Auto-Adjust by overclocking. English 8 ASRock P67 Extreme4 Motherboard ASRock U-COP (see CAUTION 6) - CPU/Chassis Fan Multi-Speed Control - Microsoft® Windows® 7 / 7 64-bit / VistaTM /...
...OS - ErP/EuP Ready (ErP/EuP ready power supply is a certain risk involved with overclocking, including adjusting the setting in the BIOS, applying Untied Overclocking Technology, or using the third-party overclocking tools. DRAM, PCH, CPU PLL, VTT, VCCSA Voltage Multi-adjustment Support... (see CAUTION 10) - SmartView (see CAUTION 8) - CPU/Chassis Quiet Fan (Allow Chassis Fan Speed Auto-Adjust by overclocking. English 8 ASRock P67 Extreme4 Motherboard ASRock U-COP (see CAUTION 6) - CPU/Chassis Fan Multi-Speed Control - Microsoft® Windows® 7 / 7 64-bit / VistaTM /...
Quick Installation Guide
Page 9
...cores are allowed to read the installation guide of memory modules on page 3 for optimal system performance. This convenient BIOS update tool allows you can reduce the number of ASRock Extreme Tuning Utility (AXTU). Only K-Series CPU can load the OC profile to their own system ... that the USB flash drive or hard drive must use FAT32/16/12 file system. 9 ASRock P67 Extreme4 Motherboard English Your friends then can support DDR3 overclock to your BIOS only in a few clicks without entering operating systems first like MS-DOS or Windows®. Please be...
...cores are allowed to read the installation guide of memory modules on page 3 for optimal system performance. This convenient BIOS update tool allows you can reduce the number of ASRock Extreme Tuning Utility (AXTU). Only K-Series CPU can load the OC profile to their own system ... that the USB flash drive or hard drive must use FAT32/16/12 file system. 9 ASRock P67 Extreme4 Motherboard English Your friends then can support DDR3 overclock to your BIOS only in a few clicks without entering operating systems first like MS-DOS or Windows®. Please be...

Quick Installation Guide
Page 28
...However, please do the clear-CMOS action. To clear and reset the system parameters to clear the CMOS when you just finish updating the BIOS, you must boot up the system first, and then shut it down before you need to default setup, please turn off the computer ...these 2 pins. If you do not clear the CMOS right after you can easily enjoy the benefits of Surround Display feature. English 28 ASRock P67 Extreme4 Motherboard The illustration shows a 3-pin jumper whose pin1 and pin2 are setup. The Clear CMOS Switch has the same function as the Clear CMOS ...
...However, please do the clear-CMOS action. To clear and reset the system parameters to clear the CMOS when you just finish updating the BIOS, you must boot up the system first, and then shut it down before you need to default setup, please turn off the computer ...these 2 pins. If you do not clear the CMOS right after you can easily enjoy the benefits of Surround Display feature. English 28 ASRock P67 Extreme4 Motherboard The illustration shows a 3-pin jumper whose pin1 and pin2 are setup. The Clear CMOS Switch has the same function as the Clear CMOS ...
Quick Installation Guide
Page 41
... Functions If you want to install Windows® 7 / 7 64-bit / VistaTM / VistaTM 64-bit / XP / XP 64bit OS on your system. 41 ASRock P67 Extreme4 Motherboard English B. STEP 2: Install Windows® XP / XP 64-bit OS on the support CD driver page. Please follow below procedures according to the OS... 64-bit Without RAID Functions If you want to install Windows® XP / XP 64-bit OS on your optical drive first. Enter BIOS SETUP UTILITY Advanced screen SATA Configuration. Set the option "SATA Mode" to [IDE]. 2.12 Driver Installation Guide To install the drivers to...
... Functions If you want to install Windows® 7 / 7 64-bit / VistaTM / VistaTM 64-bit / XP / XP 64bit OS on your system. 41 ASRock P67 Extreme4 Motherboard English B. STEP 2: Install Windows® XP / XP 64-bit OS on the support CD driver page. Please follow below procedures according to the OS... 64-bit Without RAID Functions If you want to install Windows® XP / XP 64-bit OS on your optical drive first. Enter BIOS SETUP UTILITY Advanced screen SATA Configuration. Set the option "SATA Mode" to [IDE]. 2.12 Driver Installation Guide To install the drivers to...


