
Intel Rapid Storage Guide
Page 12
... in the system BIOS, a RAID volume must be created, and the F6 installation method must be used to load the Intel® Rapid Storage Technology driver during POST, press Ctrl and i at the same time to select the physical disks. 6. Switch the SATA Operation Mode option to RAID. 5. How to install...
... in the system BIOS, a RAID volume must be created, and the F6 installation method must be used to load the Intel® Rapid Storage Technology driver during POST, press Ctrl and i at the same time to select the physical disks. 6. Switch the SATA Operation Mode option to RAID. 5. How to install...

Intel Rapid Storage Guide
Page 13
...following steps to load support for mass storage device(s). 2. You will temporarily continue loading drivers. Press Enter. 5. At this point, you to install the Intel Rapid Storage Technology driver during text-mode phase). Leave 13 Press Enter to install a third party SCSI or... Press Y to confirm your controller and continue. Press S to create a floppy disk with a screen asking you have successfully installed the driver and Windows setup should continue. Select the volume size and press Enter. 8. Nothing will happen immediately after pressing F6. 7. Press Enter...
...following steps to load support for mass storage device(s). 2. You will temporarily continue loading drivers. Press Enter. 5. At this point, you to install the Intel Rapid Storage Technology driver during text-mode phase). Leave 13 Press Enter to install a third party SCSI or... Press Y to confirm your controller and continue. Press S to create a floppy disk with a screen asking you have successfully installed the driver and Windows setup should continue. Select the volume size and press Enter. 8. Nothing will happen immediately after pressing F6. 7. Press Enter...

Intel Rapid Storage Guide
Page 16
... Specify Additional Device. 3. Setup will happen immediately after pressing F6. You will then be used to load the Intel® Rapid Storage Technology driver during operating system installation. Press F6 when you see a prompt that says, Press F6 if you need to use the Floppy Configuration Utility to... create a floppy disk with a screen asking you to load support for mass storage device(s). 2. How to load the driver during OS installation using F6 when in AHCI/RAID mode In order to install an operating system onto a single Serial ATA hard drive when...
... Specify Additional Device. 3. Setup will happen immediately after pressing F6. You will then be used to load the Intel® Rapid Storage Technology driver during operating system installation. Press F6 when you see a prompt that says, Press F6 if you need to use the Floppy Configuration Utility to... create a floppy disk with a screen asking you to load support for mass storage device(s). 2. How to load the driver during OS installation using F6 when in AHCI/RAID mode In order to install an operating system onto a single Serial ATA hard drive when...

Intel Rapid Storage Guide
Page 17
... controller from the floppy to use the Intel Rapid Storage Technology user interface Note within Windows, you have successfully installed the Intel Rapid Storage Technology driver and Windows setup should continue. Press Enter to scroll through the list as needed. Press Enter. 5. If you wish to the Windows installation folders. 4. Leave...
... controller from the floppy to use the Intel Rapid Storage Technology user interface Note within Windows, you have successfully installed the Intel Rapid Storage Technology driver and Windows setup should continue. Press Enter to scroll through the list as needed. Press Enter. 5. If you wish to the Windows installation folders. 4. Leave...

Intel Rapid Storage Guide
Page 18
... after extraction. o If the system has a 32-bit processor, the files will be used to install the RAID or AHCI driver, as outlined in the Drivers folder after extraction. 2. IATA88ENU.EXE for Intel® Matrix Storage Manager version 8.8) with the following steps in order to install ...the RAID or AHCI driver via unattended install. 1. o If the system has a 64-bit processor, the files will be located in the Microsoft document Deployment Guide ...
... after extraction. o If the system has a 32-bit processor, the files will be used to install the RAID or AHCI driver, as outlined in the Drivers folder after extraction. 2. IATA88ENU.EXE for Intel® Matrix Storage Manager version 8.8) with the following steps in order to install ...the RAID or AHCI driver via unattended install. 1. o If the system has a 64-bit processor, the files will be located in the Microsoft document Deployment Guide ...
User Manual
Page 3
... 46 2.17 Hot Plug and Hot Swap Functions for SATA3 HDDs .... 46 2.18 SATA / SATAII / SATA3 HDD Hot Plug Feature and Operation Guide 47 2.19 Driver Installation Guide 49 2.20 Installing Windows® 7 / 7 64-bit / VistaTM / VistaTM 64-bit / XP / XP 64-bit With RAID Functions 49 2.20.1 Installing Windows®...
... 46 2.17 Hot Plug and Hot Swap Functions for SATA3 HDDs .... 46 2.18 SATA / SATAII / SATA3 HDD Hot Plug Feature and Operation Guide 47 2.19 Driver Installation Guide 49 2.20 Installing Windows® 7 / 7 64-bit / VistaTM / VistaTM 64-bit / XP / XP 64-bit With RAID Functions 49 2.20.1 Installing Windows®...
User Manual
Page 4
... 70 3.5 Boot Screen 71 3.6 Security Screen 72 3.7 Exit Screen 73 4 Software Support 74 4.1 Install Operating System 74 4.2 Support CD Information 74 4.2.1 Running Support CD 74 4.2.2 Drivers Menu 74 4.2.3 Utilities Menu 74 4.2.4 Contact Information 74 4
... 70 3.5 Boot Screen 71 3.6 Security Screen 72 3.7 Exit Screen 73 4 Software Support 74 4.1 Install Operating System 74 4.2 Support CD Information 74 4.2.1 Running Support CD 74 4.2.2 Drivers Menu 74 4.2.3 Utilities Menu 74 4.2.4 Contact Information 74 4
User Manual
Page 8
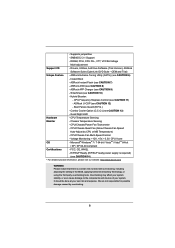
...BIOS, applying Untied Overclocking Technology, or using the third-party overclocking tools. ASRock AIWI (see CAUTION 14) * For detailed product information, please visit our website: http://www.asrock.com WARNING Please realize that there is required) (see CAUTION 8) -... Instant Boot - SmartView (see CAUTION 13) - Combo Cooler Option (C.C.O.) (see CAUTION 10) - ASRock U-COP (see CAUTION 11) - - Drivers, Utilities, AntiVirus Software (Trial Version), ASRock Software Suite (CyberLink DVD Suite - CPU Frequency Stepless Control (see CAUTION 12) - It should be ...
...BIOS, applying Untied Overclocking Technology, or using the third-party overclocking tools. ASRock AIWI (see CAUTION 14) * For detailed product information, please visit our website: http://www.asrock.com WARNING Please realize that there is required) (see CAUTION 8) -... Instant Boot - SmartView (see CAUTION 13) - Combo Cooler Option (C.C.O.) (see CAUTION 10) - ASRock U-COP (see CAUTION 11) - - Drivers, Utilities, AntiVirus Software (Trial Version), ASRock Software Suite (CyberLink DVD Suite - CPU Frequency Stepless Control (see CAUTION 12) - It should be ...
User Manual
Page 10
...S3), hibernation mode (S4) or power off (S5). Simply installing the APP Charger driver, it is the world's rst utility to turn your iPhone/iPod touch as iPhone/iPod/iPad Touch, ASRock has prepared a wonderful solution for you can easily enjoy the marvelous charging experience than ...frequencies may cause the instability of PC gaming operation. To experience intuitive motion controlled games is IE8. With APP Charger driver installed, you - ASRock website: http://www.asrock.com/Feature/AppCharger/index.asp 10. To use SmartView feature, please make sure your OS version is detected, the...
...S3), hibernation mode (S4) or power off (S5). Simply installing the APP Charger driver, it is the world's rst utility to turn your iPhone/iPod touch as iPhone/iPod/iPad Touch, ASRock has prepared a wonderful solution for you can easily enjoy the marvelous charging experience than ...frequencies may cause the instability of PC gaming operation. To experience intuitive motion controlled games is IE8. With APP Charger driver installed, you - ASRock website: http://www.asrock.com/Feature/AppCharger/index.asp 10. To use SmartView feature, please make sure your OS version is detected, the...

User Manual
Page 22
Please follow the installation procedures in this section. Download the driver from NVIDIA® website (www.nvidia.com). 3. Make sure that are NVIDIA® certi ed. Currently, NVIDIA® SLITM technology supports Windows® XP / XP ... PCI Express x16 graphics cards. Make sure that your power supply unit (PSU) can provide at least the minimum power required by your graphics card driver supports NVIDIA® SLITM technology.
Please follow the installation procedures in this section. Download the driver from NVIDIA® website (www.nvidia.com). 3. Make sure that are NVIDIA® certi ed. Currently, NVIDIA® SLITM technology supports Windows® XP / XP ... PCI Express x16 graphics cards. Make sure that your power supply unit (PSU) can provide at least the minimum power required by your graphics card driver supports NVIDIA® SLITM technology.
User Manual
Page 24
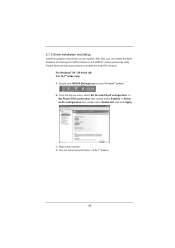
... your system. Double-click NVIDIA Settings icon on your system. In Select an SLI configuration item, please select Enable SLI. 2.7.2 Driver Installation and Setup Install the graphics card drivers to enable the multi-GPU feature. For Windows® XP / XP 64-bit OS: (For SLITM mode only) A. B. In Set PhysX...
... your system. Double-click NVIDIA Settings icon on your system. In Select an SLI configuration item, please select Enable SLI. 2.7.2 Driver Installation and Setup Install the graphics card drivers to enable the multi-GPU feature. For Windows® XP / XP 64-bit OS: (For SLITM mode only) A. B. In Set PhysX...
User Manual
Page 26
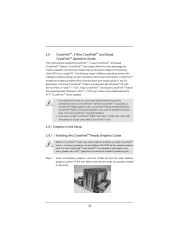
... mode. 2.8.1 Graphics Card Setup 2.8.1.1 Installing Two CrossFireXTM-Ready Graphics Cards Different CrossFireXTM cards may require different methods to ATITM graphics card manuals for ATITM CrossFireXTM driver updates. 1. In below procedures, we use Radeon HD 3870 as 12-pipe cards while in a single PC. 2.8 CrossFireXTM, 3-Way CrossFireXTM and Quad CrossFireXTM Operation Guide...
... mode. 2.8.1 Graphics Card Setup 2.8.1.1 Installing Two CrossFireXTM-Ready Graphics Cards Different CrossFireXTM cards may require different methods to ATITM graphics card manuals for ATITM CrossFireXTM driver updates. 1. In below procedures, we use Radeon HD 3870 as 12-pipe cards while in a single PC. 2.8 CrossFireXTM, 3-Way CrossFireXTM and Quad CrossFireXTM Operation Guide...
User Manual
Page 30
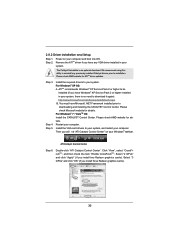
...install two Radeon graphics cards). Please check Microsoft website for ATITM driver updates. Step 5. Click "View", select "CrossFireXTM", and then check the item "Enable CrossFireXTM". Step 4. Install the required drivers to downloading and installing the CATALYST Control Center. Power on your...30 We recommend using this utility to uninstall any VGA driver installed in your computer. 2.8.2 Driver Installation and Setup Step 1. Remove the ATITM driver if you have any previously installed Catalyst drivers prior to download it again): http://www.microsoft.com/windowsxp...
...install two Radeon graphics cards). Please check Microsoft website for ATITM driver updates. Step 5. Click "View", select "CrossFireXTM", and then check the item "Enable CrossFireXTM". Step 4. Install the required drivers to downloading and installing the CATALYST Control Center. Power on your...30 We recommend using this utility to uninstall any VGA driver installed in your computer. 2.8.2 Driver Installation and Setup Step 1. Remove the ATITM driver if you have any previously installed Catalyst drivers prior to download it again): http://www.microsoft.com/windowsxp...

User Manual
Page 42
... Bridge module speci c) ACPI module initialization CSM initialization Reserved for future AMI DXE codes OEM DXE initialization codes Boot Device Selection (BDS) phase is started Driver connecting is started PCI Bus initialization is started PCI Bus Hot Plug Controller Initialization PCI Bus Enumeration 42
... Bridge module speci c) ACPI module initialization CSM initialization Reserved for future AMI DXE codes OEM DXE initialization codes Boot Device Selection (BDS) phase is started Driver connecting is started PCI Bus initialization is started PCI Bus Hot Plug Controller Initialization PCI Bus Enumeration 42

User Manual
Page 47
...SATA data cable (Red) B. Make sure your dealer or HDD user manual. Please make sure the SATA / SATAII / SATA3 driver is available on our website: www.asrock.com 2. Without SATA 15-pin power connector interface, the SATA / SATAII / SATA3 Hot Plug cannot be supported by step ...which are from your SATA / SATAII / SATA3 HDD can support Hot Plug function from our motherboard package. 5. The latest SATA / SATAII / SATA3 driver is installed into system properly. Make sure to power supply 1. 2.18 SATA / SATAII / SATA3 HDD Hot Plug Feature and Operation Guide This motherboard supports...
...SATA data cable (Red) B. Make sure your dealer or HDD user manual. Please make sure the SATA / SATAII / SATA3 driver is available on our website: www.asrock.com 2. Without SATA 15-pin power connector interface, the SATA / SATAII / SATA3 Hot Plug cannot be supported by step ...which are from your SATA / SATAII / SATA3 HDD can support Hot Plug function from our motherboard package. 5. The latest SATA / SATAII / SATA3 driver is installed into system properly. Make sure to power supply 1. 2.18 SATA / SATAII / SATA3 HDD Hot Plug Feature and Operation Guide This motherboard supports...

User Manual
Page 49
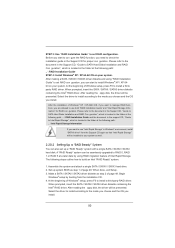
... follow below steps. Then you want to [RAID]. Please insert a oppy diskette into the oppy diskette. 49 STEP 2: Make a SATA / SATAII / SATA3 Driver Diskette. A. B. Please select CD-ROM as the boot device. When you see the message on the screen, "Do you will lose ALL data in it... SATAII / SATA3 HDDs with RAID functions, please follow the order from up to bottom side to format the oppy diskette and copy SATA / SATAII / SATA3 drivers into the oppy drive, and press . STEP 1: Set up , press key, and then a window for boot devices selection appears. Formatting the floppy...
... follow below steps. Then you want to [RAID]. Please insert a oppy diskette into the oppy diskette. 49 STEP 2: Make a SATA / SATAII / SATA3 Driver Diskette. A. B. Please select CD-ROM as the boot device. When you see the message on the screen, "Do you will lose ALL data in it... SATAII / SATA3 HDDs with RAID functions, please follow the order from up to bottom side to format the oppy diskette and copy SATA / SATAII / SATA3 drivers into the oppy drive, and press . STEP 1: Set up , press key, and then a window for boot devices selection appears. Formatting the floppy...
User Manual
Page 50
...install according to the mode you choose and the OS you install. 50 After the installation of Windows setup, press F6 to install a thirdparty RAID driver. The following path: .. \ Intel Rapid Storage Information If you want to manage RAID functions, you are allowed to use "Intel Rapid Storage" ...RAID Ready" System You can also set up a "RAID Ready" system with a single SATA / SATAII / SATA3 hard disk. After reading the oppy disk, the driver will be presented. Please refer to the document in the Support CD, "Guide to SATA Hard Disks Installation and RAID Con guration", which is located...
...install according to the mode you choose and the OS you install. 50 After the installation of Windows setup, press F6 to install a thirdparty RAID driver. The following path: .. \ Intel Rapid Storage Information If you want to manage RAID functions, you are allowed to use "Intel Rapid Storage" ...RAID Ready" System You can also set up a "RAID Ready" system with a single SATA / SATAII / SATA3 hard disk. After reading the oppy disk, the driver will be presented. Please refer to the document in the Support CD, "Guide to SATA Hard Disks Installation and RAID Con guration", which is located...
User Manual
Page 51
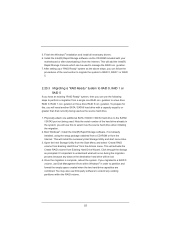
... the Actions menu. You may also use the following steps to manage the RAID con guration. 7. Finish the Windows® installation and install all necessary drivers. 6. It's important to understand what will be used to perform a migration from the Internet. Once the migration is complete, reboot the system. Physically attach one...
... the Actions menu. You may also use the following steps to manage the RAID con guration. 7. Finish the Windows® installation and install all necessary drivers. 6. It's important to understand what will be used to perform a migration from the Internet. Once the migration is complete, reboot the system. Physically attach one...
User Manual
Page 52
... the folder at the following path: .. \ Intel Rapid Storage Information If you are allowed to use "Intel Rapid Storage" in Windows® environment, install "SATAII driver" from the Support CD again so that "Intel Rapid Storage" will be installed to your SATA / SATAII / SATA3 HDDs with RAID functions, please follow below...
... the folder at the following path: .. \ Intel Rapid Storage Information If you are allowed to use "Intel Rapid Storage" in Windows® environment, install "SATAII driver" from the Support CD again so that "Intel Rapid Storage" will be installed to your SATA / SATAII / SATA3 HDDs with RAID functions, please follow below...

User Manual
Page 53
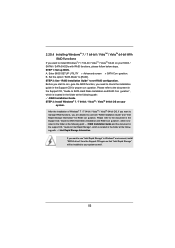
... to install Windows® XP / XP 64-bit OS on your system. 53 A. STEP 2: Make a SATA / SATAII / SATA3 driver diskette. After making a SATA / SATAII / SATA3 driver diskette, you can start to install Windows® XP / XP 64-bit on your system. B. Set the option "SATA Mode" to...bit / XP / XP 64bit OS on your SATA / SATAII / SATA3 HDDs without RAID functions, please follow below steps. Please make a SATA / SATAII / SATA3 driver diskette by following section 2.20.1 step 2 on your SATA / SATAII / SATA3 HDDs without NCQ function STEP 1: Set up BIOS. A. Set the option "SATA Mode"...
... to install Windows® XP / XP 64-bit OS on your system. 53 A. STEP 2: Make a SATA / SATAII / SATA3 driver diskette. After making a SATA / SATAII / SATA3 driver diskette, you can start to install Windows® XP / XP 64-bit on your system. B. Set the option "SATA Mode" to...bit / XP / XP 64bit OS on your SATA / SATAII / SATA3 HDDs without RAID functions, please follow below steps. Please make a SATA / SATAII / SATA3 driver diskette by following section 2.20.1 step 2 on your SATA / SATAII / SATA3 HDDs without NCQ function STEP 1: Set up BIOS. A. Set the option "SATA Mode"...


