User Manual
Page 3
...14 2.1 CPU Installation 15 2.2 Installation of CPU Fan and Heatsink 15 2.3 Installation of Memory Modules (DIMM 16 2.4 Expansion Slots (PCI and PCI Express Slots 17 2.5 Easy Multi Monitor Feature 18 2.6 Jumpers Setup 19 2.7 Onboard Headers and Connectors 20 2.8 SATAII Hard Disk Setup Guide 24 2.9 Serial ATA (SATA) / Serial ATAII (SATAII) Hard Disks Installation 25 2.10 Hot Plug and Hot Swap Functions for SATA / SATAII HDDs .... 25 2.11 SATA / SATAII HDD Hot Plug Feature and Operation Guide ..... 26 2.12 Driver Installation Guide 28 2.13 Installing Windows® 7 / 7 64-bit / VistaTM...
...14 2.1 CPU Installation 15 2.2 Installation of CPU Fan and Heatsink 15 2.3 Installation of Memory Modules (DIMM 16 2.4 Expansion Slots (PCI and PCI Express Slots 17 2.5 Easy Multi Monitor Feature 18 2.6 Jumpers Setup 19 2.7 Onboard Headers and Connectors 20 2.8 SATAII Hard Disk Setup Guide 24 2.9 Serial ATA (SATA) / Serial ATAII (SATAII) Hard Disks Installation 25 2.10 Hot Plug and Hot Swap Functions for SATA / SATAII HDDs .... 25 2.11 SATA / SATAII HDD Hot Plug Feature and Operation Guide ..... 26 2.12 Driver Installation Guide 28 2.13 Installing Windows® 7 / 7 64-bit / VistaTM...
User Manual
Page 9
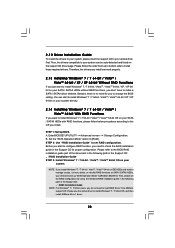
... able to SATAII connector directly. 10. You can press key during the POST or press key to BIOS setup menu to access ASRock Instant Flash. With this tool and save the new BIOS file to your USB flash drive, floppy disk or hard drive, then you can also connect SATA hard disk to provide exceptional power saving and improve power efficiency without sacrificing computing performance. Just launch this utility, you can update your hardware devices to get the...
... able to SATAII connector directly. 10. You can press key during the POST or press key to BIOS setup menu to access ASRock Instant Flash. With this tool and save the new BIOS file to your USB flash drive, floppy disk or hard drive, then you can also connect SATA hard disk to provide exceptional power saving and improve power efficiency without sacrificing computing performance. Just launch this utility, you can update your hardware devices to get the...
User Manual
Page 11
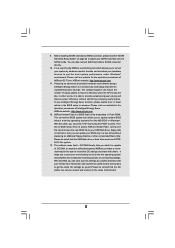
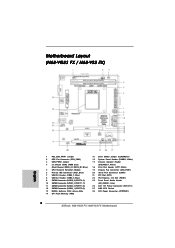
... Header (SPEAKER 1, White) 18 Print Port Header (LPT1, White) 19 Chassis Fan Connector (CHA_FAN1) 20 Serial Port Connector (COM1) 21 PCI Slot (PCI1) 22 PCI Express x16 Slot (PCIE1) 23 Front Panel Audio Header (HD_AUDIO1, Lime) 24 ATX 12V Power Connector (ATX12V1) 25 AM3 CPU Socket 26 ATX Power Connector (ATXPWR1) 11 1.3 Motherboard Layout (N68-VGS3 FX / N68-VS3 FX) 26 USB 2.0 T: USB2 B: USB3 VGA1 PS2 Mouse PS2 Keyboard 1 2 3 17.8cm (7.0-in) Support 8-Core CPU 1 PS2_USB_PWR1 CPU_FAN1 1 USB_PWR2 DDR3_B1 (64 bit, 240-FpSin Bm8od0u0le) 4 DDR3_A1 (64 bit, 240-pin module) Dual Channel...
... Header (SPEAKER 1, White) 18 Print Port Header (LPT1, White) 19 Chassis Fan Connector (CHA_FAN1) 20 Serial Port Connector (COM1) 21 PCI Slot (PCI1) 22 PCI Express x16 Slot (PCIE1) 23 Front Panel Audio Header (HD_AUDIO1, Lime) 24 ATX 12V Power Connector (ATX12V1) 25 AM3 CPU Socket 26 ATX Power Connector (ATXPWR1) 11 1.3 Motherboard Layout (N68-VGS3 FX / N68-VS3 FX) 26 USB 2.0 T: USB2 B: USB3 VGA1 PS2 Mouse PS2 Keyboard 1 2 3 17.8cm (7.0-in) Support 8-Core CPU 1 PS2_USB_PWR1 CPU_FAN1 1 USB_PWR2 DDR3_B1 (64 bit, 240-FpSin Bm8od0u0le) 4 DDR3_A1 (64 bit, 240-pin module) Dual Channel...
User Manual
Page 18
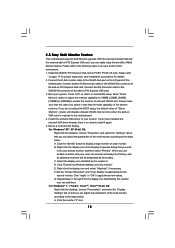
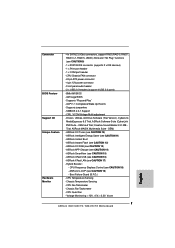
... additional monitors will disable onboard VGA/D-Sub function when the add-on PCI Express VGA card, you can adjust the parameters of the multi-monitor according to enter BIOS setup. A. Right-click the display icon in the Display Properties dialog that you can easily enjoy the benefits of this motherboard. Connect the DVI-D monitor cable to install it again. 5. If you select is no need to the VGA/DVI-D connector of...
... additional monitors will disable onboard VGA/D-Sub function when the add-on PCI Express VGA card, you can adjust the parameters of the multi-monitor according to enter BIOS setup. A. Right-click the display icon in the Display Properties dialog that you can easily enjoy the benefits of this motherboard. Connect the DVI-D monitor cable to install it again. 5. If you select is no need to the VGA/DVI-D connector of...

User Manual
Page 24
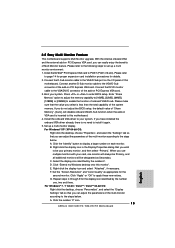
... the updates. 24 SAMSUNG 7531 8642 If pin 3 and pin 4 are just for details: http://www.hitachigst.com/hdd/support/download.htm The above examples are shorted, SATA 1.5Gb/s will be enabled. 2 . 8 SATAII Hard Disk Setup Guide Before installing SATAII hard disk to your SATAII hard disk to SATAII mode in advance; Western Digital 7531 8642 If pin 5 and pin 6 are shorted, SATA 1.5Gb/s will be enabled. Please visit the vendors' website for changing various...
... the updates. 24 SAMSUNG 7531 8642 If pin 3 and pin 4 are just for details: http://www.hitachigst.com/hdd/support/download.htm The above examples are shorted, SATA 1.5Gb/s will be enabled. 2 . 8 SATAII Hard Disk Setup Guide Before installing SATAII hard disk to your SATAII hard disk to SATAII mode in advance; Western Digital 7531 8642 If pin 5 and pin 6 are shorted, SATA 1.5Gb/s will be enabled. Please visit the vendors' website for changing various...
User Manual
Page 28
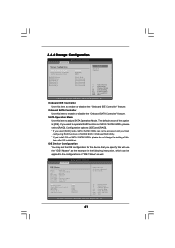
... load RAID driver from up "SATA Operation Mode" to [RAID] in the Support CD: .. \ RAID Installation Guide NOTE. STEP 1: Set Up BIOS. Enter BIOS SETUP UTILITY Advanced screen Storage Configuration. Please use the native driver to check the RAID installation guide in -1 driver. 28 You can be auto-detected and listed on your optical drive first. If you install Windows® 7 / 7 64-bit / VistaTM / VistaTM 64-bit on IDE HDDs and want to install Windows® 7 / 7 64-bit / VistaTM / VistaTM 64-bit OS on your system directly. 2.14 Installing Windows...
... load RAID driver from up "SATA Operation Mode" to [RAID] in the Support CD: .. \ RAID Installation Guide NOTE. STEP 1: Set Up BIOS. Enter BIOS SETUP UTILITY Advanced screen Storage Configuration. Please use the native driver to check the RAID installation guide in -1 driver. 28 You can be auto-detected and listed on your optical drive first. If you install Windows® 7 / 7 64-bit / VistaTM / VistaTM 64-bit on IDE HDDs and want to install Windows® 7 / 7 64-bit / VistaTM / VistaTM 64-bit OS on your system directly. 2.14 Installing Windows...

User Manual
Page 34
... as listed: [400MHz DDR3_800], [533MHz DDR3_1066], [667MHz DDR3_1333] and [800MHz DDR3_1600]. HT Bus Speed This feature allows you to adjust the value of processor voltage. BIOS SETUP UTILITY Main OC Tweaker Advanced H/W Monitor Boot Security Exit CPU Configuration Overclock Mode CPU Frequency (MHz) PCIE Frequency (MHz) Boot Failure Guard Boot Failure Guard Count CPU/LDT Spread Spectrum PCIE Spread Spectrum SATA Spread Spectrum ASRock UCC AMD Turbo Core Technology AMD IO C-State Support CPU Active Core Control [Auto] [200] [100] [Enabled] [3] [Enabled] [Enabled] [Enabled] [Disabled...
... as listed: [400MHz DDR3_800], [533MHz DDR3_1066], [667MHz DDR3_1333] and [800MHz DDR3_1600]. HT Bus Speed This feature allows you to adjust the value of processor voltage. BIOS SETUP UTILITY Main OC Tweaker Advanced H/W Monitor Boot Security Exit CPU Configuration Overclock Mode CPU Frequency (MHz) PCIE Frequency (MHz) Boot Failure Guard Boot Failure Guard Count CPU/LDT Spread Spectrum PCIE Spread Spectrum SATA Spread Spectrum ASRock UCC AMD Turbo Core Technology AMD IO C-State Support CPU Active Core Control [Auto] [200] [100] [Enabled] [3] [Enabled] [Enabled] [Enabled] [Disabled...
User Manual
Page 41
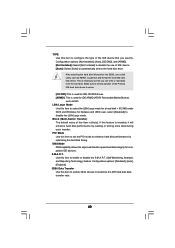
... HDDs can be accessed until you finish configuring RAID functions in NVIDIA BIOS / Windows RAID Utility. * If you want to the system. +F1 F9 F10 ESC Select Screen Select Item Change Option General Help Load Defaults Save and Exit Exit v02.54 (C) Copyright 1985-2003, American Megatrends, Inc. 41 Onboard IDE Controller Use this item after OS installation. SATA Operation Mode Use this item to the configurations of this item to enable or disable...
... HDDs can be accessed until you finish configuring RAID functions in NVIDIA BIOS / Windows RAID Utility. * If you want to the system. +F1 F9 F10 ESC Select Screen Select Item Change Option General Help Load Defaults Save and Exit Exit v02.54 (C) Copyright 1985-2003, American Megatrends, Inc. 41 Onboard IDE Controller Use this item after OS installation. SATA Operation Mode Use this item to the configurations of this item to enable or disable...
User Manual
Page 42
.... 42 Configuration options: [Not Installed], [Auto], [CD/DVD], and [ARMD]. [Not Installed]: Select [Not Installed] to active. [CD/DVD]:This is used for a hard disk > 512 MB under DOS and Windows; This is enabled, it will enhance hard disk performance by optimizing the hard disk timing. Use this item to partition and format the new IDE hard disk drives. for compatible IDE devices. Block (Multi-Sector Transfer) The default value of the Primary IDE hard disk drives to disable the use a disk utility, such...
.... 42 Configuration options: [Not Installed], [Auto], [CD/DVD], and [ARMD]. [Not Installed]: Select [Not Installed] to active. [CD/DVD]:This is used for a hard disk > 512 MB under DOS and Windows; This is enabled, it will enhance hard disk performance by optimizing the hard disk timing. Use this item to partition and format the new IDE hard disk drives. for compatible IDE devices. Block (Multi-Sector Transfer) The default value of the Primary IDE hard disk drives to disable the use a disk utility, such...

User Manual
Page 45
...Keyboard/Remote Power On [Disabled] USB Mouse Power On [Disabled] To enable or disable the onboard USB controllers. +F1 F9 F10 ESC Select Screen Select Item Change Option General Help Load Defaults Save and Exit Exit v02.54 (C) Copyright 1985-2005, American Megatrends, Inc. The default value is recommended to select [Disabled] to enable or disable the USB 2.0 support. Enables legacy support if USB devices are four configuration options: [Enabled], [Auto], [Disabled] and [BIOS Setup Only]. USB Controller Use this item to enter OS. [BIOS Setup Only] - There are connected. [Disabled...
...Keyboard/Remote Power On [Disabled] USB Mouse Power On [Disabled] To enable or disable the onboard USB controllers. +F1 F9 F10 ESC Select Screen Select Item Change Option General Help Load Defaults Save and Exit Exit v02.54 (C) Copyright 1985-2005, American Megatrends, Inc. The default value is recommended to select [Disabled] to enable or disable the USB 2.0 support. Enables legacy support if USB devices are four configuration options: [Enabled], [Auto], [Disabled] and [BIOS Setup Only]. USB Controller Use this item to enter OS. [BIOS Setup Only] - There are connected. [Disabled...
User Manual
Page 50
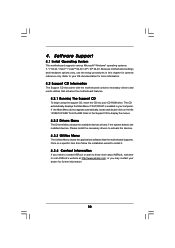
... motherboard settings and hardware options vary, use the setup procedures in your CD-ROM drive. Software Support 4.1 Install Operating System This motherboard supports various Microsoft® Windows® operating systems: 7 / 7 64-bit / VistaTM / VistaTM 64-bit / XP / XP 64-bit. Please install the necessary drivers to know more information. 4.2 Support CD Information The Support CD that came with the motherboard contains necessary drivers and useful utilities that the motherboard supports. If the Main Menu did not appear automatically, locate...
... motherboard settings and hardware options vary, use the setup procedures in your CD-ROM drive. Software Support 4.1 Install Operating System This motherboard supports various Microsoft® Windows® operating systems: 7 / 7 64-bit / VistaTM / VistaTM 64-bit / XP / XP 64-bit. Please install the necessary drivers to know more information. 4.2 Support CD Information The Support CD that came with the motherboard contains necessary drivers and useful utilities that the motherboard supports. If the Main Menu did not appear automatically, locate...
Quick Installation Guide
Page 2
...) 16 System Panel Header (PANEL1, White) 17 Chassis Speaker Header (SPEAKER 1, White) 18 Print Port Header (LPT1, White) 19 Chassis Fan Connector (CHA_FAN1) 20 Serial Port Connector (COM1) 21 PCI Slot (PCI1) 22 PCI Express x16 Slot (PCIE1) 23 Front Panel Audio Header (HD_AUDIO1, Lime) 24 ATX 12V Power Connector (ATX12V1) 25 AM3 CPU Socket 26 ATX Power Connector (ATXPWR1) 2 ASRock N68-VGS3 FX / N68-VS3 FX Motherboard Motherboard Layout (N68-VGS3 FX / N68-VS3 FX) English 1 PS2_USB_PWR1 Jumper 2 CPU Fan Connector (CPU_FAN1) 3 USB_PWR2 Jumper 4 2 x 240-pin DDR3 DIMM Slots (Dual Channel: DDR3_A1...
...) 16 System Panel Header (PANEL1, White) 17 Chassis Speaker Header (SPEAKER 1, White) 18 Print Port Header (LPT1, White) 19 Chassis Fan Connector (CHA_FAN1) 20 Serial Port Connector (COM1) 21 PCI Slot (PCI1) 22 PCI Express x16 Slot (PCIE1) 23 Front Panel Audio Header (HD_AUDIO1, Lime) 24 ATX 12V Power Connector (ATX12V1) 25 AM3 CPU Socket 26 ATX Power Connector (ATXPWR1) 2 ASRock N68-VGS3 FX / N68-VS3 FX Motherboard Motherboard Layout (N68-VGS3 FX / N68-VS3 FX) English 1 PS2_USB_PWR1 Jumper 2 CPU Fan Connector (CPU_FAN1) 3 USB_PWR2 Jumper 4 2 x 240-pin DDR3 DIMM Slots (Dual Channel: DDR3_A1...
Quick Installation Guide
Page 7
...RAID 0, RAID 1, RAID 0+1, RAID 5, JBOD), NCQ and "Hot Plug" functions (see CAUTION 19) - ASRock U-COP (see CAUTION 9) - 1 x ATA133 IDE connector (supports 2 x IDE devices) - 1 x Print port header - 1 x COM port header - CPU Fan Tachometer - Voltage Monitoring: +12V, +5V, +3.3V, Vcore English 7 ASRock N68-VGS3 FX / N68-VS3 FX Motherboard CPU, VCCM Voltage Multi-adjustment - Chassis Temperature Sensing - ASRock OC DNA (see CAUTION 13) - ASRock MAGIX Multimedia Suite - ASRock Instant Boot - Chassis Fan Tachometer - CPU/Chassis FAN connector - 24 pin ATX power connector - 4 pin...
...RAID 0, RAID 1, RAID 0+1, RAID 5, JBOD), NCQ and "Hot Plug" functions (see CAUTION 19) - ASRock U-COP (see CAUTION 9) - 1 x ATA133 IDE connector (supports 2 x IDE devices) - 1 x Print port header - 1 x COM port header - CPU Fan Tachometer - Voltage Monitoring: +12V, +5V, +3.3V, Vcore English 7 ASRock N68-VGS3 FX / N68-VS3 FX Motherboard CPU, VCCM Voltage Multi-adjustment - Chassis Temperature Sensing - ASRock OC DNA (see CAUTION 13) - ASRock MAGIX Multimedia Suite - ASRock Instant Boot - Chassis Fan Tachometer - CPU/Chassis FAN connector - 24 pin ATX power connector - 4 pin...

Quick Installation Guide
Page 9
... Tuner. To use FAT32/ 16/12 file system. 13. It is a BIOS flash utility embedded in advance. The voltage regulator can also connect SATA hard disk to access ASRock Instant Flash. Your friends then can press key during the POST or press key to BIOS setup menu to SATAII connector directly. 10. 9. Before installing SATAII hard disk to provide exceptional power saving and improve power efficiency without sacrificing computing performance. ASRock Instant Flash is a user-friendly ASRock overclocking tool which...
... Tuner. To use FAT32/ 16/12 file system. 13. It is a BIOS flash utility embedded in advance. The voltage regulator can also connect SATA hard disk to access ASRock Instant Flash. Your friends then can press key during the POST or press key to BIOS setup menu to SATAII connector directly. 10. 9. Before installing SATAII hard disk to provide exceptional power saving and improve power efficiency without sacrificing computing performance. ASRock Instant Flash is a user-friendly ASRock overclocking tool which...
Quick Installation Guide
Page 15
... Windows desktop onto this motherboard. A. Click the number "2" icon. 15 ASRock N68-VGS3 FX / N68-VS3 FX Motherboard English Connect the D-Sub monitor cable to display a large number on PCI Express VGA card. Boot your system. Set up a multi monitor environment: 1. Click the "Identify" button to the VGA/D-Sub port on PCI Express VGA card, you use multiple monitors with your primary monitor, and then select "Primary". Right-click the display icon and select "Attached", if necessary. Click "Apply" or "OK" to enter BIOS setup...
... Windows desktop onto this motherboard. A. Click the number "2" icon. 15 ASRock N68-VGS3 FX / N68-VS3 FX Motherboard English Connect the D-Sub monitor cable to display a large number on PCI Express VGA card. Boot your system. Set up a multi monitor environment: 1. Click the "Identify" button to the VGA/D-Sub port on PCI Express VGA card, you use multiple monitors with your primary monitor, and then select "Primary". Right-click the display icon and select "Attached", if necessary. Click "Apply" or "OK" to enter BIOS setup...
Quick Installation Guide
Page 20
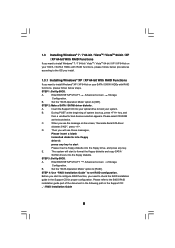
.... Therefore, the drivers you install can work properly. 2.9 Installing Windows® 7 / 7 64-bit / VistaTM / VistaTM 64-bit / XP / XP 64-bit Without RAID Functions If you to this connector. Then, the drivers compatible to your SATA / SATAII HDDs with ATX 12V plug to change the BIOS setting. ATX 12V Power Connector (4-pin ATX12V1) (see p.2 No. 10) Serial port Header (9-pin COM1) (see p.2 No.20) Please note that it is no need for detailed procedures: ..\ RAID Installation Guide English 20 ASRock N68-VGS3 FX / N68-VS3 FX Motherboard
.... Therefore, the drivers you install can work properly. 2.9 Installing Windows® 7 / 7 64-bit / VistaTM / VistaTM 64-bit / XP / XP 64-bit Without RAID Functions If you to this connector. Then, the drivers compatible to your SATA / SATAII HDDs with ATX 12V plug to change the BIOS setting. ATX 12V Power Connector (4-pin ATX12V1) (see p.2 No. 10) Serial port Header (9-pin COM1) (see p.2 No.20) Please note that it is no need for detailed procedures: ..\ RAID Installation Guide English 20 ASRock N68-VGS3 FX / N68-VS3 FX Motherboard
Quick Installation Guide
Page 21
... BIOS Setup, please refer to the User Manual (PDF file) contained in the fixed mode so that will display the Main Menu automatically if "AUTORUN" is a menu-driven program, which means during overclocking, but PCI / PCIE buses are in the Support CD. 4. To begin using the Support CD, insert the CD into your computer. It is enabled in the Support CD to display the menus. 21 ASRock N68-VGS3 FX / N68-VS3 FX Motherboard English 2.11 Untied Overclocking Technology...
... BIOS Setup, please refer to the User Manual (PDF file) contained in the fixed mode so that will display the Main Menu automatically if "AUTORUN" is a menu-driven program, which means during overclocking, but PCI / PCIE buses are in the Support CD. 4. To begin using the Support CD, insert the CD into your computer. It is enabled in the Support CD to display the menus. 21 ASRock N68-VGS3 FX / N68-VS3 FX Motherboard English 2.11 Untied Overclocking Technology...
RAID Installation Guide
Page 5
... "SATA Operation Mode" option to [IDE]. Please refer to the BIOS RAID installation guide part of system boot-up, press key, and then a window for proper configuration. Set the "SATA Operation Mode" option to [RAID]. During POST at the beginning of the document in the following path in the Support CD for boot devices selection appears. Please select CD-ROM as the boot device. When you see these messages, Please insert a blank formatted diskette into floppy drive...
... "SATA Operation Mode" option to [IDE]. Please refer to the BIOS RAID installation guide part of system boot-up, press key, and then a window for proper configuration. Set the "SATA Operation Mode" option to [RAID]. During POST at the beginning of the document in the following path in the Support CD for boot devices selection appears. Please select CD-ROM as the boot device. When you see these messages, Please insert a blank formatted diskette into floppy drive...
RAID Installation Guide
Page 7
... to load the NVIDIA® RAID drivers. Then, please set RAID configuration. Set the "SATA Operation Mode" option to boot your system. NVIDIA® RAID drivers are in the following path in BIOS first. Enter BIOS SETUP UTILITY Advanced screen Storage Configuration. Please use the native driver to install Windows® 7 / 7 64-bit OS, and then install ASRock All-in the Support CD: .. \ RAID Installation Guide NOTE. For Windows® 7 / 7 64-bit users, you need to load RAID driver from ASRock support CD. Please refer to the BIOS RAID installation guide part of...
... to load the NVIDIA® RAID drivers. Then, please set RAID configuration. Set the "SATA Operation Mode" option to boot your system. NVIDIA® RAID drivers are in the following path in BIOS first. Enter BIOS SETUP UTILITY Advanced screen Storage Configuration. Please use the native driver to install Windows® 7 / 7 64-bit OS, and then install ASRock All-in the Support CD: .. \ RAID Installation Guide NOTE. For Windows® 7 / 7 64-bit users, you need to load RAID driver from ASRock support CD. Please refer to the BIOS RAID installation guide part of...
RAID Installation Guide
Page 11
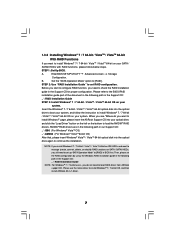
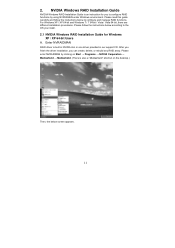
... RAID array. For Windows XP / XP 64-bit and Windows 7 / 7 64-bit / Vista / Vista 64-bit, there are different installation procedures. 2. NVIDIA Windows RAID Installation Guide NVIDIA Windows RAID Installation Guide is built in NVIDIA ALL in one driver provided in our support CD. Please enter NVRAIDMAN by using NVIDIAMAN under Windows environment. Enter NVRAIDMAN RAID driver is an instruction for Windows XP / XP 64-bit Users A. Please read this guide carefully and follow the instructions below according to configure...
... RAID array. For Windows XP / XP 64-bit and Windows 7 / 7 64-bit / Vista / Vista 64-bit, there are different installation procedures. 2. NVIDIA Windows RAID Installation Guide NVIDIA Windows RAID Installation Guide is built in NVIDIA ALL in one driver provided in our support CD. Please enter NVRAIDMAN by using NVIDIAMAN under Windows environment. Enter NVRAIDMAN RAID driver is an instruction for Windows XP / XP 64-bit Users A. Please read this guide carefully and follow the instructions below according to configure...


