
RAID Installation Guide
Page 5
... the OS you install. Please select CD-ROM as the boot device. C. When you will start to continue Please insert a floppy diskette into the floppy drive. Then you see these messages, Please choose: 1. A. Generate RAID Driver diskette for WindowsXP 2. STEP 1: Set Up BIOS. Enter BIOS SETUP UTILITY Advanced screen IDE Configuration. Set the "SATA Operation Mode" option to [RAID]. 5 STEP 2: Make a SATA / SATAII Driver Diskette. Select your system. (There are two ASRock Support CD in the motherboard gift box...
... the OS you install. Please select CD-ROM as the boot device. C. When you will start to continue Please insert a floppy diskette into the floppy drive. Then you see these messages, Please choose: 1. A. Generate RAID Driver diskette for WindowsXP 2. STEP 1: Set Up BIOS. Enter BIOS SETUP UTILITY Advanced screen IDE Configuration. Set the "SATA Operation Mode" option to [RAID]. 5 STEP 2: Make a SATA / SATAII Driver Diskette. Select your system. (There are two ASRock Support CD in the motherboard gift box...
RAID Installation Guide
Page 7
... below steps. Enter BIOS SETUP UTILITY Advanced screen IDE Configuration. STEP 2: Use "RAID Installation Guide" to [RAID]. If you install Windows® VistaTM / Windows® VistaTM 64-bit on IDE HDDs and want to manage (create, convert, delete, or rebuild) RAID functions on your system. Insert the Windows® VistaTM / Windows® VistaTM 64-bit optical disk into your optical drive, and click the "Load Driver" button on the left on your system. STEP 1: Set Up BIOS. 1.3.2 Installing Windows® VistaTM...
... below steps. Enter BIOS SETUP UTILITY Advanced screen IDE Configuration. STEP 2: Use "RAID Installation Guide" to [RAID]. If you install Windows® VistaTM / Windows® VistaTM 64-bit on IDE HDDs and want to manage (create, convert, delete, or rebuild) RAID functions on your system. Insert the Windows® VistaTM / Windows® VistaTM 64-bit optical disk into your optical drive, and click the "Load Driver" button on the left on your system. STEP 1: Set Up BIOS. 1.3.2 Installing Windows® VistaTM...
RAID Installation Guide
Page 11
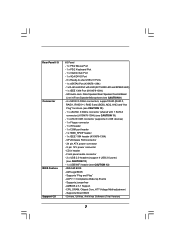
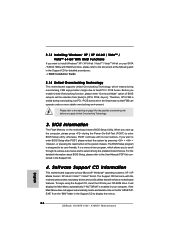
... the desktop.) Then, below to the OS you install. 2.1 NVIDIA Windows RAID Installation Guide for you can create, delete, or rebuild any RAID array. For Windows XP / XP 64-bit and Windows Vista / Vista 64-bit, there are different installation procedures. Please follow the instructions below screen appears. 11 Please enter NVRAIDMAN by using NVIDIAMAN under Windows environment. Enter NVRAIDMAN RAID driver is an instruction for Windows XP / XP 64-bit Users A. NVIDIA Windows RAID Installation Guide NVIDIA Windows RAID Installation Guide...
... the desktop.) Then, below to the OS you install. 2.1 NVIDIA Windows RAID Installation Guide for you can create, delete, or rebuild any RAID array. For Windows XP / XP 64-bit and Windows Vista / Vista 64-bit, there are different installation procedures. Please follow the instructions below screen appears. 11 Please enter NVRAIDMAN by using NVIDIAMAN under Windows environment. Enter NVRAIDMAN RAID driver is an instruction for Windows XP / XP 64-bit Users A. NVIDIA Windows RAID Installation Guide NVIDIA Windows RAID Installation Guide...
User Manual
Page 7
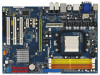
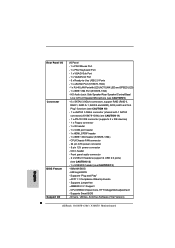
...Drivers, Utilities, AntiVirus Software (Trial Version) 7 Rear Panel I/O Connector BIOS Feature Support CD I/O Panel - 1 x PS/2 Mouse Port - 1 x PS/2 Keyboard Port - 1 x VGA/D-Sub Port - 1 x VGA/DVI-D Port - 6 x Ready-to-Use USB 2.0 Ports - 1 x eSATAII Port (K10N78-1394) - 1 x RJ-45 LAN Port with 1 SATAII connector) (K10N78-1394) (see CAUTION 11) - 1 x ATA133 IDE connector (supports 2 x IDE devices) - 1 x Floppy connector - 1 x IR header - 1 x COM port header - 1 x HDMI_SPDIF header - 1 x IEEE 1394 header (K10N78-1394) - Supports "Plug and Play" - CPU, DRAM, Chipset Core, HTT Voltage...
...Drivers, Utilities, AntiVirus Software (Trial Version) 7 Rear Panel I/O Connector BIOS Feature Support CD I/O Panel - 1 x PS/2 Mouse Port - 1 x PS/2 Keyboard Port - 1 x VGA/D-Sub Port - 1 x VGA/DVI-D Port - 6 x Ready-to-Use USB 2.0 Ports - 1 x eSATAII Port (K10N78-1394) - 1 x RJ-45 LAN Port with 1 SATAII connector) (K10N78-1394) (see CAUTION 11) - 1 x ATA133 IDE connector (supports 2 x IDE devices) - 1 x Floppy connector - 1 x IR header - 1 x COM port header - 1 x HDMI_SPDIF header - 1 x IEEE 1394 header (K10N78-1394) - Supports "Plug and Play" - CPU, DRAM, Chipset Core, HTT Voltage...
User Manual
Page 9
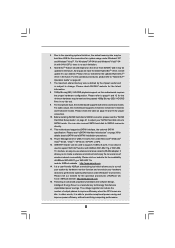
... Hard Disk Setup Guide" on the driver from NVIDIA® and it may be used to support 2 USB 2.0 ports. ASRock website http://www.asrock.com 14. Due to the operating system limitation, the actual memory size may be used to support WiFi+AP function with 64-bit CPU, there is subject to "Hybrid SLITM Operation Guide" on this motherboard requires the proper hardware configuration. Power Management for the availability of wireless network connectivity...
... Hard Disk Setup Guide" on the driver from NVIDIA® and it may be used to support 2 USB 2.0 ports. ASRock website http://www.asrock.com 14. Due to the operating system limitation, the actual memory size may be used to support WiFi+AP function with 64-bit CPU, there is subject to "Hybrid SLITM Operation Guide" on this motherboard requires the proper hardware configuration. Power Management for the availability of wireless network connectivity...
User Manual
Page 25
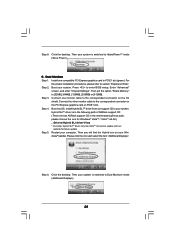
... two ASRock support CD in the motherboard gift box pack, please choose the one compatible PCI Express graphics card to PCIE1 slot (green). Then you will find the Hybrid icon on the I/O shield. Additional Displays 25 Enter "Advanced" screen, and enter "Chipset Settings". Step 4. Boot into OS. Install Hybrid SLITM driver from our support CD to your system is switched to HybridPowerTM mode (Save Power). Install one for Windows® VistaTM / VistaTM 64-bit.) ..\Drivers\Hybrid SLI driver...
... two ASRock support CD in the motherboard gift box pack, please choose the one compatible PCI Express graphics card to PCIE1 slot (green). Then you will find the Hybrid icon on the I/O shield. Additional Displays 25 Enter "Advanced" screen, and enter "Chipset Settings". Step 4. Boot into OS. Install Hybrid SLITM driver from our support CD to your system is switched to HybridPowerTM mode (Save Power). Install one for Windows® VistaTM / VistaTM 64-bit.) ..\Drivers\Hybrid SLI driver...
User Manual
Page 29
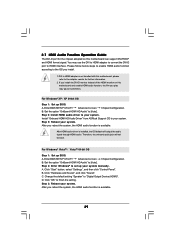
Enter BIOS SETUP UTILITY Advanced screen Chipset Configuration. Install "Onboard HDMI HD Audio Driver" from ASRock Support CD to [Auto]. Step 3: Reboot your system. D. Step 3: Reboot your system. Set the option "OnBoard HDMI HD Audio" to your system. Click "Start" button, select "Settings", and then click "Control Panel". Click "Hardware and Sound", and click "Sound". Change the default setting "Speaker" to your system manually. For Windows® XP / XP 64-bit OS Step 1: Set up your system. A. Step 2: Install HDMI audio driver to "Digital Output Device (HDMI...
Enter BIOS SETUP UTILITY Advanced screen Chipset Configuration. Install "Onboard HDMI HD Audio Driver" from ASRock Support CD to [Auto]. Step 3: Reboot your system. D. Step 3: Reboot your system. Set the option "OnBoard HDMI HD Audio" to your system. Click "Start" button, select "Settings", and then click "Control Panel". Click "Hardware and Sound", and click "Sound". Change the default setting "Speaker" to your system manually. For Windows® XP / XP 64-bit OS Step 1: Set up your system. A. Step 2: Install HDMI audio driver to "Digital Output Device (HDMI...
User Manual
Page 37
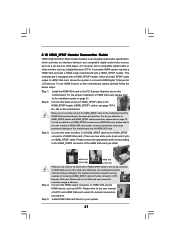
... as a set-top box, DVD player, A/V receiver and a compatible digital audio or video monitor, such as HDTV. For the proper installation of PCI Express VGA card. Make sure to correctly connect the HDMI_SPDIF cable to the motherboard and the HDMI VGA card according to the installation guide on page 21. For example, this motherboard and the HDMI VGA card. Please refer to the fan connector of HDMI VGA card, please refer to the same pin definition. 2.10 HDMI_SPDIF Header Connection Guide HDMI (High-Definition...
... as a set-top box, DVD player, A/V receiver and a compatible digital audio or video monitor, such as HDTV. For the proper installation of PCI Express VGA card. Make sure to correctly connect the HDMI_SPDIF cable to the motherboard and the HDMI VGA card according to the installation guide on page 21. For example, this motherboard and the HDMI VGA card. Please refer to the fan connector of HDMI VGA card, please refer to the same pin definition. 2.10 HDMI_SPDIF Header Connection Guide HDMI (High-Definition...
User Manual
Page 46
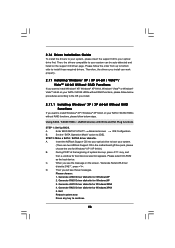
Please select CD-ROM as the boot device. C. Generate AHCI Driver diskette for WindowsXP64 5. Generate RAID Driver diskette for WindowsXP 2. Using SATA / SATAII HDDs / eSATAII devices with NCQ and Hot Plug functions STEP 1: Set Up BIOS. STEP 2: Make a SATA / SATAII driver diskette. Enter BIOS SETUP UTILITY Advanced screen IDE Configuration. A. A. When you see these messages, Please choose: 1. Then you install can be auto-detected and listed on the screen, "Generate Serial ATA driver diskette [YN]?", press . During POST at the beginning...
Please select CD-ROM as the boot device. C. Generate AHCI Driver diskette for WindowsXP64 5. Generate RAID Driver diskette for WindowsXP 2. Using SATA / SATAII HDDs / eSATAII devices with NCQ and Hot Plug functions STEP 1: Set Up BIOS. STEP 2: Make a SATA / SATAII driver diskette. Enter BIOS SETUP UTILITY Advanced screen IDE Configuration. A. A. When you see these messages, Please choose: 1. Then you install can be auto-detected and listed on the screen, "Generate Serial ATA driver diskette [YN]?", press . During POST at the beginning...
User Manual
Page 49
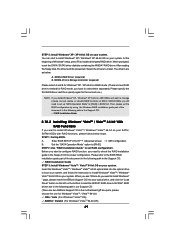
.... Enter BIOS SETUP UTILITY Advanced screen IDE Configuration. Please refer to the BIOS RAID installation guide part of the document in the following path in the Support CD: .. \ RAID Installation Guide STEP 3: Install Windows® VistaTM / VistaTM 64-bit OS on SATA / SATAII HDDs, you have to [RAID] in the Support CD for the second one for RAID mode, you still need to set up "SATA Operation Mode" to select them separately. NVIDIA RAID Driver (required) B. " page, please insert the ASRock Support...
.... Enter BIOS SETUP UTILITY Advanced screen IDE Configuration. Please refer to the BIOS RAID installation guide part of the document in the following path in the Support CD: .. \ RAID Installation Guide STEP 3: Install Windows® VistaTM / VistaTM 64-bit OS on SATA / SATAII HDDs, you have to [RAID] in the Support CD for the second one for RAID mode, you still need to set up "SATA Operation Mode" to select them separately. NVIDIA RAID Driver (required) B. " page, please insert the ASRock Support...
User Manual
Page 60
... overclocking mode. [Manual] - If you install non-NVIDIA® graphics card, you are allowed to enable or disable CD-In of the memory module you want this item to select this condition, Hybrid SLITM function will be enabled automatically and the onboard GPU core / shader clock will be disabled when PCI Sound Card is plugged. Hybrid SLI Adjust this item if you adopt is [Auto]. Onboard HD Audio Select [Auto], [Enabled] or [Disabled] for the onboard...
... overclocking mode. [Manual] - If you install non-NVIDIA® graphics card, you are allowed to enable or disable CD-In of the memory module you want this item to select this condition, Hybrid SLITM function will be enabled automatically and the onboard GPU core / shader clock will be disabled when PCI Sound Card is plugged. Hybrid SLI Adjust this item if you adopt is [Auto]. Onboard HD Audio Select [Auto], [Enabled] or [Disabled] for the onboard...
User Manual
Page 63
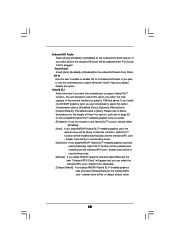
... a floppy image or use Ghost under DOS (Disk Operating System), please set this option to [non-RAID]. The default value of this option is [Disabled]. The default value is [IDE]. Configuration options: [RAID], [IDE] and [AHCI]. * If you select [RAID] mode, SATA / SATAII HDDs can not be accessed until you finish configuring RAID functions in the following instruction, which can be applied to the configurations of "IDE1 Slave" as the example in NVIDIA BIOS / Windows RAID Utility. * If you install...
... a floppy image or use Ghost under DOS (Disk Operating System), please set this option to [non-RAID]. The default value of this option is [Disabled]. The default value is [IDE]. Configuration options: [RAID], [IDE] and [AHCI]. * If you select [RAID] mode, SATA / SATAII HDDs can not be accessed until you finish configuring RAID functions in the following instruction, which can be applied to the configurations of "IDE1 Slave" as the example in NVIDIA BIOS / Windows RAID Utility. * If you install...
User Manual
Page 67
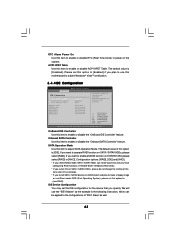
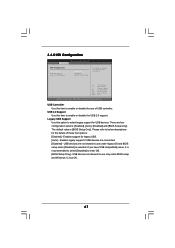
... to select legacy support for legacy USB. [Auto] - Legacy USB Support Use this item to enable or disable the USB 2.0 support. USB devices are not allowed to enter OS. [BIOS Setup Only] - USB 2.0 Support Use this option to use under BIOS setup and Windows / Linux OS. 67 3.4.8 USB Configuration BIOS SETUP UTILITY Advanced USB Configuration USB Controller USB 2.0 Support Legacy USB Support [Enabled] [Enabled] [BIOS Setup Only] To enable or disable the onboard USB controllers. +F1 F9 F10 ESC Select Screen Select Item Change Option General Help Load Defaults Save and...
... to select legacy support for legacy USB. [Auto] - Legacy USB Support Use this item to enable or disable the USB 2.0 support. USB devices are not allowed to enter OS. [BIOS Setup Only] - USB 2.0 Support Use this option to use under BIOS setup and Windows / Linux OS. 67 3.4.8 USB Configuration BIOS SETUP UTILITY Advanced USB Configuration USB Controller USB 2.0 Support Legacy USB Support [Enabled] [Enabled] [BIOS Setup Only] To enable or disable the onboard USB controllers. +F1 F9 F10 ESC Select Screen Select Item Change Option General Help Load Defaults Save and...
User Manual
Page 70
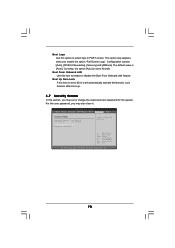
..., you may also clear it. Boot From Onboard LAN Use this option to Aircraft. For the user password, you enable the option "Full Screen Logo". Select Screen Select Item Enter Change F1 General Help F9 Load Defaults F10 Save and Exit ESC Exit v02.54 (C) Copyright 1985-2005, American Megatrends, Inc. 70 BIOS SETUP UTILITY Main Smart Advanced H/W Monitor Boot Security Exit Security Settings Supervisor Password : Not Installed User Password : Not Installed Change Supervisor Password Change User Password Install or Change the password. This option only appears when...
..., you may also clear it. Boot From Onboard LAN Use this option to Aircraft. For the user password, you enable the option "Full Screen Logo". Select Screen Select Item Enter Change F1 General Help F9 Load Defaults F10 Save and Exit ESC Exit v02.54 (C) Copyright 1985-2005, American Megatrends, Inc. 70 BIOS SETUP UTILITY Main Smart Advanced H/W Monitor Boot Security Exit Security Settings Supervisor Password : Not Installed User Password : Not Installed Change Supervisor Password Change User Password Install or Change the password. This option only appears when...
User Manual
Page 72
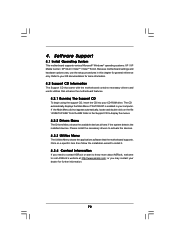
...-bit. If the Main Menu did not appear automatically, locate and double click on a specific item then follow the installation wizard to activate the devices. 4.2.3 Utilities Menu The Utilities Menu shows the applications software that enhance the motherboard features. 4.2.1 Running The Support CD To begin using the support CD, insert the CD into your OS documentation for more about ASRock, welcome to your CD-ROM drive. The CD automatically displays...
...-bit. If the Main Menu did not appear automatically, locate and double click on a specific item then follow the installation wizard to activate the devices. 4.2.3 Utilities Menu The Utilities Menu shows the applications software that enhance the motherboard features. 4.2.1 Running The Support CD To begin using the support CD, insert the CD into your OS documentation for more about ASRock, welcome to your CD-ROM drive. The CD automatically displays...
Quick Installation Guide
Page 8
... SPEED LED) - 1 x IEEE 1394 Port (K10N78-1394) - Supports Smart BIOS - Supports "Plug and Play" - CPU, DRAM, Chipset Core, HTT Voltage Multi-adjustment - Supports jumperfree - Rear Panel I/O Connector BIOS Feature Support CD I/O Panel - 1 x PS/2 Mouse Port - 1 x PS/2 Keyboard Port - 1 x VGA/D-Sub Port - 1 x VGA/DVI-D Port - 6 x Ready-to-Use USB 2.0 Ports - 1 x eSATAII Port (K10N78-1394) - 1 x RJ-45 LAN Port with 1 SATAII connector) (K10N78-1394) (see CAUTION 13) - 8Mb AMI BIOS - AMI Legal BIOS - AMBIOS 2.3.1 Support - CPU/Chassis FAN connector - 24 pin ATX power connector...
... SPEED LED) - 1 x IEEE 1394 Port (K10N78-1394) - Supports Smart BIOS - Supports "Plug and Play" - CPU, DRAM, Chipset Core, HTT Voltage Multi-adjustment - Supports jumperfree - Rear Panel I/O Connector BIOS Feature Support CD I/O Panel - 1 x PS/2 Mouse Port - 1 x PS/2 Keyboard Port - 1 x VGA/D-Sub Port - 1 x VGA/DVI-D Port - 6 x Ready-to-Use USB 2.0 Ports - 1 x eSATAII Port (K10N78-1394) - 1 x RJ-45 LAN Port with 1 SATAII connector) (K10N78-1394) (see CAUTION 13) - 8Mb AMI BIOS - AMI Legal BIOS - AMBIOS 2.3.1 Support - CPU/Chassis FAN connector - 24 pin ATX power connector...

Quick Installation Guide
Page 10
... "SATAII Hard Disk Setup Guide" on this motherboard supports both stereo and mono modes. It allows you to surveil your system by the chipset vendor and is no such limitation. 6. ASRock website http://www.asrock.com 14. 5. For microphone input, this motherboard requires the proper hardware configuration. Power Management for proper connection. 10. USB/WiFi header can also be updated in our lab test. 9. Please refer to support 2 USB 2.0 ports...
... "SATAII Hard Disk Setup Guide" on this motherboard supports both stereo and mono modes. It allows you to surveil your system by the chipset vendor and is no such limitation. 6. ASRock website http://www.asrock.com 14. 5. For microphone input, this motherboard requires the proper hardware configuration. Power Management for proper connection. 10. USB/WiFi header can also be updated in our lab test. 9. Please refer to support 2 USB 2.0 ports...

Quick Installation Guide
Page 22
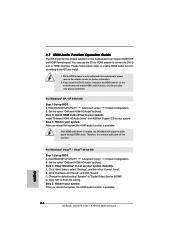
... enter "Chipset Settings". Please click the icon and select the item "Additional Displays". Press to the correspondent connector on the PCI Express graphics card on your system is switched to Dual Monitors mode (Additional Displays). 22 ASRock K10N78-1394 / K10N78 Motherboard English dows® taskbar. Then you will find the Hybrid icon on PCIE1 slot. Step 6. Then your computer. Restart your system is switched to HybridPowerTM mode (Save Power). Connect the other monitor cable to enter BIOS setup...
... enter "Chipset Settings". Please click the icon and select the item "Additional Displays". Press to the correspondent connector on the PCI Express graphics card on your system is switched to Dual Monitors mode (Additional Displays). 22 ASRock K10N78-1394 / K10N78 Motherboard English dows® taskbar. Then you will find the Hybrid icon on PCIE1 slot. Step 6. Then your computer. Restart your system is switched to HybridPowerTM mode (Save Power). Connect the other monitor cable to enter BIOS setup...
Quick Installation Guide
Page 26
... 64-bit OS Step 1:Set up BIOS. Click "Start" button, select "Settings", and then click "Control Panel". Install "Onboard HDMI HD Audio Driver" from ASRock Support CD to HDMI adapter is available. 26 ASRock K10N78-1394 / K10N78 Motherboard English A. Step 3: Reboot your system. After HDMI audio driver is available. Step 2: Enter Windows® to "Digital Output Device (HDMI)". After you install. 1. Enter BIOS SETUP UTILITY Advanced screen Chipset Configuration. Click "Hardware and Sound", and click "Sound". Change the default setting "Speaker" to set up...
... 64-bit OS Step 1:Set up BIOS. Click "Start" button, select "Settings", and then click "Control Panel". Install "Onboard HDMI HD Audio Driver" from ASRock Support CD to HDMI adapter is available. 26 ASRock K10N78-1394 / K10N78 Motherboard English A. Step 3: Reboot your system. After HDMI audio driver is available. Step 2: Enter Windows® to "Digital Output Device (HDMI)". After you install. 1. Enter BIOS SETUP UTILITY Advanced screen Chipset Configuration. Click "Hardware and Sound", and click "Sound". Change the default setting "Speaker" to set up...
Quick Installation Guide
Page 36
... the motherboard stores BIOS Setup Utility. The BIOS Setup program is a menu-driven program, which allows you want to install Windows® XP / XP 64-bit / VistaTM / VistaTM 64-bit on page 9 for detailed procedures: ..\ RAID Installation Guide 2.14 Untied Overclocking Technology This motherboard supports Untied Overclocking Technology, which means during overclocking, but PCI / PCIE buses are in your CD-ROM drive. For the detailed information about BIOS Setup, please refer to display the menus. 36 ASRock K10N78-1394 / K10N78 Motherboard English...
... the motherboard stores BIOS Setup Utility. The BIOS Setup program is a menu-driven program, which allows you want to install Windows® XP / XP 64-bit / VistaTM / VistaTM 64-bit on page 9 for detailed procedures: ..\ RAID Installation Guide 2.14 Untied Overclocking Technology This motherboard supports Untied Overclocking Technology, which means during overclocking, but PCI / PCIE buses are in your CD-ROM drive. For the detailed information about BIOS Setup, please refer to display the menus. 36 ASRock K10N78-1394 / K10N78 Motherboard English...


