
User Manual
Page 4
... 2.4 Expansion Slots (PCI Express Slots) 17 2.5 Jumpers Setup 18 2.6 Onboard Headers and Connectors 19 Chapter 3 Software and Utilities Operation 23 3.1 Installing Drivers 23 3.2 ASRock Live Update & APP Shop 24 3.2.1 UI Overview 24 3.2.2 Apps 25 3.2.3 BIOS & Drivers 28 3.2.4 Setting 29 3.3 Enabling USB Ports for Windows® 7 Installation 30 Chapter 4 UEFI SETUP UTILITY 33 4.1 Introduction 33
... 2.4 Expansion Slots (PCI Express Slots) 17 2.5 Jumpers Setup 18 2.6 Onboard Headers and Connectors 19 Chapter 3 Software and Utilities Operation 23 3.1 Installing Drivers 23 3.2 ASRock Live Update & APP Shop 24 3.2.1 UI Overview 24 3.2.2 Apps 25 3.2.3 BIOS & Drivers 28 3.2.4 Setting 29 3.3 Enabling USB Ports for Windows® 7 Installation 30 Chapter 4 UEFI SETUP UTILITY 33 4.1 Introduction 33
User Manual
Page 9
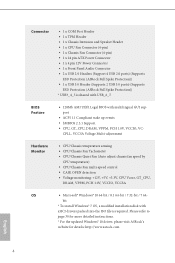
bit * To install Windows® 7 OS, a modified installation disk with USB_6_7. Connector • 1 x COM Port Header • 1 x TPM Header • 1 x Chassis Intrusion and Speaker Header • 1 x CPU Fan Connector (4-pin) • 1 x...drivers packed into the ISO file is required. Please refer to page 30 for more detailed instructions. * For the updated Windows® 10 driver, please visit ASRock's website for details: http://www.asrock.com English 4 CPLL, VCCSA Voltage Multi-adjustment Hardware Monitor • CPU/Chassis temperature sensing • CPU/Chassis Fan ...
bit * To install Windows® 7 OS, a modified installation disk with USB_6_7. Connector • 1 x COM Port Header • 1 x TPM Header • 1 x Chassis Intrusion and Speaker Header • 1 x CPU Fan Connector (4-pin) • 1 x...drivers packed into the ISO file is required. Please refer to page 30 for more detailed instructions. * For the updated Windows® 10 driver, please visit ASRock's website for details: http://www.asrock.com English 4 CPLL, VCCSA Voltage Multi-adjustment Hardware Monitor • CPU/Chassis temperature sensing • CPU/Chassis Fan ...
User Manual
Page 28
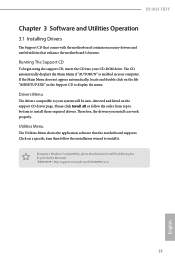
...H110M-HDV Chapter 3 Software and Utilities Operation 3.1 Installing Drivers The Support CD that comes with the motherboard contains necessary drivers and useful utilities that the motherboard supports. Click on a specific item then follow the order from top to bottom to install it. Please click Install All or follow the installation wizard to install... into your computer. Drivers Menu The drivers compatible to display the menu. To improve Windows 7 compatibility, please download and install the following hot fix provided by Microsoft. The CD automatically displays the Main Menu if...
...H110M-HDV Chapter 3 Software and Utilities Operation 3.1 Installing Drivers The Support CD that comes with the motherboard contains necessary drivers and useful utilities that the motherboard supports. Click on a specific item then follow the order from top to bottom to install it. Please click Install All or follow the installation wizard to install... into your computer. Drivers Menu The drivers compatible to display the menu. To improve Windows 7 compatibility, please download and install the following hot fix provided by Microsoft. The CD automatically displays the Main Menu if...
User Manual
Page 35
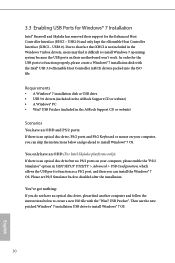
... nothing: If you can skip the instructions below to install Windows 7 operating system because the USB ports on your computer, you can install the Windows® 7 OS. USB3.0). Requirements • A Windows® 7 installation disk or USB drive • USB 3.0 drivers (included in the ASRock Support CD or website) • A Windows® PC • Win7 USB Patcher (included in...
... nothing: If you can skip the instructions below to install Windows 7 operating system because the USB ports on your computer, you can install the Windows® 7 OS. USB3.0). Requirements • A Windows® 7 installation disk or USB drive • USB 3.0 drivers (included in the ASRock Support CD or website) • A Windows® PC • Win7 USB Patcher (included in...
User Manual
Page 36
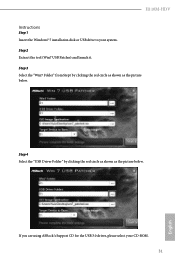
Step 3 Select the "Win7 Folder" from Step1 by clicking the red circle as shown as the picture below . If you are using ASRock's Support CD for the USB 3.0 driver, please select your system. Step 4 Select the "USB Driver Folder" by clicking the red circle as shown as the picture below . H110M-HDV Instructions Step 1 Insert the Windows® 7 installation disk or USB drive to your CD-ROM. 31 English Step 2 Extract the tool (Win7 USB Patcher) and launch it.
Step 3 Select the "Win7 Folder" from Step1 by clicking the red circle as shown as the picture below . If you are using ASRock's Support CD for the USB 3.0 driver, please select your system. Step 4 Select the "USB Driver Folder" by clicking the red circle as shown as the picture below . H110M-HDV Instructions Step 1 Insert the Windows® 7 installation disk or USB drive to your CD-ROM. 31 English Step 2 Extract the tool (Win7 USB Patcher) and launch it.

User Manual
Page 37
Step 6 If you are able to Burn". If not, the patched ISO image will be exported to save the ISO file by pressing the red circle as shown as the picture below. Step 5 Select where to the destination selected in Step5. Or please use the patched ISO image to make an OS USB drive to proceed. Then Press "Start" to install the OS. 32 English Step 7 Now you want to burn the patched image to a CD, please check "Burn Image" and select "Target Device to install Windows® 7 on Braswell or Skylake with the new burned CD.
Step 6 If you are able to Burn". If not, the patched ISO image will be exported to save the ISO file by pressing the red circle as shown as the picture below. Step 5 Select where to the destination selected in Step5. Or please use the patched ISO image to make an OS USB drive to proceed. Then Press "Start" to install the OS. 32 English Step 7 Now you want to burn the patched image to a CD, please check "Burn Image" and select "Target Device to install Windows® 7 on Braswell or Skylake with the new burned CD.

User Manual
Page 58
Select UEFI Setup Only to disable legacy USB support. This should be enabled for the complete USB keyboard legacy support for USB 2.0 devices. 4.4.6 USB Configuration H110M-HDV Legacy USB Support Enable or disable Legacy OS Support for non-USB aware OS. *Enable this option if you encounter USB compatibility issues it is recommended to support USB devices under the UEFI setup and Windows/Linux operating systems only. If you install Windows 7. 53 English Port 60/64 Emulation Enable the support of I/O port 60h/64h emulation.
Select UEFI Setup Only to disable legacy USB support. This should be enabled for the complete USB keyboard legacy support for USB 2.0 devices. 4.4.6 USB Configuration H110M-HDV Legacy USB Support Enable or disable Legacy OS Support for non-USB aware OS. *Enable this option if you encounter USB compatibility issues it is recommended to support USB devices under the UEFI setup and Windows/Linux operating systems only. If you install Windows 7. 53 English Port 60/64 Emulation Enable the support of I/O port 60h/64h emulation.


